Skip to content

This is the multi-page printable view of this section. .

Return to the regular view of this page.

Installation

Getting started with Pigsty

Quick Start

Quick start: Prepare an ssh-accessible node with fresh installed Linux, run as user with nopass ssh and sudo privileges:

Step 1

Download pigsty with:

curl -fsSL https://repo.pigsty.io/get | bash -s v3.7.0; cd ~/pigsty;

Step 2

Configure the inventory file according to your need. (CHANGE PASSWORDS in the generated pigsty.yml)

./configure

Step 3

Install everything according to your config:

./install.yml

Pigsty Installed! Explore the User Interface, check port 5432 for Postgres Service, port 3000 for Grafana dashboards (admin / pigsty).


What’s Next?


Installation

Get Started
    Setup current linux node, and download everything from the Internet
Multi-Node Installation
    Setup multiple nodes for real high-available production environment.
Offline Installation
    Bootstrap from a local offline package when internet is not available.
Minimal Installation
    Install essential packages for HA Postgres Cluster only, no monitoring.

Preparation

Prepare
    Prepare node, network, storage, user, ssh, sudo, ansible, etc...
Linux OS
    Check compatible linux distributions and availability matrix
Vagrant
    Provision local linux virtual machines with vagrant / virtualbox
Terraform
    Provision cloud linux servers with terraform on cloud vendors

Reference

Interface
    Provision cloud linux servers with terraform on cloud vendors
Configure
    Describe the infra and clusters with declarative configs
Playbook
    Check compatible linux distributions and availability matrix
Security
    Security hardening and best practices for production environments

1 - Quick Start

how to install pigsty on your linux machine?

This is a one-node installation guide, check Multi-Node for real HA production setup.


Short Version

Prepare an ssh-accessible node with Compatible Linux Distro, run as user with nopass ssh and sudo:

Step 1

    [**Download**](#download) pigsty with:

    ```bash
    curl -fsSL https://repo.pigsty.io/get | bash -s v3.7.0; cd ~/pigsty;
    ```

Step 2

    [**Configure**](#configure) the [`pigsty.yml`](/docs/config/inventory) inventory file according to
    your need and environment.

    ```bash
    ./configure
    ```

Step 3

    [**Install**](#install) everything according to your config:

    ```bash
    ./install.yml
    ```

Example: Singleton Installation on RockyLinux 9:
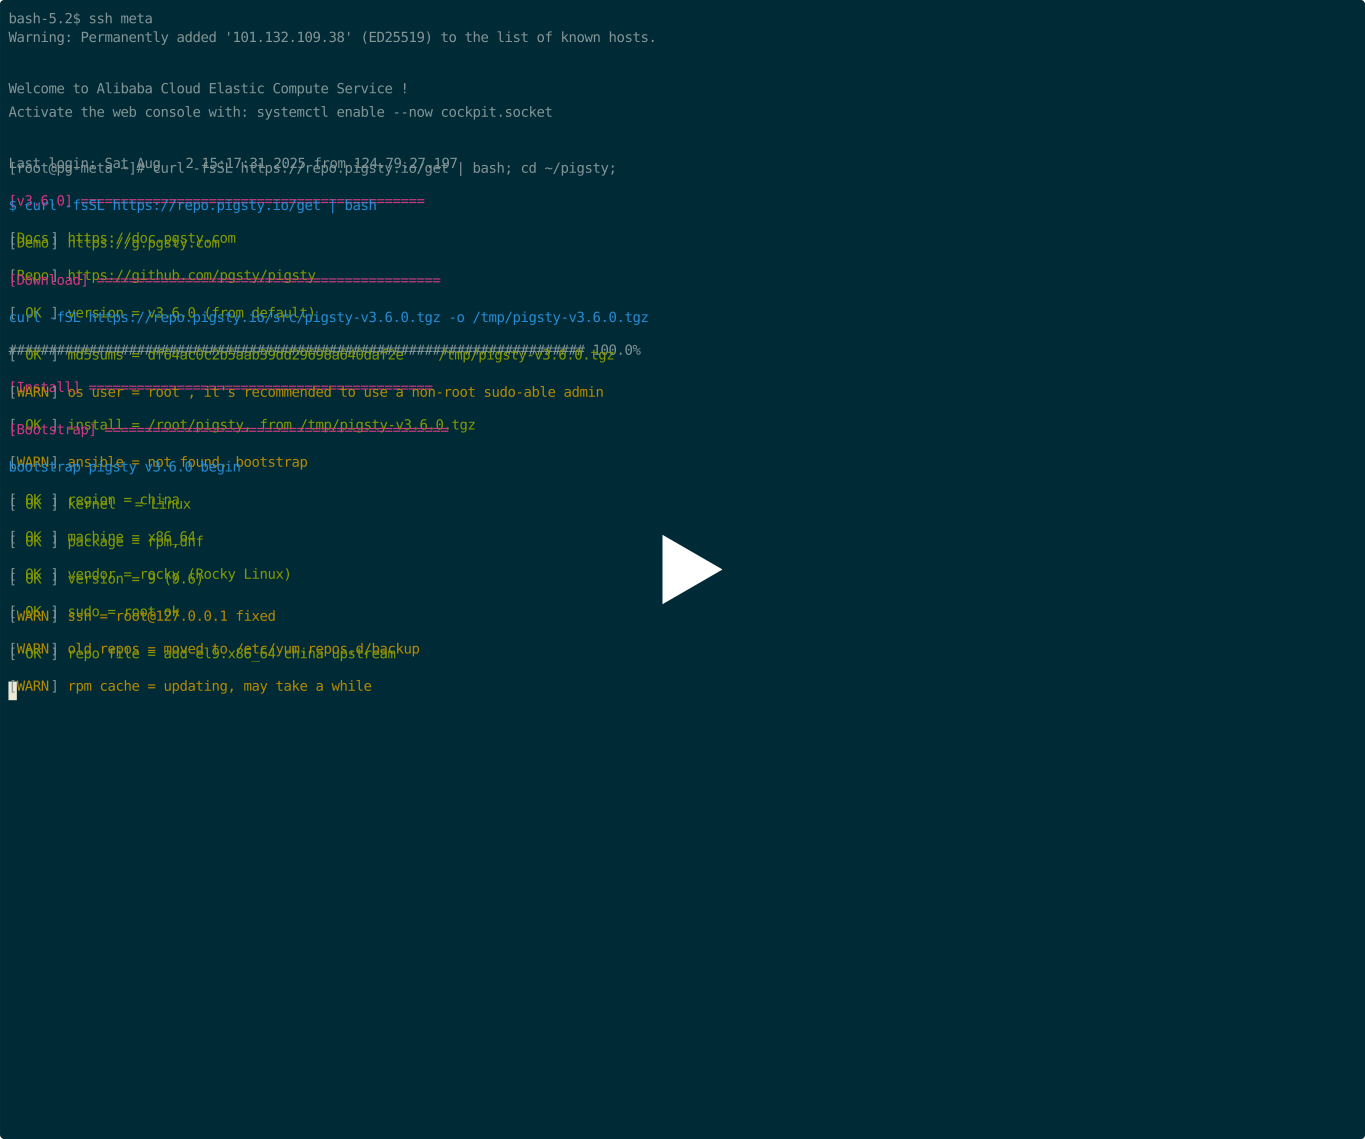
asciicast


Prepare

Check Preparation for all the details, here’s a quick summary:

Item Requirement Item Requirement
Node 1C1G at least, 2C2G recommended Spec 1 node at least, 2 for semi-HA, 3+ for real HA
Disk /data, main mount point, ext4/xfs Network static IPv4 address
VIP Optional L2 VIP Domain Optional local / public domain names
Kernel Linux Distro el8-10, d12/13, u22/24 x x86_64 / aarch64
Locale C.UTF-8 or C Firewall port: 80 / 443 / 22 / 5432
User avoid using root & postgres Sudo nopass sudo privilege
SSH nopass via public key Accessible ssh <ip|alias> sudo ls without error

Download

(RECOMMENDED) You can get & extract the latest stable version of pigsty source with:

curl -fsSL https://repo.pigsty.io/get | bash -s v3.7.0; cd ~/pigsty
curl -fsSL https://repo.pigsty.cc/get | bash -s v3.7.0; cd ~/pigsty   # china mirror
curl -fsSL https://repo.pigsty.io/get | bash -s v3.7.0; cd ~/pigsty

You can also install via git, pig, or download source & offline package tarball directly from GitHub.


Configure

The configure script will generate the pigsty.yml config file inventory with good defaults according to your environment and input. It’s OPTIONAL, you can edit the pigsty.yml directly as the tutorial shows.

There are many Config Templates for your reference, here are some quick examples:

./configure                  # use the default template, PG 18 with essential extensions
./configure -v 17            # default meta template with PG 17 instead of 18
./configure -c rich          # PG 18, local repo, download all extensions and install major ones
./configure -c slim          # minimal installation template, use with ./slim.yml playbook
./configure -c app/supa      # use the app/supa self-hosting supabase config template
./configure -c ivory         # use the ivorysql kernel instead of vanilla PG (pg18.0)
./configure -i 10.11.12.13   # give primary IP address explicitly
./configure -r china         # use use china mirror instead of default repo
./configure -c full -s       # use the 4-node sandbox config template, without IP replace & probe

Let’s just do configure without any args, it may ask you for the primary IP if more than one is found.

[vagrant@node-2 pigsty]$ ./configure
configure pigsty v3.7.0 begin
[ OK ] region  = default
[ OK ] kernel  = Linux
[ OK ] machine = x86_64
[ OK ] package = rpm,dnf
[ OK ] vendor  = rocky (Rocky Linux)
[ OK ] version = 9 (9.6)
[ OK ] sudo = vagrant ok
[ OK ] ssh = [email protected] ok
[WARN] Multiple IP address candidates found:
    (1) 192.168.121.24	inet 192.168.121.24/24 brd 192.168.121.255 scope global dynamic noprefixroute eth0
    (2) 10.10.10.12	    inet 10.10.10.12/24 brd 10.10.10.255 scope global noprefixroute eth1
[ IN ] INPUT primary_ip address (of current meta node, e.g 10.10.10.10):
=> 10.10.10.12    # <------- INPUT YOUR PRIMARY IPV4 ADDRESS HERE!
[ OK ] primary_ip = 10.10.10.12 (from input)
[ OK ] admin = [email protected] ok
[ OK ] mode = meta (el9)
[ OK ] locale  = C.UTF-8
[ OK ] configure pigsty done
proceed with ./install.yml

This script will replace the IP placeholder 10.10.10.10 to the primary IPv4 address of current node. Beware of this when you are configure pigsty manually. Check the generated pigsty.yml to proceed.

HEY! Don’t forget these passwords!

Change default passwords!

PLEASE CHANGE DEFAULT PASSWORDS in any serious deployment before install

Then change default passwords and make necessary adjustments, the final pigsty.yml may look like:

~/pigsty/pigsty.yml
all:

  #==============================================================#
  # Clusters, Nodes, and Modules
  #==============================================================#
  children:

    #----------------------------------------------#
    # PGSQL : https://doc.pgsty.com/pgsql
    #----------------------------------------------#
    # this is an example single-node postgres cluster with pgvector installed, with one biz database & two biz users
    pg-meta:
      hosts:
        10.10.10.10: { pg_seq: 1, pg_role: primary } # <---- primary instance with read-write capability
        #x.xx.xx.xx: { pg_seq: 2, pg_role: replica } # <---- read only replica for read-only online traffic
        #x.xx.xx.xy: { pg_seq: 3, pg_role: offline } # <---- offline instance of ETL & interactive queries
      vars:
        pg_cluster: pg-meta

        # install, load, create pg extensions: https://doc.pgsty.com/pgsql/extension
        pg_extensions: [ postgis, pgvector ]

        # define business users/roles : https://doc.pgsty.com/pgsql/user
        pg_users:
          - { name: dbuser_meta ,password: DBUser.Meta   ,pgbouncer: true ,roles: [dbrole_admin   ] ,comment: pigsty admin user }
          - { name: dbuser_view ,password: DBUser.Viewer ,pgbouncer: true ,roles: [dbrole_readonly] ,comment: read-only viewer  }

        # define business databases : https://doc.pgsty.com/pgsql/db
        pg_databases:
          - name: meta
            baseline: cmdb.sql
            comment: "pigsty meta database"
            schemas: [pigsty]
            # define extensions in database : https://doc.pgsty.com/pgsql/extension/create
            extensions: [ postgis, vector ]

        # define HBA rules : https://doc.pgsty.com/pgsql/hba
        pg_hba_rules:
          - { user: dbuser_view , db: all ,addr: infra ,auth: pwd ,title: 'allow grafana dashboard access cmdb from infra nodes' }

        # define backup policies: https://doc.pgsty.com/pgsql/backup
        node_crontab: [ '00 01 * * * postgres /pg/bin/pg-backup full' ] # make a full backup every day 1am

        # define (OPTIONAL) L2 VIP that bind to primary
        #pg_vip_enabled: true
        #pg_vip_address: 10.10.10.2/24
        #pg_vip_interface: eth1


    #----------------------------------------------#
    # INFRA : https://doc.pgsty.com/infra
    #----------------------------------------------#
    infra:
      hosts:
        10.10.10.10: { infra_seq: 1 }
      vars:
        repo_enabled: false   # disable in 1-node mode :  https://doc.pgsty.com/admin/repo
        #repo_extra_packages: [ pg18-main ,pg18-time ,pg18-gis ,pg18-rag ,pg18-fts ,pg18-olap ,pg18-feat ,pg18-lang ,pg18-type ,pg18-util ,pg18-func ,pg18-admin ,pg18-stat ,pg18-sec ,pg18-fdw ,pg18-sim ,pg18-etl]

    #----------------------------------------------#
    # ETCD : https://doc.pgsty.com/etcd
    #----------------------------------------------#
    etcd:
      hosts:
        10.10.10.10: { etcd_seq: 1 }
      vars:
        etcd_cluster: etcd
        etcd_safeguard: false             # prevent purging running etcd instance?

    #----------------------------------------------#
    # MINIO : https://doc.pgsty.com/minio
    #----------------------------------------------#
    #minio:
    #  hosts:
    #    10.10.10.10: { minio_seq: 1 }
    #  vars:
    #    minio_cluster: minio
    #    minio_users:                      # list of minio user to be created
    #      - { access_key: pgbackrest  ,secret_key: S3User.Backup ,policy: pgsql }
    #      - { access_key: s3user_meta ,secret_key: S3User.Meta   ,policy: meta  }
    #      - { access_key: s3user_data ,secret_key: S3User.Data   ,policy: data  }

    #----------------------------------------------#
    # DOCKER : https://doc.pgsty.com/docker
    # APP    : https://doc.pgsty.com/app
    #----------------------------------------------#
    # launch example pgadmin app with: ./app.yml (http://10.10.10.10:8885 [email protected] / pigsty)
    app:
      hosts: { 10.10.10.10: {} }
      vars:
        docker_enabled: true                # enabled docker with ./docker.yml
        docker_registry_mirrors: ["https://docker.1panel.live","https://docker.1ms.run","https://docker.xuanyuan.me","https://registry-1.docker.io"]
        app: pgadmin                        # specify the default app name to be installed (in the apps)
        apps:                               # define all applications, appname: definition
          pgadmin:                          # pgadmin app definition (app/pgadmin -> /opt/pgadmin)
            conf:                           # override /opt/pgadmin/.env
              PGADMIN_DEFAULT_EMAIL: [email protected]
              PGADMIN_DEFAULT_PASSWORD: pigsty


  #==============================================================#
  # Global Parameters
  #==============================================================#
  vars:

    #----------------------------------------------#
    # INFRA : https://doc.pgsty.com/infra
    #----------------------------------------------#
    version: v3.7.0                   # pigsty version string
    admin_ip: 10.10.10.10             # admin node ip address
    region: china                     # upstream mirror region: default|china|europe
    proxy_env:                        # global proxy env when downloading packages
      no_proxy: "localhost,127.0.0.1,10.0.0.0/8,192.168.0.0/16,*.pigsty,*.aliyun.com,mirrors.*,*.myqcloud.com,*.tsinghua.edu.cn"
      # http_proxy:  # set your proxy here: e.g http://user:[email protected]
      # https_proxy: # set your proxy here: e.g http://user:[email protected]
      # all_proxy:   # set your proxy here: e.g http://user:[email protected]
    infra_portal:                     # domain names and upstream servers
      home         : { domain: h.pigsty }
      grafana      : { domain: g.pigsty ,endpoint: "${admin_ip}:3000" , websocket: true }
      prometheus   : { domain: p.pigsty ,endpoint: "${admin_ip}:9058" }
      alertmanager : { domain: a.pigsty ,endpoint: "${admin_ip}:9059" }
      blackbox     : { endpoint: "${admin_ip}:9115" }
      loki         : { endpoint: "${admin_ip}:3100" }
      pgadmin      : { domain: adm.pigsty ,endpoint: "${admin_ip}:8885" }
      #minio       : { domain: m.pigsty ,endpoint: "${admin_ip}:9001" ,scheme: https ,websocket: true }

    #----------------------------------------------#
    # PASSWORD : https://doc.pgsty.com/config/security
    #----------------------------------------------#
    grafana_admin_password: pigsty               # <-------- CHANGE ME!
    pg_admin_password: DBUser.DBA                # <-------- CHANGE ME!
    pg_monitor_password: DBUser.Monitor          # <-------- CHANGE ME!
    pg_replication_password: DBUser.Replicator   # <-------- CHANGE ME!
    patroni_password: Patroni.API                # <-------- CHANGE ME!
    haproxy_admin_password: pigsty               # <-------- CHANGE ME!
    minio_secret_key: minioadmin                 # <-------- CHANGE ME!

    #----------------------------------------------#
    # NODE : https://doc.pgsty.com/node/param
    #----------------------------------------------#
    nodename_overwrite: false             # do not overwrite node hostname on single node mode
    node_tune: tiny                       # node tuning specs: oltp,olap,tiny,crit
    node_etc_hosts: [ '10.10.10.10 h.pigsty a.pigsty p.pigsty g.pigsty sss.pigsty' ]
    node_repo_modules: 'node,infra,pgsql' # add these repos directly to the singleton node
    #node_repo_modules: local             # use this if you want to build & user local repo
    node_repo_remove: true                # remove existing node repo for node managed by pigsty
    #node_packages: [openssh-server]      # packages to be installed current nodes with the latest version

    #----------------------------------------------#
    # PGSQL : https://doc.pgsty.com/pgsql/param
    #----------------------------------------------#
    pg_version: 18                      # default postgres version
    pg_locale: C.UTF-8                  # overwrite default C local
    pg_lc_collate: C.UTF-8              # overwrite default C lc_collate
    pg_lc_ctype: C.UTF-8                # overwrite default C lc_ctype

    pg_conf: tiny.yml                   # pgsql tuning specs: {oltp,olap,tiny,crit}.yml
    pg_safeguard: false                 # prevent purging running postgres instance?
    pg_packages: [ pgsql-main, pgsql-common ]                 # pg kernel and common utils
    #pg_extensions: [ pg18-time ,pg18-gis ,pg18-rag ,pg18-fts ,pg18-olap ,pg18-feat ,pg18-lang ,pg18-type ,pg18-util ,pg18-func ,pg18-admin ,pg18-stat ,pg18-sec ,pg18-fdw ,pg18-sim ,pg18-etl]
What if I want more Extensions?

Just uncomment the following two parameters in pigsty.yml to make it looks like:

repo_extra_packages: [ pg18-main ,pg18-core ,pg18-time ,pg18-gis ,pg18-rag ,pg18-fts ,pg18-olap ,pg18-feat ,pg18-lang ,pg18-type ,pg18-util ,pg18-func ,pg18-admin ,pg18-stat ,pg18-sec ,pg18-fdw ,pg18-sim ,pg18-etl]
pg_extensions: [pg18-time ,pg18-gis ,pg18-rag ,pg18-fts ,pg18-feat ,pg18-lang ,pg18-type ,pg18-util ,pg18-func ,pg18-admin ,pg18-stat ,pg18-sec ,pg18-fdw ,pg18-sim ,pg18-etl ] #,pg18-olap]

There are much more magic you can do with the config file, check the Configuration for details.


Install

Everything in Pigsty is described in config inventory: the pigsty.yml blueprint generated above.

Run the install.yml playbook to materialize it into reality.

~/pigsty
./install.yml

If you see something like pgsql init done or grafana datasource meta, PLAY RECAP or simlar stuff in the output, it means the installation is complete!

......

TASK [pgsql : pgsql init done] *************************************************
ok: [10.10.10.11] => {
    "msg": "postgres://10.10.10.11/postgres | meta  | dbuser_meta dbuser_view "
}
......

TASK [pg_monitor : load grafana datasource meta] *******************************
changed: [10.10.10.11]

PLAY RECAP *********************************************************************
10.10.10.11                : ok=302  changed=232  unreachable=0    failed=0    skipped=65   rescued=0    ignored=1
localhost                  : ok=6    changed=3    unreachable=0    failed=0    skipped=1    rescued=0    ignored=0

Sometimes upstream repo (like linux / pgdg repo) may break, this do happen from time to time, and led to installation failure. You can use pre-made offline packages to address this issue.

NEVER RUN THIS AGAIN ON EXISTING DEPLOYMENT!

Re-run this playbook entirely will nuke (wipe-out) the current deployment and create a new one!

If you have enough knowledge with ansible and know what you are doing, still do it with caution!

Once installed, you can explore the Interface and deploy More Nodes and more HA database clusters.


More

You can deploy & monitor More Clusters with pigsty: add definition to the Inventory and run:

bin/node-add pg-test    # init 3 nodes of cluster pg-test
bin/pgsql-add pg-test   # init HA PGSQL Cluster pg-test
bin/redis-add redis-ms  # init redis cluster redis-ms

Remember that most modules require the NODE module installed first. Check available modules for detail

PGSQL, INFRA, NODE, ETCD, MINIO, REDIS, FERRET, DOCKER, ……

2 - User Interface

Explore dashboard and access database service

Once installed, you’ll have the four core modules: PGSQL, INFRA, NODE, and ETCD on current node.

ID NODE PGSQL INFRA ETCD
1 node-1 pg-meta-1 infra-1 etcd-1

You can access WebUI services from the following Ports directly (not recommended for prod). Or use local / public Domain Names to access them via Nginx Portal. SSL Certs can only be used with domains.

Component Port Domain Comment Public Demo
Nginx 80/443 h.pigsty Portal, Repo, HAProxy Admin home.pigsty.io
Grafana 3000 g.pigsty Grafana Dashboards g.pgsty.com
Prometheus 9058 p.pigsty Prometheus Web UI p.pigsty.io
AlertManager 9059 a.pigsty Alert Management a.pigsty.io

You can access the default PostgreSQL database (meta) @ default port 5432 via the following users and corresponding PGURL:

psql postgres://dbuser_dba:[email protected]:5432/meta
psql postgres://dbuser_meta:[email protected]:5432/meta
psql postgres://dbuser_view:[email protected]:5432/meta

PostgreSQL

For personal usage, you could just use the default superuser and IP:Port to access PostgreSQL:

DBSU

Default Superuser

The default database superuser is dbuser_dba, with DBUser.DBA as default password, use your own if changed.

Username dbuser_dba pg_admin_username
Password DBUser.DBA pg_admin_password

CLI

The built-in psql CLI is already configured with .pgpass and .pg_service.conf for the admin user

p   # alias: os admin user @ current node
psql postgres://dbuser_dba:[email protected]/postgres  # replace with your IP and password

GUI

To access your database with graphical interface, you can use your favorite GUI tools, we also have some built-in templates.

Name Description Pigsty Support
PgAdmin Official PostgreSQL administration tool Built-in Docker template, OSS
Supabase Studio Fancy 3rd party UI for PostgreSQL management Built-in Docker template, OSS
PgWeb Lightweight web-based PostgreSQL client Built-in Docker template, OSS
Bytebase Schema migration tool with a good GUI Built-in Docker template, OSS
DataGrip / IntelliJ Professional database IDE with powerful features Commercial / Community
Navicat Popular commercial database management tool Commercial
DBeaver Open-source universal database GUI OSS

Defaults

You can define business Database and User. These config templates has some pre-defined examples for your reference.

For example, the default meta config template has pre-defined a meta database with Pigsty CMDB schema (optional) and a vector extension. It defines dbuser_meta as business admin user with DDL privilege, and a dbuser_view as read-only viewer user.

pg-meta:
  hosts:
    10.10.10.10: { pg_seq: 1, pg_role: primary } # <---- primary instance with read-write capability
  vars:
    pg_cluster: pg-meta                 # required identity parameter, usually same as group name

    pg_databases:                       # define business databases on this cluster, array of database definition
      - name: meta                      # REQUIRED, `name` is the only mandatory field of a database definition
        baseline: cmdb.sql              # optional, database sql baseline path, (relative to files/)
        schemas: [ pigsty ]             # optional, additional schemas to be created, array of schema names
        extensions: [ vector ]          # optional, additional extensions to be installed: array of `{name[,schema]}`
        comment: pigsty meta database   # optional, comment string for this database

    pg_users:                           # define business users/roles on this cluster, array of user definition
      - name: dbuser_meta               # REQUIRED, `name` is the only mandatory field of a user definition
        password: DBUser.Meta           # optional, password can be a scram-sha-256 hash string or plain text
      - { name: dbuser_view ,password: DBUser.Viewer ,pgbouncer: true ,roles: [dbrole_readonly], comment: read-only viewer for meta database }

    pg_hba_rules:                       # example hba rules
      - {user: dbuser_view , db: all ,addr: infra ,auth: pwd ,title: 'allow grafana dashboard access cmdb from infra nodes'}

Which means you can also access the meta database with these two users:

psql postgres://dbuser_meta:[email protected]:5432/meta
psql postgres://dbuser_view:[email protected]:5432/meta

Production

To use HA PostgreSQL cluster in production environment, you’ll need to read the following documents to proceed:

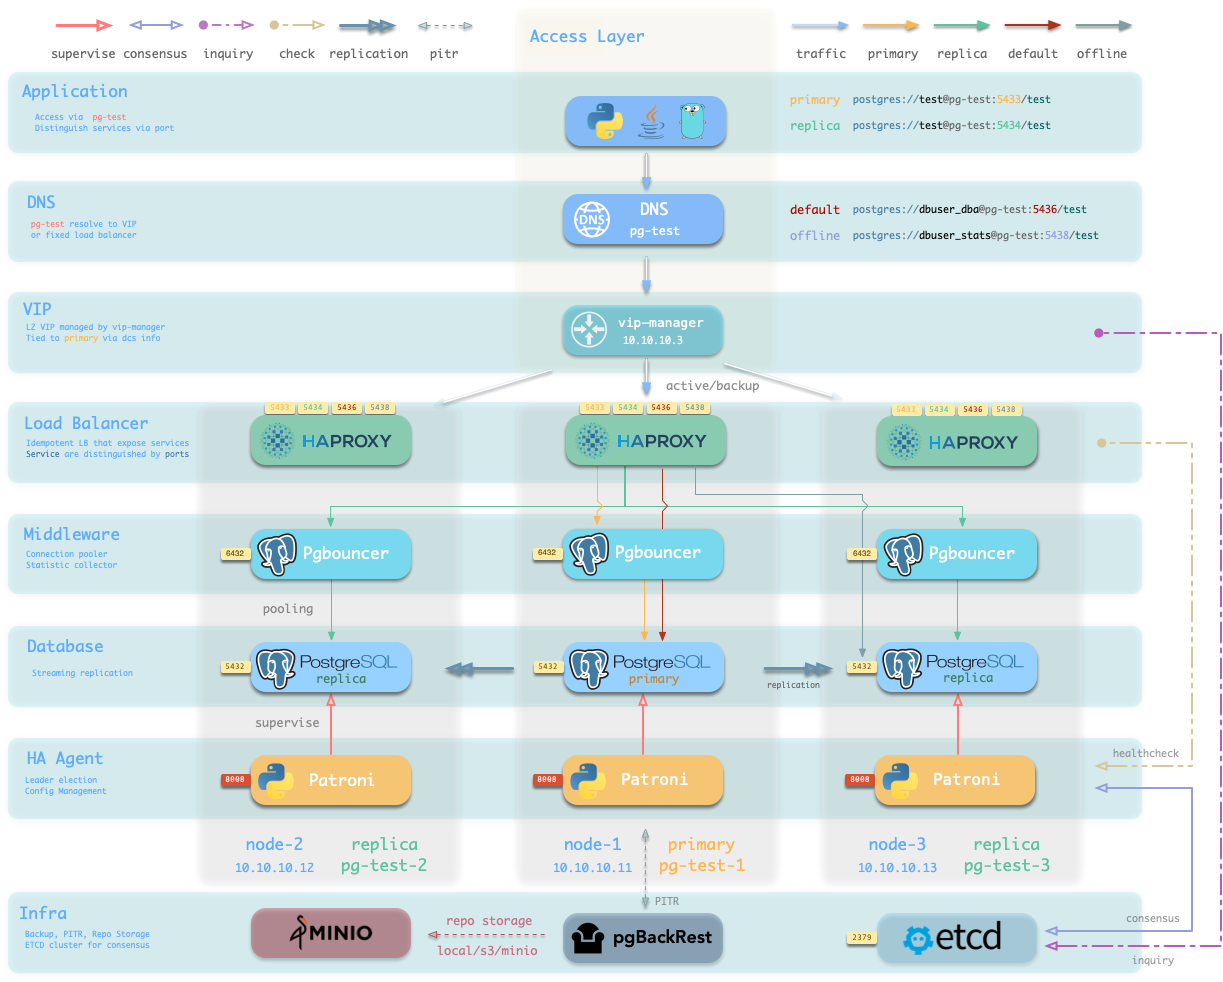
In that case, your traffic is usually distributed by haproxy and pooled by pgbouncer before reaching the database.

Grafana

Grafana is the platform for monitoring and observability, it listens on port 3000 by default:

  • http://10.10.10.10:3000 (replace with your IP)
Access via domain name

Pigsty support static local domain (fake) for web components, you can access Grafana via http://g.pigsty through Nginx It’s advised to use domain names, Since you can expose all services via Nginx with domain names, and use SSL certs for them.

Grafana Username and Password

Default credential: admin:pigsty. If you have changed the default credentials, use your own.

Username admin grafana_admin_username
Password pigsty grafana_admin_password

You can check our public demo site to see what it looks like: https://g.pgsty.com
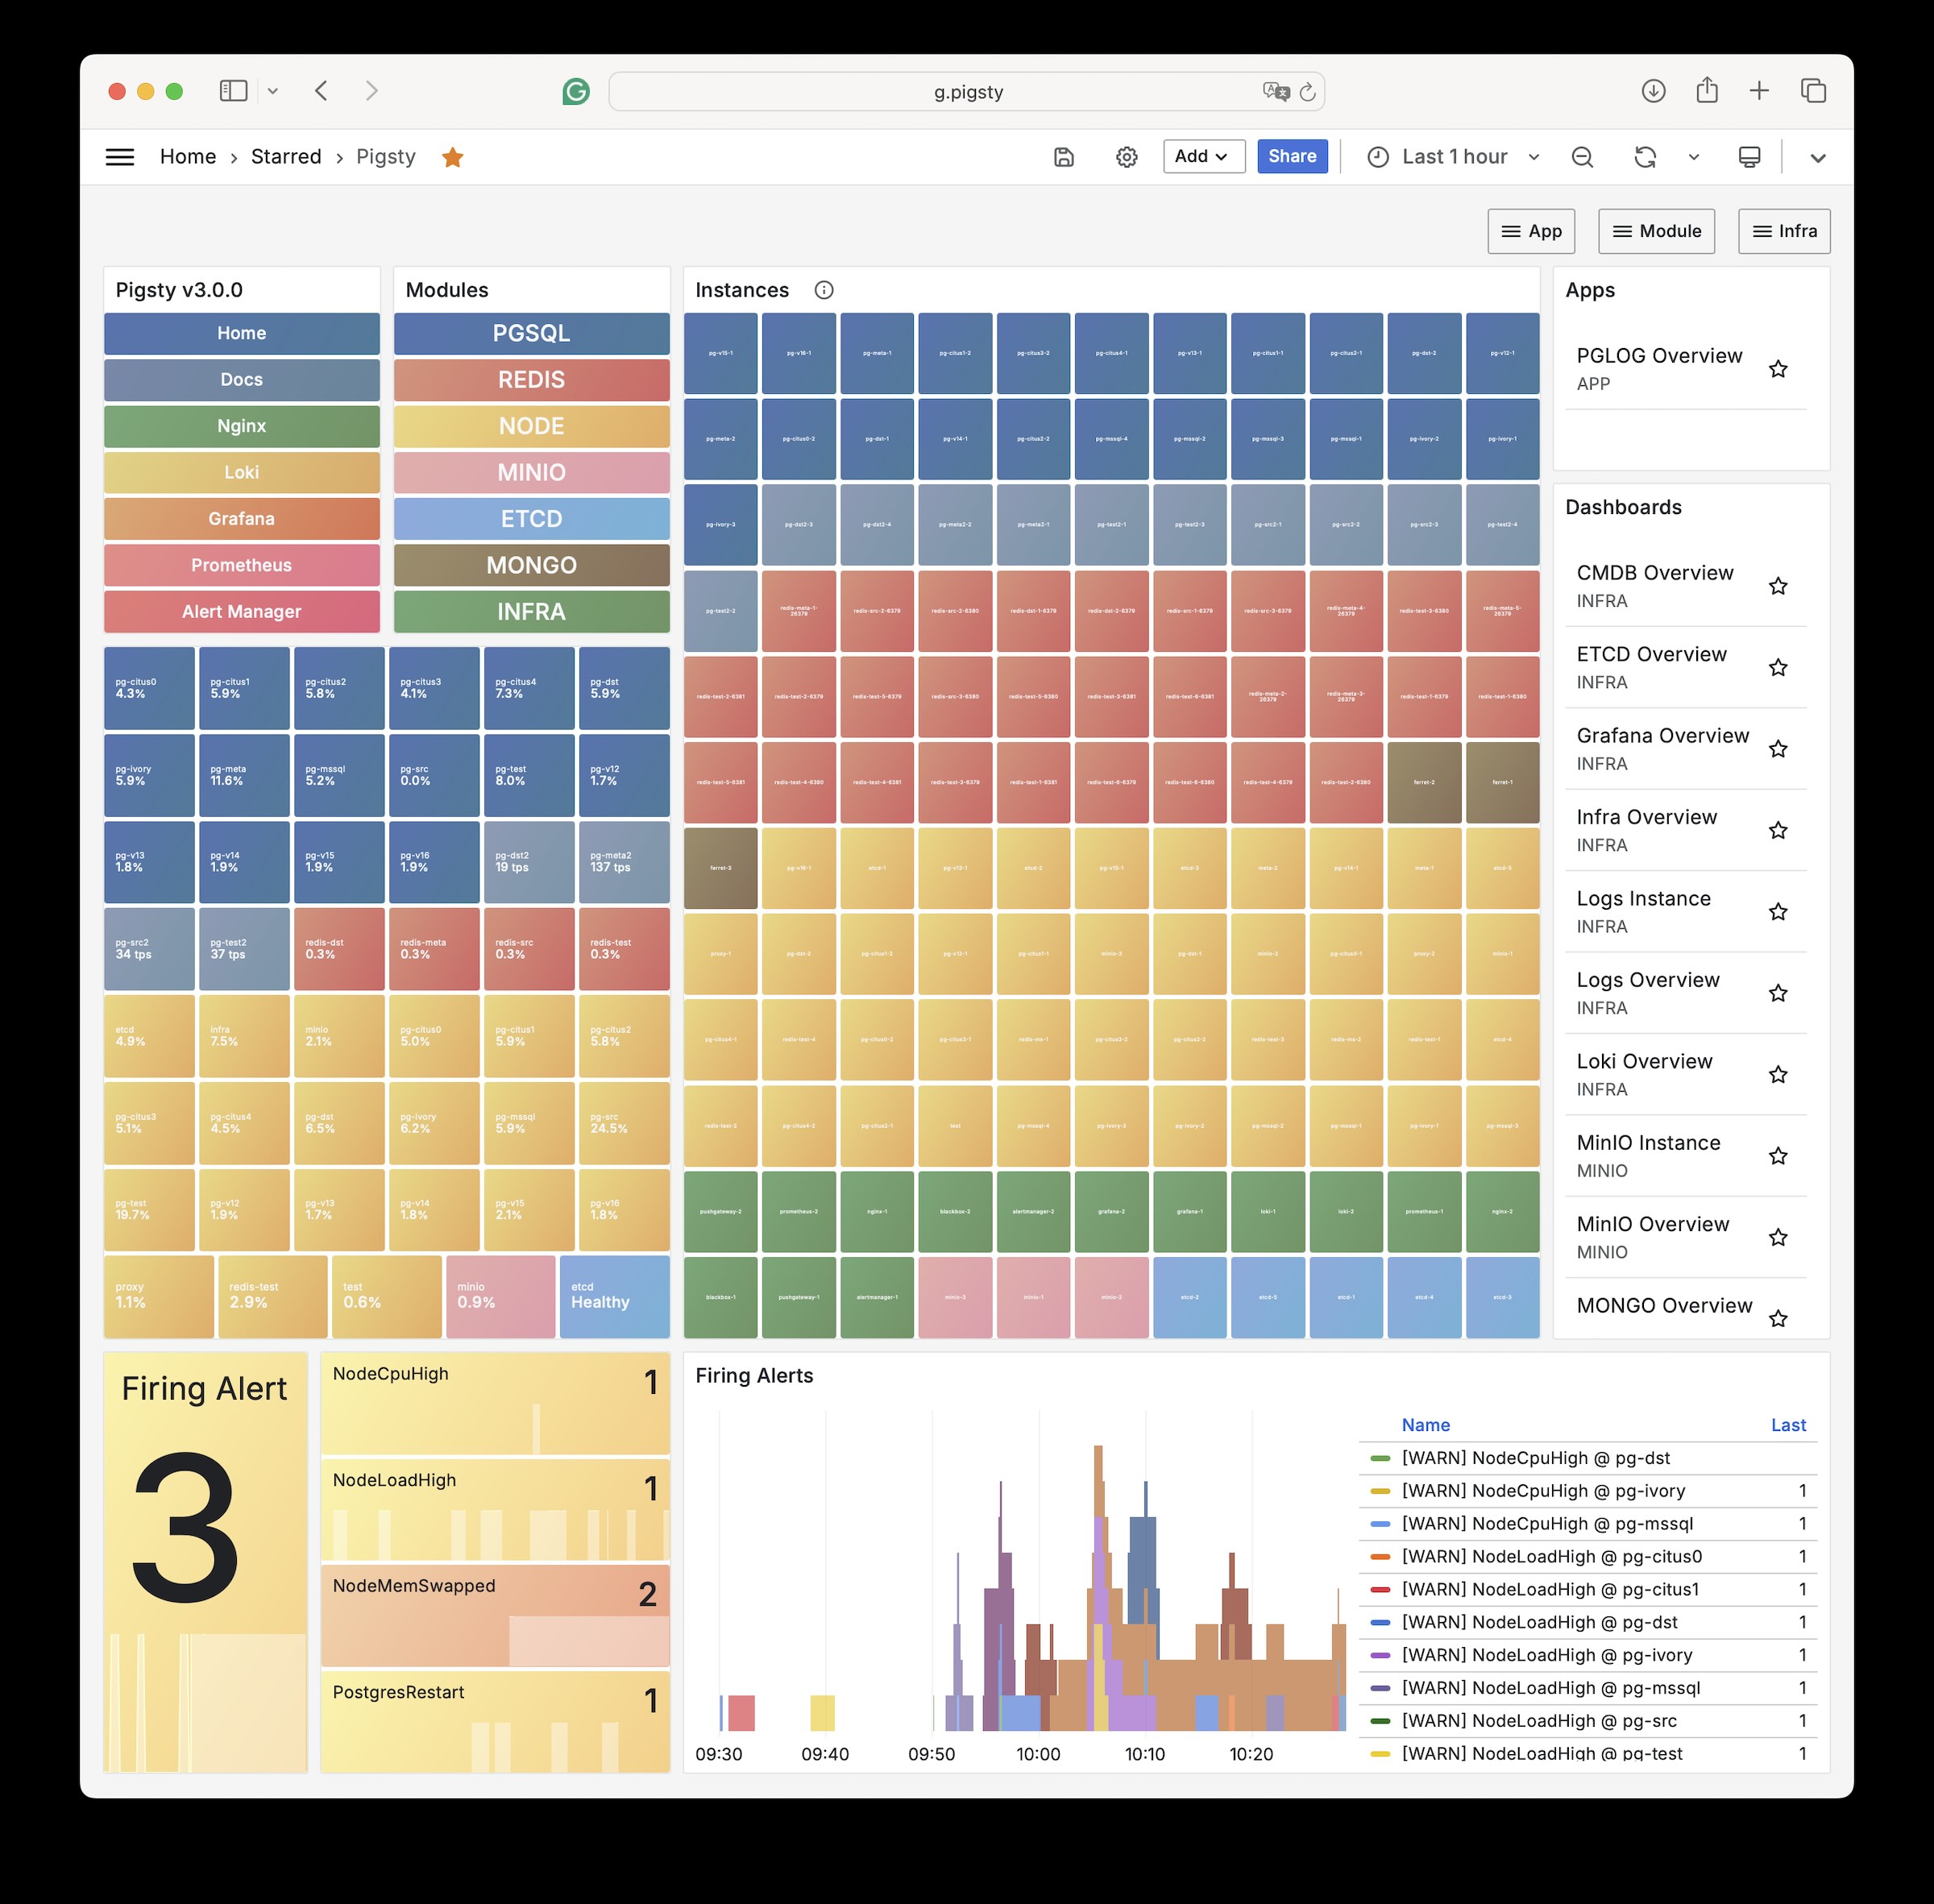
pigsty-home.jpg
SSL with local fake domain

Pigsty issues self-signed SSL certs for local static domain names, but you’ll have to trust the self-signed CA in your browser.

Use real domain names and certs

Pigsty has support for using real domain names and SSL certs

Just replace domain entries in infra_portal, and use make cert to apply for real certs for free

3 - Multi-Node

how to install pigsty on multiple nodes

There is a configuration Tutorial for expanding Pigsty from one node to multiple nodes. While the easiest way is always pre-planing everything and provisioning them in one-pass.


1-node Setup

We already illustrated the 1-node installation in the Quick Start section, which may be the simplest setup.

ID IP Address NODE PGSQL INFRA ETCD
1 10.10.10.10 meta pg-meta-1 infra-1 etcd-1

It is not advised to put all the eggs in one basket, but even this one-node setup can be used for production, as long as an external MinIO / S3 / NFS… is configured for PG as remote backup repo.

There are lots of 1-node config templates for your reference. And provision VM with Vagrant meta.rb or Terraform meta.tf.


2-node Setup

The semi-HA setup

A two-node setup enables database replication and semi-HA capabilities:

ID IP Address NODE PGSQL INFRA ETCD
1 10.10.10.10 meta pg-meta-1 infra-1 etcd-1
2 10.10.10.11 node-1 pg-meta-2

While more robust than a single node setup, HA has limitations:

  • No automatic failover if node-1 fails - manual promotion of node-2 required
  • Automatic failover works if node-2 fails - node-1 gets promoted automatically

This “semi-HA” setup can only auto-recover from specific node failures.

You can use the dual.yml config template, and provision required VM with: Vagrant dual.rb to provision this environment.


3-node Setup

The true HA

A true HA setup that can automatically recover from any single node failure:

ID IP Address NODE PGSQL INFRA ETCD
1 10.10.10.10 node-1 pg-meta-1 infra-1 etcd-1
2 10.10.10.11 node-2 pg-meta-2 infra-2 etcd-2
3 10.10.10.12 node-3 pg-meta-3 infra-3 etcd-3

You can use the trio.yml config template, and provision required VM with: Vagrant trio.rb to provision this environment.


4-node Sandbox

This is a sandbox demo environment used in Pigsty, which has one infra node and three extra data nodes:

ID IP Address NODE PGSQL INFRA ETCD MINIO
1 10.10.10.10 meta pg-meta-1 infra-1 etcd-1 minio-1
2 10.10.10.11 node-1 pg-test-1
3 10.10.10.12 node-2 pg-test-1
4 10.10.10.13 node-3 pg-test-1

You can use the full.yml config template, and provision required VM with: Vagrant full.rb or Terraform full.tf to provision this environment.


5-node Building

This pro.yml is a 5-node building environment which contains supported Linux distros.

ID IP Address NODE PGSQL INFRA ETCD
1 10.10.10.8 el8 el8-1 infra-1
2 10.10.10.9 el9 el9-1 infra-2 etcd-2
3 10.10.10.12 u12 u12-1 infra-3
4 10.10.10.22 u22 u22-1 infra-4
5 10.10.10.24 u24 u24-1 infra-5

You can use the Vagrant pro.rb or Terraform pro.tf to provision this environment.


36-node Simulation

A production simulation environment (simu.yml) with 36 nodes covering all Pigsty components

IP Address SPEC NODE PGSQL INFRA ETCD MINIO REDIS
10.10.10.10 8C32G meta1 pg-meta-1 infra-1
10.10.10.11 8C32G meta2 pg-meta-2 infra-2
10.10.10.12 2C4G pg12 pg-v12-1
10.10.10.13 2C4G pg13 pg-v13-1
10.10.10.14 2C4G pg14 pg-v14-1
10.10.10.15 2C4G pg15 pg-v15-1
10.10.10.16 2C4G pg16 pg-v16-1
10.10.10.17 2C4G pg17 pg-v17-1
10.10.10.18 2C4G proxy1
10.10.10.19 2C4G proxy2
10.10.10.21 2C4G minio1 etcd-1 minio-1 redis-meta-1
10.10.10.22 2C4G minio2 etcd-2 minio-2 redis-meta-2
10.10.10.23 2C4G minio3 etcd-3 minio-3 redis-meta-3
10.10.10.24 2C4G minio4 etcd-4 minio-4 redis-meta-4
10.10.10.25 2C4G minio5 etcd-5 minio-5 redis-meta-5
10.10.10.40 1C2G node40 pg-pitr-1
10.10.10.41 1C2G node41 pg-test-1 redis-test-1
10.10.10.42 1C2G node42 pg-test-2 redis-test-2
10.10.10.43 1C2G node43 pg-test-3 redis-test-3
10.10.10.44 1C2G node44 pg-test-4 redis-test-4
10.10.10.45 1C2G node45 pg-src-1 redis-src-1
10.10.10.46 1C2G node46 pg-src-2 redis-src-2
10.10.10.47 1C2G node47 pg-src-3 redis-src-3
10.10.10.48 1C2G node48 pg-dst-1 redis-dst-1
10.10.10.49 1C2G node49 pg-dst-2 redis-dst-2
10.10.10.50 1C2G node50 pg-citus0-1
10.10.10.51 1C2G node51 pg-citus0-2
10.10.10.52 1C2G node52 pg-citus1-1
10.10.10.53 1C2G node53 pg-citus1-2
10.10.10.54 1C2G node54 pg-citus2-1
10.10.10.55 1C2G node55 pg-citus2-2
10.10.10.56 1C2G node56 pg-citus3-1
10.10.10.57 1C2G node57 pg-citus3-2
10.10.10.58 1C2G node58 pg-citus4-1
10.10.10.59 1C2G node59 pg-citus4-2
10.10.10.88 4C8G test

You can use the Vagrant simu.rb to provision this environment. You can run the entire simulation on a real server (72C / 256G) with libvirt as VM provider with vagrant.

  • 2 infra nodes, monitoring each other
  • 2 dedicated proxy nodes that run haproxy
  • 5-node etcd cluster which tolerates 2 node failures, and 5-node redis sentinel cluster
  • 5-node minio cluster with 4 disks on each node
  • 10 postgres clusters, pg13 - pg15, pg-src, pg-dst, pg-pitr, pg-test
  • 10-node citus cluster with 5 shards
  • redis standalone cluster redis-src and redis-dst, and native cluster redis-test

4 - Offline Install

install pigsty without Internet access?

Pigsty install from Internet upstream by default, while some environments are isolated from the Internet. To address this issue, Pigsty supports offline installation from offline packages.

Step 1

    Download the pigsty offline package, put it to `/tmp/pkg.tgz`

Step 2

    Download the pigsty source package, extract it (assume `~/pigsty`)

Step 3

    `cd ~/pigsty; ./bootstrap`, it will extract the pkg and use the local repo

Step 4

    `vi ~/pigsty.yml`, overwrite [`node_repo_modules`](/docs/node/param#node_repo_modules) to `local` to use the local repo

Step 5

    Run `./install.yml` as usual. it will install everything from the local repo.

What is offline package?

Offline package packs all the required RPM/DEB packages and their dependencies; it is essentially a snapshot tarball of local APT / YUM repo, taken after a normal installation.

You can find these packages from the GitHub release page, for example:

d6e9d6fa73620460ceb373a0c2f41ebe  pigsty-v3.7.0.tgz
987529769d85a3a01776caefefa93ecb  pigsty-pkg-v3.7.0.d12.aarch64.tgz
2d8272493784ae35abeac84568950623  pigsty-pkg-v3.7.0.d12.x86_64.tgz
090cc2531dcc25db3302f35cb3076dfa  pigsty-pkg-v3.7.0.d13.x86_64.tgz
ddc54a9c4a585da323c60736b8560f55  pigsty-pkg-v3.7.0.el10.aarch64.tgz
d376e75c490e8f326ea0f0fbb4a8fd9b  pigsty-pkg-v3.7.0.el10.x86_64.tgz
8c2deeba1e1d09ef3d46d77a99494e71  pigsty-pkg-v3.7.0.el8.aarch64.tgz
9795e059bd884b9d1b2208011abe43cd  pigsty-pkg-v3.7.0.el8.x86_64.tgz
08b860155d6764ae817ed25f2fcf9e5b  pigsty-pkg-v3.7.0.el9.aarch64.tgz
1ac430768e488a449d350ce245975baa  pigsty-pkg-v3.7.0.el9.x86_64.tgz
e033aaf23690755848db255904ab3bcd  pigsty-pkg-v3.7.0.u22.aarch64.tgz
cc022ea89181d89d271a9aaabca04165  pigsty-pkg-v3.7.0.u22.x86_64.tgz
0e978598796db3ce96caebd76c76e960  pigsty-pkg-v3.7.0.u24.aarch64.tgz
48223898ace8812cc4ea79cf3178476a  pigsty-pkg-v3.7.0.u24.x86_64.tgz

We usually release offline packages for the following linux distro, with the latest OS minor version.

EL Distribution Code Arch OS Code Package
RockyLinux 9.6 EL9 x86_64 el9.x86_64 pigsty-pkg-v3.7.0.el9.x86_64.tgz
Ubuntu 24.04.2 U24 x86_64 u24.x86_64 pigsty-pkg-v3.7.0.u24.x86_64.tgz
Debian 12.11 D12 x86_64 d12.x86_64 pigsty-pkg-v3.7.0.d12.x86_64.tgz
RockyLinux 9.6 EL9 x86_64 el9.aarch64 pigsty-pkg-v3.7.0.el9.aarch64.tgz
Ubuntu 24.04.2 U24 x86_64 u24.aarch64 pigsty-pkg-v3.7.0.u24.aarch64.tgz
Debian 12.11 D12 x86_64 d12.aarch64 pigsty-pkg-v3.7.0.d12.aarch64.tgz

https://github.com/pgsty/pigsty/releases/download/v3.7.0/pigsty-pkg-v3.7.0.el9.x86_64.tgz

Offline Package is made for specific Linux OS Major.Minor Version

Using offline package on lower minor version may have a chance of success, but it is not guaranteed.


Using Offline Package

Place the offline package at /tmp/pkg.tgz, navigate to the ~/pigsty directory and execute ./bootstrap to extract and use the offline package. Pigsty will extract it to /www/pigsty, configure the system repository list to enable this repository, and install ansible from it.

Since Pigsty v3.6, most configuration templates no longer build local software repositories by default, but install packages directly from Internet upstream. A few configuration templates such as rich and full still retain the old behavior — building local repositories first before using them.

If you want to use the extracted and configured offline package in your own configuration, please modify the following settings:

  • repo_enabled: Set this to true to build local software repo (explicitly disabled in most templates)
  • node_repo_modules: Set this to local to install from local software repo for all nodes in the env
    • In most templates, this parameter is now explicitly configured as: node,infra,pgsql, which installs software packages directly from upstream repos.
    • Setting it to local will use the local repo alone, which is fastest and more reliable if applicable.
    • If you want to use both local and upstream repositories, you can set it to local,node,infra,pgsql

Pros and Cons

If you are using the exact same OS minor version above, using offline packages is advised.

Advantages of using offline package
  • Official offline packages are tested.
  • The easiest way to deliver on Internet isolated environment.
  • Speed up the installation process by pre-download all packages in one-pass.
  • The snapshot is ensured working without worrying about upstream dependency breakage.
Disadvantages of using offline package
  • If OS minor version not match, OS rpm/deb packages may break
  • It may not contain the latest updates and OS security patches.

Bootstrap

The bootstrap script will automatically detect /tmp/pkg.tgz and extract it to /www/pigsty by default. It will also set up the os package manager repo file and install ansible and other utils.

Where are my repo files?

Bootstrap will wipe-out existing repo by default to ensure only the required repos are installed.

You can find them in /etc/yum.repos.d/backup (EL) or /etc/apt/backup (debian / ubuntu)

If you want to keep your existing repo

You can use the -k|--keep parameter to keep the existing repo files intact:

./bootstrap -k # or --keep

Make offline package

If your OS choice is not in the default offline package offering list, you can make your own offline package with the built-in cache.yml playbook.

Step 1

    Find a node running exact same OS version with the Internet access

Step 2

    Run standard [online installation procedure](/docs/install) (use the `rich` template: `configure -c rich`)

Step 3

    `cd ~/pigsty; ./cache.yml`: make and fetch the offline package to `dist/${version}/`

Step 4

    Copy the offline package to the environment without Internet access (ftp, scp, usb,...)
Behavior Change in v3.6

Since Pigsty v3.6, most configuration templates install packages directly from Internet upstream, rather than downloading to the admin node first to build a local repository and then installing from it. You can restore the previous default behavior by adjusting parameters, which is useful if you need to build your own offline packages:

Some configuration templates, such as rich and full, still retain the old behavior — building local repositories first before using them, so no adjustment is needed.

We offer paid service to make offline packages for precise Linux major.minor versions. ($30)


Hybrid Approach

There’s a hybrid approach to using the offline package and do online install upon it. This could be useful if your OS repo is a local Intranet repo.

Let’s say you are using RockyLinux 9.5, but the official offline package is made for RockyLinux 9.6.

You can use the el9 offline packages, and run the make repo-build before the ./install.yml, to force Pigsty to perform a repo build task (infra.repo).

If you want to use the latest version or resolve any dependency conflict, you can remove these rpm/deb and run make repo-build, pigsty will re-download them from the upstream repo.

5 - Minimal Install

install Postgres with minimal dependencies

If you just want HA PostgreSQL itself, without monitoring, infra, etc…, consider the slim installation.

There’s no INFRA modules, no monitoring, no local repo Just ETCD & PGSQL and partial of NODE


Overview

To use slim installation, you need to:

Step 1

  Use the `slim.yml` config template (`configure -c slim`)

Step 2

  Run the `slim.yml` playbook instead of `install.yml`
curl https://repo.pigsty.cc/get | bash -s v3.7.0
./configure -c slim
./install.yml

Slim installation only installs these essential components:

Component Required Description
patroni REQUIRED Bootstrap HA PostgreSQL cluster
etcd REQUIRED meta database dependency (DCS) for patroni
pgbouncer OPTIONAL Connection pooler for postgres
vip-manager OPTIONAL L2 VIP binding to postgres cluster leader
haproxy OPTIONAL Auto-routing service
chronyd OPTIONAL Time synchronization with NTP server
tuned OPTIONAL Node tuned template and kernel parameters management

You can turn off the optional components, the only two required components are patroni and etcd.

Packages are directly installed from the Internet upstream repo, offline install is not applicable here.


Configure

Config file example: conf/slim.yml for slim installation:

all:
  children:
    infra: { hosts: { 10.10.10.10: { infra_seq: 1 }} ,vars: { repo_enabled: false }}
    etcd:  { hosts: { 10.10.10.10: { etcd_seq: 1  }} ,vars: { etcd_cluster: etcd  }}

    #----------------------------------------------#
    # PostgreSQL Cluster
    #----------------------------------------------#
    pg-meta:
      hosts:
        10.10.10.10: { pg_seq: 1, pg_role: primary }
      vars:
        pg_cluster: pg-meta
        pg_users:
          - { name: dbuser_meta ,password: DBUser.Meta   ,pgbouncer: true ,roles: [dbrole_admin   ] ,comment: pigsty admin user }
          - { name: dbuser_view ,password: DBUser.Viewer ,pgbouncer: true ,roles: [dbrole_readonly] ,comment: read-only viewer  }
        pg_databases:
          - { name: meta, baseline: cmdb.sql ,comment: pigsty meta database ,schemas: [pigsty] ,extensions: [ vector ]}
        pg_hba_rules:
          - { user: dbuser_view , db: all ,addr: infra ,auth: pwd ,title: 'allow grafana dashboard access cmdb from infra nodes' }
        node_crontab: [ '00 01 * * * postgres /pg/bin/pg-backup full' ] # make a full backup every 1am

  vars:
    #----------------------------------------------#
    # INFRA : https://doc.pgsty.com/infra/param
    #----------------------------------------------#
    version: v3.7.0                   # pigsty version string
    admin_ip: 10.10.10.10             # admin node ip address
    region: default                   # upstream mirror region: default,china,europe
    infra_portal:                     # domain names and upstream servers
      home         : { domain: h.pigsty }
      grafana      : { domain: g.pigsty ,endpoint: "${admin_ip}:3000" , websocket: true }
      prometheus   : { domain: p.pigsty ,endpoint: "${admin_ip}:9058" }
      alertmanager : { domain: a.pigsty ,endpoint: "${admin_ip}:9059" }
      blackbox     : { endpoint: "${admin_ip}:9115" }
      loki         : { endpoint: "${admin_ip}:3100" }

    #----------------------------------------------#
    # NODE : https://doc.pgsty.com/node/param
    #----------------------------------------------#
    nodename_overwrite: false           # do not overwrite node hostname on single node mode
    node_repo_modules: node,infra,pgsql # add these repos directly to the singleton node
    node_tune: oltp                     # node tuning specs: oltp,olap,tiny,crit

    #----------------------------------------------#
    # PGSQL : https://doc.pgsty.com/pgsql/param
    #----------------------------------------------#
    pg_version: 17                      # Default PostgreSQL Major Version is 17
    pg_conf: oltp.yml                   # pgsql tuning specs: {oltp,olap,tiny,crit}.yml
    pg_packages: [ pgsql-main, pgsql-common ]   # pg kernel and common utils
    #pg_extensions: [pg17-time ,pg17-gis ,pg17-rag ,pg17-fts ,pg17-feat ,pg17-lang ,pg17-type ,pg17-util ,pg17-func ,pg17-admin ,pg17-stat ,pg17-sec ,pg17-fdw ,pg17-sim ,pg17-etl ,pg17-olap]

    #----------------------------------------------#
    # SLIM: http://localhost:3000/docs/install/minimal
    #----------------------------------------------#
    nginx_enabled: false              # nginx not exists
    dns_enabled: false                # dnsmasq not exists
    prometheus_enabled: false         # prometheus not exists
    grafana_enabled: false            # grafana not exists
    pg_exporter_enabled: false        # disable pg_exporter
    pgbouncer_exporter_enabled: false # disable pgbouncer_exporter
    pgbackrest_exporter_enabled: false # disable pgbackrest_exporter
    pg_vip_enabled: false             # disable pg_vip

Install

Use the slim.yml playbook instead of the install.yml playbook:

./slim.yml
Do not use install.yml here

The slim.yml playbook is designed to replace the install.yml playbook for the minimal installations.

6 - Video Demo

Install process video tutorial

Asciinema Videos: Vonng


Standard Install

Pigsty v3.6.0, RockyLinux 9.6, x86_64, Standard Installation, Link

This will use the default meta single-node configuration.

curl -fsSL https://repo.pigsty.io/get | bash -s v3.6.0; cd ~/pigsty;
./configure
./install.yml

asciicast


Rich Install

Pigsty v3.6.0, Ubuntu 24.04.2, x86_64, Rich Installation

Rich template has the following features enabled in addition to the standard installation:

  • almost all available postgres extensions
  • build local software repo for entire env (download before installing)
  • 1 node minio used as central backup repo
  • cluster stub for 3-node pg-test / ferret / redis
  • stub for nginx, certs, and website self-hosting config
  • detailed comments for database / user / service
./configure -c rich     # use the conf/rich.yml template
./install.yml
curl -fsSL https://repo.pigsty.io/get | bash -s v3.6.0; cd ~/pigsty;
./configure -i rich
vi pigsty.yml   # edit password
./install.yml
make tu tssh
asciinema rec
ssh meta
ls /www/pigsty
cat ~/pigsty/pigsty.yml | grep node_repo_modules
sudo su - postgres
pg list
pb info
pg-backup incr
pb list
psql
SELECT * FROM pg_available_extensions;

Slim Install

Pigsty v3.6.0, Debian 12.11, aarch64, Slim Installation, Link

Postgres HA Cluster with essential modules, (with ETCD, without INFRA).

asciinema rec
ssh meta
curl -fsSL https://repo.pigsty.io/get | bash -s v3.6.0; cd ~/pigsty;
./configure -i slim
./slim.yml
sudo su - postgres
psql

Offline Install

Pigsty v3.6.0, RockyLinux 9.6, aarch64, Slim Installation

# download this offline package and put it to /tmp/pkg.tgz, we just skip downloading here
# curl https://github.com/pgsty/pigsty/releases/download/v3.6.0/pigsty-pkg-v3.6.0.el9.x86_64.tgz -o /tmp/pkg.tgz
scp ~/pigsty/dist/v3.6.0/pigsty-v3.6.0.tgz meta:~/pigsty.tgz

# download source package and extract it to ~/pigsty, we just skip downloading here
# curl https://github.com/pgsty/pigsty/releases/download/v3.6.0/pigsty-v3.6.0.tgz -o ~/pigsty.tgz; tar xzf ~/pigsty.tgz -C ~/
scp ~/pigsty/dist/v3.6.0/pigsty-pkg-v3.6.0.el9.aarch64.tgz meta:/tmp/pkg.tgz

ssh meta
tar -xf pigsty.yml  # extract pigsty source tarball
cd pigsty           # enter pigsty home dir
./bootstrap         # now bootstrap pigsty from local repo
./configure         # generate pigsty.yml
vi pigsty.yml       # use local repo rather than install from the internet upstream repo
#node_repo_modules: local

./install.yml

Supabase

Pigsty v3.6.0, Ubuntu 24.04, x86_64, Install Supabase

curl -fsSL https://repo.pigsty.io/get | bash -s v3.6.0; cd ~/pigsty;
./configure -c supabase
./install.yml
./docker.yml
./app.yml

Now let’s setup your domain name and HTTPS certificates

vi pigsty.yml

curl -fsSL https://repo.pigsty.cc/get | bash -s v3.6.0; cd ~/pigsty ./configure -c supabase # 使用 supabase 配置(请在 pigsty.yml 中更改凭据) vi pigsty.yml # 编辑域名、密码、密钥… ./install.yml # 安装 pigsty ./docker.yml # 安装 docker compose 组件 ./app.yml # 使用 docker 启动 supabase 无状态部分