Hardware
Nodes, specs, disks, network, VIP, domain ...
This is the multi-page printable view of this section. .
Nodes, specs, disks, network, VIP, domain ...
List of supported Linux OS distributions
Locale, Firewall, Ansible, Pigsty...
User, Sudo, SSH, Accessibility...
You can leverage IaC tools such as Terraform and Vagrant to help you prepare the environment and do the chore.
Ansible 101, basic knowledge for pigsty users
The four-node sandbox for learning & testing
Provision local virtual machine with vagrant
Provision cloud servers with terraform
Here’s a checklist to help you prepare the environment for a serious Pigsty deployment in production environment.
| Item | Requirement | Item | Requirement |
|---|---|---|---|
| Node | 1C1G at least, 2C2G recommended, no upper limit |
Spec | 1 node at least, 2 for semi-HA, 3+ for real HA |
| Disk | /data, main mount point, ext4 or xfs |
Network | static intranet, IPv4 address, nice to have Internet access |
| VIP | Reserve an L2 IP for VIP (OPTIONAL) | Domain | Use local / public domain names (OPTIONAL) |
| Kernel | Linux, MacOS can be used as admin controller |
Distro | EL (8/9), Debian (12), Ubuntu (22/24), x86_64 / aarch64 |
| Locale | C.UTF-8 or C |
Firewall | port: 80 / 443 / 22 / 5432 |
| User | avoid using root & postgres |
Sudo | nopass sudo privilege |
| SSH | nopass via public key |
Accessible | ssh <ip|alias> sudo ls works |
Pigsty currently runs on nodes with Linux kernel and x86_64 / aarch64 architecture.
A “node” refers to a resource that is SSH accessible and offers a bare Linux OS environment.
It could be a physical machine, a virtual machine, or an OS-like container equipped with systemd, sudo and sshd.
It requires at least 1 node to deploy pigsty,
You can prepare more and setup everything in one-pass, or add them later.
The minimum node spec requirement is 1C1G, it is recommended to use at least 2C2G.
Higher is better, with no upper limit. Parameters will be automatically tuned based on available resource.
A functioning HA setup requires at least 3 nodes to work, or use 2 for a semi-HA setup
How many nodes do you need? It depends on your resource and your requirements.
A two-node setup enables database replication and semi-HA capabilities:
While more robust than a single node setup, HA has limitations:
node-1 fails - manual promotion of node-2 requirednode-2 fails - node-1 gets promoted automaticallyThis “semi-HA” setup can only auto-recover from specific node failures.
Pigsty will use /data as the default data directory, if you have a dedicated main data disk, it is recommended to mount it there,
and use /data1, /data2, /dataN for extra disk drivers.
If you are mounting it elsewhere, you’ll have to change the following parameters accordingly:
| Name | Description | Default |
|---|---|---|
node_data |
node main data directory | /data |
pg_fs_main |
postgres main data directory | /data |
pg_fs_backup |
postgres backup data directory | /data/backups |
etcd_data |
etcd data directory | /data/etcd |
prometheus_data |
prometheus data directory | /data/prometheus |
loki_data |
loki data directory | /data/loki |
minio_data |
minio data directory | /data/minio |
redis_fs_main |
redis data directory | /data/redis |
We recommend using ext4 or xfs as the filesystem for data disks. They have the best performance for PostgreSQL.
While ext4 has more tools for data recovery, xfs is more efficient for small files.
If you are running MinIO, It’s recommended to use xfs, otherwise, ext4 is recommended as the default option.
Pigsty requires static network to work, you should explicitly assign a fixed IPv4 address for each node.
The 127.0.0.1 could be used as a workaround in case of no fixed IP address in one-node installation.
The IP address will be used as the node’s unique identifier, it should be the primary IP address bind to the primary network interface used for internal network communications.
Using public IP addresses as node identifiers can cause security and connectivity issues.
To use the optional Node VIP and PG VIP features, ensure all nodes are located within the same L2 network
Internet access is required when performing the standard (online) installation. But pigsty can be offline installed via offline package, which does not require Internet access in this case.
Pigsty supports optional L2 VIP for NODE clusters (keepalived) and PGSQL clusters (vip-manager).
To use L2 VIP features, You have to explicitly assign an L2 VIP for them. It’s not a big deal when running on your own hardware, but may become an issue when working in a public cloud environment.
Pigsty using local static domain names for the following service with WebUI.
You can assign your custom domain names to these services, or use real domain names.
Just change them in the infra_portal.
| Domain | Name | Port | Component | Description |
|---|---|---|---|---|
h.pigsty |
home |
80/443 | Nginx | Default server, local repo |
g.pigsty |
grafana |
3000 | Grafana | Monitoring & visualization |
p.pigsty |
prometheus |
9058 | Prometheus | Time series DB |
a.pigsty |
alertmanager |
9059 | AlertManager | Alert aggregation & routing |
Domain names are optional, to use them, it is user’s responsibility to add the following records to your /etc/hosts file (local static resolution),
Or add them to your DNS server / public DNS vendor.
Pigsty works well on EL9, U24, D12, Recommended OS: RockyLinux 9.6, Ubuntu 24.04.2, Debian 12.11
| Distribution | Arch | Code | PG18 | PG17 | PG16 | PG15 | PG14 | PG13 |
|---|---|---|---|---|---|---|---|---|
| RHEL9 / Rocky9 / Alma9 | x86_64 | el9.x86_64 |
✓ | ✓ | ✓ | ✓ | ✓ | ✓ |
| RHEL9 / Rocky9 / Alma9 | aarch64 | el9.aarch64 |
✓ | ✓ | ✓ | ✓ | ✓ | ✓ |
Ubuntu 24.04 (noble) |
x86_64 | u24.x86_64 |
✓ | ✓ | ✓ | ✓ | ✓ | ✓ |
Ubuntu 24.04 (noble) |
aarch64 | u24.aarch64 |
✓ | ✓ | ✓ | ✓ | ✓ | ✓ |
Debian 12 (bookworm) |
x86_64 | d12.x86_64 |
✓ | ✓ | ✓ | ✓ | ✓ | ✓ |
Debian 12 (bookworm) |
aarch64 | d12.aarch64 |
✓ | ✓ | ✓ | ✓ | ✓ | ✓ |
Pigsty works on RHEL / Rocky / Alma / Anolis / CentOS 8, 9, 10.
| EL Distribution | Arch | Code | PG18 | PG17 | PG16 | PG15 | PG14 | PG13 |
|---|---|---|---|---|---|---|---|---|
| RHEL10 / Rocky10 / Alma10 | x86_64 | el10.x86_64 |
✓ | ✓ | ✓ | ✓ | ✓ | ✓ |
| RHEL10 / Rocky10 / Alma10 | aarch64 | el10.aarch64 |
✓ | ✓ | ✓ | ✓ | ✓ | ✓ |
| RHEL9 / Rocky9 / Alma9 | x86_64 | el9.x86_64 |
✓ | ✓ | ✓ | ✓ | ✓ | ✓ |
| RHEL9 / Rocky9 / Alma9 | aarch64 | el9.aarch64 |
✓ | ✓ | ✓ | ✓ | ✓ | ✓ |
| RHEL8 / Rocky8 / Alma8 | x86_64 | el8.x86_64 |
✓ | ✓ | ✓ | ✓ | ✓ | ✓ |
| RHEL8 / Rocky8 / Alma8 | aarch64 | el8.aarch64 |
✓ | ✓ | ✓ | ✓ | ✓ | ✓ |
| RHEL7 / CentOS7 | x86_64 | el7.x86_64 |
● | ● | ● | |||
| RHEL7 / CentOS7 | aarch64 | - |
For extended support on legacy os, consider our pro subscription.
Pigsty works on Ubuntu 24.04 / 22.04:
| Ubuntu Distribution | 架构 | 系统代码 | PG18 | PG17 | PG16 | PG15 | PG14 | PG13 |
|---|---|---|---|---|---|---|---|---|
Ubuntu 24.04 (noble) |
x86_64 | u24.x86_64 |
✓ | ✓ | ✓ | ✓ | ✓ | ✓ |
Ubuntu 24.04 (noble) |
aarch64 | u24.aarch64 |
✓ | ✓ | ✓ | ✓ | ✓ | ✓ |
Ubuntu 22.04 (jammy) |
x86_64 | u22.x86_64 |
✓ | ✓ | ✓ | ✓ | ✓ | ✓ |
Ubuntu 22.04 (jammy) |
aarch64 | u22.aarch64 |
✓ | ✓ | ✓ | ✓ | ✓ | ✓ |
Pigsty works on Debian 12 / 13, we recommend using the latest Debian 12.11
| Debian Distribution | Arch | Code | PG18 | PG17 | PG16 | PG15 | PG14 | PG13 |
|---|---|---|---|---|---|---|---|---|
Debian 13 (trixie) |
x86_64 | d13.x86_64 |
✓ | ✓ | ✓ | ✓ | ✓ | ✓ |
Debian 13 (trixie) |
aarch64 | d13.aarch64 |
✓ | ✓ | ✓ | ✓ | ✓ | ✓ |
Debian 12 (bookworm) |
x86_64 | d12.x86_64 |
✓ | ✓ | ✓ | ✓ | ✓ | ✓ |
Debian 12 (bookworm) |
aarch64 | d12.aarch64 |
✓ | ✓ | ✓ | ✓ | ✓ | ✓ |
Debian 11 (bullseye) |
x86_64 | d11.x86_64 |
● | ● | ● | ● | ||
Debian 11 (bullseye) |
aarch64 | - |
For extended support on legacy os, consider our pro subscription.
Pigsty runs on Linux Operating System, it supports 14 mainstream Linux distros: Compatible OS List
We recommend using RockyLinux 9.6, Debian 12.11, or Ubuntu 24.04.5 as the default OS options.
You can install pigsty on macOS, and initiate control from your local laptop with ansible. (use as admin node)
But the database / infra / node / etcd services are still running on Linux nodes.
We strongly recommend using a clean installed OS environment with en_US set as the primary language.
To ensure the en_US locale is available when using other primary language:
Pigsty DOES NOT use containers, main components are packed for specific distro major version.
Please use the same major and minor version of the OS on all nodes in a single deployment.
Pigsty suggests using ext4 or xfs file systems, both of which have the best performance for PostgreSQL use cases.
If you know what you are doing, you can also consider using file systems like zfs, but never run database services on network file systems like nfs.
If you need to use MinIO, it is recommended to use the xfs file system, which is the only file system recommended by MinIO.
It performs better in scenarios with a large number of small files, but the tool ecosystem (e.g., data recovery) is slightly inferior to ext4.
The default recommendation for running standard PostgreSQL services is to use the ext4 file system.
Your security policy and firewall setup should allow access to the required ports.
To access the WebUI services, you’ll have to allow the HTTP (80) / HTTPS (443) access.
To access the PostgreSQL database services, you’ll have to allow the 5432 port for postgres.
5432: PostgreSQL database6432: Pgbouncer Connection Pooler5433: PG Primary Service5434: PG Replica Service5436: PG Default Service5438: PG Offline ServiceIf you are accessing the postgres services via other ports, allow them accordingly
In a typical public cloud VPS setup, port 22/80/443/5432 are usually opened.
Exposing database service ports directly to the Internet is very dangerous. If you need to do this, consider consulting Security Best Practices and proceed with caution.
In a typical production setup, port 22/80/443 are opened to DBA/OPS from LAN / Jumpserver.
And other ports are accessed from intranet. You have to make sure they are opened internally: used ports.
Pigsty uses Ansible to initiate control from admin node to all managed nodes.
You don’t need to care about details, ansible is installed during the Bootstrap stage.
Ansible is only required on admin node, you can run ansible on macOS to use your laptop as admin node.
(RECOMMENDED) You can get & extract the latest stable version of pigsty source with:
To install a specific version, pass the version string as the first parameter:
You can also use git to clone the Pigsty source repo from GitHub:
The default main branch may in an unstable development status, git checkout v3.7.0 before using.
You can also download the pigsty src (pigsty-<version>.tar.gz) from GitHub Release Page manually:
If your environment does not have Internet access, consider downloading offline packages along with source tarball and upload them to your nodes.
Check Offline Installation for details.
Pigsty requires an OS user with passwordless ssh and sudo on all managed nodes.
Usually we’ll choose a name such as dba or admin for this purpose,
but avoid using root or postgres:
While possible, using root as admin user is not recommended for security reasons.
DBSU (postgres by default) should NOT be used as admin user.
It will cause unexpected security issues.
If you are using a different dbsu user, avoid using it as admin user as well.
The nopass requirement is optional if you can accept the password prompt for every ssh and sudo command.
You can use the -k|--ask-pass when running playbook to prompt for the ssh password.
And use -K|--ask-become-pass to prompt for the sudo password.
It’s user/vendor’s responsibility to create & deliver such an admin user during server provisioning stage. But if you don’t have such an admin user, or that user is restricted, you can create one with pigsty itself:
Assuming you have a root or existing admin user on the node, you can create an admin user with pigsty itself.
It will leverage the existing admin to create a new admin user.
It will create a dedicated dba (uid=88) user described by the following parameters,
with sudo / ssh properly configured.
| Name | Description | Default |
|---|---|---|
node_admin_enabled |
enable node admin user | true |
node_admin_uid |
uid of node admin user | 88 |
node_admin_username |
name of node admin user | dba |
All the admin user should have passwordless sudo privileges on all managed nodes.
In case you want to configure an admin user with passwordless sudo privileges from scratch:
To manually allow a user to execute sudo commands without password:
Create a sudoers file for your admin user (assume vagrant, replace with your name choice):
Assume your admin user name choice is dba, then /etc/sudoers.d/dba content would be
Ansible relies on sudo to execute commands with root privileges on managed nodes.
So on environments where sudo is not available (like inside a slim container), you may have to install sudo first.
Your current user should have nopass ssh access to all managed nodes as corresponding admin user.
Your current user can be the admin user itself, but not required as long as you can ssh as the admin user.
SSH configuration is Linux 101, but we will cover the basics here in case you are not familiar with it:
Generate an SSH key pair if you don’t have one
Pigsty will do that for you if you don’t have a key pair, during the bootstrap stage.
You’ll need to distribute your generated public key remote (and local) servers, and put
it into the ~/.ssh/authorized_keys file of the admin user on all nodes.
The ssh-copy-id util can be used.
Copy the public key to all managed nodes, ssh-copy-id or add to ~/.ssh/authorized_keys manually.
You can use sshpass tool to pass the password directly without prompting, but it’s dangerous:
When direct ssh access is not available (due to jumpserver, other port, credentials, etc…), consider:
Configure SSH aliases in ~/.ssh/config, and put custom parameters for the alias there.
And reference the alias in the inventory, use ansible_host to specify the real ssh alias.
SSH parameters can be used directly in ansible, Check Ansible Inventory Guide for details.
Your should be able to access all managed nodes with nopass ssh via your current user from admin node.
And the remote user (admin user) should have the privilege to run nopass sudo commands.
Run this command on admin node to all managed nodes:
if there’s no password prompt or error raised, nopass ssh/sudo is working as expected.
Pigsty has a sandbox, which is a 4-node deployment with fixed IP addresses and other identifiers.
We will use this as a standard demonstration environment for learning and testing purposes.
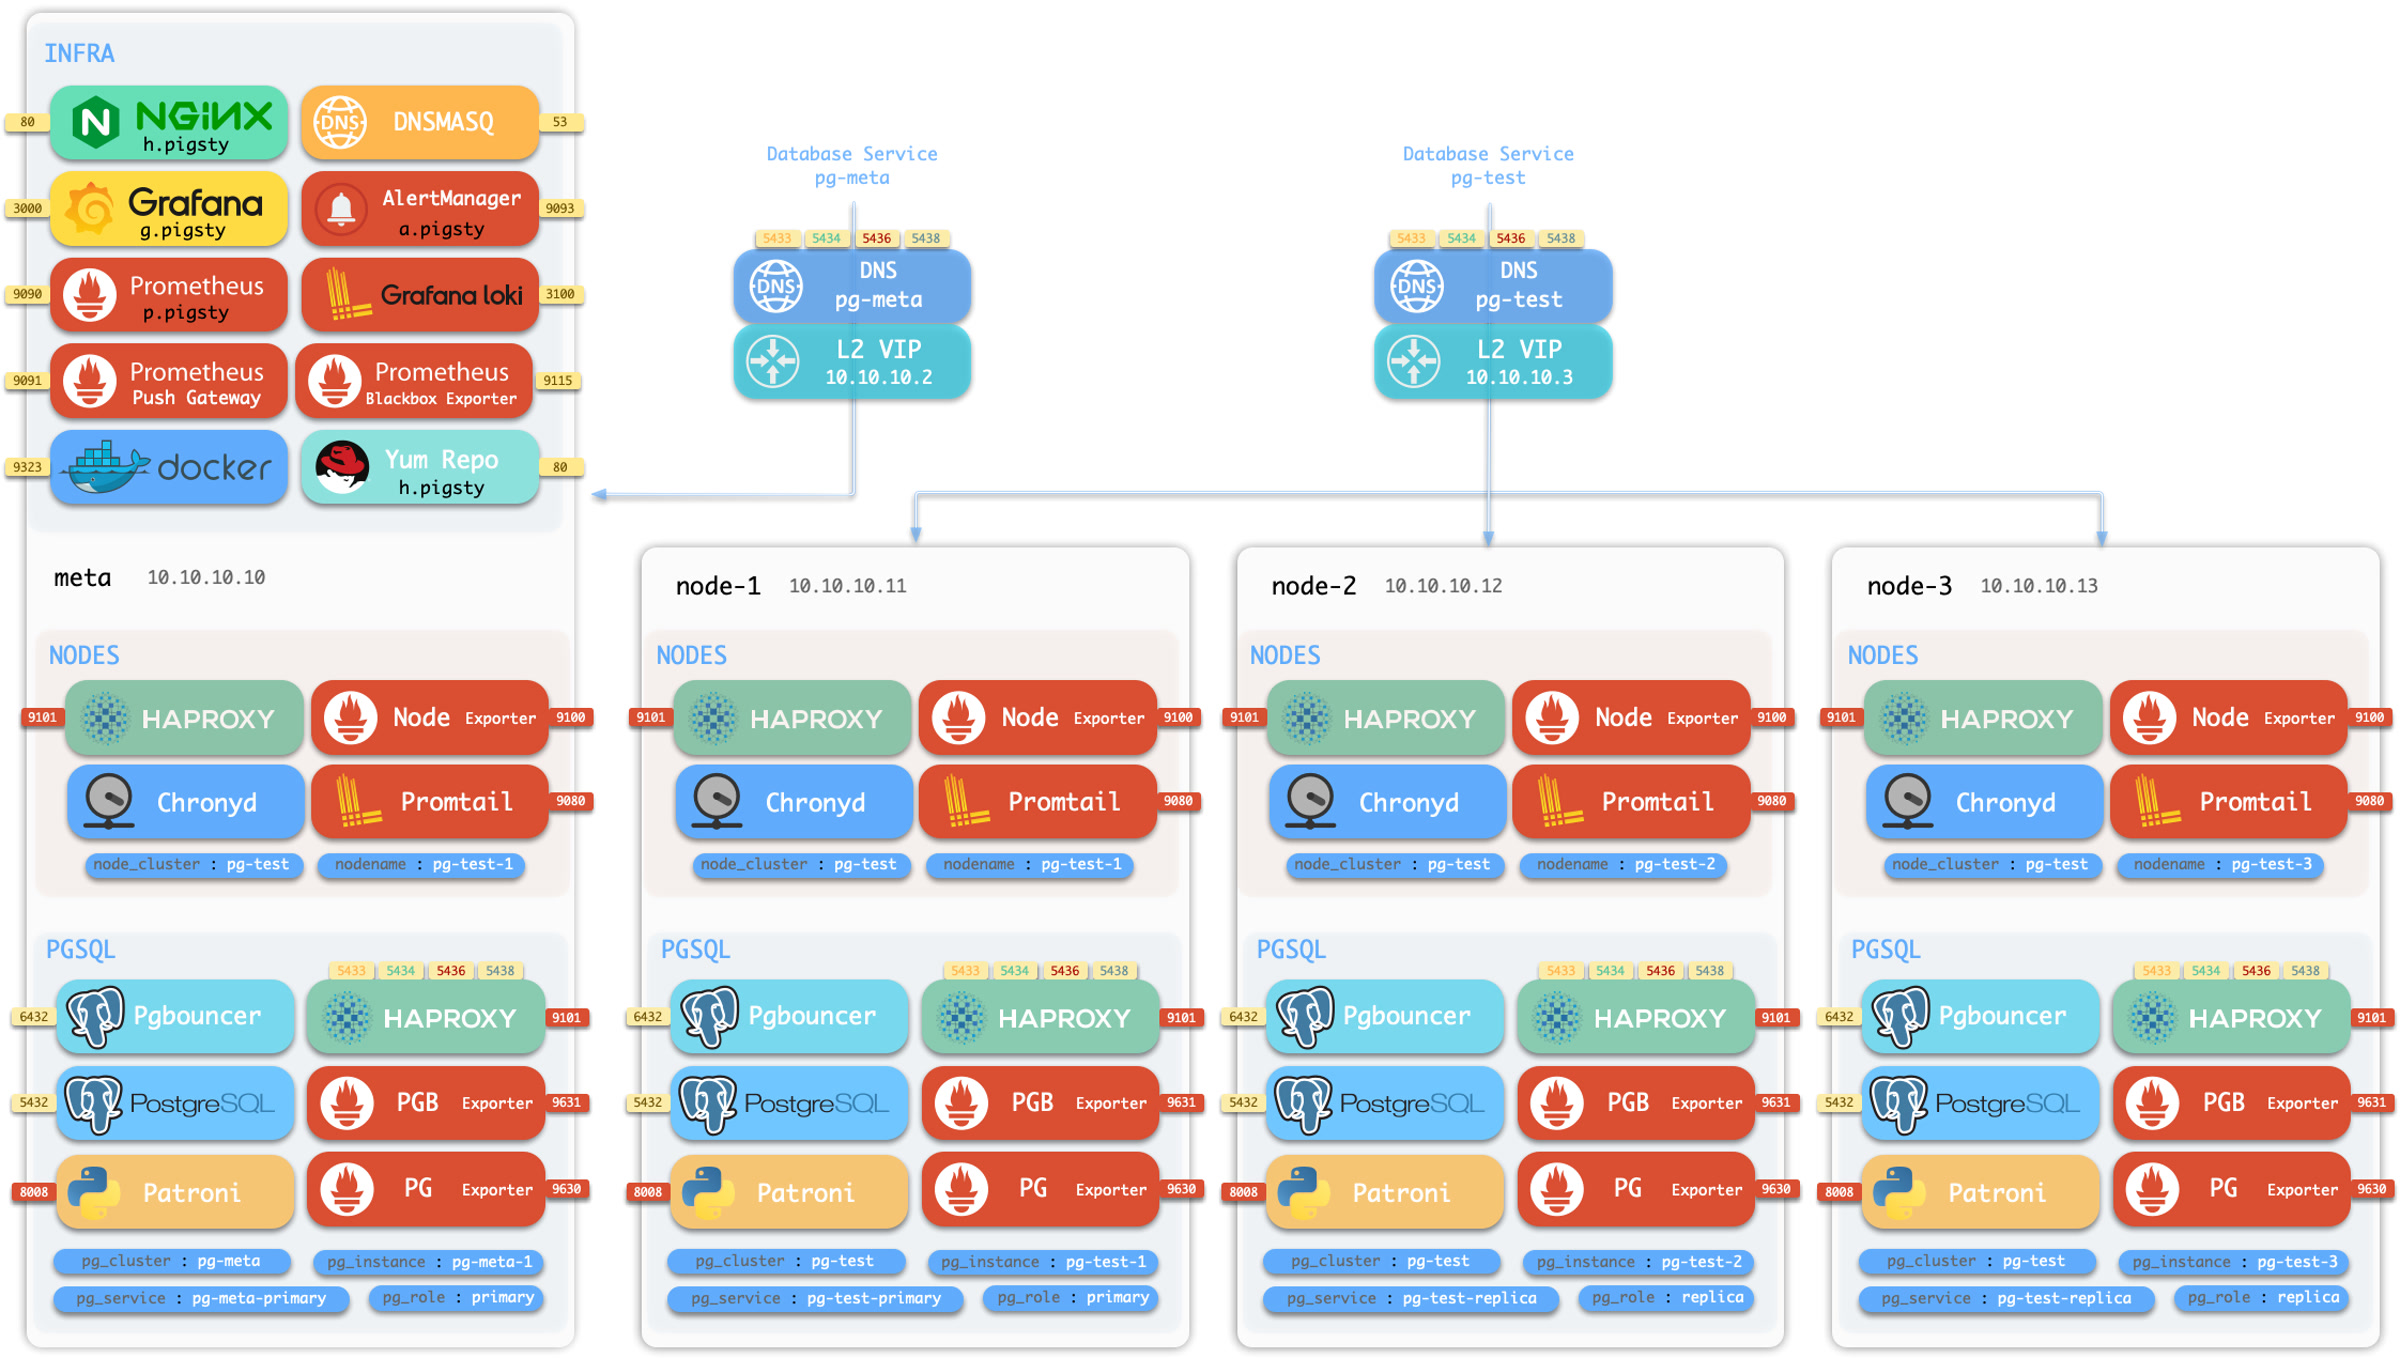
The sandbox consists of 4 nodes with fixed IP addresses and identities:
| ID | IP Address | NODE | PGSQL | INFRA | ETCD | MINIO |
|---|---|---|---|---|---|---|
| 1 | 10.10.10.10 |
meta |
pg-meta-1 |
infra-1 |
etcd-1 |
minio-1 |
| 2 | 10.10.10.11 |
node-1 |
pg-test-1 |
|||
| 3 | 10.10.10.12 |
node-2 |
pg-test-1 |
|||
| 4 | 10.10.10.13 |
node-3 |
pg-test-1 |
There’s a primary singleton PostgreSQL cluster: pg-meta on the meta node,
which can be used standalone, and there’s also an optional L2 VIP 10.10.10.2 and cluster DNS pg-meta bind to it.
There are three additional nodes in the sandbox, form a 3-instance PostgreSQL HA cluster pg-test.
With an optional L2 VIP 10.10.10.3 and cluster DNS pg-test bind to the cluster leader.
There’s also a 1-node etcd cluster, and 1-node minio cluster on the meta node, too.
You can create a local sandbox with Vagrant, or a cloud sandbox with Terraform.
To utilize local vagrant templates:
To utilize cloud terraform templates, use the spec/aliyun-full.tf as an example, Aliyun 4-node sandbox template for all distro & amd/arm.
Pigsty requires Linux environment, you can easily create local linux VMs with Vagrant.
You’ll also need a virtual machine provider, (like VirtualBox for laptops and libvirt for servers)
You can install vagrant, virtualbox, ansible on macOS with homebrew:
You are all set! use the make shortcuts to create VMs:
You have to define VMs in the Vagrantfile before launch.
The default Vagrantfile defines a el9 (bento/rockylinux-9) 1-node virtual machine with the local virtualbox VM provider.
vagrant/
spec/
VagrantfileWe have a list of pre-defined VM specs available in the vagrant/spec Folder
| Templates | Nodes | Spec | Comment | Alias |
|---|---|---|---|---|
| meta.rb | 1 node | 2c4g x 1 | Single Node Meta | Devbox |
| dual.rb | 2 node | 1c2g x 2 | Dual Nodes | |
| trio.rb | 3 node | 1c2G x 3 | Three Nodes | |
| full.rb | 4 node | 2c4g + 1c2g x 3 | Full-Featured 4 Node | Sandbox |
| simu.rb | 36 node | misc | Prod Env Simulation | Simubox |
| oss.rb | 3 node | 1c2g x 3 | 3-Node OSS Building Env | |
| pro.rb | 5 node | 1c2g x 5 | 5-Node PRO Building Env |
Each spec file contains a Specs variable describe VM nodes. For example, the full.rb contains:
You can use specs with the config script, it will render the Vagrantfile according to spec and environment variables (resouce, image, vm provider, etc…).
You can scale the resource unit with environment variable VM_SCALE, the default value is 1.
For example, VM_SCALE=2 vagrant/config meta will double the cpu / mem resources of the meta spec
You can create the VMs with vagrant up command after configuration.
Pigsty templates will use your ~/.ssh/id_rsa[.pub] as the default ssh key for vagrant provisioning.
Make sure you have a valid ssh key pair before you start, you can generate one by: ssh-keygen -t rsa -b 2048
There are some shortcuts that wrap the vagrant commands, you can use them to manage the VMs.
Pigsty currently uses the following vagrant boxes for testing:
Not all of them have arm64 arch support, so beware when using Apple Silicon MacOS.
You can find the supported Box Image on https://app.vagrantup.com/bento/boxes
It require extra setup to use the default 10.x.x.x CIDR as host-only networks
when using older version of virtualbox as vagrant provider: add it to /etc/vbox/networks.conf
Terraform is a popular IaC tool. You can create VMs on public cloud with one command.
Aliyun & AWS templates are used as example providers. You can take terraform.tf as an example.
You can install terraform with homebrew on macOS
Then init terraform cloud provider, adjust the terraform.tf config file and apply it:
Print public IP Address:
You have to set up aws config & credential to use AWS provider.
There’s a contrib example for AWS (Amazon Web Services), but it’s not actively maintained.
You can add your aliyun credentials to the environment file, such as ~/.bash_profile
Example config files:
Here are example ECS public OS images used in Aliyun:
| Distribution | Image Prefix | Image Prefix |
|---|---|---|
| CentOS 7.9 | centos_7_9_x64 |
rockylinux_8_10_arm6 |
| Rocky 8.10 | rockylinux_8_10_x64 |
rockylinux_9_6_arm64 |
| Rocky 9.6 | rockylinux_9_5_x64 |
|
| Debian 11.11 | debian_11_11_x64 |
|
| Debian 12.11 | debian_12_11_x64 |
debian_12_11_arm64 |
| Ubuntu 20.04 | ubuntu_20_04_x64 |
|
| Ubuntu 22.04 | ubuntu_22_04_x64 |
ubuntu_22_04_arm64 |
| Ubuntu 24.04 | ubuntu_24_04_x64 |
ubuntu_24_04_arm64 |
| Anolis 8.8 | anolisos_8_9_x64 |
There’s a contrib example for QCloud (Tencent Cloud), but it’s not actively maintained.