Values
    Why use Pigsty?
    The 8 core value propositions of Pigsty
This is the multi-page printable view of this section. .
Pigsty v4 was still a future preview at this freeze point; this archive documents the stable v3.7.0 release.
Postgres In Great STYle —— Postgres Infra Graphic Service Toolbox, Yours
Pigsty (/ˈpɪɡ staɪ/) is a Battery-Included, FOSS PostgreSQL Distribution as a Local-First RDS Alternative.
Why use Pigsty?
The 8 core value propositions of Pigsty
Key features, Highlights and Technical details
Architecture, Use Cases, Comparisons, and other references
License, Release, Community, News, Author, Service, etc...
Pigsty assembles all the superpowers from the PostgreSQL and Database world, provides everything you’ll need to build your own Data Infra.
Just use Postgres for Everything! and Self-Hosting it like a Pro!
Quick Start: Prepare an ssh-accessible node with fresh installed Linux,
run as user with nopass ssh and sudo privileges:
Download, Configure and Install. Pigsty Installed! You can add more nodes and database clusters later.
Explore the User Interface, check port 5432 for Postgres Service, port 3000 for grafana dashboards (userpass: admin / pigsty).
Install Pigsty on Linux Servers
Prepare Environment for Serious Deployment
Customize database clusters with Config Inventory
Manage your environment with Ansible Playbook
You can also wrap exotic PostgreSQL kernels into RDS: Citus, WiltonDB, IvorySQL, OpenHalo, Percona, OrioleDB, PolarDB, and Supabase.
Pigsty consists of multiple Modules. The PINE stack: PGSQL / INFRA / NODE / ETCD are REQUIRED for self-hosting Postgres RDS service.
HA PG Cluster with HA, PITR, IaC, ACL, Monitor, and 437 extensions
Nginx, Repo, DNS, NTP, Prometheus and Grafana stack for Observability
Enroll nodes into the desired state and monitor it, and VIP, HAProxy
Reliable distributive consensus storage (DCS), empowering PGSQL HA
Pigsty also has some OPTIONAL “Bonus” modules, which work well with PostgreSQL, and bring extra value to your data infrastructure.
S3 compatible object storage compatible, optional backup storage
High-performance in-memory cache, optional data structure server
Container runtime, optional for running stateless app and tools
MongoDB wire-protocol compatible on PostgreSQL, optional middleware
Pigsty is a PostgreSQL distribution: an open-source, local-first RDS-like solution. It isn't a database (DBMS), but rather a management tool, solution, and set of best practices. Think of a database as a car, a DBA as the driver, RDS as a taxi service, and Pigsty as self-driving software.
Database expertise is scarce and costly—you either hire expensive DBAs or pay a premium for cloud RDS. Now there's a new option: Pigsty (the "self-driving" equivalent). It lets you run databases without a dedicated DBA at under one-tenth the cost of typical RDS, while achieving greater performance and flexibility in a local cloud environment.
Pigsty packages hard-earned best practices from large, complex PostgreSQL deployments into a reproducible solution. It tackles everything: scalable installs, high availability, connection pooling, monitoring, backup/recovery, parameter tuning, IaC-based cluster management, one-click deployment, and automated ops—letting you avoid common pitfalls and reinventing the wheel.
Pigsty provides a richer feature set than most RDS offerings: 400+ extensions, support for 9+ Postgres kernels, a unique monitoring system, and proven architecture refined by top-tier enterprise use (Apple, Alibaba, Tantan). It's easy to use, deeply tested, and fueled by genuine passion—at a depth and maturity level typical RDS platforms can't match.
With Pigsty, you can run what's effectively a ¥400–¥1400/core/month RDS instance on bare-metal resources costing as little as ¥10/core/month—and skip paying a DBA's salary. At scale, total cost of ownership can drop by 90% or more. Pigsty slashes license, service, and personnel costs, so you can channel your budget where it really matters.
Pigsty integrates 400+ PG extensions for an all-in-Postgres approach—letting you replace Redis, Kafka, MySQL, Elasticsearch, vector databases, and even certain OLAP/big-data use cases with one stack. This boosts developer agility, cuts complexity, and enables self-serve DevOps without needing a dedicated DBA.
Pigsty's self-healing HA ensures you don't need to scramble when hardware fails—ops and DBAs can sleep easy. Advanced monitoring aids troubleshooting and performance tuning. IaC automates large-scale cluster management. Ops can double as DBAs, and DBAs skip heavy lifting to focus on high-value tasks—or just enjoy a tea break while learning PG.
Pigsty is primarily developed by @Vonng / Ruohang Feng, a PostgreSQL veteran with a decade of open-source contributions and production experience at Alibaba, Tantan, and Apple. He's the founder of a one-person company (YC China/MiraclePlus S22) offering professional postgres consultancy. He's also a top database/cloud KOL with over 100k followers.
Pigsty is one of the most active OSS projects in the PG ecosystem (OSSRank). It prevails in extension distribution and monitoring solutions, positioning itself as a challenger to cloud RDS. It's already in wide use across military, government, healthcare, internet, finance, and manufacturing sectors.
Pigsty was built for massive PostgreSQL clusters, but it's also optimized for simplicity. Even solo developers or small businesses without DBA skills can get going easily. Largest known production scale: 25k vCPUs at 4.5 million QPS over six years. Smallest: a 1c1g VM demo or dev box.
Pigsty focuses on Postgres best practices and integrates well with complementary open-source tools like Etcd, Redis, MinIO, DuckDB, Prometheus, FerretDB, Babelfish, IvorySQL, PolarDB, OrioleDB, OpenHalo, Supabase, Greenplum, Dify, Odoo, and more.
Massive production postgres deployment, self-hosting RDS, object storage, caching, data warehousing, Supabase, etc. It can run enterprise apps like Odoo, Dify, wikis, GitLab, or serve as a monitoring hub for existing nodes and DBMS. It also excels at combining multiple PG extensions, powering interactive data apps, data visualization, and websites.
Yes. Pigsty is 100% free software under the AGPLv3 license. You can use it freely for commercial purposes if you comply with that license. We value software freedom; for non-DBaaS/OEM use, we apply an Apache 2.0–like approach. See the license for details.
Pigsty itself is free, but we provide commercial subscriptions for those who want assurance and expert support. Subscriptions extend coverage to more OS/PG/CPU architectures, plus consultancy. This delivers top-tier technical expertise and solutions, saving you time, reducing risk, and covering tough issues.
Yes, under the AGPLv3 license—meaning any derivative work must be open-sourced. We reserve the right to pursue violations by public cloud/database vendors. If you prefer not to open-source derivatives, consider Pigsty Service Subscriptions, which provide explicit licensing and an AGPLv3 exemption for this scenario.
Quick start: Prepare an ssh-accessible node with fresh installed Linux,
run as user with nopass ssh and sudo privileges:
Download pigsty with:
Configure the inventory file according to your need. (CHANGE PASSWORDS in the generated pigsty.yml)
Install everything according to your config:
Pigsty Installed! Explore the User Interface, check port 5432 for Postgres Service, port 3000 for Grafana dashboards (admin / pigsty).
Setup current linux node, and download everything from the Internet
Setup multiple nodes for real high-available production environment.
Bootstrap from a local offline package when internet is not available.
Install essential packages for HA Postgres Cluster only, no monitoring.
Prepare node, network, storage, user, ssh, sudo, ansible, etc...
Check compatible linux distributions and availability matrix
Provision local linux virtual machines with vagrant / virtualbox
Provision cloud linux servers with terraform on cloud vendors
Provision cloud linux servers with terraform on cloud vendors
Describe the infra and clusters with declarative configs
Check compatible linux distributions and availability matrix
Security hardening and best practices for production environments
This is a one-node installation guide, check Multi-Node for real HA production setup.
Prepare an ssh-accessible node with Compatible Linux Distro,
run as user with nopass ssh and sudo:
    [**Download**](#download) pigsty with:

    ```bash
    curl -fsSL https://repo.pigsty.io/get | bash -s v3.7.0; cd ~/pigsty;
    ```
    [**Configure**](#configure) the [`pigsty.yml`](/docs/config/inventory) inventory file according to
    your need and environment.

    ```bash
    ./configure
    ```
    [**Install**](#install) everything according to your config:

    ```bash
    ./install.yml
    ```
Example: Singleton Installation on RockyLinux 9:
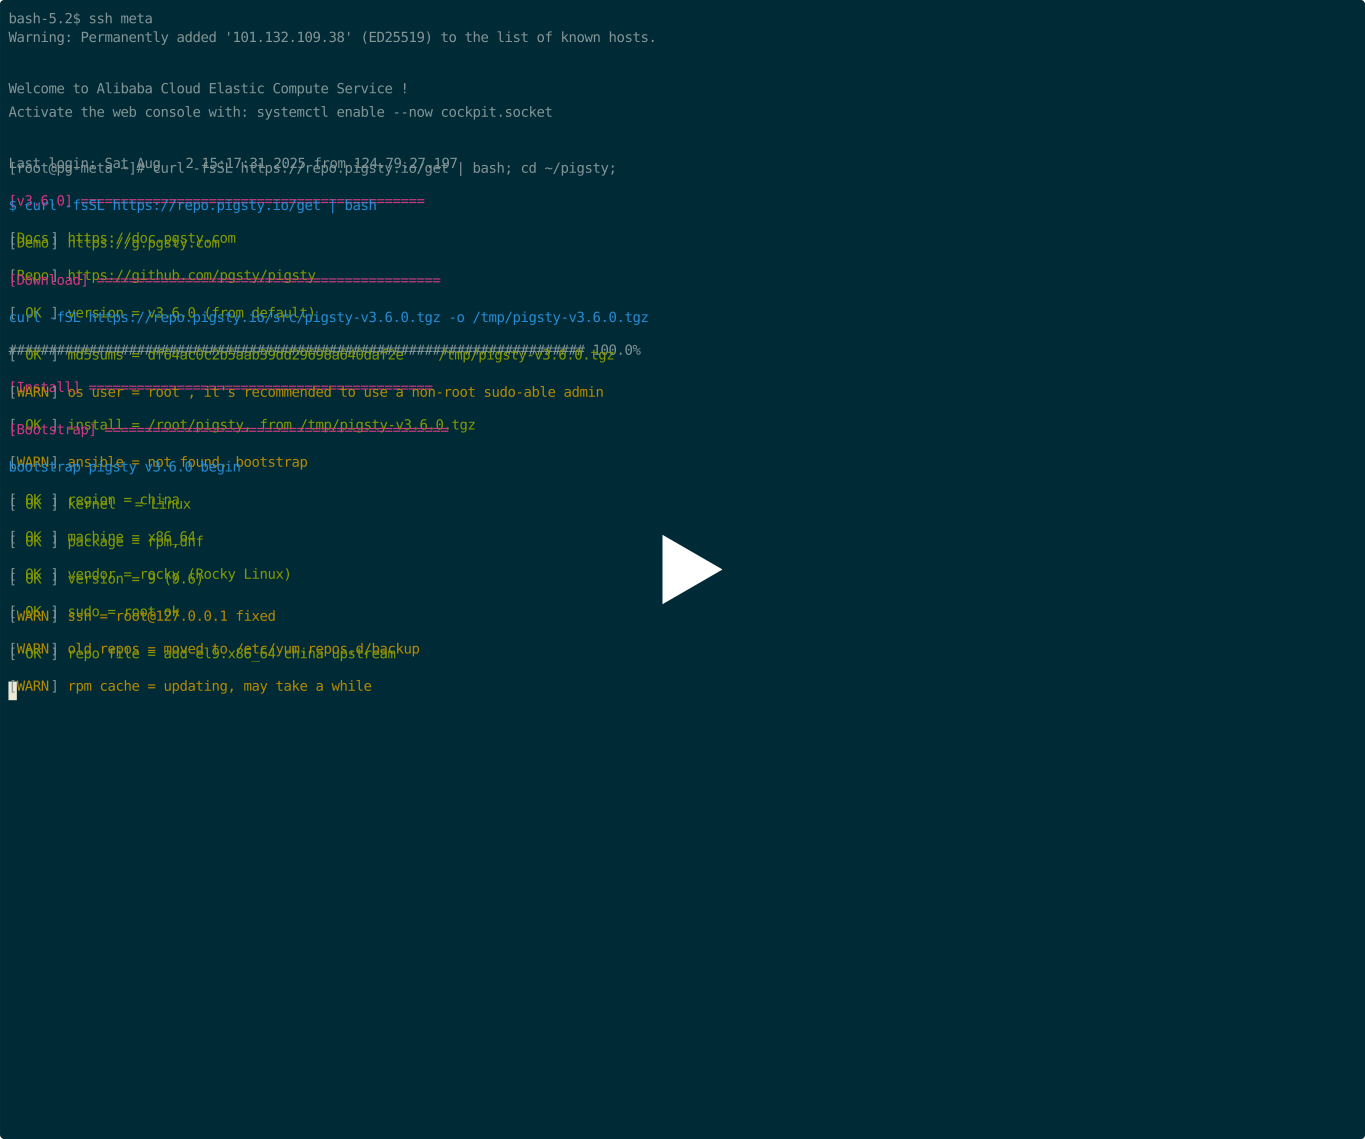
Check Preparation for all the details, here’s a quick summary:
| Item | Requirement | Item | Requirement |
|---|---|---|---|
| Node | 1C1G at least, 2C2G recommended |
Spec | 1 node at least, 2 for semi-HA, 3+ for real HA |
| Disk | /data, main mount point, ext4/xfs |
Network | static IPv4 address |
| VIP | Optional L2 VIP | Domain | Optional local / public domain names |
| Kernel | Linux |
Distro | el8-10, d12/13, u22/24 x x86_64 / aarch64 |
| Locale | C.UTF-8 or C |
Firewall | port: 80 / 443 / 22 / 5432 |
| User | avoid using root & postgres |
Sudo | nopass sudo privilege |
| SSH | nopass via public key |
Accessible | ssh <ip|alias> sudo ls without error |
(RECOMMENDED) You can get & extract the latest stable version of pigsty source with:
You can also install via git, pig, or download source & offline package tarball directly from GitHub.
pigsty/
The configure script will generate the pigsty.yml config file inventory with good defaults according to your environment and input.
It’s OPTIONAL, you can edit the pigsty.yml directly as the tutorial shows.
There are many Config Templates for your reference, here are some quick examples:
Let’s just do configure without any args, it may ask you for the primary IP if more than one is found.
This script will replace the IP placeholder 10.10.10.10 to the primary IPv4 address of current node.
Beware of this when you are configure pigsty manually. Check the generated pigsty.yml to proceed.
PLEASE CHANGE DEFAULT PASSWORDS in any serious deployment before install
Then change default passwords and make necessary adjustments, the final pigsty.yml may look like:
Just uncomment the following two parameters in pigsty.yml to make it looks like:
There are much more magic you can do with the config file, check the Configuration for details.
Everything in Pigsty is described in config inventory: the pigsty.yml blueprint generated above.
Run the install.yml playbook to materialize it into reality.
If you see something like pgsql init done or grafana datasource meta, PLAY RECAP or simlar stuff in the output, it means the installation is complete!
Sometimes upstream repo (like linux / pgdg repo) may break, this do happen from time to time, and led to installation failure. You can use pre-made offline packages to address this issue.
Re-run this playbook entirely will nuke (wipe-out) the current deployment and create a new one!
If you have enough knowledge with ansible and know what you are doing, still do it with caution!
Once installed, you can explore the Interface and deploy More Nodes and more HA database clusters.
You can deploy & monitor More Clusters with pigsty: add definition to the Inventory and run:
Remember that most modules require the NODE module installed first. Check available modules for detail
Once installed, you’ll have the four core modules:
PGSQL, INFRA, NODE, and ETCD on current node.
You can access WebUI services from the following Ports directly (not recommended for prod). Or use local / public Domain Names to access them via Nginx Portal. SSL Certs can only be used with domains.
| Component | Port | Domain | Comment | Public Demo |
|---|---|---|---|---|
| Nginx | 80/443 |
h.pigsty |
Portal, Repo, HAProxy Admin | home.pigsty.io |
| Grafana | 3000 |
g.pigsty |
Grafana Dashboards | g.pgsty.com |
| Prometheus | 9058 |
p.pigsty |
Prometheus Web UI | p.pigsty.io |
| AlertManager | 9059 |
a.pigsty |
Alert Management | a.pigsty.io |
You can access the default PostgreSQL database (meta) @ default port 5432 via the following users and corresponding PGURL:
For personal usage, you could just use the default superuser and IP:Port to access PostgreSQL:
The default database superuser is dbuser_dba, with DBUser.DBA as default password, use your own if changed.
| Username | dbuser_dba |
pg_admin_username |
|---|---|---|
| Password | DBUser.DBA |
pg_admin_password |
The built-in psql CLI is already configured with .pgpass and .pg_service.conf for the admin user
To access your database with graphical interface, you can use your favorite GUI tools, we also have some built-in templates.
| Name | Description | Pigsty Support |
|---|---|---|
| PgAdmin | Official PostgreSQL administration tool | Built-in Docker template, OSS |
| Supabase Studio | Fancy 3rd party UI for PostgreSQL management | Built-in Docker template, OSS |
| PgWeb | Lightweight web-based PostgreSQL client | Built-in Docker template, OSS |
| Bytebase | Schema migration tool with a good GUI | Built-in Docker template, OSS |
| DataGrip / IntelliJ | Professional database IDE with powerful features | Commercial / Community |
| Navicat | Popular commercial database management tool | Commercial |
| DBeaver | Open-source universal database GUI | OSS |
You can define business Database and User. These config templates has some pre-defined examples for your reference.
For example, the default meta config template has pre-defined a meta database with Pigsty CMDB schema (optional) and a vector extension.
It defines dbuser_meta as business admin user with DDL privilege, and a dbuser_view as read-only viewer user.
Which means you can also access the meta database with these two users:
To use HA PostgreSQL cluster in production environment, you’ll need to read the following documents to proceed:
In that case, your traffic is usually distributed by haproxy and pooled by pgbouncer before reaching the database.
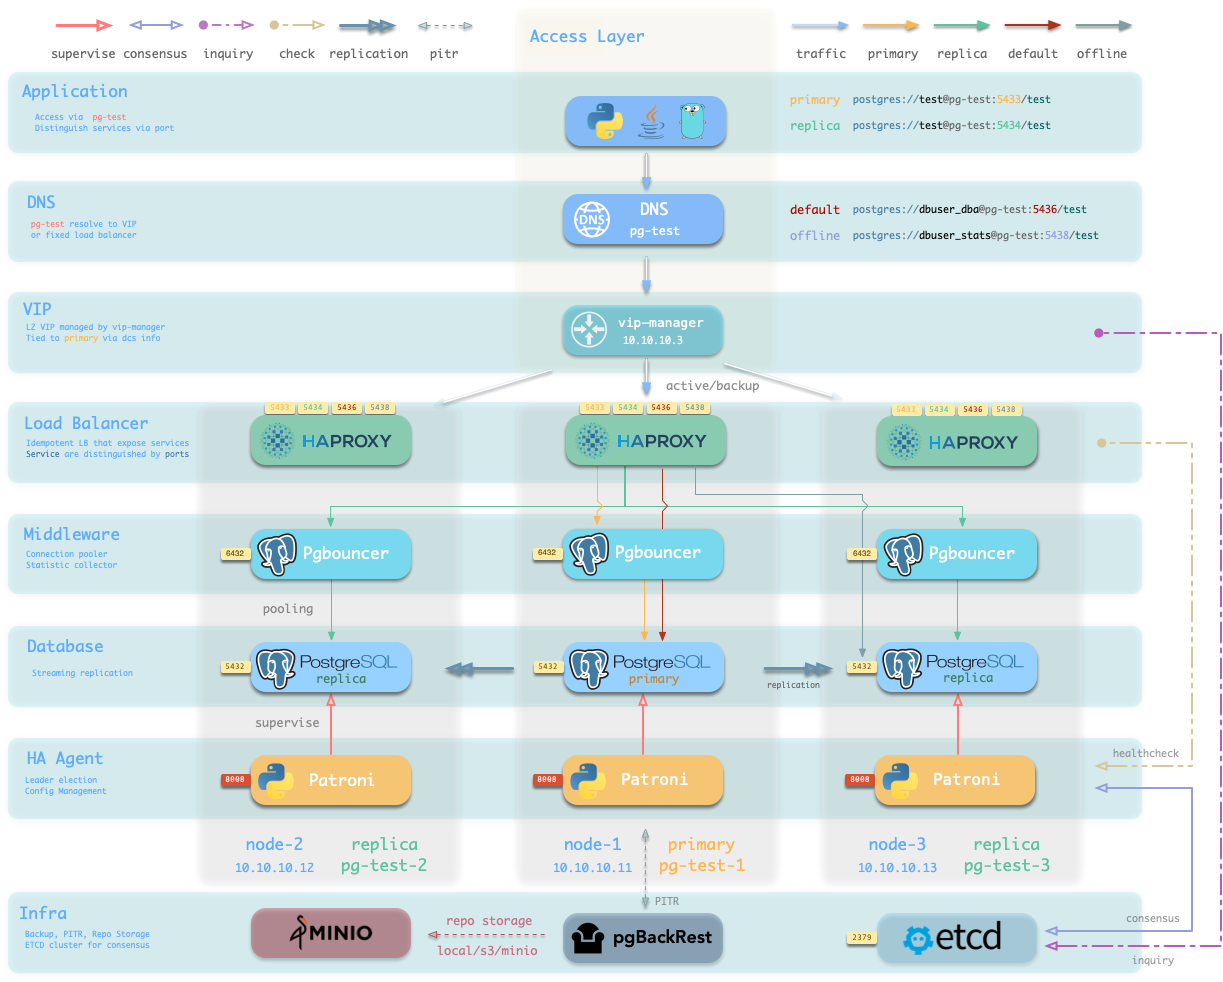
Grafana is the platform for monitoring and observability, it listens on port 3000 by default:
Pigsty support static local domain (fake) for web components, you can access Grafana via http://g.pigsty through Nginx
It’s advised to use domain names, Since you can expose all services via Nginx with domain names, and use SSL certs for them.
Default credential: admin:pigsty. If you have changed the default credentials, use your own.
| Username | admin |
grafana_admin_username |
|---|---|---|
| Password | pigsty |
grafana_admin_password |
You can check our public demo site to see what it looks like: https://g.pgsty.com
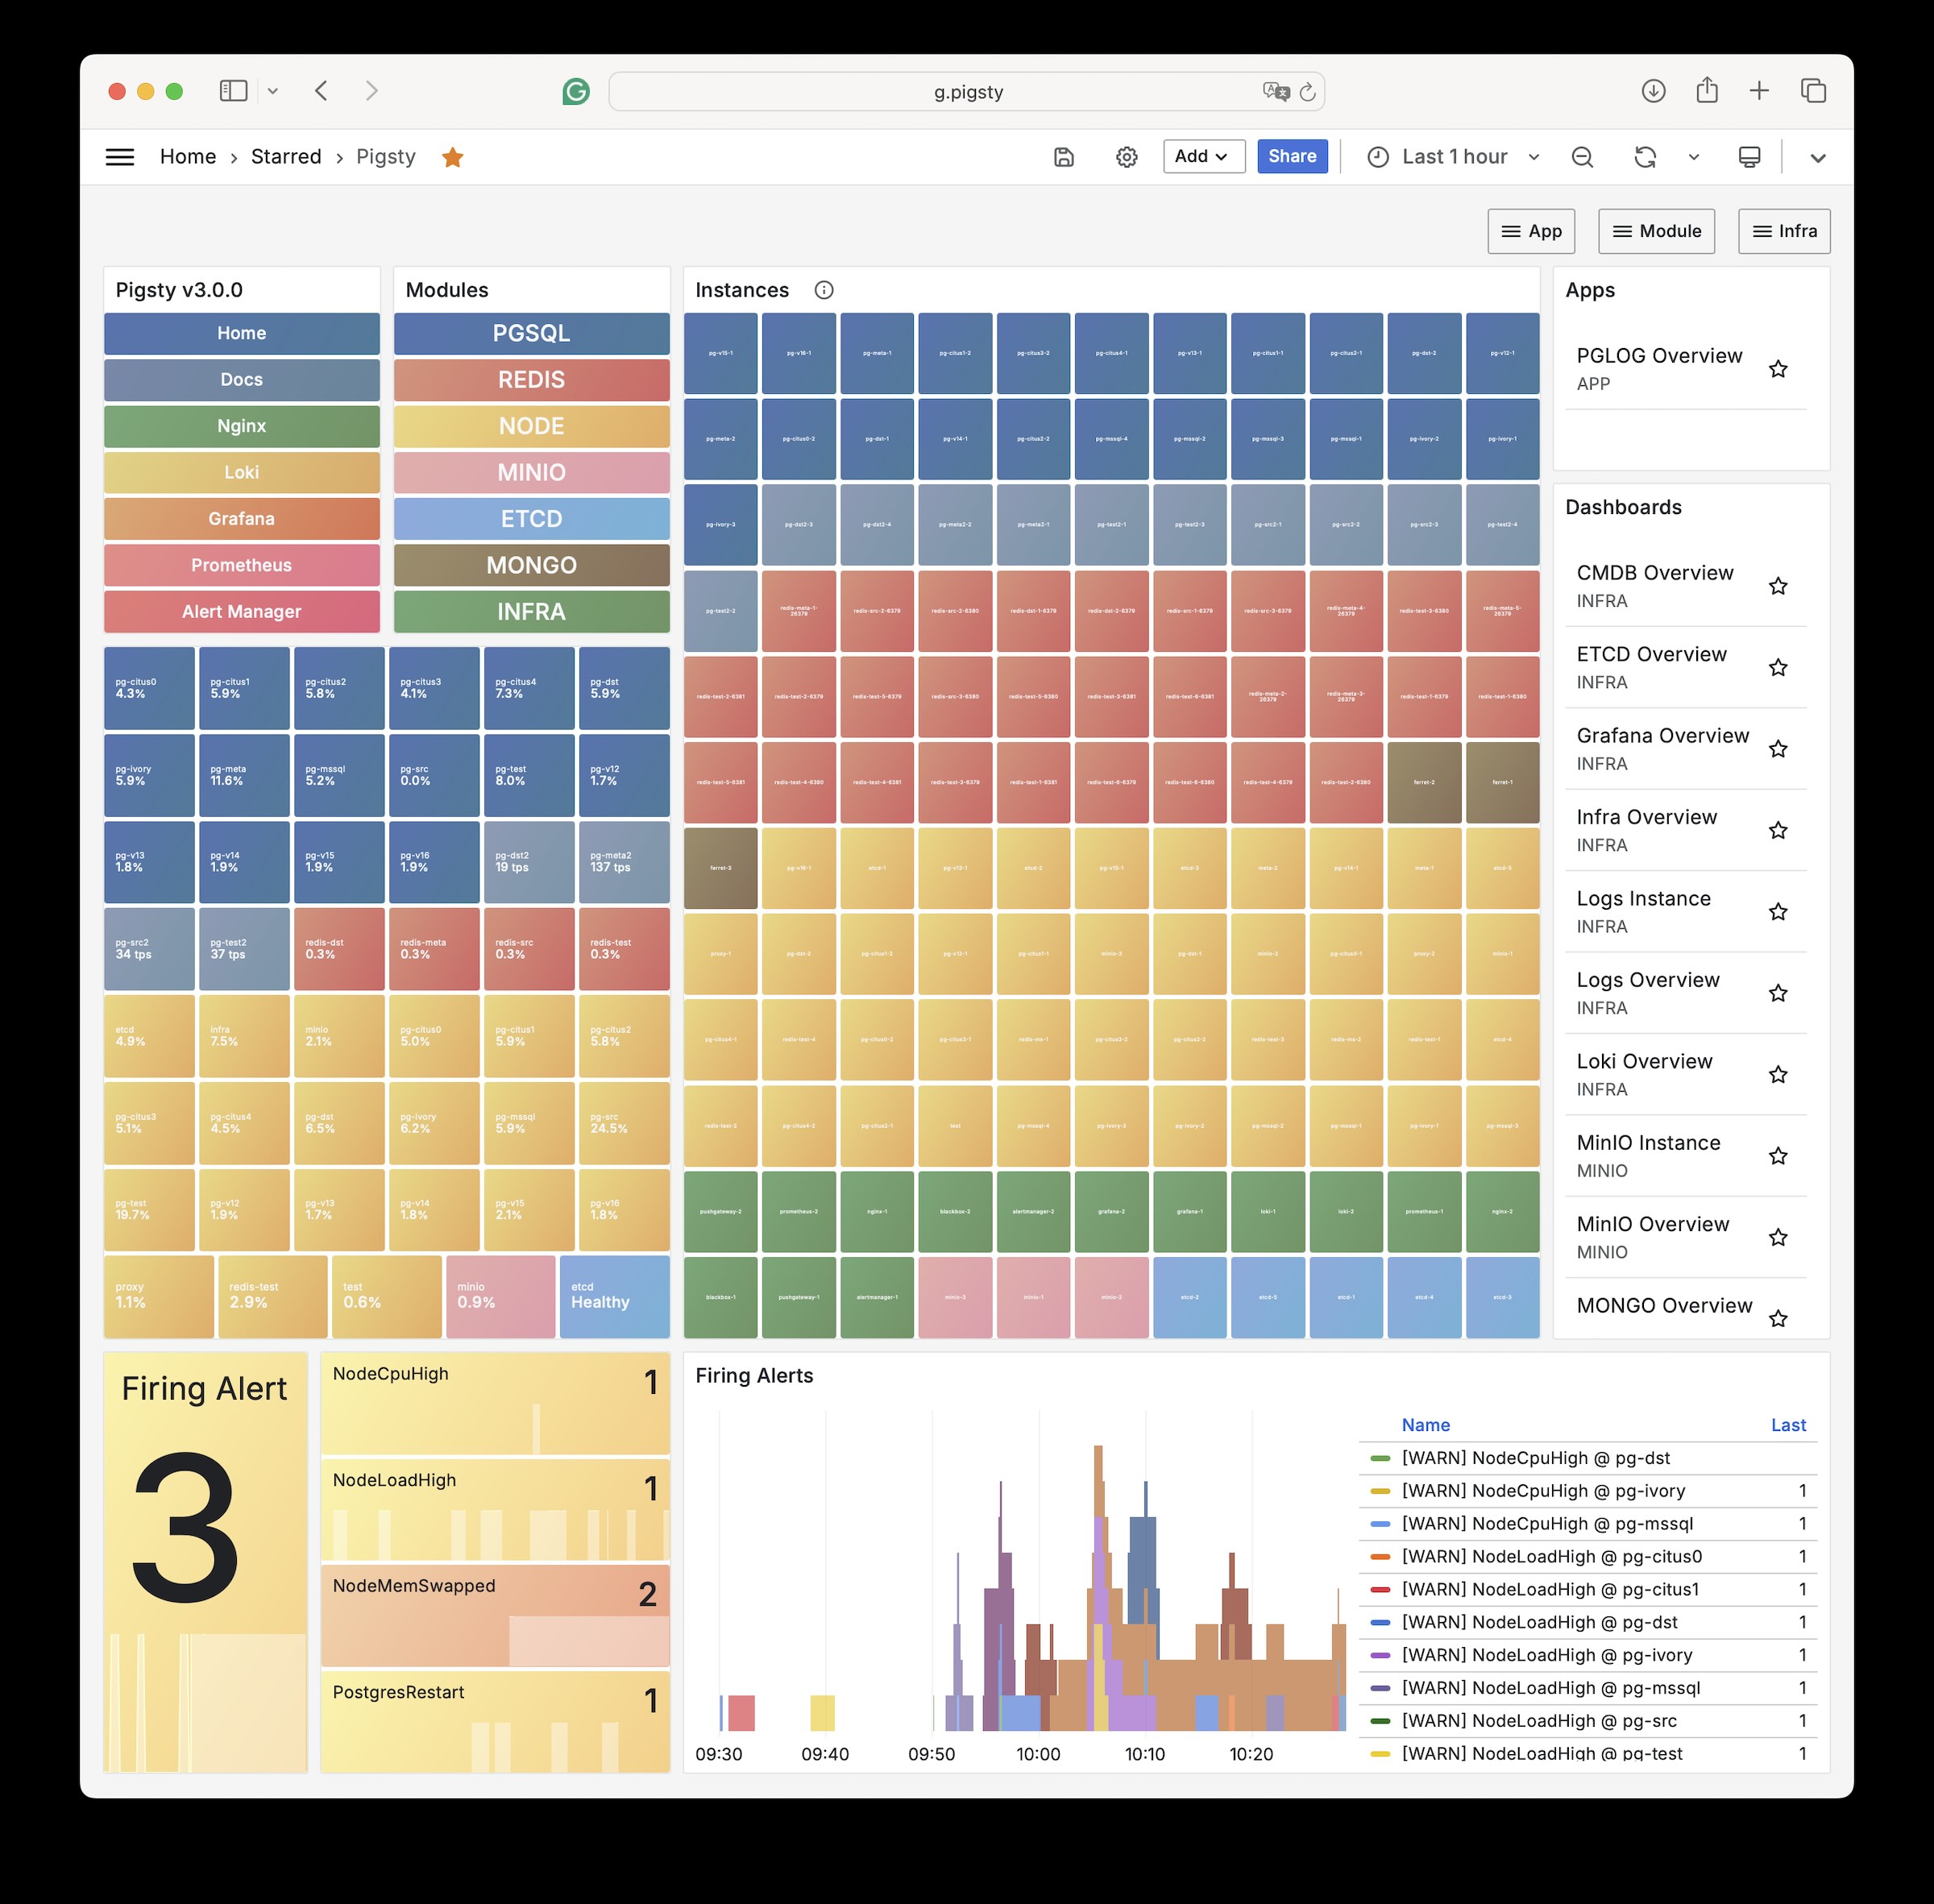
Pigsty issues self-signed SSL certs for local static domain names, but you’ll have to trust the self-signed CA in your browser.
Pigsty has support for using real domain names and SSL certs
Just replace domain entries in infra_portal, and use make cert to apply for real certs for free
There is a configuration Tutorial for expanding Pigsty from one node to multiple nodes. While the easiest way is always pre-planing everything and provisioning them in one-pass.
We already illustrated the 1-node installation in the Quick Start section, which may be the simplest setup.
It is not advised to put all the eggs in one basket, but even this one-node setup can be used for production, as long as an external MinIO / S3 / NFS… is configured for PG as remote backup repo.
There are lots of 1-node config templates for your reference.
And provision VM with Vagrant meta.rb
or Terraform meta.tf.
The semi-HA setup
A two-node setup enables database replication and semi-HA capabilities:
| ID | IP Address | NODE | PGSQL | INFRA | ETCD |
|---|---|---|---|---|---|
| 1 | 10.10.10.10 |
meta |
pg-meta-1 |
infra-1 |
etcd-1 |
| 2 | 10.10.10.11 |
node-1 |
pg-meta-2 |
While more robust than a single node setup, HA has limitations:
node-1 fails - manual promotion of node-2 requirednode-2 fails - node-1 gets promoted automaticallyThis “semi-HA” setup can only auto-recover from specific node failures.
You can use the dual.yml config template, and provision required VM with:
Vagrant dual.rb to provision this environment.
The true HA
A true HA setup that can automatically recover from any single node failure:
| ID | IP Address | NODE | PGSQL | INFRA | ETCD |
|---|---|---|---|---|---|
| 1 | 10.10.10.10 |
node-1 |
pg-meta-1 |
infra-1 |
etcd-1 |
| 2 | 10.10.10.11 |
node-2 |
pg-meta-2 |
infra-2 |
etcd-2 |
| 3 | 10.10.10.12 |
node-3 |
pg-meta-3 |
infra-3 |
etcd-3 |
You can use the trio.yml config template, and provision required VM with:
Vagrant trio.rb to provision this environment.
This is a sandbox demo environment used in Pigsty, which has one infra node and three extra data nodes:
| ID | IP Address | NODE | PGSQL | INFRA | ETCD | MINIO |
|---|---|---|---|---|---|---|
| 1 | 10.10.10.10 |
meta |
pg-meta-1 |
infra-1 |
etcd-1 |
minio-1 |
| 2 | 10.10.10.11 |
node-1 |
pg-test-1 |
|||
| 3 | 10.10.10.12 |
node-2 |
pg-test-1 |
|||
| 4 | 10.10.10.13 |
node-3 |
pg-test-1 |
You can use the full.yml config template, and provision required VM with:
Vagrant full.rb or Terraform full.tf to provision this environment.
This pro.yml is a 5-node building environment which contains supported Linux distros.
| ID | IP Address | NODE | PGSQL | INFRA | ETCD |
|---|---|---|---|---|---|
| 1 | 10.10.10.8 |
el8 |
el8-1 |
infra-1 |
|
| 2 | 10.10.10.9 |
el9 |
el9-1 |
infra-2 |
etcd-2 |
| 3 | 10.10.10.12 |
u12 |
u12-1 |
infra-3 |
|
| 4 | 10.10.10.22 |
u22 |
u22-1 |
infra-4 |
|
| 5 | 10.10.10.24 |
u24 |
u24-1 |
infra-5 |
You can use the Vagrant pro.rb or Terraform pro.tf to provision this environment.
A production simulation environment (simu.yml) with 36 nodes covering all Pigsty components
| IP Address | SPEC | NODE | PGSQL | INFRA | ETCD | MINIO | REDIS |
|---|---|---|---|---|---|---|---|
10.10.10.10 |
8C32G | meta1 |
pg-meta-1 |
infra-1 |
|||
10.10.10.11 |
8C32G | meta2 |
pg-meta-2 |
infra-2 |
|||
10.10.10.12 |
2C4G | pg12 |
pg-v12-1 |
||||
10.10.10.13 |
2C4G | pg13 |
pg-v13-1 |
||||
10.10.10.14 |
2C4G | pg14 |
pg-v14-1 |
||||
10.10.10.15 |
2C4G | pg15 |
pg-v15-1 |
||||
10.10.10.16 |
2C4G | pg16 |
pg-v16-1 |
||||
10.10.10.17 |
2C4G | pg17 |
pg-v17-1 |
||||
10.10.10.18 |
2C4G | proxy1 |
|||||
10.10.10.19 |
2C4G | proxy2 |
|||||
10.10.10.21 |
2C4G | minio1 |
etcd-1 |
minio-1 |
redis-meta-1 |
||
10.10.10.22 |
2C4G | minio2 |
etcd-2 |
minio-2 |
redis-meta-2 |
||
10.10.10.23 |
2C4G | minio3 |
etcd-3 |
minio-3 |
redis-meta-3 |
||
10.10.10.24 |
2C4G | minio4 |
etcd-4 |
minio-4 |
redis-meta-4 |
||
10.10.10.25 |
2C4G | minio5 |
etcd-5 |
minio-5 |
redis-meta-5 |
||
10.10.10.40 |
1C2G | node40 |
pg-pitr-1 |
||||
10.10.10.41 |
1C2G | node41 |
pg-test-1 |
redis-test-1 |
|||
10.10.10.42 |
1C2G | node42 |
pg-test-2 |
redis-test-2 |
|||
10.10.10.43 |
1C2G | node43 |
pg-test-3 |
redis-test-3 |
|||
10.10.10.44 |
1C2G | node44 |
pg-test-4 |
redis-test-4 |
|||
10.10.10.45 |
1C2G | node45 |
pg-src-1 |
redis-src-1 |
|||
10.10.10.46 |
1C2G | node46 |
pg-src-2 |
redis-src-2 |
|||
10.10.10.47 |
1C2G | node47 |
pg-src-3 |
redis-src-3 |
|||
10.10.10.48 |
1C2G | node48 |
pg-dst-1 |
redis-dst-1 |
|||
10.10.10.49 |
1C2G | node49 |
pg-dst-2 |
redis-dst-2 |
|||
10.10.10.50 |
1C2G | node50 |
pg-citus0-1 |
||||
10.10.10.51 |
1C2G | node51 |
pg-citus0-2 |
||||
10.10.10.52 |
1C2G | node52 |
pg-citus1-1 |
||||
10.10.10.53 |
1C2G | node53 |
pg-citus1-2 |
||||
10.10.10.54 |
1C2G | node54 |
pg-citus2-1 |
||||
10.10.10.55 |
1C2G | node55 |
pg-citus2-2 |
||||
10.10.10.56 |
1C2G | node56 |
pg-citus3-1 |
||||
10.10.10.57 |
1C2G | node57 |
pg-citus3-2 |
||||
10.10.10.58 |
1C2G | node58 |
pg-citus4-1 |
||||
10.10.10.59 |
1C2G | node59 |
pg-citus4-2 |
||||
10.10.10.88 |
4C8G | test |
You can use the Vagrant simu.rb to provision this environment.
You can run the entire simulation on a real server (72C / 256G) with libvirt as VM provider with vagrant.
pg13 - pg15, pg-src, pg-dst, pg-pitr, pg-testredis-src and redis-dst, and native cluster redis-testPigsty install from Internet upstream by default, while some environments are isolated from the Internet. To address this issue, Pigsty supports offline installation from offline packages.
Download the pigsty offline package, put it to `/tmp/pkg.tgz`
Download the pigsty source package, extract it (assume `~/pigsty`)
`cd ~/pigsty; ./bootstrap`, it will extract the pkg and use the local repo
`vi ~/pigsty.yml`, overwrite [`node_repo_modules`](/docs/node/param#node_repo_modules) to `local` to use the local repo
Run `./install.yml` as usual. it will install everything from the local repo.
Offline package packs all the required RPM/DEB packages and their dependencies; it is essentially a snapshot tarball of local APT / YUM repo, taken after a normal installation.
You can find these packages from the GitHub release page, for example:
We usually release offline packages for the following linux distro, with the latest OS minor version.
| EL Distribution | Code | Arch | OS Code | Package |
|---|---|---|---|---|
| RockyLinux 9.6 | EL9 | x86_64 | el9.x86_64 |
pigsty-pkg-v3.7.0.el9.x86_64.tgz |
| Ubuntu 24.04.2 | U24 | x86_64 | u24.x86_64 |
pigsty-pkg-v3.7.0.u24.x86_64.tgz |
| Debian 12.11 | D12 | x86_64 | d12.x86_64 |
pigsty-pkg-v3.7.0.d12.x86_64.tgz |
| RockyLinux 9.6 | EL9 | x86_64 | el9.aarch64 |
pigsty-pkg-v3.7.0.el9.aarch64.tgz |
| Ubuntu 24.04.2 | U24 | x86_64 | u24.aarch64 |
pigsty-pkg-v3.7.0.u24.aarch64.tgz |
| Debian 12.11 | D12 | x86_64 | d12.aarch64 |
pigsty-pkg-v3.7.0.d12.aarch64.tgz |
https://github.com/pgsty/pigsty/releases/download/v3.7.0/pigsty-pkg-v3.7.0.el9.x86_64.tgz
Using offline package on lower minor version may have a chance of success, but it is not guaranteed.
Place the offline package at /tmp/pkg.tgz, navigate to the ~/pigsty directory and execute ./bootstrap to extract and use the offline package.
Pigsty will extract it to /www/pigsty, configure the system repository list to enable this repository, and install ansible from it.
Since Pigsty v3.6, most configuration templates no longer build local software repositories by default, but install packages directly from Internet upstream.
A few configuration templates such as rich and full still retain the old behavior — building local repositories first before using them.
If you want to use the extracted and configured offline package in your own configuration, please modify the following settings:
repo_enabled: Set this to true to build local software repo (explicitly disabled in most templates)node_repo_modules: Set this to local to install from local software repo for all nodes in the env
node,infra,pgsql, which installs software packages directly from upstream repos.local will use the local repo alone, which is fastest and more reliable if applicable.local,node,infra,pgsqlIf you are using the exact same OS minor version above, using offline packages is advised.
The bootstrap script will automatically detect /tmp/pkg.tgz and extract it to /www/pigsty by default.
It will also set up the os package manager repo file and install ansible and other utils.
Bootstrap will wipe-out existing repo by default to ensure only the required repos are installed.
You can find them in /etc/yum.repos.d/backup (EL) or /etc/apt/backup (debian / ubuntu)
You can use the -k|--keep parameter to keep the existing repo files intact:
If your OS choice is not in the default offline package offering list,
you can make your own offline package with the built-in cache.yml playbook.
Find a node running exact same OS version with the Internet access
Run standard [online installation procedure](/docs/install) (use the `rich` template: `configure -c rich`)
`cd ~/pigsty; ./cache.yml`: make and fetch the offline package to `dist/${version}/`
Copy the offline package to the environment without Internet access (ftp, scp, usb,...)
Since Pigsty v3.6, most configuration templates install packages directly from Internet upstream, rather than downloading to the admin node first to build a local repository and then installing from it. You can restore the previous default behavior by adjusting parameters, which is useful if you need to build your own offline packages:
repo_enabled: set to true to build local software reponode_repo_modules: set to local to install from local repoSome configuration templates, such as rich and full, still retain the old behavior — building local repositories first before using them, so no adjustment is needed.
We offer paid service to make offline packages for precise Linux major.minor versions. ($30)
There’s a hybrid approach to using the offline package and do online install upon it. This could be useful if your OS repo is a local Intranet repo.
Let’s say you are using RockyLinux 9.5, but the official offline package is made for RockyLinux 9.6.
You can use the el9 offline packages, and run the make repo-build before the ./install.yml,
to force Pigsty to perform a repo build task (infra.repo).
If you want to use the latest version or resolve any dependency conflict, you can remove these rpm/deb and run make repo-build,
pigsty will re-download them from the upstream repo.
If you just want HA PostgreSQL itself, without monitoring, infra, etc…, consider the slim installation.
There’s no INFRA modules, no monitoring, no local repo Just ETCD & PGSQL and partial of NODE
To use slim installation, you need to:
Use the `slim.yml` config template (`configure -c slim`)
Run the `slim.yml` playbook instead of `install.yml`
Slim installation only installs these essential components:
| Component | Required | Description |
|---|---|---|
| patroni | REQUIRED | Bootstrap HA PostgreSQL cluster |
| etcd | REQUIRED | meta database dependency (DCS) for patroni |
| pgbouncer | OPTIONAL | Connection pooler for postgres |
| vip-manager | OPTIONAL | L2 VIP binding to postgres cluster leader |
| haproxy | OPTIONAL | Auto-routing service |
| chronyd | OPTIONAL | Time synchronization with NTP server |
| tuned | OPTIONAL | Node tuned template and kernel parameters management |
You can turn off the optional components, the only two required components are patroni and etcd.
Packages are directly installed from the Internet upstream repo, offline install is not applicable here.
Config file example: conf/slim.yml for slim installation:
Use the slim.yml playbook instead of the install.yml playbook:
The slim.yml playbook is designed to replace the install.yml playbook for the minimal installations.
Asciinema Videos: Vonng
Pigsty v3.6.0, RockyLinux 9.6, x86_64, Standard Installation, Link
This will use the default meta single-node configuration.
Pigsty v3.6.0, Ubuntu 24.04.2, x86_64, Rich Installation
Rich template has the following features enabled in addition to the standard installation:
Pigsty v3.6.0, Debian 12.11, aarch64, Slim Installation, Link
Postgres HA Cluster with essential modules, (with ETCD, without INFRA).
Pigsty v3.6.0, RockyLinux 9.6, aarch64, Slim Installation
Pigsty v3.6.0, Ubuntu 24.04, x86_64, Install Supabase
vi pigsty.yml
curl -fsSL https://repo.pigsty.cc/get | bash -s v3.6.0; cd ~/pigsty ./configure -c supabase # 使用 supabase 配置(请在 pigsty.yml 中更改凭据) vi pigsty.yml # 编辑域名、密码、密钥… ./install.yml # 安装 pigsty ./docker.yml # 安装 docker compose 组件 ./app.yml # 使用 docker 启动 supabase 无状态部分
Nodes, specs, disks, network, VIP, domain ...
List of supported Linux OS distributions
Locale, Firewall, Ansible, Pigsty...
User, Sudo, SSH, Accessibility...
You can leverage IaC tools such as Terraform and Vagrant to help you prepare the environment and do the chore.
Ansible 101, basic knowledge for pigsty users
The four-node sandbox for learning & testing
Provision local virtual machine with vagrant
Provision cloud servers with terraform
Here’s a checklist to help you prepare the environment for a serious Pigsty deployment in production environment.
| Item | Requirement | Item | Requirement |
|---|---|---|---|
| Node | 1C1G at least, 2C2G recommended, no upper limit |
Spec | 1 node at least, 2 for semi-HA, 3+ for real HA |
| Disk | /data, main mount point, ext4 or xfs |
Network | static intranet, IPv4 address, nice to have Internet access |
| VIP | Reserve an L2 IP for VIP (OPTIONAL) | Domain | Use local / public domain names (OPTIONAL) |
| Kernel | Linux, MacOS can be used as admin controller |
Distro | EL (8/9), Debian (12), Ubuntu (22/24), x86_64 / aarch64 |
| Locale | C.UTF-8 or C |
Firewall | port: 80 / 443 / 22 / 5432 |
| User | avoid using root & postgres |
Sudo | nopass sudo privilege |
| SSH | nopass via public key |
Accessible | ssh <ip|alias> sudo ls works |
Pigsty currently runs on nodes with Linux kernel and x86_64 / aarch64 architecture.
A “node” refers to a resource that is SSH accessible and offers a bare Linux OS environment.
It could be a physical machine, a virtual machine, or an OS-like container equipped with systemd, sudo and sshd.
It requires at least 1 node to deploy pigsty,
You can prepare more and setup everything in one-pass, or add them later.
The minimum node spec requirement is 1C1G, it is recommended to use at least 2C2G.
Higher is better, with no upper limit. Parameters will be automatically tuned based on available resource.
A functioning HA setup requires at least 3 nodes to work, or use 2 for a semi-HA setup
How many nodes do you need? It depends on your resource and your requirements.
A two-node setup enables database replication and semi-HA capabilities:
While more robust than a single node setup, HA has limitations:
node-1 fails - manual promotion of node-2 requirednode-2 fails - node-1 gets promoted automaticallyThis “semi-HA” setup can only auto-recover from specific node failures.
Pigsty will use /data as the default data directory, if you have a dedicated main data disk, it is recommended to mount it there,
and use /data1, /data2, /dataN for extra disk drivers.
If you are mounting it elsewhere, you’ll have to change the following parameters accordingly:
| Name | Description | Default |
|---|---|---|
node_data |
node main data directory | /data |
pg_fs_main |
postgres main data directory | /data |
pg_fs_backup |
postgres backup data directory | /data/backups |
etcd_data |
etcd data directory | /data/etcd |
prometheus_data |
prometheus data directory | /data/prometheus |
loki_data |
loki data directory | /data/loki |
minio_data |
minio data directory | /data/minio |
redis_fs_main |
redis data directory | /data/redis |
We recommend using ext4 or xfs as the filesystem for data disks. They have the best performance for PostgreSQL.
While ext4 has more tools for data recovery, xfs is more efficient for small files.
If you are running MinIO, It’s recommended to use xfs, otherwise, ext4 is recommended as the default option.
Pigsty requires static network to work, you should explicitly assign a fixed IPv4 address for each node.
The 127.0.0.1 could be used as a workaround in case of no fixed IP address in one-node installation.
The IP address will be used as the node’s unique identifier, it should be the primary IP address bind to the primary network interface used for internal network communications.
Using public IP addresses as node identifiers can cause security and connectivity issues.
To use the optional Node VIP and PG VIP features, ensure all nodes are located within the same L2 network
Internet access is required when performing the standard (online) installation. But pigsty can be offline installed via offline package, which does not require Internet access in this case.
Pigsty supports optional L2 VIP for NODE clusters (keepalived) and PGSQL clusters (vip-manager).
To use L2 VIP features, You have to explicitly assign an L2 VIP for them. It’s not a big deal when running on your own hardware, but may become an issue when working in a public cloud environment.
Pigsty using local static domain names for the following service with WebUI.
You can assign your custom domain names to these services, or use real domain names.
Just change them in the infra_portal.
| Domain | Name | Port | Component | Description |
|---|---|---|---|---|
h.pigsty |
home |
80/443 | Nginx | Default server, local repo |
g.pigsty |
grafana |
3000 | Grafana | Monitoring & visualization |
p.pigsty |
prometheus |
9058 | Prometheus | Time series DB |
a.pigsty |
alertmanager |
9059 | AlertManager | Alert aggregation & routing |
Domain names are optional, to use them, it is user’s responsibility to add the following records to your /etc/hosts file (local static resolution),
Or add them to your DNS server / public DNS vendor.
Pigsty works well on EL9, U24, D12, Recommended OS: RockyLinux 9.6, Ubuntu 24.04.2, Debian 12.11
| Distribution | Arch | Code | PG18 | PG17 | PG16 | PG15 | PG14 | PG13 |
|---|---|---|---|---|---|---|---|---|
| RHEL9 / Rocky9 / Alma9 | x86_64 | el9.x86_64 |
✓ | ✓ | ✓ | ✓ | ✓ | ✓ |
| RHEL9 / Rocky9 / Alma9 | aarch64 | el9.aarch64 |
✓ | ✓ | ✓ | ✓ | ✓ | ✓ |
Ubuntu 24.04 (noble) |
x86_64 | u24.x86_64 |
✓ | ✓ | ✓ | ✓ | ✓ | ✓ |
Ubuntu 24.04 (noble) |
aarch64 | u24.aarch64 |
✓ | ✓ | ✓ | ✓ | ✓ | ✓ |
Debian 12 (bookworm) |
x86_64 | d12.x86_64 |
✓ | ✓ | ✓ | ✓ | ✓ | ✓ |
Debian 12 (bookworm) |
aarch64 | d12.aarch64 |
✓ | ✓ | ✓ | ✓ | ✓ | ✓ |
Pigsty works on RHEL / Rocky / Alma / Anolis / CentOS 8, 9, 10.
| EL Distribution | Arch | Code | PG18 | PG17 | PG16 | PG15 | PG14 | PG13 |
|---|---|---|---|---|---|---|---|---|
| RHEL10 / Rocky10 / Alma10 | x86_64 | el10.x86_64 |
✓ | ✓ | ✓ | ✓ | ✓ | ✓ |
| RHEL10 / Rocky10 / Alma10 | aarch64 | el10.aarch64 |
✓ | ✓ | ✓ | ✓ | ✓ | ✓ |
| RHEL9 / Rocky9 / Alma9 | x86_64 | el9.x86_64 |
✓ | ✓ | ✓ | ✓ | ✓ | ✓ |
| RHEL9 / Rocky9 / Alma9 | aarch64 | el9.aarch64 |
✓ | ✓ | ✓ | ✓ | ✓ | ✓ |
| RHEL8 / Rocky8 / Alma8 | x86_64 | el8.x86_64 |
✓ | ✓ | ✓ | ✓ | ✓ | ✓ |
| RHEL8 / Rocky8 / Alma8 | aarch64 | el8.aarch64 |
✓ | ✓ | ✓ | ✓ | ✓ | ✓ |
| RHEL7 / CentOS7 | x86_64 | el7.x86_64 |
● | ● | ● | |||
| RHEL7 / CentOS7 | aarch64 | - |
For extended support on legacy os, consider our pro subscription.
Pigsty works on Ubuntu 24.04 / 22.04:
| Ubuntu Distribution | 架构 | 系统代码 | PG18 | PG17 | PG16 | PG15 | PG14 | PG13 |
|---|---|---|---|---|---|---|---|---|
Ubuntu 24.04 (noble) |
x86_64 | u24.x86_64 |
✓ | ✓ | ✓ | ✓ | ✓ | ✓ |
Ubuntu 24.04 (noble) |
aarch64 | u24.aarch64 |
✓ | ✓ | ✓ | ✓ | ✓ | ✓ |
Ubuntu 22.04 (jammy) |
x86_64 | u22.x86_64 |
✓ | ✓ | ✓ | ✓ | ✓ | ✓ |
Ubuntu 22.04 (jammy) |
aarch64 | u22.aarch64 |
✓ | ✓ | ✓ | ✓ | ✓ | ✓ |
Pigsty works on Debian 12 / 13, we recommend using the latest Debian 12.11
| Debian Distribution | Arch | Code | PG18 | PG17 | PG16 | PG15 | PG14 | PG13 |
|---|---|---|---|---|---|---|---|---|
Debian 13 (trixie) |
x86_64 | d13.x86_64 |
✓ | ✓ | ✓ | ✓ | ✓ | ✓ |
Debian 13 (trixie) |
aarch64 | d13.aarch64 |
✓ | ✓ | ✓ | ✓ | ✓ | ✓ |
Debian 12 (bookworm) |
x86_64 | d12.x86_64 |
✓ | ✓ | ✓ | ✓ | ✓ | ✓ |
Debian 12 (bookworm) |
aarch64 | d12.aarch64 |
✓ | ✓ | ✓ | ✓ | ✓ | ✓ |
Debian 11 (bullseye) |
x86_64 | d11.x86_64 |
● | ● | ● | ● | ||
Debian 11 (bullseye) |
aarch64 | - |
For extended support on legacy os, consider our pro subscription.
Pigsty runs on Linux Operating System, it supports 14 mainstream Linux distros: Compatible OS List
We recommend using RockyLinux 9.6, Debian 12.11, or Ubuntu 24.04.5 as the default OS options.
You can install pigsty on macOS, and initiate control from your local laptop with ansible. (use as admin node)
But the database / infra / node / etcd services are still running on Linux nodes.
We strongly recommend using a clean installed OS environment with en_US set as the primary language.
To ensure the en_US locale is available when using other primary language:
Pigsty DOES NOT use containers, main components are packed for specific distro major version.
Please use the same major and minor version of the OS on all nodes in a single deployment.
Pigsty suggests using ext4 or xfs file systems, both of which have the best performance for PostgreSQL use cases.
If you know what you are doing, you can also consider using file systems like zfs, but never run database services on network file systems like nfs.
If you need to use MinIO, it is recommended to use the xfs file system, which is the only file system recommended by MinIO.
It performs better in scenarios with a large number of small files, but the tool ecosystem (e.g., data recovery) is slightly inferior to ext4.
The default recommendation for running standard PostgreSQL services is to use the ext4 file system.
Your security policy and firewall setup should allow access to the required ports.
To access the WebUI services, you’ll have to allow the HTTP (80) / HTTPS (443) access.
To access the PostgreSQL database services, you’ll have to allow the 5432 port for postgres.
5432: PostgreSQL database6432: Pgbouncer Connection Pooler5433: PG Primary Service5434: PG Replica Service5436: PG Default Service5438: PG Offline ServiceIf you are accessing the postgres services via other ports, allow them accordingly
In a typical public cloud VPS setup, port 22/80/443/5432 are usually opened.
Exposing database service ports directly to the Internet is very dangerous. If you need to do this, consider consulting Security Best Practices and proceed with caution.
In a typical production setup, port 22/80/443 are opened to DBA/OPS from LAN / Jumpserver.
And other ports are accessed from intranet. You have to make sure they are opened internally: used ports.
Pigsty uses Ansible to initiate control from admin node to all managed nodes.
You don’t need to care about details, ansible is installed during the Bootstrap stage.
Ansible is only required on admin node, you can run ansible on macOS to use your laptop as admin node.
(RECOMMENDED) You can get & extract the latest stable version of pigsty source with:
To install a specific version, pass the version string as the first parameter:
You can also use git to clone the Pigsty source repo from GitHub:
The default main branch may in an unstable development status, git checkout v3.7.0 before using.
You can also download the pigsty src (pigsty-<version>.tar.gz) from GitHub Release Page manually:
If your environment does not have Internet access, consider downloading offline packages along with source tarball and upload them to your nodes.
Check Offline Installation for details.
Pigsty requires an OS user with passwordless ssh and sudo on all managed nodes.
Usually we’ll choose a name such as dba or admin for this purpose,
but avoid using root or postgres:
While possible, using root as admin user is not recommended for security reasons.
DBSU (postgres by default) should NOT be used as admin user.
It will cause unexpected security issues.
If you are using a different dbsu user, avoid using it as admin user as well.
The nopass requirement is optional if you can accept the password prompt for every ssh and sudo command.
You can use the -k|--ask-pass when running playbook to prompt for the ssh password.
And use -K|--ask-become-pass to prompt for the sudo password.
It’s user/vendor’s responsibility to create & deliver such an admin user during server provisioning stage. But if you don’t have such an admin user, or that user is restricted, you can create one with pigsty itself:
Assuming you have a root or existing admin user on the node, you can create an admin user with pigsty itself.
It will leverage the existing admin to create a new admin user.
It will create a dedicated dba (uid=88) user described by the following parameters,
with sudo / ssh properly configured.
| Name | Description | Default |
|---|---|---|
node_admin_enabled |
enable node admin user | true |
node_admin_uid |
uid of node admin user | 88 |
node_admin_username |
name of node admin user | dba |
All the admin user should have passwordless sudo privileges on all managed nodes.
In case you want to configure an admin user with passwordless sudo privileges from scratch:
To manually allow a user to execute sudo commands without password:
Create a sudoers file for your admin user (assume vagrant, replace with your name choice):
Assume your admin user name choice is dba, then /etc/sudoers.d/dba content would be
Ansible relies on sudo to execute commands with root privileges on managed nodes.
So on environments where sudo is not available (like inside a slim container), you may have to install sudo first.
Your current user should have nopass ssh access to all managed nodes as corresponding admin user.
Your current user can be the admin user itself, but not required as long as you can ssh as the admin user.
SSH configuration is Linux 101, but we will cover the basics here in case you are not familiar with it:
Generate an SSH key pair if you don’t have one
Pigsty will do that for you if you don’t have a key pair, during the bootstrap stage.
You’ll need to distribute your generated public key remote (and local) servers, and put
it into the ~/.ssh/authorized_keys file of the admin user on all nodes.
The ssh-copy-id util can be used.
Copy the public key to all managed nodes, ssh-copy-id or add to ~/.ssh/authorized_keys manually.
You can use sshpass tool to pass the password directly without prompting, but it’s dangerous:
When direct ssh access is not available (due to jumpserver, other port, credentials, etc…), consider:
Configure SSH aliases in ~/.ssh/config, and put custom parameters for the alias there.
And reference the alias in the inventory, use ansible_host to specify the real ssh alias.
SSH parameters can be used directly in ansible, Check Ansible Inventory Guide for details.
Your should be able to access all managed nodes with nopass ssh via your current user from admin node.
And the remote user (admin user) should have the privilege to run nopass sudo commands.
Run this command on admin node to all managed nodes:
if there’s no password prompt or error raised, nopass ssh/sudo is working as expected.
Pigsty has a sandbox, which is a 4-node deployment with fixed IP addresses and other identifiers.
We will use this as a standard demonstration environment for learning and testing purposes.
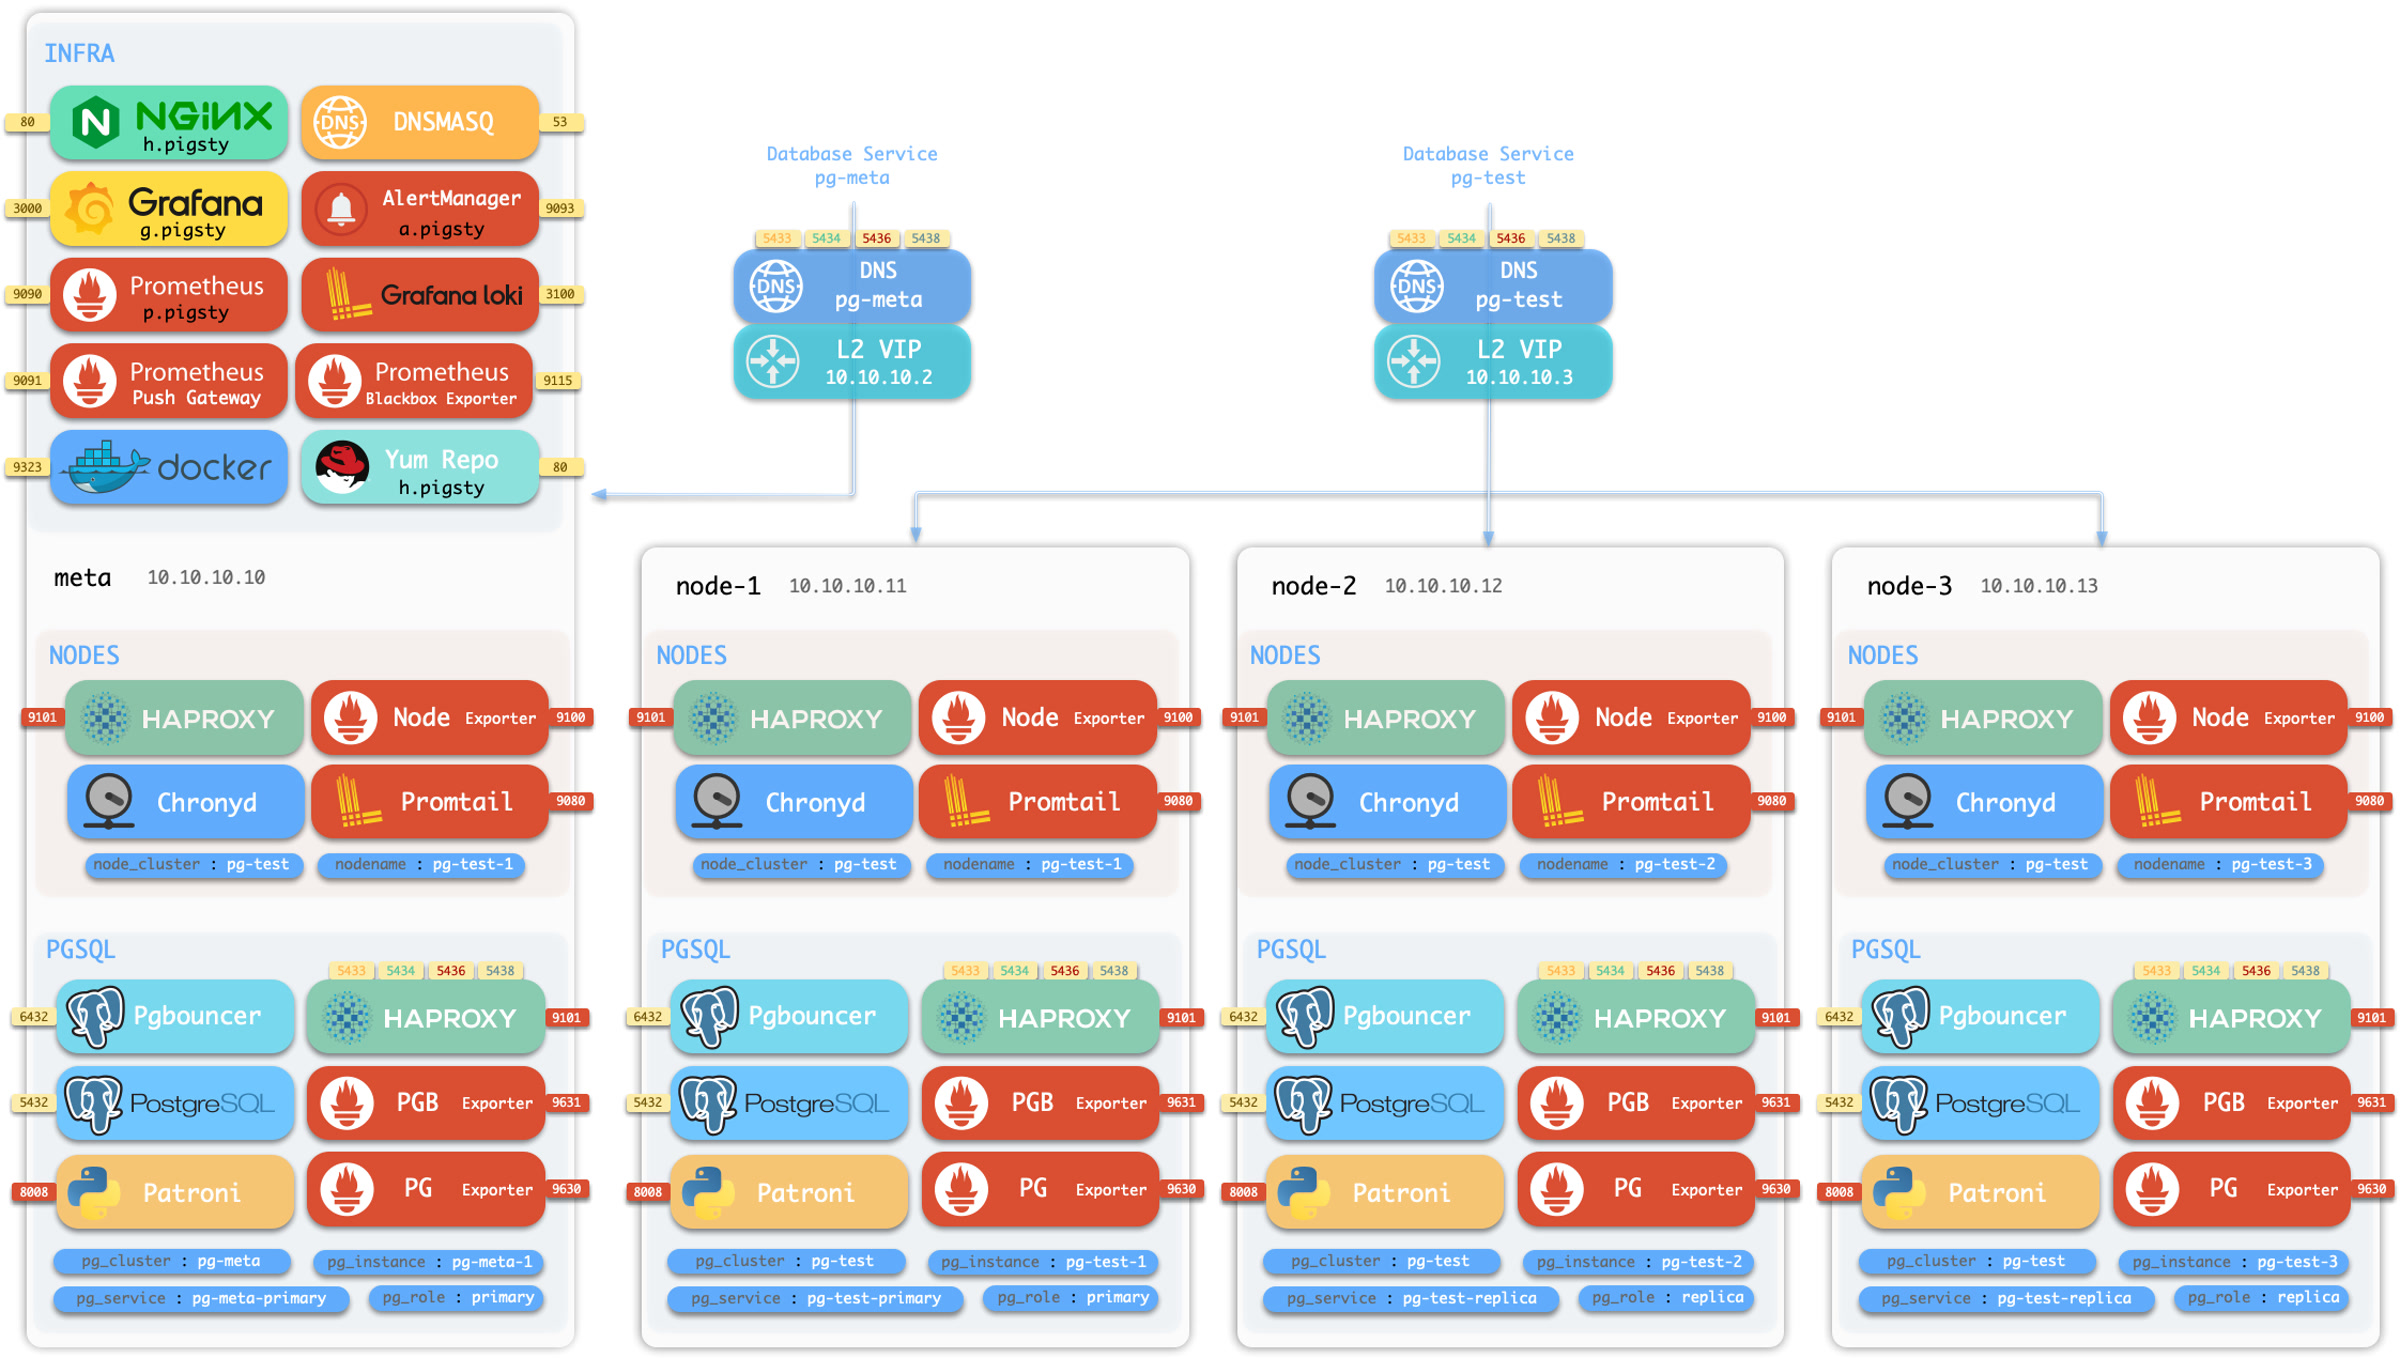
The sandbox consists of 4 nodes with fixed IP addresses and identities:
| ID | IP Address | NODE | PGSQL | INFRA | ETCD | MINIO |
|---|---|---|---|---|---|---|
| 1 | 10.10.10.10 |
meta |
pg-meta-1 |
infra-1 |
etcd-1 |
minio-1 |
| 2 | 10.10.10.11 |
node-1 |
pg-test-1 |
|||
| 3 | 10.10.10.12 |
node-2 |
pg-test-1 |
|||
| 4 | 10.10.10.13 |
node-3 |
pg-test-1 |
There’s a primary singleton PostgreSQL cluster: pg-meta on the meta node,
which can be used standalone, and there’s also an optional L2 VIP 10.10.10.2 and cluster DNS pg-meta bind to it.
There are three additional nodes in the sandbox, form a 3-instance PostgreSQL HA cluster pg-test.
With an optional L2 VIP 10.10.10.3 and cluster DNS pg-test bind to the cluster leader.
There’s also a 1-node etcd cluster, and 1-node minio cluster on the meta node, too.
You can create a local sandbox with Vagrant, or a cloud sandbox with Terraform.
To utilize local vagrant templates:
To utilize cloud terraform templates, use the spec/aliyun-full.tf as an example, Aliyun 4-node sandbox template for all distro & amd/arm.
Pigsty requires Linux environment, you can easily create local linux VMs with Vagrant.
You’ll also need a virtual machine provider, (like VirtualBox for laptops and libvirt for servers)
You can install vagrant, virtualbox, ansible on macOS with homebrew:
You are all set! use the make shortcuts to create VMs:
You have to define VMs in the Vagrantfile before launch.
The default Vagrantfile defines a el9 (bento/rockylinux-9) 1-node virtual machine with the local virtualbox VM provider.
vagrant/
spec/
VagrantfileWe have a list of pre-defined VM specs available in the vagrant/spec Folder
| Templates | Nodes | Spec | Comment | Alias |
|---|---|---|---|---|
| meta.rb | 1 node | 2c4g x 1 | Single Node Meta | Devbox |
| dual.rb | 2 node | 1c2g x 2 | Dual Nodes | |
| trio.rb | 3 node | 1c2G x 3 | Three Nodes | |
| full.rb | 4 node | 2c4g + 1c2g x 3 | Full-Featured 4 Node | Sandbox |
| simu.rb | 36 node | misc | Prod Env Simulation | Simubox |
| oss.rb | 3 node | 1c2g x 3 | 3-Node OSS Building Env | |
| pro.rb | 5 node | 1c2g x 5 | 5-Node PRO Building Env |
Each spec file contains a Specs variable describe VM nodes. For example, the full.rb contains:
You can use specs with the config script, it will render the Vagrantfile according to spec and environment variables (resouce, image, vm provider, etc…).
You can scale the resource unit with environment variable VM_SCALE, the default value is 1.
For example, VM_SCALE=2 vagrant/config meta will double the cpu / mem resources of the meta spec
You can create the VMs with vagrant up command after configuration.
Pigsty templates will use your ~/.ssh/id_rsa[.pub] as the default ssh key for vagrant provisioning.
Make sure you have a valid ssh key pair before you start, you can generate one by: ssh-keygen -t rsa -b 2048
There are some shortcuts that wrap the vagrant commands, you can use them to manage the VMs.
Pigsty currently uses the following vagrant boxes for testing:
Not all of them have arm64 arch support, so beware when using Apple Silicon MacOS.
You can find the supported Box Image on https://app.vagrantup.com/bento/boxes
It require extra setup to use the default 10.x.x.x CIDR as host-only networks
when using older version of virtualbox as vagrant provider: add it to /etc/vbox/networks.conf
Terraform is a popular IaC tool. You can create VMs on public cloud with one command.
Aliyun & AWS templates are used as example providers. You can take terraform.tf as an example.
You can install terraform with homebrew on macOS
Then init terraform cloud provider, adjust the terraform.tf config file and apply it:
Print public IP Address:
You have to set up aws config & credential to use AWS provider.
There’s a contrib example for AWS (Amazon Web Services), but it’s not actively maintained.
You can add your aliyun credentials to the environment file, such as ~/.bash_profile
Example config files:
Here are example ECS public OS images used in Aliyun:
| Distribution | Image Prefix | Image Prefix |
|---|---|---|
| CentOS 7.9 | centos_7_9_x64 |
rockylinux_8_10_arm6 |
| Rocky 8.10 | rockylinux_8_10_x64 |
rockylinux_9_6_arm64 |
| Rocky 9.6 | rockylinux_9_5_x64 |
|
| Debian 11.11 | debian_11_11_x64 |
|
| Debian 12.11 | debian_12_11_x64 |
debian_12_11_arm64 |
| Ubuntu 20.04 | ubuntu_20_04_x64 |
|
| Ubuntu 22.04 | ubuntu_22_04_x64 |
ubuntu_22_04_arm64 |
| Ubuntu 24.04 | ubuntu_24_04_x64 |
ubuntu_24_04_arm64 |
| Anolis 8.8 | anolisos_8_9_x64 |
There’s a contrib example for QCloud (Tencent Cloud), but it’s not actively maintained.
Pigsty treats Infra & Database as Code. You can describe everything with declarative config Inventory.
Which is usually an Ansible Inventory in YAML format: pigsty.yml.
But CMDB can also be used as dynamic inventory.
The configure procedure will generate a config according to your environment and input.
But it’s OPTIONAL: you can always edit the pigsty.yml file directly as tutorial shows.
And there are plenty of templates for your reference.
The main config file of Pigsty, Describe your entire deployment
Generate config file according to your input & environment
Planning your deployment according to business requirements
Available configuration templates and examples
Security considerations and best practices for prod deployment
Use PostgreSQL as CMDB instead of local YAML config file
PostgreSQL Cluster with HA, PITR, IaC, ACL, Monitoring, Pooling
Nginx, Repo, DNS, NTP, Prometheus and Grafana stack for Observability
Enroll nodes into the desired state and monitor it, and VIP, HAProxy
Reliable distributed consensus storage (DCS), empowering PGSQL HA
S3 compatible object storage, optional backup storage
High-performance in-memory cache, optional data structure server
Each pigsty deployment has a corresponding config inventory.
It could be stored in a local config file in YAML format, or dynamically generated from CMDB or any ansible compatible format.
Pigsty uses one monolith YAML config file by default, which is pigsty.yml, located in the pigsty home directory.
pigsty/
The configure script will generate the pigsty.yml file scaffold with good defaults according to your env and input,
but it’s OPTIONAL: you can always edit the pigsty.yml file directly as the tutorial shows.
The inventory consists of two parts: global vars & multiple groups. You can define new clusters in all.children.
And describe infra with global vars: all.vars. Which may look like this:
There are plenty of examples under conf/, which can also be used as templates during configure.
Each ansible group may represent a cluster, which could be a Node cluster, PostgreSQL cluster, Redis cluster, Etcd cluster, or Minio cluster, etc…
Cluster definition consists of two parts: hosts & vars.
You can define cluster members in <cls>.hosts and describe cluster with parameters in <cls>.vars.
Here’s an example of a 3-node HA PG cluster:
The vars in cluster level will override the global vars, and vars in host level will override the cluster vars and global vars.
Parameters are key-value pairs that define all entities in the deployment. The key is a string name, and the value can be one of five types: boolean, string, number, array, or object.
And parameters can be set at different levels with the following precedence:
| Level | Location | Description | Precedence |
|---|---|---|---|
| CLI Args | Command Line | via -e cli param arg |
Highest (5) |
| Host Vars | <group>.hosts.<host> |
Parameters specific to a single host | High (4) |
| Group Vars | <group>.vars |
Parameters shared by hosts in a group/cluster | Medium (3) |
| Global Vars | all.vars |
Parameters shared by all hosts | Low (2) |
| Defaults | <roles>/default/main.yml |
Role implementation default values | Lowest (1) |
Here are some examples about parameter precedence:
-e pg_version=16pg_role on Host Varspg_cluster on Group Vars.node_ntp_servers on Global Varspg_version is set, pigsty will use the default value from role implementation (18 by default)Every parameter has a proper default value except for mandatory IDENTITY PARAMETERS; they are used as identifiers and must be set explicitly.
Such as pg_cluster, pg_role, and pg_seq in above snippet.
Available parameters vary according to the modules:
Pigsty has 290+ parameters, check module parameters for details.
| Module | Section | Description | Count |
|---|---|---|---|
INFRA |
META |
Pigsty Metadata | 4 |
INFRA |
CA |
Self-Signed CA | 3 |
INFRA |
INFRA_ID |
Infra Portals & Identity | 2 |
INFRA |
REPO |
Local Software Repo | 9 |
INFRA |
INFRA_PACKAGE |
Infra Packages | 2 |
INFRA |
NGINX |
Nginx Web Server | 7 |
INFRA |
DNS |
DNSMASQ Nameserver | 3 |
INFRA |
PROMETHEUS |
Prometheus Stack | 18 |
INFRA |
GRAFANA |
Grafana Stack | 6 |
INFRA |
LOKI |
Loki Logging Service | 4 |
NODE |
NODE_ID |
Node Identity Parameters | 5 |
NODE |
NODE_DNS |
Node domain names & resolver | 6 |
NODE |
NODE_PACKAGE |
Node Repo & Packages | 5 |
NODE |
NODE_TUNE |
Node Tuning & Kernel features | 10 |
NODE |
NODE_ADMIN |
Admin User & Credentials | 7 |
NODE |
NODE_TIME |
Node Timezone, NTP, Crontabs | 5 |
NODE |
NODE_VIP |
Node Keepalived L2 VIP | 8 |
NODE |
HAPROXY |
HAProxy the load balancer | 10 |
NODE |
NODE_EXPORTER |
Node Monitoring Agent | 3 |
NODE |
PROMTAIL |
Promtail logging Agent | 4 |
DOCKER |
DOCKER |
Docker Daemon | 4 |
ETCD |
ETCD |
ETCD DCS Cluster | 10 |
MINIO |
MINIO |
MINIO S3 Object Storage | 15 |
REDIS |
REDIS |
Redis the key-value NoSQL cache | 20 |
PGSQL |
PG_ID |
PG Identity Parameters | 11 |
PGSQL |
PG_BUSINESS |
PG Business Object Definition | 12 |
PGSQL |
PG_INSTALL |
Install PG Packages & Extensions | 10 |
PGSQL |
PG_BOOTSTRAP |
Init HA PG Cluster with Patroni | 35 |
PGSQL |
PG_PROVISION |
Create in-database objects | 9 |
PGSQL |
PG_BACKUP |
Set Backup Repo with pgBackRest | 5 |
PGSQL |
PG_ACCESS |
Exposing service, bind vip, dns | 16 |
PGSQL |
PG_MONITOR |
Collect metrics & logs for Postgres | 18 |
PGSQL |
PG_EXPORTER |
Remove a Postgres cluster | 4 |
The configure script will generate the pigsty.yml config file inventory with good defaults according to your environment and input.
It’s OPTIONAL, you can edit the pigsty.yml directly as the tutorial shows.
pigsty/
The configure script is an interactive wizard unless -n|--non-interactive is specified.
| Option | Description |
|---|---|
-c|--conf |
Generate config from config templates according to this parameter |
-i|--ip |
Replace IP address placeholder 10.10.10.10 with given IP |
-v|--version |
Specify PostgreSQL major version number (13|14|15|16|17|18) |
-r|--region |
Set upstream repo mirror according to region (default|china|europe) |
-o|--output |
Write the generated inventory to this file (pigsty.yml by default) |
-x|--proxy |
Write current proxy env to the config proxy_env |
-s|--skip |
Skip interactive wizard and using default/arg values |
-n|--non-interactive |
Non-interactively mode |
-p|--port |
Specify SSH port (only used if set) |
configure output example:
If -c|--conf <template> is specified, it will generate the config file from the specified template. Such as meta, app/supa, etc…
If no config template is given, it will use the default 1-node config template meta.
If -i|--ip <ipaddr> is specified, it will replace the placeholder 10.10.10.10 in the config template with the given IP address.
Otherwise, if the current node has only one IP address, it will be used. If there are multiple IP addresses, it will ask you to input the primary IP address of current node manually.
If -v|--version is specified, it will use the specified PostgreSQL major version number, range from 13 to 18.
If no version is specified, it leaves the pg_version intact, which usually fallbacks to 18 by default.
If -r|--region is specified, it will use the specified region directly. The china mirror will be used where Google services are not accessible.
If -x|--proxy is specified, it will write the current proxy environment variables to the config proxy_env.
Will be reused during installation. Including: HTTP_PROXY, HTTPS_PROXY, ALL_PROXY, NO_PROXY.
If -s|--skip is specified, it will skip IP address replacement and ssh sudo privilege check
If -n|--non-interactive is specified, this script will not ask you for anything, but you have to specify a primary IP address with -i|--ip <ipaddr> explicitly.
If -p|--port is specified, it will use the specified SSH port instead of the default 22.
It is used when your local SSH port is not 22.
Pigsty will use C.UTF-8 as the default locale, If:
C.utf8 / C.utf-8 locale (locale -a)Otherwise, local C will be used by default.
Instead of using configure to generate config, you can write a pigsty config file from scratch manually.
Here is a tutorial to help you to build a complex config file inventory from scratch.
This is a minimal working config example, you have to tell pigsty the IP of admin node and infra node.
This will install INFRA and NODE module on 10.10.10.10 (change to your IP address).
You’ll have a complete observability stack with node monitoring. But database service is not running yet.
To provide PostgreSQL service, you have to define additional groups and install PGSQL & ETCD modules.
We add two new groups here: etcd and pg-meta, which defines an 1-node ETCD cluster and a 1-node PGSQL cluster.
Recreate everything with ./install.yml, or using these cmd to do incremental steps:
The PGSQL module depends on ETCD for HA consensus, so make sure to install ETCD module first.
Now we want to customize our postgres database cluster, with users, database, and backups:
We define some additional details at the pg-meta cluster level:
pg_users: define a new user dbuser_meta with password DBUser.Metapg_databases: define a new database meta with pigsty CMDB schema and vector extensionnode_crontab: define crontab that takes a full backup at 1 am every dayInstead of recreating everything with ./install.yml, we make changes incrementally:
You can install different major versions of PostgreSQL, and 437+ corresponding extensions.
Let’s install PostgreSQL 16 (instead of default 18) with timescaledb, postgis, and pgvector extensions.
repo_extra_packages: download timescaledb and postgis extensions.pg_libs: preload timescaledb, pg_stat_statements, auto_explain extensions.Let’s redownload missing packages (PG 16 kernel & extensions), remove the old cluster, and recreate it:
We can add 3 more nodes to this deployment.
Or add them one by one:
Now we want to add a new database cluster pg-test, with 3-node HA setup:
Pigsty’s working assumption is there’s only ONE postgres instance on each node. There’s no support to run multiple postgres instances on a single node.
Pigsty has optional Redis support, which is used as a cache in front of PostgreSQL.
Redis HA setup requires cluster mode, or sentinel infra, check Redis Config for details.
Pigsty has optional MinIO support, which is used as a backup storage for PostgreSQL.
Serious production MinIO deployment usually requires at least 4 nodes with 4 disks each (4N/16D)
Install docker on the infra group:
Check the App: Pgadmin for details on how to run pgAdmin with Pigsty. Short version:
Check the App: Supabase for details on how to run Supabase with Pigsty. Short version:
This directory conf contains pigsty config templates, which will be used during configure procedure.
Config templates can be designated using ./configure -c <conf>, where the conf is a relative path to conf directory (with or without .yml suffix).
e.g. the ~/pigsty/conf/rich.yml can be specified as rich
If no -c|--conf is given, the single-node meta config template will be automatically selected by default.
Here are one-node templates, which provide different features and configurations.
| Template | Node | Description |
|---|---|---|
meta.yml |
1 | Default 1-node config, pgsql, infra, node, etcd, minimal ext |
rich.yml |
1 | meta + minio + all extensions |
slim.yml |
1 | meta - infra - node monitor, minimal install |
fat.yml |
1 | PG 13-18 packages, and install all extensions for current ver |
Using exotic Postgres kernel forks:
| Template | Node | Description |
|---|---|---|
mssql.yml |
1 | WiltonDB & Babelfish with MSSQL wire-compatibility |
polar.yml |
1 | PolarDB for PostgreSQL with Aurora RAC Flavor |
ivory.yml |
1 | IvorySQL cluster with Oracle compatibility |
mysql.yml |
1 | Halo cluster with MySQL wire-compatibility |
mongo.yml |
1 | FerretDB & DocumentDB with Mongo wire-compatibility |
oriole.yml |
1 | OrioleDB cluster with OLTP enhancement |
| Template | Node | Description |
|---|---|---|
dual.yml |
2 | Semi-HA deployment |
trio.yml |
3 | Standard HA deployment |
full.yml |
4 | Sandbox deployment |
safe.yml |
4 | Security enhancement with delayed replica |
simu.yml |
36 | Production simulation |
| Template | Description |
|---|---|
app/supa.yml |
Launch 1-node supabase |
app/odoo.yml |
Launch the odoo ERP system |
app/dify.yml |
Launch the dify AI workflow system |
app/electric.yml |
Launch the electric sync engine app |
| Template | Description |
|---|---|
demo/el.yml |
Config file with all default parameters for EL 8/9/10 systems |
demo/debian.yml |
Config file with all default parameters for debian/ubuntu systems |
demo/remote.yml |
Example config for monitoring a remote pgsql cluster or RDS PG |
demo/redis.yml |
Example config for redis clusters |
demo/minio.yml |
Example config for a 3-node minio clusters |
demo/demo.yml |
Config file for the pigsty public demo |
citus.yml |
Citus cluster example: 1 coordinator and 3 data nodes (4-node) |
| Template | Description |
|---|---|
build/oss.yml |
Building config for EL 8, 9, Debian 12, and Ubuntu 22.04/24.04 OSS |
build/pro.yml |
Building config for EL 7-10, Ubuntu, Debian pro version |
Pigsty already provides a secure-by-default database authentication and access control model.
It is strong enough for most common scenarios, as long as you follow the security best-practices below.
pigsty.yml hold very sensitive information like passwords~/pigsty/files/pki/ca/ca.key by defaultAlways change these default passwords in serious deployment
grafana_admin_password: pigstypg_admin_password: DBUser.DBApg_monitor_password: DBUser.Monitorpg_replication_password: DBUser.Replicatorpatroni_password: Patroni.APIhaproxy_admin_password: pigstyminio_secret_key: minioadminIf you are using MinIO as backup storage, also change these credentials:
minio_users.[pgbackrest].secret_keypgbackrest_repo.minio.s3_key_secret$lib/passwordcheck to pg_libs to enforce password policy.passwordcheck_cracklibpgbackrest_repo definition repo_cipher_typecipher_type: aes-256-cbc by defaultpg_pwd_enc default scram-sha-256 instead of legacy md5scram-sha-256, md5 is deprecatedYou can set an expiry date for each user for compliance purposes.
Don’t forget to refresh these expiry dates periodically with pgsql-user.yml playbook
pg_listen address is 0.0.0.0, which is all IPv4 addresses.pg_listen: '${ip},${vip},${lo}' to bind to specific addresses for better security.redis_bind_address to listen on intranet IP.safe.ymlrestapi.allowlistnginx_sslmode, which is enable by default.infra_portal..domain.patroni_ssl_enabled is disabled by defaultpgbouncer_sslmode is disable by defaultcrit.yml templates for pg_conf will trade some availability for the best consistency.set node_tune to crit to reduce dirty page ratio.
Enable data checksum to detect silent data corruption.
pg_checksum is enabled by default in v3.7.0
This can be enabled later, which requires a full cluster scan/stop.
log_connections and log_disconnections after the pg cluster bootstrap.crit.yml by default.Running install.yml again will nuke (overwrite) the entire deployment!
It will OVERWRITE existing PostgreSQL by default before v3.5.
Use pg_safeguard to avoid fat fingers
Pigsty allows you to use a database (CMDB) as a dynamic configuration source instead of a static configuration file. You can use the built-in PostgreSQL as config inventory for config management.
With Postgres CMDB, configuration is organized in structured relational tables, which can be easily queried and manipulated using SQL. This allows for easier integration with other systems and tools.
Ansible allows you to use a dynamic inventory script to generate the inventory config on-the-fly.
The idea is to replace static pigsty.yml in ansible.cfg with a dynamic shell script inventory.sh
The content of inventory.sh is very simple, it will query the PostgreSQL CMDB and retrieve config.
bin/inventory_load: Loads YAML config file into the CMDBbin/inventory_cmdb: Use CMDB as config inventory (meta.pigsty)bin/inventory_conf: Use YAML file as config inventory (pigsty.yml)The CMDB baseline schema is shipped with pigsty: files/cmdb.sql
And most of the default config templates will use it as example baseline. Which means it can be used by default.
CMDB is empty by default, load config file into the CMDB with the bin/inventory_load script.
Run bin/inventory_load without arguments will load the default pigsty.yml into the default CMDB.
Use -p to specify the config file path, and -d to specify the CMDB URL.
You can switch to dynamic CMDB inventory with:
Which essentially changes the inventory parameter in the ansible.cfg to use the inventory.sh script.
Run admin commands with ansible
Built-in playbooks in Pigsty
Introduction to grafana dashboards
Introduction to prometheus & alertmanager
Nginx Portal for WebUI services
Manage local APT / YUM repository
Use local / public domain names
Use self-signed or real HTTPS certificates
PostgreSQL Cluster with HA, PITR, IaC, ACL, Monitoring, Pooling
Nginx, Repo, DNS, NTP, Prometheus and Grafana stack for Observability
Enroll nodes into the desired state and monitor it, and VIP, HAProxy
Reliable distributed consensus storage (DCS), empowering PGSQL HA
S3 compatible object storage, optional backup storage
High-performance in-memory cache, optional data structure server
Pigsty implements admin controllers with Ansible, which is an open source automation tool for managing large-scale infrastructure in an Infra-as-Code (IaC) manner. Widely used in the industry by operators.
Pigsty will try its best to install ansible and its dependencies during bootstrap.
But you can always install it manually, it is available on most OS’s official repos and can be installed with one command.
Playbooks also require a weak dependency: the jmespath python package.
Beware that el10 epel does not offer the ansible package, which is fixed by Pigsty PGDG el10 repo
Ansible is available on macOS too. You can install Ansible on your Mac with Homebrew. And use it as the admin node to manage remote cloud server. It’s convenient if you are deploying a single-node pigsty on cloud VPS. But not recommended for production use.
Knowledge about Ansible is good but NOT REQUIRED. You only need to know how to run Ansible Playbooks. Playbooks are executable YAML files that contain a series of tasks to be executed.
Running the ./node.yml playbook essentially translates to ansible-playbook node.yml.
The hashbang at the top of the file makes it directly executable.
And you can use Args to control the playbook execution:
The following 4 parameters need your attention to use ansible effectively:
| Purpose | Parameter | Description |
|---|---|---|
| Where | -l|--limit <pattern> |
Limit execution target on specific group/host/pattern |
| What | -t|--tags <tags> |
Only run tasks with specific tags |
| How | -e|--extra-vars <vars> |
Extra command line arguments |
| Config | -i|--inventory <path> |
Using a specific inventory file |
The execution target of a playbook can be limited with -l|--limit <selector>.
It is handy when trying to run playbooks on a specific host/node or group/clusters.
Here are some examples of host limits:
Check all details in the ansible docs: Patterns: targeting hosts and groups
Missing this value could be dangerous, since most playbooks will execute on all hosts. DO USE WITH CAUTION.
The execution tasks can be controlled with -t|--tags <tags>.
If specified, tasks with given tags will be executed instead of the ENTIRE playbook.
Here are some task limit examples:
To run multiple tasks, specify multiple tags and separate with comma: -t tag1,tag2:
You can override config param at runtime with cli args, it has the highest precedence.
Extra command-line args can be passed via -e|--extra-vars KEY=VALUE, it can be used multiple times:
for complex parameters, JSON string can be used:
The default config file is pigsty.yml in the pigsty home directories.
You can use the -i <path> parameter to specify a different Inventory file path.
To permanently change the default config file, change the inventory parameter in the ansible.cfg.
Pigsty implements admin controllers with idempotent Ansible playbooks.
Playbooks require the ansible-playbook executable bin in your PATH. You’ll have to install ansible to run playbooks.
Here are built-in playbooks in Pigsty, you can also add your own.
| Module | Playbook | Function |
|---|---|---|
| INFRA | install.yml |
Install Pigsty on current node in one-pass |
| INFRA | infra.yml |
Init pigsty infrastructure on infra nodes |
| INFRA | infra-rm.yml |
Remove infrastructure components from infra nodes |
| INFRA | cache.yml |
Make offline install packages from target node |
| INFRA | cert.yml |
Issue cert with pigsty self-signed CA (e.g. for pg clients) |
| NODE | node.yml |
Init node for pigsty, tune node into desired status |
| NODE | node-rm.yml |
Remove node from pigsty |
| PGSQL | pgsql.yml |
Init HA PostgreSQL clusters, or adding new replicas |
| PGSQL | pgsql-rm.yml |
Remove PostgreSQL cluster, or remove replicas |
| PGSQL | pgsql-db.yml |
Add new business database to existing PostgreSQL cluster |
| PGSQL | pgsql-user.yml |
Add new business user to existing PostgreSQL cluster |
| PGSQL | pgsql-pitr.yml |
Run point-in-time-recovery on existing PostgreSQL cluster |
| PGSQL | pgsql-monitor.yml |
Monitor remote postgres instance with local exporters |
| PGSQL | pgsql-migration.yml |
Generate Migration manual & scripts for existing PostgreSQL |
| PGSQL | slim.yml |
Install Pigsty with minimal components |
| REDIS | redis.yml |
Init redis cluster/node/instance |
| REDIS | redis-rm.yml |
Remove redis cluster/node/instance |
| ETCD | etcd.yml |
Init etcd cluster, or append new member |
| ETCD | etcd-rm.yml |
Remove etcd cluster, or remove existing member |
| MINIO | minio.yml |
Init minio cluster |
| MINIO | minio-rm.yml |
Remove minio cluster |
| DOCKER | docker.yml |
Install docker on nodes |
| DOCKER | app.yml |
Install application with docker compose |
| FERRET | mongo.yml |
Install Mongo/FerretDB on nodes |
The special playbook install.yml will deploy everything with ad hoc playbooks:
| Playbook | Command | Group | infra |
[nodes] |
etcd |
minio |
[pgsql] |
|---|---|---|---|---|---|---|---|
infra.yml |
./infra.yml |
-l infra |
✓ | ✓ | |||
node.yml |
./node.yml |
✓ | ✓ | ✓ | ✓ | ||
etcd.yml |
./etcd.yml |
-l etcd |
✓ | ||||
minio.yml |
./minio.yml |
-l minio |
✓ | ||||
pgsql.yml |
./pgsql.yml |
✓ |
There is a weak circular dependency between NODE and INFRA: to register a NODE to INFRA, the INFRA should already exist, while the INFRA module relies on NODE to work.
One way to work around it is to init infra nodes first, then add other nodes, if you wish to deploy them all in
one-pass, install.yml is the way to go.
Most playbooks are idempotent, meaning that some deployment playbooks may erase existing databases and create
new ones without the protection option turned on. Especially care with pgsql, minio, and infra playbooks.
Please read the documentation carefully and operate with caution. The author is not responsible for any loss of databases due to misuse.
-l) to avoid unintended hosts if applicable-t) to run subset of tasks if possiblePigsty installs Nginx on the INFRA Node as a web service proxy, using ports 80/443 by default.
The global parameter infra_portal configures Nginx proxy rules and upstream services.
The Nginx server configuration is specified through the infra_portal parameter.
Users declare all domains to be proxied through Nginx, along with corresponding upstream server endpoints or local directory paths.
Nginx can be reconfigured using Ansible playbooks:
Each server record in infra_portal supports the following configuration options:
domain - Optional proxy domain nameendpoint - Upstream service address (IP:PORT or socket path)path - Local web server root directory for static contentscheme - Protocol specification (http/https/tcp/udp)certbot - Enable Let’s Encrypt certificate managementcert - Custom SSL certificate file pathkey - Custom SSL private key file pathconf - Custom Nginx configuration templatedomains - Additional domain names for the serviceindex - Enable directory listing for static contentlog - Custom log file configurationwebsocket - Enable WebSocket support for real-time applications/etc/hosts file modificationFor local development and testing, add entries to your /etc/hosts file:
Replace <your_public_ip_address> with your actual admin node IP address.
Configure HTTPS access via the nginx_sslmode parameter with the following options:
disabled - HTTP only, no SSLself-signed - Use self-signed certificates (default)provided - Use provided certificatesletsencrypt - Use Let’s Encrypt certificatesFor self-signed certificates, you can:
thisisunsafe in Chrome)With the default configuration, services are accessible via:
http://h.pigsty or https://h.pigstyhttp://g.pigsty or https://g.pigstyhttp://p.pigsty or https://p.pigstyhttp://a.pigsty or https://a.pigstyIf you want to add some packages to the local repo, add them to:
repo_packages for default packagesrepo_extra_packages for extra packagesThen run the make repo shortcut to update the local repo and node repo cache:
You can use alias to specify a bundle of packages, check roles/node_id/vars/<os>.<arch>.yml for available aliases:
| Distro | x86_64 | aarch64 |
|---|---|---|
| EL 7 | el7.x86_64.yml |
- |
| EL 8 | el8.x86_64.yml |
el8.aarch64.yml |
| EL 9 | el9.x86_64.yml |
el9.aarch64.yml |
| EL 10 | el10.x86_64.yml |
el10.aarch64.yml |
| Distro | x86_64 | aarch64 |
|---|---|---|
| Debian 11 | d11.x86_64.yml |
- |
| Debian 12 | d12.x86_64.yml |
d12.aarch64.yml |
| Debian 13 | d13.x86_64.yml |
d13.aarch64.yml |
| Ubuntu 22.04 | u22.x86_64.yml |
u22.aarch64.yml |
| Ubuntu 24.04 | u24.x86_64.yml |
u24.aarch64.yml |
Use these playbook tasks to manage local package repositories (YUM/APT) on Infra nodes:
Commonly used commands:
After installing Pigsty, users can access most Infra components’ web interfaces via IP + Port.
Let’s say your node’s internal IP is 10.10.10.10, then by default:
While IP + Port works fine for dev/test environments (hey, we’re all lazy sometimes!), for more serious deployments, I strongly recommend accessing these services via domain names.
Using domains has numerous advantages, doesn’t cost extra, and requires just one simple config line.
Let’s dive into these topics:
Add this static resolution record to your /etc/hosts (Linux/MacOS) or C:\Windows\System32\drivers\etc\hosts (Windows):
Replace placeholder IP
10.10.10.10with your Pigsty node’s IP (public/private, as long as it’s reachable).If you modified default domains in
infra_portal, replace them with your custom domains.
Pigsty strongly recommends using domains instead of direct IP+Port access for several reasons:
Pigsty uses internal static domains by default — just add DNS records locally, no need to register real domains.
For internet-facing deployments, consider using real domains with free HTTPS certs.
If you’re not familiar with HTTP/DNS protocols, here’s a quick primer on how Nginx serves multiple domains on a single port (80 + HTTPS 443):
DNS Protocol
HTTP Protocol
Pigsty configures these four internal domains by default:
| Domain | Name | Port | Component | Description |
|---|---|---|---|---|
h.pigsty |
home |
80/443 | Nginx | Default server, local repo |
g.pigsty |
grafana |
3000 | Grafana | Monitoring & visualization |
p.pigsty |
prometheus |
9058 | Prometheus | Time series DB |
a.pigsty |
alertmanager |
9059 | AlertManager | Alert aggregation & routing |
Since these domains don’t use TLDs, you’ll need local static or internal dynamic resolution.
Don’t worry — it’s just one config line away! 🚀
Assuming Pigsty’s internal IP is 10.10.10.10, add this to your client machine’s hosts file:
The client machine is where you browse Pigsty services — your laptop, desktop, VM, etc.
For Linux / macOS: sudo nano /etc/hosts For Windows: Run notepad as admin, edit C:\Windows\System32\drivers\etc\hosts
After adding the record, you can access Pigsty web services via these domains.
Not a fan of default domains? Modify them in infra_portal before installation:
Then update your hosts file accordingly:
Use any domain you like — real or made-up - as long as it resolves to Pigsty’s IP via local, internal, or public DNS.
Running other Pigsty extensions? Add these records too:
For cloud deployments, resolve to your public IP, not internal IP.
If your server has internet access, it typically has two NICs - one for internet (public IP) and one for internal network (private IP).
Example: If your cloud server’s public IP is 1.2.3.4 and VPC IP is 10.10.10.10:
Want your office colleagues to access Pigsty via domains? Use internal dynamic resolution.
The simplest way: Ask your network admin to add the DNS records to your internal DNS server.
If your internal DNS server is 192.168.1.1, on Linux/MacOS edit /etc/resolv.conf:
On Windows: Network Settings → Network Adapter → TCP/IPv4 Properties → DNS config
Test internal DNS resolution:
Pigsty Infra module includes DNS server (port 53).
⚠️ Warning for China deployments: Public servers typically cannot run DNS services (port 53)!
HTTP access to Pigsty shows “Not Secure” - it’s plaintext, susceptible to MITM attacks.
By default, Pigsty uses a local self-signed CA to issue certs for all Nginx virtual hosts.
HTTPS access shows “Certificate Error” - these are self-signed certs, not from a trusted CA.
Your options:
thisisunsafe when warned (magic words!)For internal access needing HTTPS without constant warnings, trust Pigsty’s self-signed CA.
For production, we recommend using public domains with free HTTPS certs via certbot.
Pigsty generates a self-signed CA in the admin node source directory (~/pigsty) during init.
To use HTTPS, distribute Pigsty’s CA cert to client trust stores (or use real CAs — expensive!).
Pigsty-managed Linux nodes auto-trust the CA. For other Linux systems:
MacOS: Double-click ca.crt, add to Keychain, search pigsty-ca, open and “Trust” the root cert.
Windows: Add ca.crt to “Trusted Root Certification Authorities”.
After trusting Pigsty’s CA, no more “untrusted certificate” warnings! 🎉
Use DNS providers like Cloudflare, Godaddy, Aliyun, or Tencent Cloud DNSPod.
Requires purchasing a domain - basic ones cost ~$10/year.
Add DNS records via provider’s console/API to point domains to Pigsty’s public IP.
Example: With domain pigsty.xxx, add wildcard * A record or individual A records:
Pigsty includes Certbot support for free HTTPS certs (renew every 3 months).
For more advanced configurations, check the Pigsty documentation for DNS, Nginx, and HTTPS certificate management.
Pigsty comes with Certbot pre-installed on the Infra node, enabling you to obtain free Let’s Encrypt HTTPS certificates for Nginx servers and public domains.
Before obtaining Let’s Encrypt certificates, ensure you have:
First, identify which upstream services require public certificates by configuring domains in your infra_portal:
Configure DNS A records to point all your domains to your server’s public IP address:
Verify that your domains are properly pointing to your server:
Use Certbot to request Let’s Encrypt certificates for your domains:
During the first run, you’ll be prompted to:
For automated deployments, use the non-interactive mode:
Example for multiple domains:
After successfully obtaining certificates, update your infra_portal configuration to use them by adding the certbot: true parameter:
Then regenerate the Nginx configuration and restart the service:
Let’s Encrypt certificates expire every 90 days. Set up automatic renewal to ensure continuous HTTPS coverage:
Before setting up automatic renewal, test the process:
To manually renew all certificates:
To renew a specific certificate:
Set up a monthly cron job for automatic renewal:
Alternatively, use a systemd timer if available:
Here are useful Certbot commands for managing your certificates:
Pigsty (/ˈpɪɡ staɪ/) is a Battery-Included, FOSS PostgreSQL Distribution as a Local-First RDS Alternative.
Pigsty is created by Ruohang Feng (@Vonng) and the community
Pigsty is open-sourced under AGPLv3 license, with some exemptions
Join our user groups and forums, get support from the community
Professional support and subscription plans for enterprise usecases
Release notes and changelogs for Pigsty
Latest event, conference, meetup, office hours, and more
New features, improvements, and future plans for Pigsty
Security vulnerabilities, bug defects, fix announcements
I’m Ruohang Feng, also known as @Vonng, creator of Pigsty. I’ve developed most of Pigsty’s code solo, with the community contributing specific features.
Unique individuals create unique works — I hope Pigsty can be one of those creations.
If you are interested in the author, here’s my personal website: https://vonng.com/en/
The Pigsty project kicked off between 2018 and 2019, originating from Tantan, a dating app similar to China’s Tinder, now acquired by Momo. Tantan, a startup with a Nordic vibe, was founded by a team of Swedish engineers. Renowned for their tech sophistication, they chose PostgreSQL and Go as their core tech stack. Tantan’s architecture, inspired by Instagram, revolves around PostgreSQL. They managed to scale to millions of daily active users, millions of TPS, and hundreds of TBs of data using PostgreSQL exclusively. Almost all business logic was implemented using PG stored procedures, including recommendation algorithms with 100ms latency! This unconventional development approach, deeply leveraging PostgreSQL features, demanded exceptional engineering and DBA skills. Pigsty emerged from these real-world, high-standard database cluster scenarios as an open-source project encapsulating our top-tier PostgreSQL expertise and best practices.
Initially, Pigsty didn’t have the vision, objectives, or scope it has today. It was meant to be a PostgreSQL monitoring system for our use. After evaluating every available option—open-source, commercial, cloud-based, datadog, pgwatch,…… none met our observability bar. So, we took matters into our own hands, creating a system based on Grafana and Prometheus, which became the precursor to Pigsty. As a monitoring system, it was remarkably effective, solving countless management issues.
Eventually, developers wanted the same monitoring capabilities on their local dev machines. We used Ansible to write provisioning scripts, transitioning from a one-off setup to a reusable software. New features allowed users to quickly set up local DevBoxes or production servers with Vagrant and Terraform, automating PostgreSQL and monitoring system deployment through Infra as Code.
We then redesigned the production PostgreSQL architecture, introducing Patroni and pgBackRest for high availability and point-in-time recovery. We developed a zero-downtime migration strategy based on logical replication, performing rolling updates across 200 database clusters to the latest major version using blue-green deployments. These capabilities were integrated into Pigsty.
Pigsty, built for our use, reflects our understanding of our needs, avoiding shortcuts. The greatest benefit of “eating our own dog food” is being both developers and users, deeply understanding and not compromising on our requirements.
We tackled one problem after another, incorporating solutions into Pigsty. Its role evolved from a monitoring system to a ready-to-use PostgreSQL distribution. At this stage, we decided to open-source Pigsty, initiating a series of technical talks and promotions, attracting feedback from users across various industries.
In 2022, Pigsty secured seed funding from Dr. Lu Qi’s MiraclePlus S22 (Former YC China), enabling me to work on it full-time. As an open-source project, Pigsty has thrived. In the two years since going full-time, its GitHub stars skyrocketed from a few hundred to 4000, On OSSRank, Pigsty ranks 26th among PostgreSQL ecosystem projects.
Originally only compatible with CentOS7, Pigsty now supports all major Linux Distros and PostgreSQL versions 12 - 17, integrating over 420 extensions from the ecosystem. I’ve personally compiled, packaged, and maintained some extensions not found in official PGDG repositories.
Pigsty’s identity has evolved from a PostgreSQL distribution to an open-source cloud database alternative, directly competing with entire cloud database services offered by cloud providers.
Public cloud vendors like AWS, Azure, GCP, and Aliyun offer many conveniences to startups but are proprietary and lock users into high-cost infra rentals.
We believe that top-notch database services should be as accessible as the top-notch database kernel (PostgreSQL), not confined to costly rentals from cloud providers.
Cloud agility and elasticity are great, but it should be open-source, local-first and cheap enough. We envision a cloud computing universe with an open-source solution, returning the control to users without sacrificing the benefits of the cloud.
Thus, we’re leading the “cloud-exit” movement in China, rebelling against public cloud norms to reshape industry values.
We’d like to see a world where everyone has the factual right to use top services freely, not just view the world from the pens provided by a few public cloud providers.
This is what Pigsty aims to achieve —— a superior, open-source, free RDS alternative. Enabling users to deploy a database service better than cloud RDS with just one click, anywhere (including on cloud servers).
Pigsty is a comprehensive enhancement for PostgreSQL and spicy satire on cloud RDS. We offer “the Simple Data Stack”, which consists of PostgreSQL, Redis, MinIO, and more optional modules.
Pigsty is entirely open-source and free, sustained through consulting. A well-built system might run for years without issues, but when database problems arise, they’re serious. Often, expert advice can turn a dire situation around, and we offer such services to clients in need—a fairer and more rational model.
Pigsty uses the AGPLv3 license, which is a strong copyleft license that requires you to also distribute the source code of your derivative works under the same license when you “Distribute” Pigsty. It’s no big deal if you are just “USING” it.
<div class="col-span-5 h-full">
<div class="col-span-3 h-full">
We extend exemptions to common end users under terms akin to the Apache 2.0 license. As long as you do not use pigsty for DBaaS and OEM purpose (i.e. re-sell as database service).
Our Subscription includes coverage for DBaaS & OEM scenarios.
We don’t like the idea that public cloud vendors take open-source code, provide as-a-service, and not give back equally (their admin controller & console) to the community. This is a vulnerability in the GPL license that AGPLv3 was designed to close.
The AGPLv3 does not affect regular end users: using Pigsty internally is not “distributing” it, so you don’t have to worry about whether your business code needs to be open-sourced. If you do worry about it, you can always choose the pro version with written guarantees.
While you only need to consider AGPLv3 when you “distribute” Pigsty or modifications to it as part of a software/service offering. Such as database/software/cloud vendors who provide Pigsty as a service or part of their software to their customers.
Related Open Source Project and their license.
| Module | Software Name | License | Usage | Necessity |
|---|---|---|---|---|
| PGSQL | PostgreSQL | PostgreSQL | the PostgreSQL kernel | Required |
| PGSQL | patroni | MIT | PostgreSQL high-availability agent | Required |
| ETCD | etcd | Apache-2.0 | DCS for postgres/patroni HA setup | Required |
| INFRA | Ansible | GPL-3.0 | Admin tool for running playbooks | Required |
| INFRA | Nginx | BSD-2.0 | Exposes WebUI and serve as local repo | Required |
| PGSQL | pgbackrest | MIT | Backup/PITR management tool | Recommended |
| PGSQL | pgbouncer | ISC | PostgreSQL connection pooling | Recommended |
| PGSQL | vip-manager | BSD 2-Clause | Bind L2 VIP to postgres cluster leader | Recommended |
| PGSQL | pg_exporter | Apache-2.0 | Collect metrics from postgres and pgbouncer | Recommended |
| NODE | node_exporter | Apache-2.0 | Collect node-level monitoring metrics | Recommended |
| NODE | haproxy | HAPROXY | load balancing and expose service | Recommended |
| INFRA | Grafana | AGPL-3.0 | Visualization platform | Recommended |
| INFRA | Prometheus | Apache-2.0 | TSDB, metric collection, alerting | Recommended |
| INFRA | Loki | AGPL-3.0 | Logging collection platform | Recommended |
| INFRA | DNSMASQ | GPL-2.0 | DNS resolution and name lookup | Recommended |
| MINIO | MinIO | AGPL-3.0 | S3-compatible object storage service | Optional |
| NODE | keepalived | MIT | Binds VIP to node clusters | Optional |
| REDIS | Redis | Redis | Fast cache, data structure service (@7.2.6) | Optional |
| REDIS | RedisExporter | MIT | Redis monitoring capabilities | Optional |
| MONGO | FerretDB | Apache-2.0 | MongoDB compatibility layer over postgres | Optional |
| DOCKER | docker-ce | Apache-2.0 | Container management capability | Optional |
| CLOUD | SealOS | Apache-2.0 | Fast K8S cluster deployment and admin tool | Optional |
| DUCKDB | DuckDB | MIT | High-performance analytics | Optional |
For 437 PostgreSQL Extensions License, check the extension list for details
Necessity Levels:
The Pigsty community already offers free WeChat/Discord/Telegram Q&A Office Hours, and we are also happy to provide more free value-added services to our supporters.
Consider giving us a star on GitHub if you find Pigsty useful. Issues, PRs, and discussions are welcome.
The source code repository of Pigsty
The `pgsty` organization on GitHub is the official home of Pigsty.
Create new issues and report bugs, submit feature requests
Ask questions, share ideas, and get help from the community
We have 7 active wechat user groups with around 2700+ users, join our discussions!
The GitHub discussion forum of Pigsty
Search `pigsty-cc` and join the User Group.
The Telegram group of Pigsty: gV9zfZraNPM3YjFh
The Discord server of Pigsty: j5pG8qfKxU
You can also contact me with email: [email protected]
You can ask community for help, questions with enough info & context are more likely to get help.
Also consider using our ChatGPT QA Agent or Professional Service.
What happened? (REQUIRED)
Pigsty Version & OS Version (REQUIRED)
If you are using a cloud provider, please tell us which cloud provider and what operating system image you are using.
If you have customized and modified the environment after installing the bare OS, or have specific security rules and firewall configurations in your WAN, please also tell us when troubleshooting.
Pigsty Config File (REQUIRED)
Don’t forget to remove sensitive information like passwords, etc…
What did you expect to happen?
Please describe what you expected to happen.
How to reproduce it?
Please tell us as much detail as possible about how to reproduce the problem.
Monitoring Screenshots
If you are using pigsty monitoring system, you can paste RELEVANT screenshots here.
Error Log
Please copy and paste any RELEVANT log output. Do not paste something like “Failed to start xxx service”
/var/log/messages (RHEL) or /var/log/syslog (Debian)/pg/log/postgres/*/pg/log/patroni/*/pg/log/pgbouncer/*/pg/log/pgbackrest/*Have you tried the Issue & FAQ?
Anything else we need to know?
The more information and context you provide, the more likely we are to be able to help you solve the problem.

Topic: A World-Grade Postgres Meta Distribution
Lighting Talk: Why PostgreSQL is the king of DB in the AI area.
Lighting Talk: Trapped! Best practice for delivering PostgreSQL!
The 8th Conf of PG Ecosystem, HangZhou, China

Giving a lightning talk here at #PGConfdev is Ruohang Feng, founder at Pigsty, presenting on “Extension Delivery: Make your PG Ext accessible to users” —— PGConf.Dev X
Lighting Talks, PGConf.Dev 2025, Monteral, Canada
Youtube: https://www.youtube.com/live/cucQOOAahNY (Start @ 4:50:20)
PGEXT.DAY, PGCon.Dev 2025, Montreal
2025-04-19 | Practical Workshop | PostgreSQL Database Technology Summit
2025-04-11 | Live Hosting | OSCHINA - Data Intelligence Talk
2025-01-15 | Live Presentation | Open Source Projects: Veterans and Newcomers, Episode 4
2025-01-09 | Award Ceremony | OSCHINA 2024 Outstanding Contribution Expert
2025-01-06 | Panel Discussion | China PostgreSQL Database Ecosystem Conference
2024-11-23 | Podcast | Podcast · Tech Hotpot
2024-08-21 | Media Interview | Blue Tech Wave: Interview with Feng Ruohang, author of Pigsty
2024-08-15 | Technical Conference | GOTC Global Open Source Technology Summit
2024-07-12 | Keynote Speech | 13th PG China Technical Conference
2024-05-31 | Technical Conference | PGCon.Dev 2024 Global PG Developer Conference Unconference
2024-05-29 | Keynote Speech | 13th PG China Technical Conference
2024-05-28 | Thematic Seminar | PGCon.Dev 2024 Global PG Developer Conference Extension Summit
2024-05-10 | Live Discussion | Three-way Talk: Cloud Computing Mudslide Series Episode 3
2024-04-17 | Live Discussion | Three-way Talk: Cloud Computing Mudslide Series Episode 2
2024-04-16 | Panel Discussion | Cloudflare Immerse Shenzhen
2024-04-12 | Technical Conference | 2024 Data Technology Carnival
2024-03-31 | Live Discussion | Three-way Talk: Cloud Computing Mudslide Series Episode 1
2024-01-24 | Live Hosting | OSCHINA: Open Source Talk Episode 9
2023-12-20 | Live Debate | Open Source Musings, Episode 7
2023-11-24 | Tech Conference | Vector Databases in the Era of Large Models
2023-09-08 | Exclusive Interview | MogDB Notable Figures Interview
2023-08-16 | Tech Conference | DTCC 2023
2023-08-09 | Live Debate | Open Source Musings, Episode 1
2023-07-01 | Tech Conference | SACC 2023
2023-05-12 | Offline Event | PostgreSQL China Community Wenzhou Offline Salon
2023-04-08 | Tech Conference | Database Carnival 2023
2023-04-01 | Tech Conference | PostgreSQL China Community Xi’an Offline Salon
2023-03-23 | Public Livestream | Bytebase x Pigsty
2023-03-04 | Tech Conference | PostgreSQL China Tech Conference
2023-02-01 | Tech Conference | DTCC 2022
2022-07-21 | Live Debate | Can Open Source Fight Back Against Cloud Cannibalization?
2022-07-04 | Exclusive Interview | Creators Speak
2022-06-28 | Public Livestream | Beth’s Roundtable
2022-06-12 | Public Roadshow | MiraclePlus S22 Demo Day
2022-06-05 | Video Livestream | PG Chinese Community Livestream Sharing
Level: Critical, Please arrange fix ASAP
Scope: Pigsty v2.0.0 - v2.5.1, fixed in Pigsty v2.6.0
Description:
etcd has a default 2GB database capacity limit. If your etcd database exceeds this limit, etcd will reject write requests, which may cause PostgreSQL high availability mechanisms that depend on etcd to fail. At the same time, etcd’s data model creates a new version with each write, so even if you have only a few keys, frequent writes to your etcd cluster can cause the etcd database size to continuously grow and eventually fail when it reaches the capacity limit.
Solution:
Update Pigsty to v2.6.0 or above, or update the code in the roles/etcd section and re-execute ./etcd.yml to force reset the etcd cluster to implement the fix.
Key configuration update: roles/etcd/templates/etcd.conf
Pigsty follows a structured development roadmap with regular releases and continuous improvement. This page outlines our release schedule, upcoming features, and long-term plans.
Pigsty v3.7.0 released!
Pigsty v3.5.0 released!
Pigsty uses semantic versioning with the format <major version>.<minor version>.<patch>:
v3.1.0, v3.2.0, etc.v3.1.0-a1, v3.1.0-a2 (early development)v3.1.0-b1, v3.1.0-b2 (feature complete, testing)v3.1.0-rc1 (production ready, final testing)The following features are planned or under consideration for future releases:
vectorvictorialogsvictoriametricsPigsty delivers eight core value propositions, giving you an enterprise-ready database platform
Blossom of Possibilities
Rock-Solid and Secure
Clarity and Vision
Elastic Performance
Simple and Actionable
Flexible Lego-Blocks
Sovereign Self-Hosting
Cost-Effective RDS
“Nurturing all, thriving in synergy, forging infinite possibilities!”
Big Data's New Challenger
Baseline for RAG/Vector App
De Facto GIS Standard
Temporal Data Mastery
Built-in Search Engine
Language of Your Choice
Connecting Data Silos
Database as a Platform
“Towering peaks, bedrock solid, standing firm at any summit!”
Reliable PostgreSQL RDS
Adaptive Service Failover
Pre-configured Backup & Archives
No External Dependencies
Built-in Best-Practice Model
Guaranteed Data Security
Thorough Verification
Availability Results
“Heaven’s movement, all-seeing view, perceiving details to master the whole!”
Built-in Observability Stack
Measure what you Manage
The Definitive PG monitoring
RDS or Compat Kernels
No more manual checks
Slow-query Optimize
Fast root-cause detection
Low-code Data App
“Ever-flowing like water, soft yet resilient, converging streams to adapt to endless change!”
Hardware Fully Harnessed
Unlimited Read Scaling
High Concurrency
Traffic Control
Distributive Extension
Transparent Compression
Large clusters made easy
Cloud-like Elasticity
“Blazing like wildfire, illuminating all around, burning bright without end!”
Define everything in Code
Up and Running in Minutes
No Containers or Kubernetes
Stable, Hassle-free Delivery
Best Practices Included
Online Migration & Resizing
Plenty of Tunable Knobs
One-command IaaS Provisioning
“Swift as the wind, simplifying complexity, riding the currents of change with freedom and ease!”
Lego-like Assembly
One-Click Enterprise Deployment
Fully-Featured Postgres RDS
Extending RDS Capabilities
Swappable Database Engines
Powerful Analytics Capabilities
Exploring Cutting-Edge Frontiers
Creative Postgres Flavors
“Grounded like the earth, gathering all rivers—standing firm while gazing at the stars!”
Self-hosting democratized
Run on-premises indefinitely
No vendor lock-in
437 PostgreSQL extensions
Pay fair cost for resources
AGPLv3 preserving freedom
Meeting domestic requirements
Top-tier PostgreSQL specialists
“Thunderous impact, breaking to build anew, keeping costs manageable and value ever rising!”
Fully leverage PostgreSQL's eco
Escape the RDS money pit
Everyone can be a DBA
No Containers or K8s
Key blockers resolved
Discuss & Share
Pay as needed
Clear pricing, value for money
These eight values work in synergy to deliver a comprehensive database platform that scales from development to enterprise production environments. Pigsty transforms PostgreSQL from a simple database into a powerful, observable, and maintainable data infrastructure that organizations can truly own and control.
Nurturing all, thriving in synergy, forging infinite possibilities!
Big Data's New Challenger
Baseline for RAG/Vector App
De Facto GIS Standard
Temporal Data Mastery
Built-in Search Engine
Language of Your Choice
Connecting Data Silos
Database as a Platform
T0 analytical performance, DuckDB Extension Battleground, HTAP’s future
Parallelism, MPP, columnar compression, GPU acceleration, Parquet analysis
Vector database, one extension conquering the entire specialized niche
Complete in-db AI workflow: inference, training, storage, embedding, and RAG
De facto standard for GIS, accelerating storage to computation, index & query
Route planning, sky indexing, IP geocoding, H3 indexing
Enhanced time-series processing & analytics capabilities, for IoT, FinTech, APM
Simplify app dev with temporal tables, time travel, version control, cron tasks
Built-in full-text search engine with multilingual support
Advanced text processing and search capabilities
PostgreSQL is not just a database, but a full-featured data development platform
Support for 20+ stored procedure languages, putting even Oracle to shame
Create data federations with FDW, becoming the data exchange hub
Uniformly access & ETL all heterogeneous data sources with SQL
HTTP requests, SMTP email, compression, QR codes, PDF scanning
Developing web app inside Postgres - Just use PostgreSQL for everything!
Towering peaks, bedrock solid, standing firm at any summit!
Reliable PostgreSQL RDS
Adaptive Service Failover
Pre-configured Backup & Archives
No External Dependencies
Built-in Best-Practice Model
Guaranteed Data Security
Thorough Verification
Availability Results
Delivers PG HA solutions following industry best practices.
Adjustable Recovery Time Objective (RTO) and Recovery Point Objective (RPO).
Self-healing architecture with transparent topology and multi-writer experience.
Automatic traffic routing based on health checks and flexible access methods.
Pre-configures physical backups and enables WAL archiving by default.
Protection against software defects and human errors with incremental recovery.
Complete PostgreSQL RDS infrastructure requiring no external dependencies.
All critical services included for self-contained operation.
Default ACL with read/write/admin/analytics/monitoring/DBA separation.
Secure configuration out of the box with role-based access control.
Self-signed CA, SSL encryption, password for backups and endpoints
As long as your passwords & key are secure, your data remains safe.
Data checksums for silent corruption. Replicas and delayed standby instances.
Audit extensions and centralized logging, with transparency and efficiency.
Running robustly in many large organizations, maintain 99.999%+ availability. Ultimate business continuity: rolling upgrades, switchovers, and online migrations
Heaven’s movement, all-seeing view, perceiving details to master the whole!
Built-in Observability Stack
Measure what you Manage
The Definitive PG monitoring
RDS or Compat Kernels
No more manual checks
Slow-query Optimize
Fast root-cause detection
Low-code Data App
Ready-to-use Prometheus & Grafana observability tech stack
Automatic target discovery. Enterprise-grade monitoring without configure
Monitoring built with data analytics and BI principles, turn metrics into insights
From macro overview to micro details, solid data support for administration
Five years of refinement for the ultimate PG monitoring experience.
Dig into tables, indexes, func, and query objects details
Monitoring cloud RDS PG or existing PG-compatible kernels
Monitoring nodes, dbms, apps, LB with correlation analysis
Production-tested preset alert rule sets with automatic event notification
AlertManager integration: aggregation, silencing, IM connectivity
Combine metrics & catalogs to identify and optimize slow queries quickly
Dashboards for query details, with quantifiable comparison results
Unified log collection system with Loki and Promtail, sys db log in one place
Search and filter logs with massive parallel grep, fast and efficient
PostgreSQL + Grafana + Echarts + VolkovLabs datasources/panels
Create interactive data app, quickly build prototypes and visualization demos
Ever-flowing like water, soft yet resilient, converging streams to adapt to endless change!
Hardware Fully Harnessed
Unlimited Read Scaling
High Concurrency
Traffic Control
Distributive Extension
Transparent Compression
Large clusters made easy
Cloud-like Elasticity
Highlights amazing scalability and top-tier hardware performance.
Maximizing the potential of modern hardware with optimized configurations.
Offers unlimited replicas through cascading replication with auto traffic routing.
Scale read workloads horizontally without impacting write performance.
Built-in PGBouncer connection pool, ready out of the box and syncing with postgres.
Handle thousands of concurrent connections efficiently with resource optimization.
Monitor and schedule request traffic in real-time with HAProxy console.
Intelligent traffic distribution with health checks and failover capabilities.
Citus extension with multi-write and multi-tenant capabilities.
Scale beyond single-node limitations with distributed PostgreSQL.
Achieve 10:1 or even higher compression ratios with columnar and other exts
R/W data in S3 with FDW, hot/cold separation and unlimited capacity expansion
Designed for extreme scale - flexible for 25K vCPU clusters or 1c1m node
No limit on nodes per deployment - soft constrained only by monitoring capacity
Supports cloud EC2 deployment, fully leveraging the elastic advantages of cloud
Flexible multi-cloud strategies - enjoy RDS elasticity with EC2/EBS prices
Blazing like wildfire, illuminating all around, burning bright without end!
Define everything in Code
Up and Running in Minutes
No Containers or Kubernetes
Stable, Hassle-free Delivery
Best Practices Included
Online Migration & Resizing
Plenty of Tunable Knobs
One-command IaaS Provisioning
Declarative API for database deployment and operations
Designed for large-scale cluster management
One-command installation
Pre-configured templates with automatic hardware tuning
Runs directly on Linux without containers
Supports mainstream Linux distros: EL 8/9, Debian 12, Ubuntu 22/24
Offline installation packages for environments without internet
Snapshots from local repositories
Distills top-tier DBA experience into conventions
Helps avoid common system pitfalls
Zero-downtime migration with blue-green deployment
Zero-maintenance window switchovers
Nearly 300+ configurable parameters with defaults suitable for most scenarios
Can adjust to meet demanding customization requirements
Enables running a complete 4-node simulation on a single laptop
Integrated Vagrant/Terraform templates for quick resource provisioning
Swift as the wind, simplifying complexity, riding the currents of change with freedom and ease!
Lego-like Assembly
One-Click Enterprise Deployment
Fully-Featured Postgres RDS
Extending RDS Capabilities
Swappable Database Engines
Powerful Analytics Capabilities
Exploring Cutting-Edge Frontiers
Creative Postgres Flavors
Modular design, freely combine components like Lego blocks
Declarative configuration for customizing infrastructure and database environments
Optional Docker module with Compose templates
Stateless containers that can be destroyed, with state persisted in external HA PGSQL
4 core modules working together to build a complete PostgreSQL RDS
Scalable, flexible combinations with no additional dependencies
Components that work exceptionally well with PostgreSQL
Completely optional, install as needed
Optional replacements for vanilla PostgreSQL kernel
Offering different database compatibility
DuckDB integration showcase
Installation and monitoring support for Greenplum derivatives
Unrelated to PostgreSQL
Experimental capability explorations
Diverse wrappers and features on native PostgreSQL
Exploring Backend-as-a-Service, serverless, and in-database web development
Grounded like the earth, gathering all rivers—standing firm while gazing at the stars!
Self-hosting democratized
Run on-premises indefinitely
No vendor lock-in
437 PostgreSQL extensions
Pay fair cost for resources
AGPLv3 preserving freedom
Meeting domestic requirements
Top-tier PostgreSQL specialists
100% built upon open-source components
A gift to the PostgreSQL community
Fully functional even offline
Running forever without external dependencies
Build your own full-stack DBaaS
Reduce clouds to mere resource providers
437 PostgreSQL extensions ready to use
Built for PG 17-13 on mainstream distributions
Pay for resources at fair cost
Enjoy cutting-edge hardware advantages
AGPLv3 License preserving software freedom
Essentially Apache 2.0 for end users
Ranked #1 among China-led PG projects
Meets domestic requirements
Top-tier PostgreSQL specialists
Affordable subscription plans
Thunderous impact, breaking to build anew, keeping costs manageable and value ever rising!
Fully leverage PostgreSQL's eco
Escape the RDS money pit
Everyone can be a DBA
No Containers or K8s
Key blockers resolved
Discuss & Share
Pay as needed
Clear pricing, value for money
Open source doesn’t mean free, and using it effectively can be costly.
Comparison of different PostgreSQL hosting solutions and their costs.
Affordable financial cost: escape the expensive pricing traps of RDS
Save 50% to 95%+ compared to cloud database services
Affordable manpower cost, transforming Devs and OPS into DBAs
Build enterprise-grade database services with existing team members
Simplicity matters, no need to use containers and kubernetes
Cloud-native benefits without the operational complexity
Traditional public cloud services are rapidly losing their value proposition
Database is essential for cloud exit, Pigsty provides the missing piece
Active user community with free public Q&A support
Multiple channels for getting help and sharing experiences
Professional consultation services available on demand
Flexible pricing for different levels of support needs
Transparent subscription pricing with clear value propositions
Different tiers to meet various organizational needs
      href="/docs/intro/distro">
    Just use PostgreSQL for Everything! \
    Build data infra with assembled superpowers!
    Self-hosting PostgreSQL like a Pro! \
    Operate production grade Service without expertise
Get the superpower of **437** PG extensions out of the box
Self-healing architecture and hassle-free service access
Simulating MySQL, Mongo, Oracle, SQL Server upon PGSQL
Auto configured backups and PITR made simple
Describe and materialize everything with Code / Data
Pre-configured Dashboards with Grafana & Prometheus stack
Turn Postgres into a full-featured backend as a service
Harden software with HA PG: Gitlab, Odoo, Dify, and more
Pigsty allows you to harness the synergistic superpower of the PostgreSQL extensions ecosystem with three things:
pigAlso check our blog post: PostgreSQL is eating the Database World
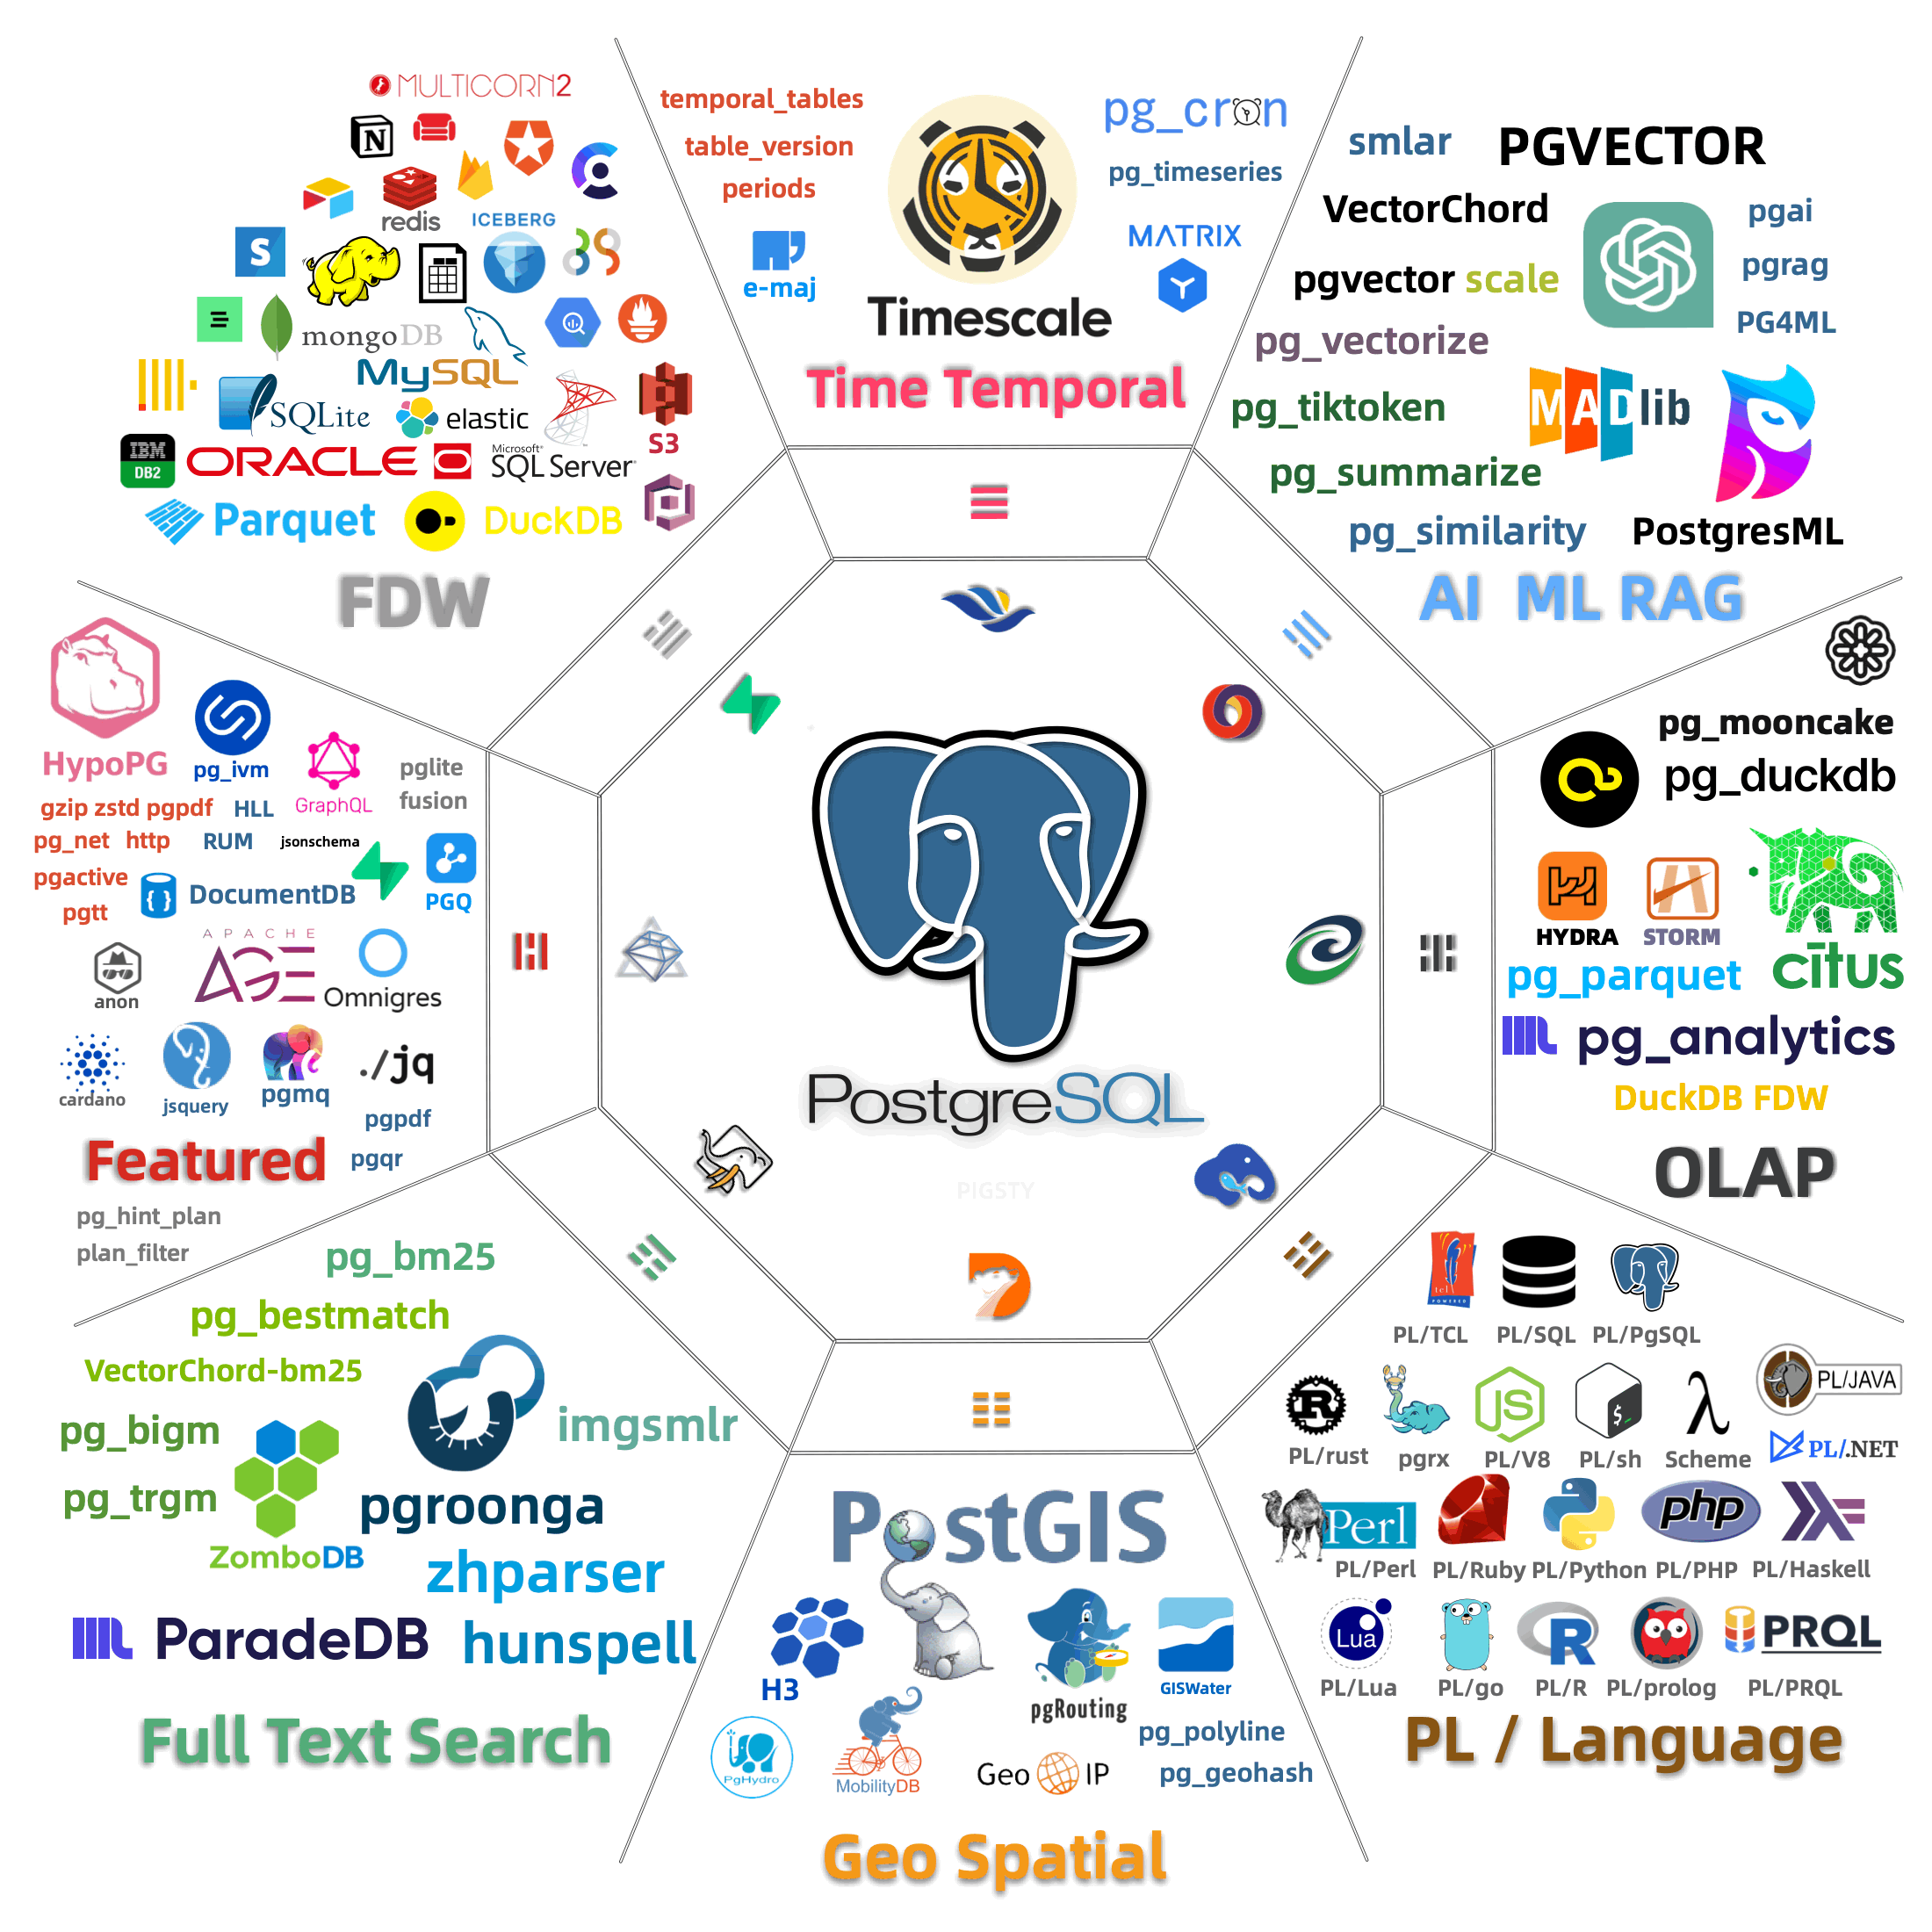
TIME
GIS
RAG
FTS
OLAP
FEAT
LANG
TYPE
UTIL
FUNC
ADMIN
STAT
SEC
FDW
SIM
ETL
| Category | Count | Description |
|---|---|---|
| TIME | 11 | TimescaleDB, Versioning & Temporal Table, Crontab, Async & Background Job Scheduler |
| GIS | 20 | GeoSpatial Data Types, Operators, and Indexes, Hexagonal Indexing, OGR Data FDW, GeoIP & MobilityDB |
| RAG | 10 | Vector Database with IVFFLAT, HNSW, DiskANN Indexes, AI & ML in SQL interface, Similarity Funcs |
| FTS | 20 | ElasticSearch Alternative with BM25, 2-gram/3-gram Fuzzy Search, Zhparser & Hunspell Segregation Dicts |
| OLAP | 13 | DuckDB Integration with FDW & PG Lakehouse, Access Parquet from File/S3, Sharding with Citus/Partman/PlProxy |
| FEAT | 56 | OpenCypher with AGE, GraphQL, JsonSchema, Hints & Hypo Index, HLL, Rum, IVM, ChemRDKit, and Message Queues |
| LANG | 31 | Develop, Test, Package, and Deliver Stored Procedures written in various PL/Languages: Java, Js, Lua, R, Sh, PRQL |
| TYPE | 37 | Dedicate New Data Types Like: prefix, sember, uint, SIUnit, RoaringBitmap, Rational, Sphere, Hash, RRule |
| UTIL | 31 | Utilities such as send http request, perform gzip/zstd compress, send mails, Regex, ICU, encoding, docs, Encryption |
| FUNC | 43 | Function such as id generator, aggregations, sketches, vector functions, mathematical functions and digest functions |
| ADMIN | 36 | Utilities for Bloat Control, DirtyRead, BufferInspect, DDL Generate, ChecksumVerify, Permission, Priority, Catalog |
| STAT | 34 | Observability Catalogs, Monitoring Metrics & Views, Statistics, Query Plans, WaitSampling, SlowLogs |
| SEC | 26 | Auditing Logs, Enforce Passwords, Keep Secrets, TDE, SM Algorithm, Login Hooks, Log Erros, Extension White List |
| FDW | 22 | Wrappers & Multicorn for FDW Development, Access other DBMS: MySQL, Mongo, SQLite, MSSQL, Oracle, HDFS, DB2 |
| SIM | 16 | Protocol Simulation & heterogeneous DBMS Compatibility: Oracle, MSSQL, DB2, MySQL, Memcached, and Babelfish |
| ETL | 17 | Logical Replication, Decoding, CDC in protobuf/JSON/Mongo format, Copy & Load & Compare Postgres Databases |
Pigsty has a repository that provides 200+ extra PostgreSQL extensions on 10 mainstream Linux Distros. It is designed to work together with the official PostgreSQL Global Development Group (PGDG) repo.
You can enable the pigsty infra & pgsql repo with the pig CLI tool, or add them manually to your system:
All the RPM / DEB packages are signed with GPG Key fingerprint (B9BD8B20) in Pigsty repository.
“Postgres Install Genius, the missing extension package manager for PostgreSQL ecosystem”
Get started with PIG in seconds:
Then it’s ready to use, assume you want to install the pg_duckdb extension:
Pigsty supports various PostgreSQL kernels and compatible forks, enabling you to simulate different database systems while leveraging PostgreSQL’s ecosystem. Each kernel provides unique capabilities and compatibility layers.
Vanilla Postgres with 437 Extensions
Native Distributive Extension
SQL Server wire-compatible
Oracle grammar & PL/SQL compatible
MySQL wire-compatibility
Transparent Data Encryption
OLTP-optimized cloud-native storage engine
Aurora-like RAC with china domestic compliance
Backend as a Service, self-hosting Firebase
Mongo Wire-Compatibility over PostgreSQL
Flexible Kernel: Choose the right kernel for your specific use case - whether you need MSSQL compatibility, Oracle features, or horizontal scaling capabilities.
| Kernel | Key Feature | Description |
|---|---|---|
| PostgreSQL | Original Flavor | Vanilla PostgreSQL with 437 extensions |
| Citus | Horizontal Scaling | Distributive PostgreSQL via native extension |
| WiltonDB | SQL Server Migration | SQL Server wire-compatibility |
| IvorySQL | Oracle Migration | Oracle Grammar and PL/SQL compatible |
| OpenHalo | MySQL Migration | MySQL wire-protocol compatibility |
| Percona | Transparent Data Encryption | Percona Distribution with pg_tde |
| FerretDB | MongoDB Migration | MongoDB wire-protocol compatibility |
| OrioleDB | OLTP Optimization | Zheap, No bloat, S3 Storage |
| PolarDB | Aurora flavor RAC | RAC, China domestic compliance |
| Supabase | Backend as Service | BaaS based on PostgreSQL, Firebase alternative |
| Cloudberry (WIP) | MPP DW & Analytics | Massively parallel processing database warehouse |
Citus Native Distributive
Citus transforms PostgreSQL into a distributed database system, enabling horizontal scaling across multiple nodes. Deploy native HA Citus clusters with Pigsty for better throughput and performance.
Planning Required: Proper shard key selection is crucial for optimal performance and avoiding cross-shard queries.
Babelfish SQL Server Wire Compatible
SQL Server Compatible
Beta
Create SQL Server-compatible PostgreSQL clusters with WiltonDB and Babelfish, providing wire protocol-level compatibility with Microsoft SQL Server.
Migration Path: Ideal for organizations looking to reduce licensing costs while maintaining existing SQL Server application compatibility.
Babelfish Oracle Grammar Compatible
Run Oracle-compatible PostgreSQL clusters with the IvorySQL kernel, open-sourced by HighGo, providing Oracle syntax and feature compatibility.
Enterprise Focus: Particularly valuable for enterprises with significant Oracle investments looking for migration paths.
OpenHalo MySQL Wire-Compatible
The OpenHalo kernel provides MySQL-compatible PostgreSQL functionality, accessible using standard MySQL clients and protocols.
Early Stage: Currently experimental - evaluate thoroughly before production use.
OrioleDB OLTP Optimized Cloud Native
A PostgreSQL storage engine optimized for OLTP workloads, eliminating transaction ID wraparound issues and table bloat while supporting cloud storage.
Compatible with PostgreSQL 17, Available on all support platforms.
Early Stage: Currently in Beta - evaluate thoroughly before production use.
PolarDB Aurora Flavor RAC
Replace vanilla PostgreSQL with PolarDB PG, an open-source Aurora-like solution similar to Oracle RAC with shared storage architecture.
Cloud Architecture: Designed for cloud environments with disaggregated compute and storage.
Supabase Backend as a Service
Self-host Supabase with existing managed HA PostgreSQL clusters, launching the stateless components with docker-compose for a complete Firebase alternative.
Full Stack: Provides a complete backend solution with PostgreSQL as the foundation.
Cloudberry MPP Data Warehouse
Install and monitor Greenplum / Cloudberry / YMatrix MPP clusters with Pigsty for large-scale analytical processing and data warehousing.
Enterprise Analytics: Designed for enterprise-scale analytical workloads requiring massive parallel processing capabilities.
Pigsty delivers unparalleled observability with a modern monitoring stack built on industry best practices. Automatically monitor every component with 3000+ metrics, 30+ dashboards.

Complete Insight: Monitor everything from high-level cluster health to individual table statistics. Get complete insight into the past, present, and future of your infrastructure.
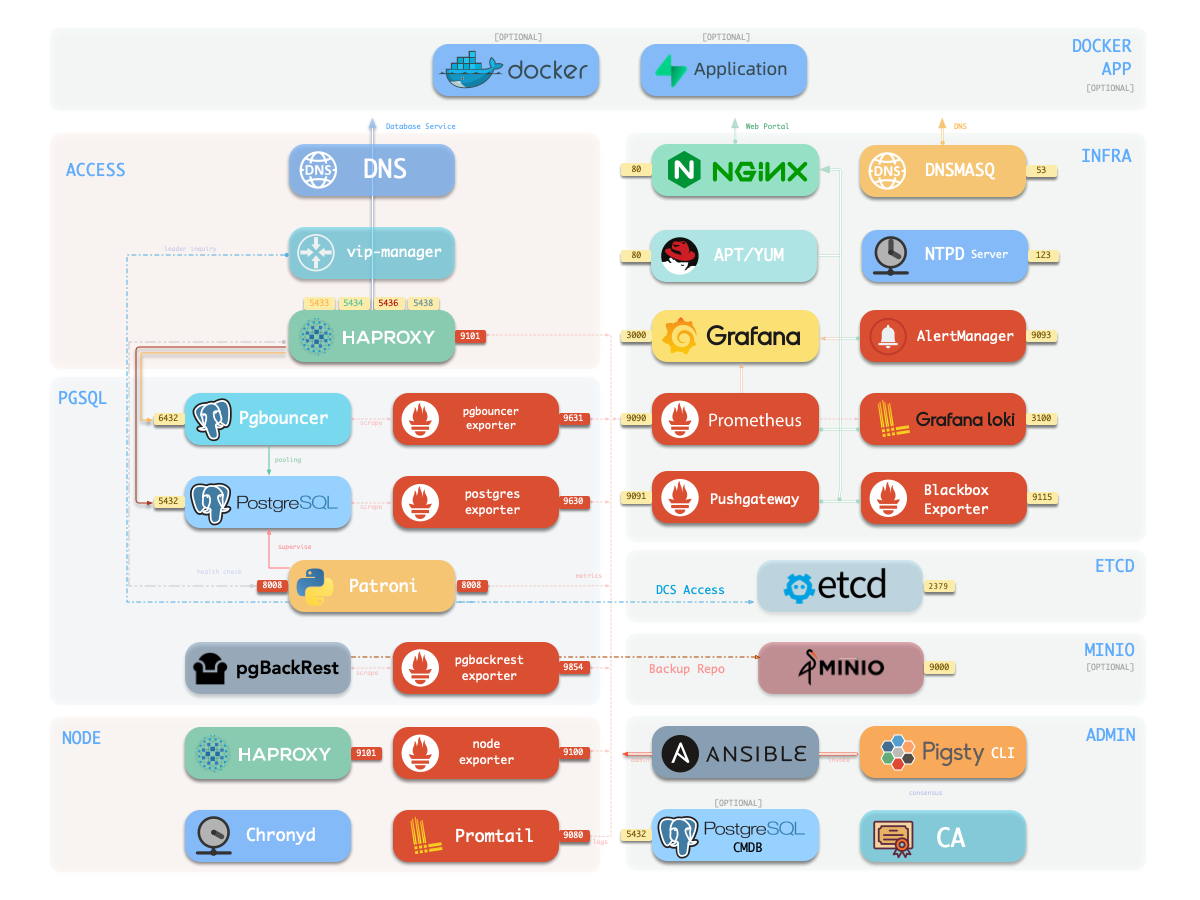
Pigsty’s observability infrastructure leverages battle-tested open-source components in a cohesive, production-ready stack:
Dashboards with advanced interactive visualizations
Time-series storage with powerful query language
Centralized logging with label-based indexing
Alert aggregate, management and escalation
graph TB
    subgraph "Observability Stack"
        Grafana[Grafana :3000]
        Prometheus[Prometheus :9058]
        Loki[Loki :3100]
        AlertManager[AlertManager :9059]
        Pushgateway[Pushgateway :9091]
        Blackbox[Blackbox :9115]
    end

    subgraph "Data Sources"
        PG[(PostgreSQL)]
        Node[Node Metrics]
        Redis[(Redis)]
        MinIO[(MinIO)]
    end

    subgraph "Exporters"
        PGExp[pg_exporter]
        NodeExp[node_exporter]
        RedisExp[redis_exporter]
        MinIOExp[minio_exporter]
    end

    PG --> PGExp
    Node --> NodeExp
    Redis --> RedisExp
    MinIO --> MinIOExp

    PGExp --> Prometheus
    NodeExp --> Prometheus
    RedisExp --> Prometheus
    MinIOExp --> Prometheus

    Prometheus --> Grafana
    Prometheus --> AlertManager
Loki --> GrafanaPigsty provides 26+ PostgreSQL dashboards organized in a logical drill-down hierarchy:
Purpose: High-level operational visibility across entire environment Audience: Operations teams, management dashboards
Purpose: Cluster-wide PostgreSQL performance and health Audience: Database administrators, SRE teams
Purpose: Deep-dive into individual PostgreSQL instances Audience: Database developers, performance engineers
Purpose: Application-level database performance analysis Audience: Application developers, database analysts
Seamless exploration from overview to granular details with contextual linking
Flexible time windows from real-time to historical analysis over months
Dynamic filtering by cluster, instance, database, or custom labels
Visual alert correlation with metrics and direct links to alert details
Pigsty extends Grafana with powerful plugins and data sources for advanced analytics:
Purpose: Essential visualization capabilities for monitoring dashboards
Purpose: Rich, interactive visualizations for complex data analysis
Purpose: Connect to diverse data sources beyond traditional metrics
Purpose: Tailored user experience optimized for PostgreSQL environments
Pigsty deploys the full Prometheus ecosystem for comprehensive observability:
Core metrics database with advanced querying and storage capabilities
Intelligent alert routing with suppression, grouping, and escalation
Batch job metrics collection for ephemeral workloads and cron jobs
Network connectivity monitoring with HTTP, TCP, and ICMP probes
Pigsty’s pg_exporter is a highly customizable PostgreSQL metrics collector supporting all PostgreSQL versions with fine-grained metric control:
Advantages: Flexible, lightweight, and highly configurable
Benefit: Single exporter for heterogeneous PostgreSQL environments
Pigsty v3.7 installs node_exporter on managed nodes and registers Node,
HAProxy, Keepalived, Nginx, Etcd, MinIO, Redis, PostgreSQL, PgBouncer, and
pgBackRest targets with Prometheus when the corresponding modules are
enabled. Component ports and switches are defined by the tagged role
defaults and documented on each module’s parameter page.
Existing PostgreSQL instances and cloud RDS can be registered with
pgsql-monitor.yml. Supply a monitor connection URL with only the required
pg_monitor privileges; Pigsty registers pg_exporter and the Grafana
datasource without provisioning or changing that database.
Grafana can query both Prometheus metrics and PostgreSQL data. The bundled dashboards use variables and URL links for drill-down navigation; ECharts and other packaged plugins can visualize application or business data.
Grafana panels may be combined with PostgreSQL queries to build internal operational views. This is a visualization capability, not a separate Pigsty deployment module or application API.
infra.yml can deploy INFRA independently from PGSQL. Nginx, DNSMasq,
Prometheus, AlertManager, Grafana, and Loki are controlled by their
documented *_enabled parameters, allowing Pigsty to reuse or coexist with
existing infrastructure.
Prometheus and Loki in v3.7 are single-node services by default. Very large metric cardinality, long retention, or complex dashboards require capacity planning. External long-term storage and HA monitoring architectures are manual integrations rather than built-in v3.7 modules.
Pigsty uses Patroni to achieve high availability for PostgreSQL, ensuring automatic failover.
Primary Failure RTO ≈ 30s, RPO < 1MB, Replica Failure RTO≈0 (reset current conn)
Pigsty’s PostgreSQL cluster has battery-included high-availability powered by Patroni, Etcd, and HAProxy.
When you have two or more instances in the PostgreSQL cluster, you have the ability to self-heal from hardware failures without any further configuration — as long as any instance within the cluster survives, the cluster can serve its services. Clients simply need to connect to any node in the cluster to obtain full services without worrying about replication topology changes.
By default, the recovery time objective (RTO) for primary failure is approximately 30s ~ 60s, and the data recovery point objective (RPO) is < 1MB; for standby failure, RPO = 0, RTO ≈ 0 (instantaneous). In consistency-first mode, zero data loss during failover is guaranteed: RPO = 0. These metrics can be configured as needed based on your actual hardware conditions and reliability requirements.
Pigsty incorporates an HAProxy load balancer for automatic traffic switching, offering multiple access methods for clients such as DNS/VIP/LVS. Failovers and switchover are almost imperceptible to the business side except for sporadic interruptions, meaning applications do not need connection string modifications or restarts.
High availability addresses critical operational challenges:
Elevates availability: RPO ≈ 0, RTO < 30s for enhanced data protection
Seamless maintenance: Minimize maintenance windows for operational convenience
Self-healing: Automatic recovery from hardware failures without human intervention
Read scaling: Distribute read-only queries across standby instances
Implementing HA introduces certain trade-offs and requirements:
Infrastructure Requirements: HA requires at least 3 nodes and additional infrastructure dependencies.
High availability cannot prevent:
For these scenarios, additional recovery strategies are needed:
Pigsty’s HA architecture leverages a multi-component design that eliminates single points of failure:
Cluster Management: Orchestrates PostgreSQL processes and handles automatic failover
Consensus Store: Provides distributed configuration and leader election
Load Balancer: Routes traffic and provides service discovery
Virtual IP: Optional Layer 2 VIP binding for seamless connectivity
Cluster Orchestrator
Distributed Configuration Store
Traffic Router and Load Balancer
Virtual IP Management
Pigsty’s HA implementation follows proven patterns for PostgreSQL clustering:
PostgreSQL uses built-in streaming replication for data synchronization between primary and standby nodes.
Patroni uses Etcd for distributed consensus to elect cluster leader and manage topology changes.
When primary fails, Patroni automatically promotes the most up-to-date standby to become the new primary.
HAProxy detects topology changes and automatically routes traffic to the new primary instance.
Primary Node Failure Process
Write Service Interruption: 15-30 seconds during failover process
Standby Node Failure Process
Minimal Impact: Read-only queries experience brief interruption only
Network Partition Handling
Quorum Dependency: Requires majority of consensus nodes to remain operational
Pigsty provides configurable parameters to balance between recovery speed and data consistency:
The pg_rto parameter controls failover timing and sensitivity:
Lower RTO values:
Higher RTO values:
The pg_rpo parameter limits potential data loss during failover:
Lower RPO values:
Higher RPO values:
Use Case: Financial systems, critical transactional data
Use Case: High-traffic applications, read-heavy workloads
Use Case: Most production environments
Network conditions significantly affect HA behavior:
Pigsty provides comprehensive monitoring for HA cluster health:
Monitor cluster topology, leader status, and member health
Track replication lag and sync status across all replicas
Log and analyze failover events and their impact
Monitor query performance and connection health
Pigsty includes pre-built Grafana dashboards for HA monitoring:
Anti-Affinity: Deploy cluster nodes across different physical hosts, racks, or availability zones.
Avoid These Common Mistakes:
Pigsty’s high availability solution provides:
The combination of Patroni, Etcd, and HAProxy creates a robust, production-ready HA solution that handles the majority of failure scenarios automatically while providing the flexibility to tune behavior based on specific requirements.
High availability is not just about technology—it’s about building resilient systems that your business can depend on.
Point-in-Time Recovery (PITR) allows rolling back a PostgreSQL cluster to any specific moment in the past, preventing data loss from software defects or human errors. Pigsty uses pgBackRest for PITR, with configurable backup strategies using local filesystems or object storage like MinIO.
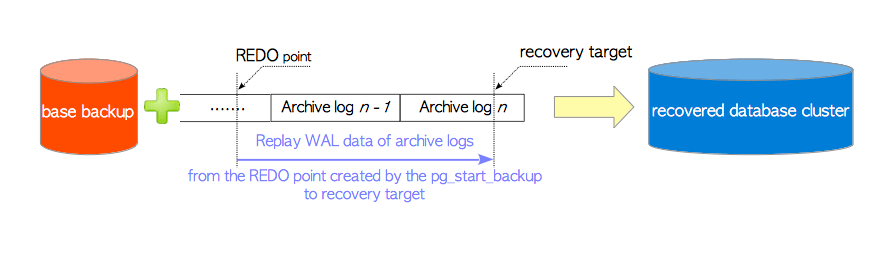
Time Travel for Databases: Roll back your cluster to any point in time, protecting against software defects, human errors, and data corruption scenarios that high availability cannot address.
Pigsty provides enterprise-grade Point-in-Time Recovery with zero-configuration setup, automated backups, and flexible restore options. Built on pgBackRest with MinIO/S3 support, it protects against data corruption, human errors, and logical disasters.
Minimize Recovery Point Objective with continuous WAL archiving
Enhanced data integrity protection against corruption
Improved disaster recovery capabilities with flexible restore options
PITR requires two key components working together to enable point-in-time recovery:
Uses pgBackRest to create database cluster snapshots with multiple backup types:

- **Full backups**: Complete database cluster snapshots
- **Incremental backups**: Only changes since the last backup
- **Differential backups**: Changes since the last full backup
- **Scheduled backups**: Periodic backups configured via Crontab
Continuously archives Write-Ahead Log (WAL) segment files:

- **Continuous archiving**: Real-time WAL file preservation
- **Automatic management**: WAL files and cleanup handled automatically
- **Optional feature**: Can be disabled if PITR is not needed
Pigsty provides two default backup strategies with flexible configuration options:
- **Frequency**: Daily full backups
- **Storage**: Local filesystem storage
- **Use case**: Single-node or local development environments
- **Frequency**: Weekly full backup with daily incremental backups
- **Storage**: Object storage (MinIO, S3)
- **Use case**: Production environments with distributed storage
Backup configuration is highly flexible with options to specify:
Recovery operations should be performed carefully as they will replace the current database state.
Recovery commands allow restoring to various points in time:
### Latest WAL Archive
Restore to the most recent point available in WAL archives:
```bash
pg-pitr
```
### Specific Timestamp
Restore to an exact moment in time:
```bash
pg-pitr --time="2022-12-30 14:44:44+08"
```
### Named Restore Point
Restore to a previously created named point:
```bash
pg-pitr --name="my-restore-point"
```
### Specific LSN or Transaction ID
Restore to a particular Log Sequence Number or transaction:
```bash
pg-pitr --lsn="0/1234567"
pg-pitr --xid="12345"
```
While PITR is powerful for data recovery, it should ideally be combined with High Availability solutions for comprehensive data protection against both logical and physical failures.
Pigsty provides a declarative interface: Describe everything in a config file, and Pigsty operates it to the desired state with idempotent playbooks. It works like Kubernetes CRDs & Operators but for databases and infrastructures on any nodes: bare metal or virtual machines.
Infra as Code, Database as Code: Declarative API & Idempotent Playbooks, GitOPS works like a charm.
You can declare modules on a single node:
And apply with playbooks:
To create a three-node HA postgres cluster with streaming replication:
And apply with:
You can deep customize a database cluster:
Define advanced access control rules:
Declare a horizontally distributed Citus cluster:
Declare different types of Redis clusters:
Declare a 3-node etcd consensus cluster:
Declare a 3-node MinIO object storage cluster:
Pigsty enables you to describe your entire infrastructure declaratively and manage it through code, providing consistency, repeatability, and scalability for your database and infrastructure operations.
Pigsty runs on bare Linux, We support mainstream Linux distributions like EL / Debian / Ubuntu, and compatible Linux distributions like Rocky Linux, AlmaLinux, etc…
We do this on purpose. It is hard to compile and package all the postgres related packages and hundreds of extensions into RPM/DEB for each Major version x PG version x OS Arch…
But I believe this is the right thing to do. So we don’t take shortcuts like Docker, Podman, or Kubernetes.
Self-Hosting Supabase
Run Odoo the OSS ERP
Run Dify the AI workflow
Run official Admin GUI Tool
Pigsty (/ˈpɪɡ staɪ/) is a Battery-Included, FOSS PostgreSQL Distribution as a Local-First RDS Alternative.
Create self-healing High-Available PG clusters without hassle, with pre-configured Point-In-Time-Recovery, ACL, CA, SSL...
Declare your entire infra with code, and setup everything PG needs from Bare OS: LB, Nginx, NTP, DNS, Local Repo, etc...
Unparalleled monitoring best practices built upon modern Prometheus & Grafana observability stacks out-of-the-box
<span class="text-red-800 font-bold">437</span> PGSQL Extensions battery-included! Alone with forks: Babelfish, Oriole, IvorySQL, OpenHalo, PolarDB, Supabase,...
Pigsty provides everything you’ll need for self-hosting an enterprise-grade PostgreSQL Service even without expertise.
Just use PostgreSQL for EVERYTHING, and Self-Hosting PostgreSQL Like a Pro!
Read our in-depth What is Pigsty introduction.
PostgreSQL is eating the database world, and it is becoming the Linux kernel of the database world.
But where are the distributions?
Nowadays, people use OS distributions like Ubuntu, Debian, and RHEL, rather than the raw Linux kernel directly. You’ll need a lot of components to build a practical operating system, such as systemd, cron, NTP, DNS, logging, …, to make the raw Linux kernel usable.
The linux kernel is several MB in size, but a full OS DVD can easily take up 10+GB, including all the necessary parts and software packages. That’s what a PostgreSQL Distribution is all about —— Gives you everything to build a production-grade Database Service.
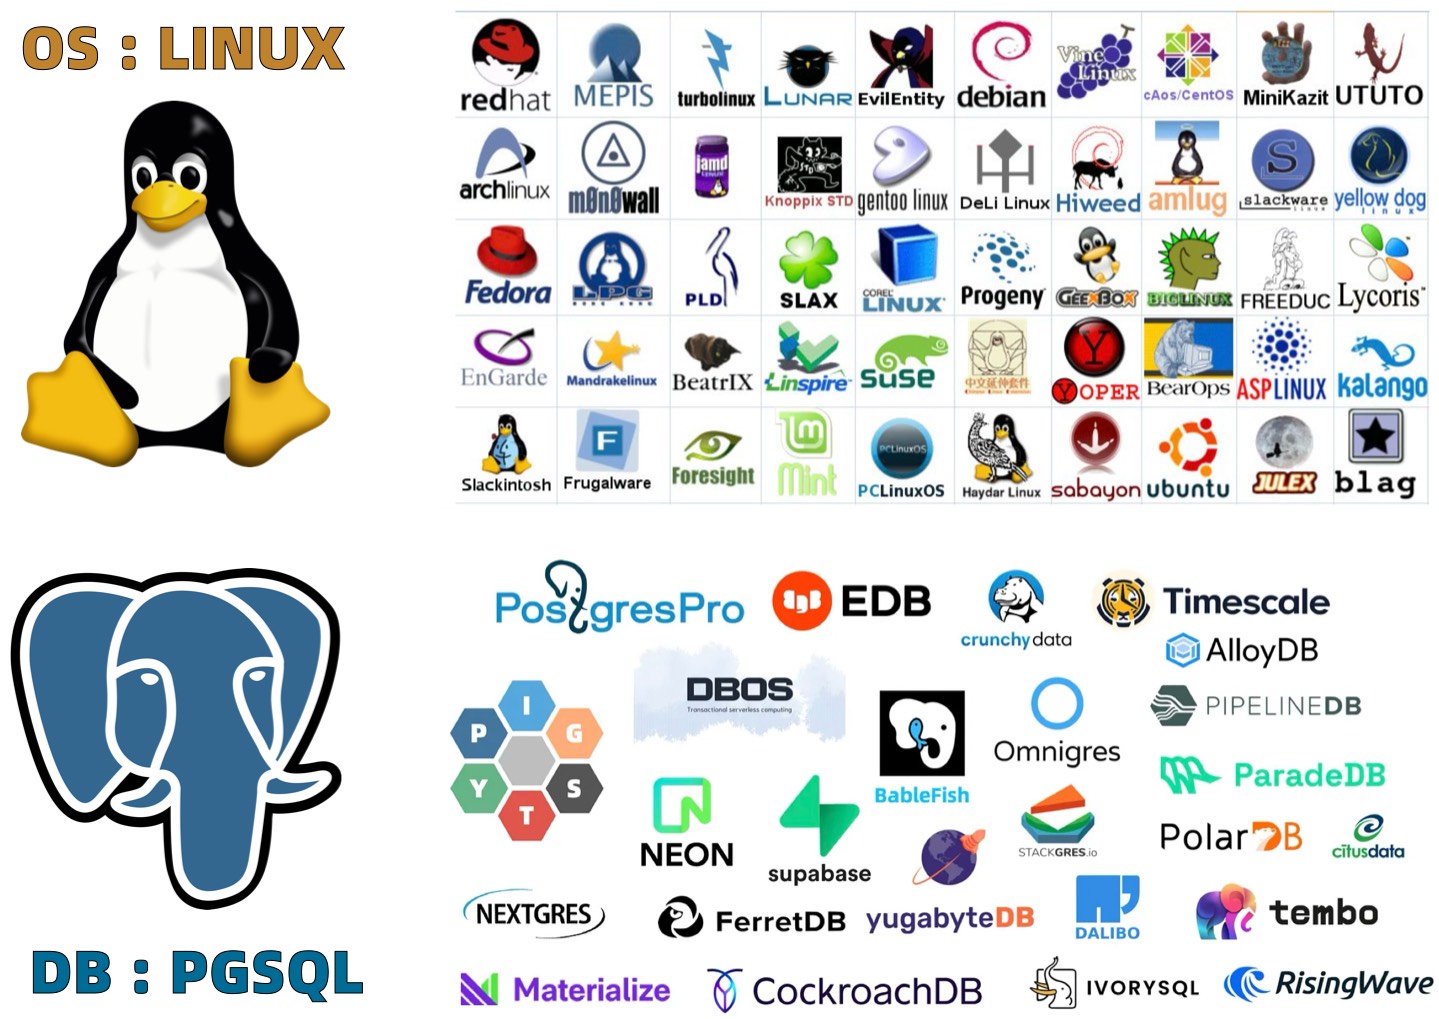
We have two things to forge a powerful PostgreSQL distribution: Extensions and Services.
There are 1000+ extensions in the PostgreSQL ecosystem. But only 100 of them are accessible via the “Official” PGDG Repositories.
So we packed the most popular and useful extensions into pre-made RPM/DEB packages for 10 linux distributions and 5 PG Major version. Now there are unparalleled 422 extensions available out-of-the-box, and we will continue to add more extensions in the future.
What’s more, we even have support for 8 flavors of PostgreSQL kernels (ext, fork, wrapper, etc.), including:
| Kernel | Key Feature | Description |
|---|---|---|
| Citus | Horizontal Scaling | Native Distributive PostgreSQL |
| WiltonDB | SQL Server Migration | SQL Server wire-compatibility |
| IvorySQL | Oracle Migration | Oracle Grammar and PL/SQL compatible |
| OpenHalo | MySQL Migration | MySQL wire-protocol compatibility |
| FerretDB | MongoDB Migration | MongoDB wire-protocol compatibility |
| OrioleDB | OLTP Optimization | Zheap, No bloat, S3 Storage |
| PolarDB PG | Aurora flavor RAC | RAC, China domestic compliance |
| Supabase | Backend as Service | BaaS based on PostgreSQL, Firebase alternative |
| Greenplum | Analytics/DW | Massively parallel processing database warehouse |
You can get started with raw PostgreSQL kernel easily like systemctl start postgresql, but it’s far away from production grade service.
That’s the main reason why people pay 160 $ / vCPU·Month for a managed PostgreSQL service like AWS RDS.
But what if you can just build an enterprise-grade PostgreSQL service on your own, with a few commands, and no license fees? Pigsty enables you to do that. It gives you HA PostgreSQL clusters with PITR, Monitoring & Alerting, Connection Pooling, along with
You can get started with raw PostgreSQL kernel easily like systemctl start postgresql, but it’s far away from production grade service.
That’s the main reason why people pay 160 $ / vCPU·Month for a managed PostgreSQL service like AWS RDS. and even pay more for traditional “enterprise” database services.
The expertise of Building and Managing Production-Grade PostgreSQL Service is rare and expensive.
But what if you can just build an enterprise-grade PostgreSQL service on your own, with a few commands, and no license fees? Pigsty enables you to do that. It gives you HA PostgreSQL clusters with PITR, Monitoring & Alerting, Connection Pooling, along with
It’s all starts from a few commands, and you can build a production-grade PostgreSQL service on your own, without the need for expensive licenses or expertise.
Modular Architecture and Declarative Interface!
Pigsty uses a modular design, and there are six default modules: PGSQL, INFRA, NODE, ETCD, REDIS, and MINIO.
PGSQL: Autonomous HA Postgres cluster powered by Patroni, Pgbouncer, HAproxy, PgBackrest, etc…INFRA: Local yum/apt repo, Prometheus, Grafana, Loki, AlertManager, PushGateway, Blackbox Exporter…NODE: Tune node to desired state, name, timezone, NTP, ssh, sudo, haproxy, docker, promtail, keepalivedETCD: Distributed key-value store will be used as DCS for high-available Postgres clusters.REDIS: Redis servers in standalone master-replica, sentinel, cluster mode with Redis exporter.MINIO: S3 compatible simple object storage server, can be used as an optional backup center for Postgres.You can compose them freely in a declarative manner. If you want host monitoring, INFRA & NODE will suffice. Additional ETCD and PGSQL are used for HA PG Clusters. Deploying them on multiple nodes will form an HA cluster. You can reuse pigsty infra and develop your modules, considering optional REDIS and MINIO as examples.
Pigsty will install on a single node (BareMetal / VirtualMachine) by default. The install.yml playbook will install INFRA, ETCD, PGSQL, and optional MINIO modules on the current node, which will give you a full-featured observability infrastructure (Prometheus, Grafana, Loki, AlertManager, PushGateway, BlackboxExporter, etc… ) and a battery-included PostgreSQL Singleton Instance (Named meta).
This node now has a self-monitoring system, visualization toolsets, and a Postgres database with autoconfigured PITR. You can use this node for devbox, testing, running demos, and doing data visualization & analysis. Or, furthermore, adding more nodes to it!
The installed Singleton Meta can be used as an admin node and monitoring center, to take more nodes & Database servers under it’s surveillance & control.
If you want to install the Prometheus / Grafana observability stack, Pigsty just deliver the best practice for you! It has fine-grained dashboards for Nodes & PostgreSQL, no matter these nodes or PostgreSQL servers are managed by Pigsty or not, you can have a production-grade monitoring & alerting immediately with simple configuration.
With Pigsty, you can have your own local production-grade HA PostgreSQL RDS as much as you want.
And to create such a HA PostgreSQL cluster, All you have to do is describe it & run the playbook:
Which will give you the following cluster with monitoring, replica, backup all set.
Hardware failures are covered by self-healing HA architecture powered by patroni, etcd, and haproxy, which will perform auto failover in case of leader failure under 30 seconds. With the self-healing traffic control powered by haproxy, the client may not even notice there’s a failure at all, in case of a switchover or replica failure.
Software Failures, human errors, and DC Failure are covered by pgbackrest, and optional MinIO clusters. Which gives you the ability to perform point-in-time recovery to anytime (as long as your storage is capable)
Pigsty follows IaC & GitOPS philosophy: Pigsty deployment is described by declarative Config Inventory and materialized with idempotent playbooks.
The user describes the desired status with Parameters in a declarative manner, and the playbooks tune target nodes into that status in an idempotent manner. It’s like Kubernetes CRD & Operator but works on Bare Metals & Virtual Machines.
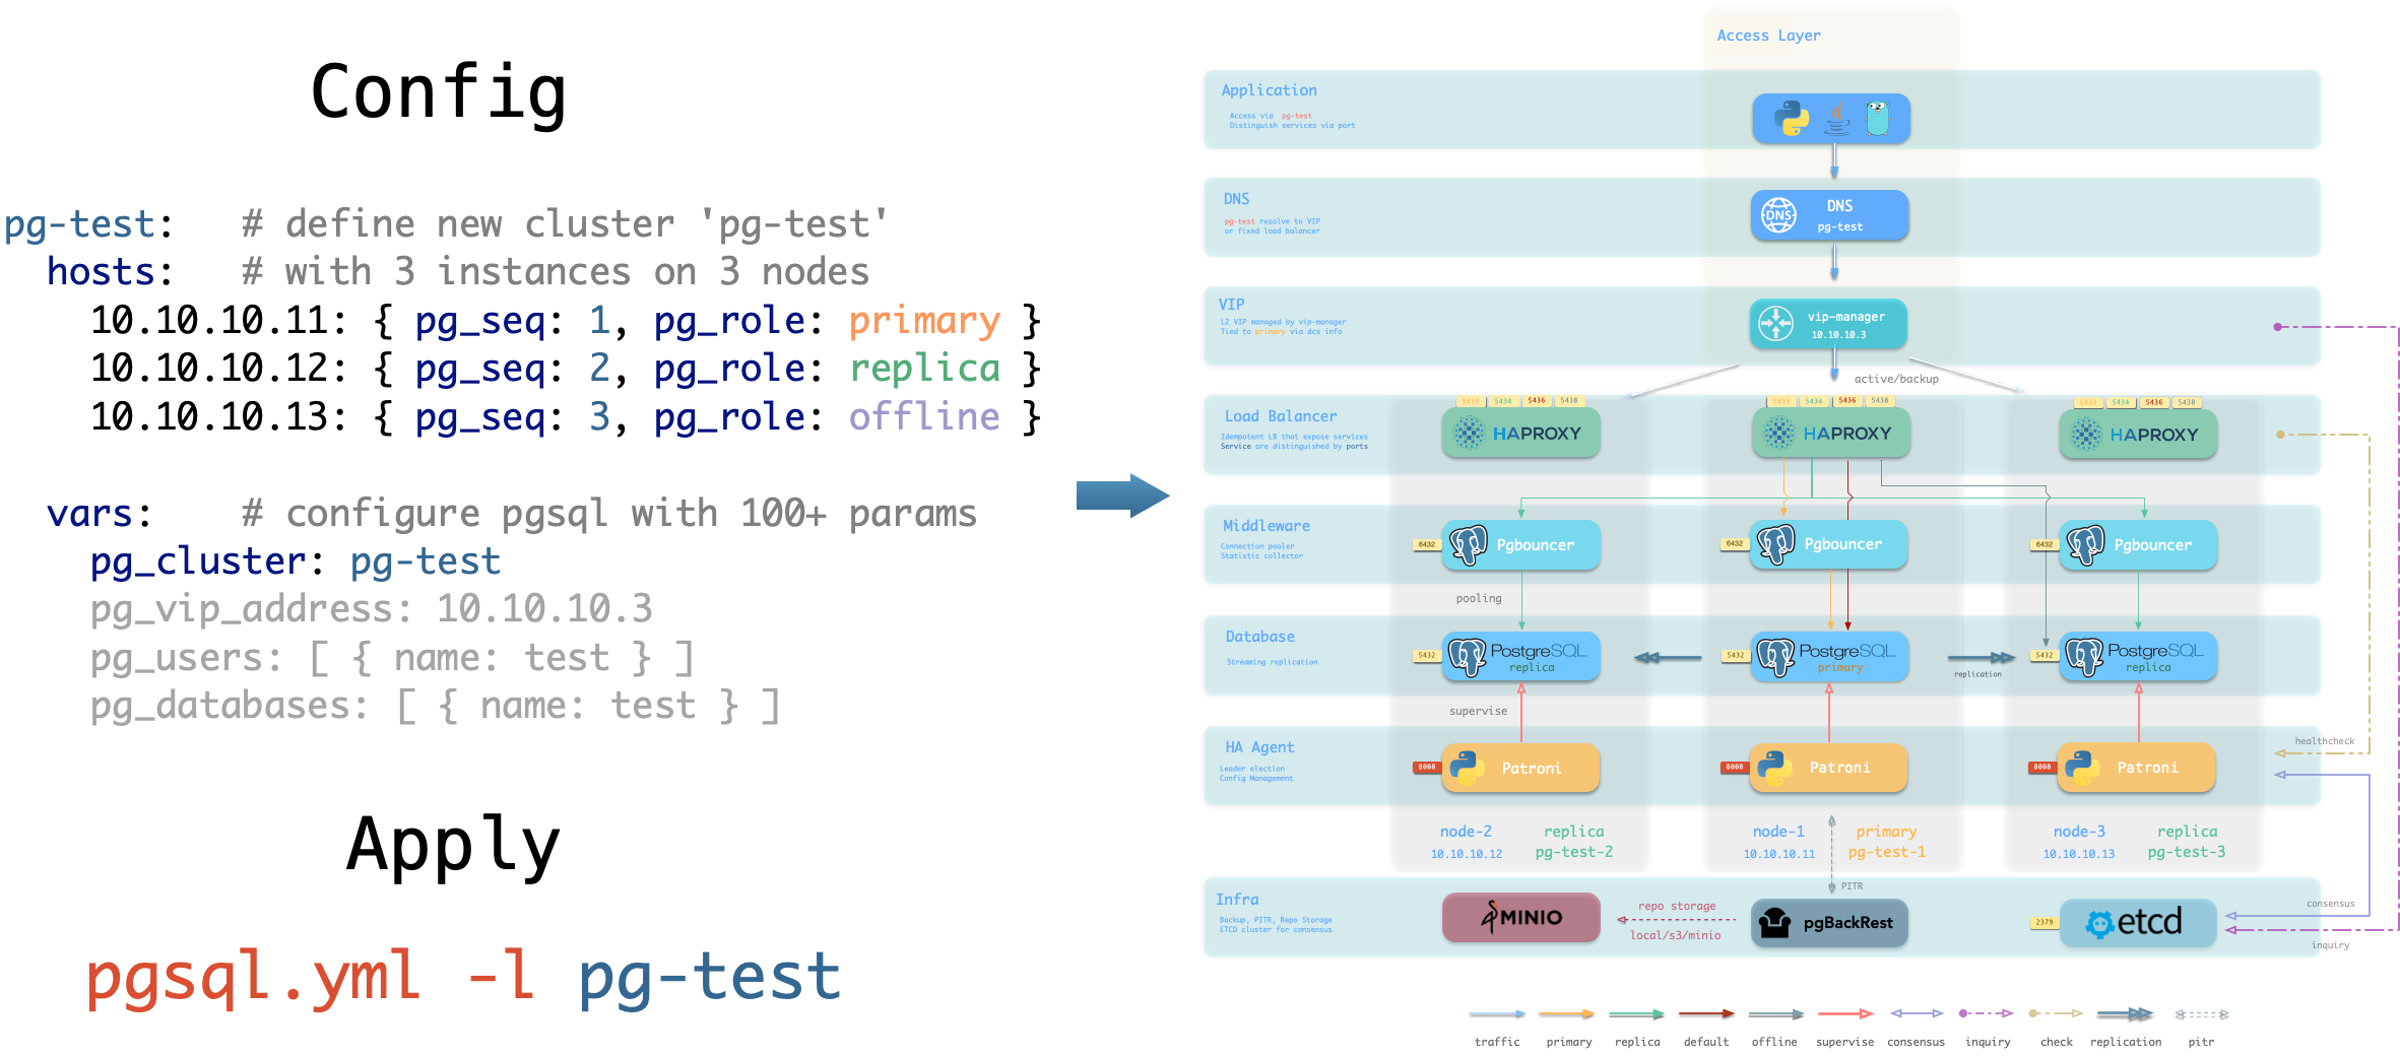
Take the default config snippet as an example, which describes a node 10.10.10.10 with modules INFRA, NODE, ETCD, and PGSQL installed.
To materialize it, use the following playbooks:
It would be straightforward to perform regular administration tasks. For example, if you wish to add a new replica/database/user to an existing HA PostgreSQL cluster, all you need to do is add a host in config & run that playbook on it, such as:
You can even manage many PostgreSQL Entities using this approach: User/Role, Database, Service, HBA Rules, Extensions, Schemas, etc…
Check PGSQL Config for details.
Notice: this post is outdated and re-generated with claude
Pigsty positions itself as a local-first, open-source PostgreSQL platform that challenges traditional cloud database services and complex orchestration platforms. This comparison demonstrates Pigsty’s advantages across key dimensions.
| Feature | AWS RDS PostgreSQL | Pigsty |
|---|---|---|
| Deployment | Managed cloud service | Self-hosted on bare metal/VM/cloud |
| Cost | $200-1,300/core/month | $20-40/core/month hardware cost |
| Licensing | Proprietary + usage fees | AGPLv3 open source |
| Extensions | Limited, AWS-approved only | 400+ extensions freely available |
| Monitoring Metrics | 99 basic metrics | 3,000+ comprehensive metrics |
| Dashboards | CloudWatch basic views | 50+ specialized dashboards |
| Superuser Access | Restricted | Full superuser privileges |
| Data Sovereignty | AWS controlled | Complete local control |
| Offline Operation | Impossible | Full offline capability |
| Migration Flexibility | Vendor lock-in | Multi-cloud portability |
Traditional Cloud RDS Pricing:
Pigsty Total Cost of Ownership:
Pigsty Monitoring Capabilities:
Cloud Provider Limitations:
| Aspect | Kubernetes Operators | Pigsty |
|---|---|---|
| Complexity | High learning curve | Simple Ansible-based |
| Dependencies | Kubernetes cluster required | Bare Linux sufficient |
| Resource Overhead | Container orchestration overhead | Native performance |
| Monitoring | Separate monitoring stack needed | Integrated observability |
| Storage | Complex PV/PVC management | Direct storage access |
| Networking | K8s networking complexity | Standard Linux networking |
| Debugging | Multi-layer troubleshooting | Direct system access |
| Operational Burden | Kubernetes + DB operations | Database-focused operations |
Simplicity Benefits:
Operational Advantages:
| Feature | EnterpriseDB | Postgres Pro | VMware Postgres | Pigsty |
|---|---|---|---|---|
| Licensing | Commercial | Commercial | Commercial | AGPLv3 |
| Cost | High license fees | High license fees | High license fees | Free |
| Extensions | Limited selection | Curated set | VMware-specific | 400+ available |
| Monitoring | Additional purchase | Basic included | vCenter integration | 3,000+ metrics included |
| High Availability | Enterprise feature | Available | Available | Built-in |
| Support | Paid support only | Paid support | VMware support | Community + commercial |
| Solution | Focus Area | Pigsty Advantage |
|---|---|---|
| Patroni | HA clustering only | Complete platform with monitoring |
| PostgreSQL Helm Charts | K8s deployment | No K8s dependency, simpler ops |
| Postgres Operator | K8s orchestration | Native performance, easier management |
| TimescaleDB Cloud | Time-series focus | General-purpose with time-series support |
| Supabase | Backend-as-a-Service | Full infrastructure control |
Cloud Provider Lock-in Risks:
Pigsty Multi-Cloud Benefits:
graph TB
    A[Existing PostgreSQL] --> B[Pigsty Migration Tool]
    B --> C[Cloud Provider A]
    B --> D[Cloud Provider B]
    B --> E[On-Premises]
    B --> F[Hybrid Deployment]

    C --> G[Cross-Cloud Replication]
    D --> G
    E --> G
    F --> G
Migration Capabilities:
| Category | Cloud RDS | Pigsty |
|---|---|---|
| Analytics | Limited (no pg_duckdb) | Full OLAP stack |
| Vector/AI | Basic pgvector | pgvector, pgml, pg_embedding |
| Geospatial | PostGIS only | PostGIS + advanced GIS extensions |
| Time Series | Basic TimescaleDB | TimescaleDB + specialized tools |
| Graph | Not available | Apache AGE + graph extensions |
| Search | Basic text search | Advanced search + vector hybrid |
| Monitoring | None | pg_stat_monitor + custom metrics |
Pigsty Includes:
Cloud Limitations:
Pigsty Performance Advantages:
Benchmark Results:
Efficiency Gains:
| Security Aspect | Cloud RDS | Pigsty |
|---|---|---|
| Data Location | Cloud provider controlled | Fully controlled |
| Encryption | Provider-managed keys | Self-managed PKI |
| Access Control | Platform-dependent | Full administrative control |
| Audit Logging | Limited visibility | Complete audit trail |
| Compliance | Provider certifications | Direct compliance control |
| Vulnerability Management | Provider responsibility | Direct security management |
Pigsty Sovereignty Benefits:
Ideal Use Cases:
Cloud RDS Advantages:
Migration Path:
Pigsty delivers enterprise-grade PostgreSQL capabilities with significant cost savings, superior observability, and complete operational control, making it a compelling alternative to cloud database services and complex orchestration platforms.
Pigsty consists of multiple modules. The PINE stack: PGSQL / INFRA / NODE / ETCD are ESSENTIAL for self-hosting Postgres RDS service.
HA PG Cluster with PITR, IaC, ACL, Monitor, and 437 extensions
Nginx, Repo, DNS, NTP, Prometheus and Grafana stack for Observability
Enroll nodes into the desired state and monitor it, and VIP, HAProxy
Reliable distributive consensus storage (DCS), empowering PGSQL HA
Pigsty also have some OPTIONAL “Bonus” modules, which works well with PostgreSQL, and brings extra value to your data infrastructure.
S3 compatible object storage compatible, optional backup storage
High-performance in-memory cache, optional data structure server
Container runtime, optional for running stateless app and tools
MongoDB wire-protocol compatible on PostgreSQL, optional middleware
Pigsty allows using 8 exotic PostgreSQL KERNEL forks, as an optional in-place replacement:
Native Distributive Extension
SQL Server wire-compatible
Oracle grammar & PL/SQL compatible
MySQL wire-compatibility
OLTP-optimized cloud-native storage engine
Aurora-like shared storage, with china compliance
Backend as a Service, self-hosting Firebase
Massively parallel processing data warehouse
The latest stable version of pigsty: **v3.7.0**
There's no active beta release now.
Pigsty release notes of all history versions.
`pig` the Package manager release note.
`pg_exporter` the prometheus metrics exporter release note
Observability and infra package release note
PostgreSQL rpm packages change log and release notes.
PostgreSQL deb packages change log and release notes.
| Version | Date | Summary | GitHub |
|---|---|---|---|
| v3.7.0 | 2025-12-02 | PG18 as default, el10, d13 full support, pgext.cloud with 437 ext | v3.7.0 |
| v3.6.1 | 2025-08-15 | Routine PG minor update, PGDG CN Mirror, el10, d13 stub | v3.6.1 |
| v3.6.0 | 2025-07-30 | Better PITR & Supabase, MinIO, Etcd, & Simple Install | v3.6.0 |
| v3.5.0 | 2025-06-16 | PG18 beta, 421 ext, monitor & pgsql refactor | v3.5.0 |
| v3.4.1 | 2025-04-05 | OpenHalo & OrioleDB, MySQL Compatibility pgAdmin 9.2 | v3.4.1 |
| v3.4.0 | 2025-03-30 | Better Backups, Auto Certbot, Locale, Ivory, AGE, APP | v3.4.0 |
| v3.3.0 | 2025-02-24 | 404 extension, App Playbook, DocumentDB, Extension Catalog | v3.3.0 |
| v3.2.2 | 2025-01-23 | 390 extension, omnigres, mooncake, citus13 with pg17 | v3.2.2 |
| v3.2.1 | 2025-01-12 | 351 extension, anon, ivorysql4, Odoo self-hosting | v3.2.1 |
| v3.2.0 | 2024-12-25 | Pig CLI, Arm64 Full Extension, Supabase & Grafana Enhance | v3.2.0 |
| v3.1.0 | 2024-11-24 | ARM64 & Ubuntu24, PG17 by Default, Better Supabase & MinIO | v3.1.0 |
| v3.0.4 | 2024-10-28 | PostgreSQL 17 Extensions, Better self-hosting Supabase | v3.0.4 |
| v3.0.3 | 2024-09-27 | PostgreSQL 17, Etcd Enhancement, IvorySQL 3.4,PostGIS 3.5 | v3.0.3 |
| v3.0.2 | 2024-09-07 | Mini Install, PolarDB 15, Bloat View Update | v3.0.2 |
| v3.0.1 | 2024-08-31 | Oracle Compatibility, Patroni 4.0, Routine Bug Fix | v3.0.1 |
| v3.0.0 | 2024-08-30 | Extension Exploding & Plugable Kernels (MSSQL,Oracle) | v3.0.0 |
| v2.7.0 | 2024-05-16 | Extension Overwhelming, new docker apps | v2.7.0 |
| v2.6.0 | 2024-02-29 | PG 16 as default version, ParadeDB & DuckDB | v2.6.0 |
| v2.5.1 | 2023-12-01 | Routine update, pg16 major extensions | v2.5.1 |
| v2.5.0 | 2023-10-24 | Ubuntu/Debian Support: bullseye, bookworm, jammy, focal | v2.5.0 |
| v2.4.1 | 2023-09-24 | Supabase/PostgresML support, graphql, jwt, pg_net, vault | v2.4.1 |
| v2.4.0 | 2023-09-14 | PG16, RDS Monitor, New Extensions | v2.4.0 |
| v2.3.1 | 2023-09-01 | PGVector with HNSW, PG16 RC1, Chinese Docs, Bug Fix | v2.3.1 |
| v2.3.0 | 2023-08-20 | PGSQL/REDIS Update, NODE VIP, Mongo/FerretDB, MYSQL Stub | v2.3.0 |
| v2.2.0 | 2023-08-04 | Dashboard & Provision overhaul, UOS compatibility | v2.2.0 |
| v2.1.0 | 2023-06-10 | PostgreSQL 12 ~ 16beta support | v2.1.0 |
| v2.0.2 | 2023-03-31 | Add pgvector support and fix MinIO CVE | v2.0.2 |
| v2.0.1 | 2023-03-21 | v2 Bug Fix, security enhance and bump grafana version | v2.0.1 |
| v2.0.0 | 2023-02-28 | Compatibility Security Maintainability Enhancement | v2.0.0 |
| v1.5.1 | 2022-06-18 | Grafana Security Hotfix | v1.5.1 |
| v1.5.0 | 2022-05-31 | Docker Applications | v1.5.0 |
| v1.4.1 | 2022-04-20 | Bug fix & Full translation of English documents. | v1.4.1 |
| v1.4.0 | 2022-03-31 | MatrixDB Support, Separated INFRA, NODES, PGSQL, REDIS | v1.4.0 |
| v1.3.0 | 2021-11-30 | PGCAT Overhaul & PGSQL Enhancement & Redis Support Beta | v1.3.0 |
| v1.2.0 | 2021-11-03 | Upgrade default Postgres to 14, monitoring existing pg | v1.2.0 |
| v1.1.0 | 2021-10-12 | HomePage, JupyterLab, PGWEB, Pev2 & Pgbadger | v1.1.0 |
| v1.0.0 | 2021-07-26 | v1 GA, Monitoring System Overhaul | v1.0.0 |
| v0.9.0 | 2021-04-04 | Pigsty GUI, CLI, Logging Integration | v0.9.0 |
| v0.8.0 | 2021-03-28 | Service Provision | v0.8.0 |
| v0.7.0 | 2021-03-01 | Monitor only deployment | v0.7.0 |
| v0.6.0 | 2021-02-19 | Architecture Enhancement | v0.6.0 |
| v0.5.0 | 2021-01-07 | Database Customize Template | v0.5.0 |
| v0.4.0 | 2020-12-14 | PostgreSQL 13 Support, Official Documentation | v0.4.0 |
| v0.3.0 | 2020-10-22 | Provisioning Solution GA | v0.3.0 |
| v0.2.0 | 2020-07-10 | PGSQL Monitoring v6 GA | v0.2.0 |
| v0.1.0 | 2020-06-20 | Validation on Testing Environment | v0.1.0 |
| v0.0.5 | 2020-08-19 | Offline Installation Mode | v0.0.5 |
| v0.0.4 | 2020-07-27 | Refactor playbooks into ansible roles | v0.0.4 |
| v0.0.3 | 2020-06-22 | Interface enhancement | v0.0.3 |
| v0.0.2 | 2020-04-30 | First Commit | v0.0.2 |
| v0.0.1 | 2019-05-15 | POC | v0.0.1 |
Highlights
Version Updates
For detailed version changes, please refer to:
API Changes
citus extension is no longer installed by default in rich and full templates (PG 18 support pending).duckdb extension stubs to PostgreSQL parameter templates.min_wal_size, max_wal_size, and max_slot_wal_keep_size at 200 GB, 2000 GB, and 3000 GB, respectively.temp_file_limit at 200 GB (2 TB for OLAP workloads).prometheus_port (default: 9058) to avoid conflicts with the EL10 RHEL Web Console port.alertmanager_port default to 9059 to avoid potential conflicts with Kafka SSL ports.pg_pre subtask to pg_pkg: removes conflicting LLVM packages (bpftool, python3-perf) on EL9+ prior to PG installation.llvm module to the default repository definition for Debian/Ubuntu.infra-rm.yml.Compatibility Fixes
int type casting for sequence variables.with_items syntax to loop.range usage to list.name and port.play_hosts with ansible_play_hosts.ansible-collection-community-crypto preventing key generation.ansible logic packages.modulemd_tools, flamegraph, and timescaledb-tool.java-17-openjdk with java-21-openjdk.dnsutils with bind9-dnsutils.tcpdump due to upstream dependency crashes.Checksums
Highlights
Infra Package Updates
Extension Package Updates
API Changes
br_filter from default node_kernel_modulesChecksums
Highlights
pgsql-pitr playbook and backup/restore tutorial, improved PITR experienceImprovements
ETCD module with dedicate remove playbook and bin utilsMinIO module with plain HTTP mode, better bucket provisioning options.pgactive for multi-master replication and sub-second failoverpg_fs_main / pg_fs_backup, simplified file directory structure designBug Fixes
haproxy_enabled flag not workingInfra Package Updates
Added Victoria Metrics / Victoria Logs related packages
Database Package Updates
pig install subcommandExtension Package Updates
API Changes
pg_fs_backup: Renamed to pg_fs_backup, default value /data/backups.pg_rm_bkup: Renamed to pg_rm_backup, default value true.pg_fs_main: Default value adjusted to /data/postgres.nginx_cert_validity: New parameter to control Nginx self-signed certificate validity, default 397d.minio_buckets: Default value adjusted to create three buckets named pgsql, meta, data.minio_users: Removed dba user, added s3user_meta and s3user_data users for meta and data buckets respectively.minio_https: New parameter to allow MinIO to use HTTP mode.minio_provision: New parameter to allow skipping MinIO provisioning stage (skip bucket and user creation)minio_safeguard: New parameter, abort minio-rm.yml when enabledminio_rm_data: New parameter, whether to remove minio data directory during minio-rm.ymlminio_rm_pkg: New parameter, whether to uninstall minio package during minio-rm.ymletcd_learner: New parameter to control whether to init etcd instance as learneretcd_rm_data: New parameter, whether to remove etcd data directory during etcd-rm.ymletcd_rm_pkg: New parameter, whether to uninstall etcd package during etcd-rm.ymlChecksums
Highlights
pg_exporter 1.0.0, installer alias via pig 0.4.2, and a pg18 templatepig do CLI replaces legacy bin/ scriptspg_exporter 1.0, new panels & pluginsModule Changes
pg18.ymlpgsql modulepg_monitor role; removed clean logicdir/utils block, renamed templates (no .j2)extensions schema (Supabase best-practice)SET search_path='' to every monitoring functionpgbouncer_ignore_parampg_key task to generate pgsodium master keyssync_replication_slots by default on PG 17pg_remove modulepg_rm_data, pg_rm_bkup, pg_rm_pkg control what gets wipedpg_monitor modulepg_exporterpg_exporter 0.9.0 with updated replication slot metrics for PG16/17pgsodium server key loadingsupa-kick crontabset search_path clause for monitor functionspig do command to CLI, allowing command-line tool to replace Shell scripts in bin/Infra Package Updates
Observability Package Updates
Database Package Updates
Extension Package Updates
Checksums
GitHub Release Page: v3.4.1
mysql_fdw extension with dependency errors from EL8Infra Updates
Extension Update
Checksums
GitHub Release Page: v3.4.0
Introduction Blog: Pigsty v3.4 MySQL Compatibility and Overall Enhancements
New Features
C/C.UTF-8 locale settingsapp.yml playbook: launch standard Docker app without extra configInfra Packages
PostgreSQL Related
PostgreSQL Extensions
Interface Changes
docker_data and docker_storage_driver (#521 by @waitingsong)alertmanager_port, which lets you specify the AlertManager portcertbot_sign, apply for cert during nginx init? (false by default)certbot_email, specifying the email used when requesting certificates via Certbotcertbot_options, specifying additional parameters for Certbot/usr/ivory-4 starting in IvorySQL 4.4pg_lc_ctype and other locale-related parameters from en_US.UTF-8 to CUTF8 encoding with C or C.UTF-8 locales, PostgreSQL’s built-in localization rules now take priorityconfigure automatically detects whether C.utf8 is supported by both the PG version and the environment, and adjusts locale-related options accordingly/usr/ivory-4pg_packages to pgsql-main patroni pgbouncer pgbackrest pg_exporter pgbadger vip-managerrepo_packages to [node-bootstrap, infra-package, infra-addons, node-package1, node-package2, pgsql-utility, extra-modules]LANG and LC_ALL environment variable settings from /etc/profile.d/node.shbento/rockylinux-8 and bento/rockylinux-9 as the Vagrant box images for ELextra_modules, which includes additional optional modulespostgresql, pgsql-main, pgsql-core, pgsql-fullnode.yml playbook now includes a node_pip task to configure a pip mirror on each nodepgsql.yml playbook now includes a pgbackrest_exporter task for collecting backup metricsMakefile now allows the use of META/PKG environment variables/pg/spool directory as temporary storage for pgBackRestlink-all option by defaultBug Fixes
pg-backup (#532 by @waitingsong)pg-tune-hugepage, restricted PostgreSQL to use only large pages (#527 by @waitingsong)pg-role tasknode_repo_modules in the slim templateChecksums
app.yml script for auto-installing apps like Odoo, Supabase, Dify.infra_portal.pg_default_extensions.node_aliases to add command aliases for Nodes.git, docker, systemctl #506 #507 by @waitingsong.ignore_startup_parameters in pgbouncer config template #488 by @waitingsong.pig CLI now auto-sets PostgreSQL extension build environment.New Extensions
12 new PostgreSQL extensions added, bringing the total to 404 available extensions.
Bump Extension
Infra Updates
Omnigres 33 extensions, postgres as platformpg_mooncake: duckdb in postgrespg_xxhashtimescaledb_toolkitpg_xenophilepg_drop_eventspg_incrementalcitus to 13.0.0 with PostgreSQL 17 support.pgml to 2.10.0pg_extra_time to 2.0.0pg_vectorize to 0.20.0What’s Changed
infra_packagespgxxx-citus package aliaspgxxx-olap category in pg_extensions by defaultHighlights
Bump software versions
Add New Extension
Update Extension
Highlights
pig command-line tool for managing extension plugins.Package Changes
timescaledb, timescaledb-loader, timescaledb-toolkit, and timescaledb-tool to the PIGSTY repository.prometheus2 to prometheus)python3-cdiff for el8.aarch64 to fix missing Patroni dependency.timescaledb-tools for el9.aarch64 to fix missing package in official repo.pg_filedump for el9.aarch64 to fix missing package in official repo.pg_duckdb.API Changes
repo_url_packages now defaults to an empty array; packages are installed via OS package managers.grafana_plugin_cache is deprecated; Grafana plugins are now installed via OS package managers.grafana_plugin_list is deprecated for the same reason.simu.node_id/vars now includes aarch64 support.infra_packages now includes the pig CLI tool.configure command now updates the version numbers of pgsql-xxx aliases in auto-generated config files.Bug Fix
--arg value support for pg-pitr by @waitingsongChecksums
2024-11-24 : ARM64 & Ubuntu24, PG17 by Default, Better Supabase & MinIO https://github.com/pgsty/pigsty/releases/tag/v3.1.0
2024-10-28 : PostgreSQL 17 Extensions, Better self-hosting Supabase
https://github.com/pgsty/pigsty/releases/tag/v3.0.4
2024-09-27 : PostgreSQL 17, Etcd Enhancement, IvorySQL 3.4,PostGIS 3.5
https://github.com/pgsty/pigsty/releases/tag/v3.0.3
2024-09-07 : Mini Install, PolarDB 15, Bloat View Update
https://github.com/pgsty/pigsty/releases/tag/v3.0.2
2024-08-31 : Oracle Compatibility, Patroni 4.0, Routine Bug Fix
https://github.com/pgsty/pigsty/releases/tag/v3.0.1
2024-08-30 : Extension Exploding & Plugable Kernels (MSSQL,Oracle)
https://github.com/pgsty/pigsty/releases/tag/v3.0.0
2024-05-16 : Extension Overwhelming, new docker apps
https://github.com/pgsty/pigsty/releases/tag/v2.7.0
2024-02-29 : PG 16 as default version, ParadeDB & DuckDB
https://github.com/pgsty/pigsty/releases/tag/v2.6.0
2023-12-01 : Routine update, pg16 major extensions
https://github.com/pgsty/pigsty/releases/tag/v2.5.1
2023-10-24 : Ubuntu/Debian Support: bullseye, bookworm, jammy, focal
https://github.com/pgsty/pigsty/releases/tag/v2.5.0
2023-09-24 : Supabase/PostgresML support, graphql, jwt, pg_net, vault
https://github.com/pgsty/pigsty/releases/tag/v2.4.1
2023-09-14 : PG16, RDS Monitor, New Extensions
https://github.com/pgsty/pigsty/releases/tag/v2.4.0
2023-09-01 : PGVector with HNSW, PG16 RC1, Chinese Docs, Bug Fix
https://github.com/pgsty/pigsty/releases/tag/v2.3.1
2023-08-20 : PGSQL/REDIS Update, NODE VIP, Mongo/FerretDB, MYSQL Stub
https://github.com/pgsty/pigsty/releases/tag/v2.3.0
2023-08-04 : Dashboard & Provision overhaul, UOS compatibility
https://github.com/pgsty/pigsty/releases/tag/v2.2.0
2023-06-10 : PostgreSQL 12 ~ 16beta support
https://github.com/pgsty/pigsty/releases/tag/v2.1.0
2023-03-31 : Add pgvector support and fix MinIO CVE
https://github.com/pgsty/pigsty/releases/tag/v2.0.2
2023-03-21 : v2 Bug Fix, security enhance and bump grafana version
https://github.com/pgsty/pigsty/releases/tag/v2.0.1
2023-02-28 : Compatibility Security Maintainability Enhancement
https://github.com/pgsty/pigsty/releases/tag/v2.0.0
2022-06-18 : Grafana Security Hotfix
https://github.com/pgsty/pigsty/releases/tag/v1.5.1
2022-05-31 : Docker Applications
https://github.com/pgsty/pigsty/releases/tag/v1.5.0
2022-04-20 : Bug fix & Full translation of English documents.
https://github.com/pgsty/pigsty/releases/tag/v1.4.1
2022-03-31 : MatrixDB Support, Separated INFRA, NODES, PGSQL, REDIS
https://github.com/pgsty/pigsty/releases/tag/v1.4.0
2021-11-30 : PGCAT Overhaul & PGSQL Enhancement & Redis Support Beta
https://github.com/pgsty/pigsty/releases/tag/v1.3.0
2021-11-03 : Upgrade default Postgres to 14, monitoring existing pg
https://github.com/pgsty/pigsty/releases/tag/v1.2.0
2021-10-12 : HomePage, JupyterLab, PGWEB, Pev2 & Pgbadger
https://github.com/pgsty/pigsty/releases/tag/v1.1.0
2021-07-26 : v1 GA, Monitoring System Overhaul
https://github.com/pgsty/pigsty/releases/tag/v1.0.0
2021-04-04 : Pigsty GUI, CLI, Logging Integration
https://github.com/pgsty/pigsty/releases/tag/v0.9.0
2021-03-28 : Service Provision
https://github.com/pgsty/pigsty/releases/tag/v0.8.0
2021-03-01 : Monitor only deployment
https://github.com/pgsty/pigsty/releases/tag/v0.7.0
2021-02-19 : Architecture Enhancement
https://github.com/pgsty/pigsty/releases/tag/v0.6.0
2021-01-07 : Database Customize Template
https://github.com/pgsty/pigsty/releases/tag/v0.5.0
2020-12-14 : PostgreSQL 13 Support, Official Documentation
https://github.com/pgsty/pigsty/releases/tag/v0.4.0
2020-10-22 : Provisioning Solution GA
https://github.com/pgsty/pigsty/releases/tag/v0.3.0
2020-07-10 : PGSQL Monitoring v6 GA
https://github.com/pgsty/pigsty/commit/385e33a62a19817e8ba19997260e6b77d99fe2ba
2020-06-20 : Validation on Testing Environment
https://github.com/pgsty/pigsty/commit/1cf2ea5ee91db071de00ec805032928ff582453b
2020-08-19 : Offline Installation Mode
https://github.com/pgsty/pigsty/commit/0fe9e829b298fe5e56307de3f78c95071de28245
2020-07-27 : Refactor playbooks into ansible roles
https://github.com/pgsty/pigsty/commit/90b44259818d2c71e37df5250fe8ed1078a883d0
2020-06-22 : Interface enhancement
https://github.com/pgsty/pigsty/commit/4c5c68ccd57bc32a9e9c98aa3f264aa19f45c7ee
2020-04-30 : First Commit
https://github.com/pgsty/pigsty/commit/dd646775624ddb33aef7884f4f030682bdc371f8
2019-05-15 : POC
https://github.com/Vonng/pg/commit/fa2ade31f8e81093eeba9d966c20120054f0646b
Highlights
Version Updates
For detailed version changes, please refer to:
API Changes
citus extension is no longer installed by default in rich and full templates (PG 18 support pending).duckdb extension stubs to PostgreSQL parameter templates.min_wal_size, max_wal_size, and max_slot_wal_keep_size at 200 GB, 2000 GB, and 3000 GB, respectively.temp_file_limit at 200 GB (2 TB for OLAP workloads).prometheus_port (default: 9058) to avoid conflicts with the EL10 RHEL Web Console port.alertmanager_port default to 9059 to avoid potential conflicts with Kafka SSL ports.pg_pre subtask to pg_pkg: removes conflicting LLVM packages (bpftool, python3-perf) on EL9+ prior to PG installation.llvm module to the default repository definition for Debian/Ubuntu.infra-rm.yml.Compatibility Fixes
int type casting for sequence variables.with_items syntax to loop.range usage to list.name and port.play_hosts with ansible_play_hosts.ansible-collection-community-crypto preventing key generation.ansible logic packages.modulemd_tools, flamegraph, and timescaledb-tool.java-17-openjdk with java-21-openjdk.dnsutils with bind9-dnsutils.tcpdump due to upstream dependency crashes.Checksums
Note: There is currently no active Beta version available, as the latest stable release, v3.7.0, has just been published.
This historical freeze had no active beta. Use the version-pinned v3.7.0 installer from the latest-release page.
pig is an open-source PostgreSQL (& Extension) Package Manager for Mainstream Linux.
Install PostgreSQL 13 ~ 18 along with 437 extensions on (amd64 / arm64) with native apt/yum/dnf.
The latest stable version is v0.7.4, Check the GitHub Repo and pig documentation for more details.
| Version | Date | Summary | GitHub |
|---|---|---|---|
| v0.7.4 | 2025-12-01 | update ivory, pgtde, pgdg extras | v0.7.4 |
| v0.7.3 | 2025-11-24 | fix repo for el10 & debian13 | v0.7.3 |
| v0.7.2 | 2025-11-20 | 437 extensions, fix pig build issue | v0.7.2 |
| v0.7.1 | 2025-11-10 | New Website, improve in-docker experience | v0.7.1 |
| v0.7.0 | 2025-11-05 | Build Enhancement and massive upgrade | v0.7.0 |
| v0.6.2 | 2025-10-03 | PG 18 official Repo | v0.6.2 |
| v0.6.1 | 2025-08-14 | CI/CD, el10 stub, PGDG CN Mirror | v0.6.1 |
| v0.6.0 | 2025-07-17 | 423 extension, percona pg_tde, mcp toolbox | v0.6.0 |
| v0.5.0 | 2025-06-30 | 422 extension, new extension catalog | v0.5.0 |
| v0.4.2 | 2025-05-27 | 421 extension, halo & oriole deb | v0.4.2 |
| v0.4.1 | 2025-05-07 | 414 extension, pg18 alias support | v0.4.1 |
| v0.4.0 | 2025-05-01 | do & pt sub-cmd, halo & orioledb | v0.4.0 |
| v0.3.4 | 2025-04-05 | routine update | v0.3.4 |
| v0.3.3 | 2025-03-25 | alias, repo, deps | v0.3.3 |
| v0.3.2 | 2025-03-21 | new extensions | v0.3.2 |
| v0.3.1 | 2025-03-19 | minior bug fix | v0.3.1 |
| v0.3.0 | 2025-02-24 | new home page and extension catalog | v0.3.0 |
| v0.2.2 | 2025-02-22 | 404 extensions | v0.2.2 |
| v0.2.0 | 2025-02-14 | 400 extensions | v0.2.0 |
| v0.1.4 | 2025-02-12 | routine bugfix | v0.1.4 |
| v0.1.3 | 2025-01-23 | 390 extensions | v0.1.3 |
| v0.1.2 | 2025-01-12 | the anon extension and 350 other ext | v0.1.2 |
| v0.1.1 | 2025-01-09 | Update Extension List | v0.1.1 |
| v0.1.0 | 2024-12-29 | repo, ext, sty, and self-update | v0.1.0 |
| v0.0.1 | 2024-12-23 | Genesis Release | v0.0.1 |
pg_search, pgmq, pg_stat_monitorextras now move to parent directoryChecksums
pig repo reload to update repo.ymlChecksums
Checksums
pg18, pg17 arg format in pig ext link commandPIG_NO_SUDO to force not using sudoChecksums
pig build overhaul
pig build pkg <pkg> will download source, prepare deps, and build rpm/debpig build pgrx is separated from pig build rust with its own subcommandpig build pgrx [-v pgrx_version] now can scan existing pg and init with thempig build dep will now process EL rpm spec dependencies directlypig build ext will now build EL rpm spec directly without the build scriptpig build spec now support downloading spec files directly from pigsty repopig build repo / pig repo add / pig repo set will now using node,pgsql,infra as default repo modules instead of previous node,pgdg,pigstyChecksums
v prefix when specify pigsty version stringChecksums
pgdg-el10fix repopig install to simplify pig ext installChecksums
Checksums
Release: https://github.com/pgsty/pig/releases/tag/v0.5.0
Checksums
Release: https://github.com/pgsty/pig/releases/tag/v0.4.2
citus_wal2json and citus_pgoutput to pig ext scan mappingExtension Package Updates
Checksums
Release: https://github.com/pgsty/pig/releases/tag/v0.4.1
pig do subcommand for executing Pigsty playbook taskspig pt subcommand for wrapping Patroni command-line toolsopenhalo and orioledbgitlab-ce / gitlab-ee repository distinctionpig ext status panic issue under specific conditionspig ext scan unable to match several extensionsExtension Package Updates
Checksums
Release: https://github.com/pgsty/pig/releases/tag/v0.4.0
gitlab repo to the repo listChecksums
Release: https://github.com/pgsty/pig/releases/tag/v0.3.4
pig build dep command to install extension build dependenciesmssql module (wiltondb/babelfish)infrapgsql, pgsql-main, pgsql-core, pgsql-mini, pgsql-fullivorysql now maps to ivorysql4timescaledb-utilspgbackrest_exporterpgsql-simplepig repo set now will auto update the meta-cacheWhat’s Changed
New Contributors
Full Changelog: https://github.com/pgsty/pig/compare/v0.3.2...v0.3.3
Release: https://github.com/pgsty/pig/releases/tag/v0.3.3
Checksums
Release: https://github.com/pgsty/pig/releases/tag/v0.3.3
Enhancement
upx to reduce binary size-y to force re-install rust in pig build rust-v to specifiy pgrx version to be installedNew Extensions
List of 405 PG extensions:
Checksums
Release: https://github.com/pgsty/pig/releases/tag/v0.3.2
Routine bugfix
Checksums
Release: https://github.com/pgsty/pig/releases/tag/v0.3.1
The pig project now has a new homepage, alone with the PostgreSQL Extension Catalog.
You can install PostgreSQL Kernels along with & 404 extensions with a simple command. Besides, pig v0.3 is also embedded & shipped with the latest Pigsty v3.3.0.
New Features
pig build subcommand with the ability to set up extension building environment
And other utils such as building proxy:
And pig 0.3.0 is shipped with Pigsty 3.3.0
New Extensions
The pgext.cloud catalog is moving to https://pgext.cloud with more information!
Checksums
Release: https://github.com/pgsty/pig/releases/tag/v0.3.0
404 Extensions Available in Pig v0.2.2
Release: https://github.com/pgsty/pig/releases/tag/v0.2.2
Install the latest pig version with:
New Extensions
Update Extension Version
Release: https://github.com/pgsty/pig/releases/tag/v0.2.0
Install the latest pig version with:
New Extensions
Update Extension Version
Checksums
Release: https://github.com/pgsty/pig/releases/tag/v0.1.4
v0.1.3, routine update, with 390 extensions available now!
Omnigres 33 extensions, postgres as platformpg_mooncake: duckdb in postgrespg_xxhashtimescaledb_toolkitpg_xenophilepg_drop_eventspg_incrementalcitus to 13.0.0 with PostgreSQL 17 support.pgml to 2.10.0pg_extra_time to 2.0.0pg_vectorize to 0.20.0Checksums
Release: https://github.com/pgsty/pig/releases/tag/v0.1.3
351 PostgreSQL Extensions, including the powerful postgresql-anonymizer 2.0
Now you can install pig with:
Add New Extension
Update Extension
Release: https://github.com/pgsty/pig/releases/tag/v0.1.2
The pig CLI v0.1 is out, with the following new features:
Install Script
Extension Management
You can download the extension and its dependencies with import subcommand, activate different postgres major versions with link, and prepare building env with build subcommand
Repo Management
You can now create a local repo and create a tarball (offline package) from it, copy it to somewhere (e.g., without internet access), and create a repo from that offline package:
Pigsty Management
The pig can also be used as a CLI tool for Pigsty — the battery-include free PostgreSQL RDS
Self-Updating
To update pig itself to the latest version, you can use the following command:
Info
Now pig info provides more details about your OS & PG environment:
Enjoy PostgreSQL!
What’s Changed
New Contributors
Full Changelog: https://github.com/pgsty/pig/compare/v0.0.1...v0.1.0
Checksums
Release: https://github.com/pgsty/pig/releases/tag/v0.1.0
Get Started
Installthe pig package first, you can also install via command:
Then it’s ready to use, assume you want to install the pg_duckdb extension:
That’s it! All sets! you can check with the pig ext status sub command:
Check the advanced usage for details and list 340 available extensions.
Installation
The pig util is a standalone go binary with no dependencies. you can just download the binary or use the following commands to add the repo and install it via package manager (recommended).
For Ubuntu 22.04 / 24.04 & Debian 12 or any compatible platforms:
For EL 8/9 and compatible platforms:
For mainland china user: consider replace the
repo.pigsty.iowithrepo.pigsty.cc
Compatibility
pig runs on: RHEL 8/9, Ubuntu 22.04/24.04, and Debian 12, on both amd64/arm64 arch
| Code | Distribution | x86_64 |
aarch64 |
|---|---|---|---|
| el9 | RHEL 9 / Rocky9 / Alma9 / … | PG 17 - 13 | PG 17 - 13 |
| el8 | RHEL 8 / Rocky8 / Alma8 / … | PG 17 - 13 | PG 17 - 13 |
| u24 | Ubuntu 24.04 (noble) |
PG 17 - 13 | PG 17 - 13 |
| u22 | Ubuntu 22.04 (jammy) |
PG 17 - 13 | PG 17 - 13 |
| d12 | Debian 12 (bookworm) |
PG 17 - 13 | PG 17 - 13 |
Here are some bad cases and limitations for the above distros:
citus is not available on aarch64 and ubuntu 24.04pljava is missing on el8jdbc_fdw is missing on el8.aarch64 and el9.aarch64pllua is missing on el8.aarch64 for pg 13,14,15topn is missing on el8.aarch64 and el9.aarch64 for pg13, and all deb.aarch64pg_partman and timeseries is missing on u24 for pg13wiltondb is missing on d12Advanced PostgreSQL & pgBouncer metrics exporter for Prometheus
PG Exporter brings ultimate monitoring experience to your PostgreSQL with declarative config, dynamic planning, and customizable collectors. It provides 600+ metrics and ~3K time series per instance, covers everything you’ll need for PostgreSQL observability. Check the GitHub Repo for more details.
The latest stable version of pg_exporter is v1.0.3
| Version | Date | Summary | GitHub |
|---|---|---|---|
| v1.0.3 | 2025-11-20 | Routine update on 1.25.4, fix unsupported libpq env | v1.0.3 |
| v1.0.2 | 2025-08-14 | CI/CD Pipeline with go 1.25, https://exp.pgsty.com | v1.0.2 |
| v1.0.1 | 2025-07-17 | DockerHub images, Go 1.24.5, disable pg_tsdb_hypertable | v1.0.1 |
| v1.0.0 | 2025-05-06 | PostgreSQL 18 support, new WAL/checkpointer/I/O metrics | v1.0.0 |
| v0.9.0 | 2025-04-26 | TimescaleDB, Citus, pg_wait_sampling collectors | v0.9.0 |
| v0.8.1 | 2025-03-29 | Dependencies update, docker image tags | v0.8.1 |
| v0.8.0 | 2025-02-14 | PgBouncer 1.24 support, Go 1.24, logging refactor | v0.8.0 |
| v0.7.1 | 2024-12-29 | Routine update, configuration as Reader support | v0.7.1 |
| v0.7.0 | 2024-08-09 | PostgreSQL 17 support, predicate queries feature | v0.7.0 |
| v0.6.0 | 2023-10-18 | PostgreSQL 16 support, ARM64 packages, security fixes | v0.6.0 |
| v0.5.0 | 2022-05-13 | RPM/DEB builds, column scaling, metrics enhancements | v0.5.0 |
| v0.4.1 | 2022-03-08 | Collector updates, connect-timeout parameter | v0.4.1 |
| v0.4.0 | 2021-05-28 | PostgreSQL 14 support, auto-discovery feature | v0.4.0 |
| v0.3.2 | 2021-02-01 | Shadow DSN fixes, documentation updates | v0.3.2 |
| v0.3.1 | 2020-12-04 | Configuration fixes for older PostgreSQL versions | v0.3.1 |
| v0.3.0 | 2020-10-29 | PostgreSQL 13 support, REST APIs, dummy server | v0.3.0 |
| v0.2.0 | 2020-03-21 | YUM packages, configuration reload support | v0.2.0 |
| v0.1.2 | 2020-02-20 | Dynamic configuration reload, bulky mode | v0.1.2 |
| v0.1.1 | 2020-01-10 | Startup hang bug fix | v0.1.1 |
| v0.1.0 | 2020-01-08 | Initial stable release | v0.1.0 |
| v0.0.4 | 2019-12-20 | Production tested release | v0.0.4 |
| v0.0.3 | 2019-12-13 | Production environment testing | v0.0.3 |
| v0.0.2 | 2019-12-09 | Early testing release | v0.0.2 |
| v0.0.1 | 2019-12-09 | Initial release with PgBouncer mode | v0.0.1 |
auto-discovery to true by @kadaffyChecksums
https://github.com/pgsty/pg_exporter/releases/download/v1.0.3/checksums.txt
Checksums
https://github.com/pgsty/pg_exporter/releases/download/v1.0.2/checksums.txt
pg_tsdb_hypertable collector by default, since timescaledb catalog is changed.Checksums
https://github.com/pgsty/pg_exporter/releases/tag/v1.0.1
Add PostgreSQL 18 metrics support
pg_wal_18:write, sync, write_time, sync_time metricspg_stat_iopg_checkpointer_18:num_doneslru_writtenpg_db_18:parallel_workers_to_launchparallel_workers_launchedpg_table_18:table_parallel_workers_to_launchtable_parallel_workers_launchedpg_io_18:read_byteswrite_bytesextend_bytesop_bytes due to fixed valuepg_vacuuming_18delay_timehttps://github.com/pgsty/pg_exporter/releases/tag/v1.0.0
Default Collectors
timescaledb hypertablecitus dist nodepg_wait_sampling wait event profilepg_slot overhaul: Add 16/17 pg_replication_slot metricspg_slot collector run on replica since 16/17pg_wait collector to agg from all processesreset_time as GAUGE rather than COUNTERpg_recovery_prefetch_skip_fpw type from GAUGE to COUNTERpg_recv.state type from LABEL to GAUGEpg_exporter_build_info / pgbouncer_exporter_build_infoserver_encoding to pg_meta collectorpg_setting collectorExporter Codebase
pgsty/pg_exporter repo to pgsty/pg_exporterserver.go to reduce Compatible and PostgresPrecheck complexityhttps://github.com/pgsty/pg_exporter/releases/tag/v0.9.0
https://github.com/pgsty/pg_exporter/releases/tag/v0.8.1
310-pg_size.yml fails if log dir not set properly #64 by @Süleyman Vuruculog/slog instead of go-kithttps://github.com/pgsty/pg_exporter/releases/tag/v0.8.0
Routine update with dependabot
https://github.com/pgsty/pg_exporter/releases/tag/v0.7.1
Refactor codebase for the latest go version.
https://github.com/pgsty/pg_exporter/releases/tag/v0.7.0
Security Enhancement: Fix security dependent-bot issue
Add pg16 collectors
Add arm64 & aarch64 packages
Remove the monitor schema requirement for pg_query collectors (you have to ensure it with search_path or just
install pg_stat_statements in the default public schema)
Fix pgbouncer version parsing message level from info to debug
Fix pg_table_10_12 collector missing relid issue.
Recognize the files with yml suffix in config directory by @Japin Li
https://github.com/pgsty/pg_exporter/releases/tag/v0.6.0
Exporter Enhancement
nfpmcolumn.default, replace when metric value is NULLcolumn.scale, multiply scale factor when metric value is float/int (e.g µs to second)/stat endpoint outputpgsty/pg_exporterMetrics Collector
https://github.com/pgsty/pg_exporter/releases/tag/v0.5.0
pg_repl collector overlap on pg 12-T connect-timeout PG_EXPORTER_CONNECT_TIMEOUT
this can be useful when monitoring remote Postgres instances.pg_exporter.yaml are renamed as pg_exporter.yml in rpm package.https://github.com/pgsty/pg_exporter/releases/tag/v0.4.1
auto-discovery , include-database and exclude-database optionauto-discovery = on)https://github.com/pgsty/pg_exporter/releases/tag/v0.4.0
https://github.com/pgsty/pg_exporter/releases/tag/v0.3.2
fix default configuration problems (especially for versions lower than 13)
primary_conninfo not exists until PG13funcid label to pg_func collector to avoid func name duplicate labelpg_exporterhttps://github.com/pgsty/pg_exporter/releases/tag/v0.3.1
https://github.com/pgsty/pg_exporter/releases/tag/v0.3.0
pg_slru, pg_shmem, pg_query13,pg_backup,
etc…)pg_up 0 metric, which serves before PgExporter is initialized.sslmode=disable to URL if sslmode is not givenpgbouncer_up metricshttps://github.com/pgsty/pg_exporter/releases/tag/v0.2.0
https://github.com/pgsty/pg_exporter/releases/tag/v0.1.2
Fix the bug that pg_exporter will hang during start-up if any query is failed.
https://github.com/pgsty/pg_exporter/releases/tag/v0.1.1
It works, looks good to me.
https://github.com/pgsty/pg_exporter/releases/tag/v0.1.0
Tested in real world production environment with 200+ nodes for about 2 weeks. Looks good !
https://github.com/pgsty/pg_exporter/releases/tag/v0.0.4
v0.0.3 Release, Tested in Production Environment
This version is already tested in a production environment.
This project is still under rapid evolution, I would say if you want use it in production , try with caution.
https://github.com/pgsty/pg_exporter/releases/tag/v0.0.3
It’s ok to try now
https://github.com/pgsty/pg_exporter/releases/tag/v0.0.2
Add pgbouncer mode
Check pgsty/rpm repo for build specs and pigsty-pgsql for usage
| Name | Old | New | Comment |
|---|---|---|---|
| vchord | 0.5.3 | 1.0.0 | |
| pg_later | 0.3.1 | 0.4.0 | |
| pgvectorscale | 0.8.0 | 0.9.0 | -pg13, +pg18 |
| pglite_fusion | 0.0.5 | 0.0.6 | |
| pgx_ulid | 0.2.1 | 0.2.2 | |
| pg_search | 0.19.5 | 0.20.0 | resume PIGSTY building |
| citus | 13.2.0 | 13.2.0 | official tag |
| timescaledb | 2.23.0 | 2.23.1 | |
| pg_profile | 4.10 | 4.11 | |
| pglinter | 1.0.0 | new | |
| pg_typeid | 0.3.0 | head with pg18 support | |
| pg_enigma | 0.4.0 | vonng patched pgrx version | |
| pg_retry | 1.0.0 | new, pg17-18 | |
| pg_biscuit | 1.0 | new, pg16-18 | |
| pg_weighted_statistics | 1.0.0 | new, pg13-18 | |
| pg_stat_monitor | 2.2.0 | 2.3.0 | fix PGDG pg18 missing |
| documentdb | 0.106 | 0.107 | ferretdb fork |
| PolarDB | 15.15 | 15.15.5.0-38948055 |
Add PostgreSQL 18 support for almost all extensions
| Name | Old | New | Comment |
|---|---|---|---|
| omni_csv | - | 0.1.1 | new |
| omni_datasets | - | 0.1.0 | new |
| omni_shmem | - | 0.1.0 | new |
| pg_csv | - | 1.0.1 | new |
| pg_dbms_errlog | - | 2.2 | new |
| pg_rrule | - | 0.2.0 | new |
| plxslt | - | 0.20140221 | new |
| anon | 2.3.0 | 2.4.1 | +pg18 |
| collection | 1.0.0 | 1.1.0 | +pg18 |
| credcheck | 3.0 | 4.2 | +pg18 |
| emaj | 4.7.0 | 4.7.1 | +pg18 |
| explain_ui | 0.0.1 | 0.0.2 | +pg18 |
| firebird_fdw | 1.4.0 | 1.4.1 | +pg18 |
| logerrors | 2.1.3 | 2.1.5 | +pg18 |
| multicorn | 3.0 | 3.2 | +pg18 |
| omni | 0.2.9 | 0.2.14 | +pg18 |
| omni_email | 0 | 0.1.0 | +pg18 |
| omni_httpc | 0.1.5 | 0.1.10 | +pg18 |
| omni_httpd | 0.4.6 | 0.4.11 | +pg18 |
| omni_id | 0.4.2 | 0.4.3 | +pg18 |
| omni_kube | 0.1.1 | 0.4.2 | +pg18 |
| omni_ledger | 0.1.2 | 0.1.3 | +pg18 |
| omni_sql | 0.5.1 | 0.5.3 | +pg18 |
| omni_sqlite | 0.1.2 | 0.2.2 | +pg18 |
| omni_types | 0.3.4 | 0.3.6 | +pg18 |
| omni_vfs | 0.2.1 | 0.2.2 | +pg18 |
| omni_worker | 0.1.0 | 0.2.1 | +pg18 |
| periods | 1.2.2 | 1.2.3 | +pg18 |
| pg_bestmatch | 0.0.1 | 0.0.2 | +pg18 |
| pg_cardano | 1.0.5 | 1.1.1 | +pg18 |
| pg_checksums | 1.1 | 1.3 | +pg18 |
| pg_duckdb | 0.3.1 | 1.1.0 | +pg18 |
| pg_failover_slots | 1.1.0 | 1.2.0 | +pg18 |
| pg_graphql | 1.5.11 | 1.5.12 | +pg18 |
| pg_idkit | 0.3.1 | 0.4.0 | +pg18 |
| pg_later | 0.3.0 | 0.3.1 | +pg18 |
| pg_mooncake | 0.1.2 | 0.2.0 | +pg18 |
| pg_net | 0.9.2 | 0.20.0 | +pg18 |
| pg_parquet | 0.4.3 | 0.5.1 | +pg18 |
| pg_render | 0.1.2 | 0.1.3 | +pg18 |
| pg_session_jwt | 0.3.1 | 0.3.3 | +pg18 |
| pg_smtp_client | 0.2.0 | 0.2.1 | +pg18 |
| pg_sphere | 1.5.1 | 1.5.2 | +pg18 |
| pg_statement_rollback | 1.4 | 1.5 | +pg18 |
| pg_store_plans | 1.8 | 1.9 | +pg18 |
| pg_tle | 1.5.1 | 1.5.2 | +pg18 |
| pg_tokenizer | 0.1.0 | 0.1.1 | +pg18 |
| pg_uuidv7 | 1.6.0 | 1.7.0 | +pg18 |
| pgactive | 2.1.6 | 2.1.7 | +pg18 |
| pglogical | 2.4.5 | 2.4.6 | +pg18 |
| pglogical_origin | 2.4.5 | 2.4.6 | +pg18 |
| pgmq | 1.5.1 | 1.7.0 | +pg18 |
| pgsmcrypto | 0.1.0 | 0.1.1 | +pg18 |
| pgx_ulid | 0.2.0 | 0.2.1 | +pg18 |
| pldbgapi | 1.8 | 1.9 | +pg18 |
| pljava | 1.6.8 | 1.6.10 | +pg18 |
| plprql | 1.0.0 | 18.0.0 | +pg18 |
| roaringbitmap | 0.5.4 | 0.5.5 | +pg18 |
| semver | 0.32.1 | 0.40.0 | +pg18 |
| supautils | 2.10.0 | 3.0.2 | +pg18 |
| tds_fdw | 2.0.4 | 2.0.5 | +pg18 |
| timescaledb | 2.22.0 | 2.23.0 | +pg18 |
| timescaledb_toolkit | 1.21.0 | 1.22.0 | +pg18 |
| timeseries | 0.1.6 | 0.1.7 | +pg18 |
| tzf | 0.2.2 | 0.2.3 | +pg18 |
| vchord | 0.5.1 | 0.5.3 | +pg18 |
| vchord_bm25 | 0.2.1 | 0.2.2 | +pg18 |
| vectorize | 0.22.2 | 0.25.0 | +pg18 |
| wrappers | 0.5.4 | 0.5.6 | +pg18 |
| gzip | 1.0.1 | 1.0.0 | +pg18 |
| hypopg | 1.4.1 | 1.4.2 | +pg18 |
| mobilitydb | 1.2.0 | 1.3.0 | +pg18 |
| mongo_fdw | 5.5.1 | 5.5.3 | +pg18 |
| orafce | 4.14.4 | 4.14.6 | +pg18 |
| pg_hint_plan | 1.7.1 | 1.8.0 | +pg18 |
| pg_ivm | 1.11 | 1.13 | +pg18 |
| pg_partman | 5.2.4 | 5.3.1 | +pg18 |
| pg_search | 0.18.1 | 0.19.2 | +pg18 |
| pg_show_plans | 2.1.6 | 2.1.7 | +pg18 |
| pgpcre | 1 | 0.20190509 | +pg18 |
| pgroonga | 4.0.0 | 4.0.4 | +pg18 |
| pgroonga_database | 4.0.0 | 4.0.4 | +pg18 |
| plpgsql_check | 2.8.2 | 2.8.3 | +pg18 |
| uint | 1.20231206 | 1.20250815 | +pg18 |
| uint128 | 1.1.0 | 1.1.1 | +pg18 |
| omni_* | 20250525 | 20251108 | +pg18 |
| acl | 1.0.4 | +pg18 | |
| aggs_for_arrays | 1.3.3 | +pg18 | |
| aggs_for_vecs | 1.4.0 | +pg18 | |
| arraymath | 1.1 | +pg18 | |
| asn1oid | 1.6 | +pg18 | |
| aws_s3 | 0.0.1 | +pg18 | |
| base36 | 1.0.0 | +pg18 | |
| base62 | 0.0.1 | +pg18 | |
| bzip | 1.0.0 | +pg18 | |
| chkpass | 1.0 | +pg18 | |
| convert | 0.0.4 | +pg18 | |
| count_distinct | 3.0.2 | +pg18 | |
| country | 0.0.3 | +pg18 | |
| cryptint | 1.0.0 | +pg18 | |
| currency | 0.0.3 | +pg18 | |
| data_historization | 1.1.0 | +pg18 | |
| db_migrator | 1.0.0 | +pg18 | |
| dbt2 | 0.61.7 | +pg18 | |
| ddl_historization | 0.0.7 | +pg18 | |
| ddsketch | 1.0.1 | +pg18 | |
| decoder_raw | 1.0 | +pg18 | |
| decoderbufs | 3.2.0 | +pg18 | |
| emailaddr | 0 | +pg18 | |
| envvar | 1.0.1 | +pg18 | |
| faker | 0.5.3 | +pg18 | |
| financial | 1.0.1 | +pg18 | |
| fio | 1.0 | +pg18 | |
| first_last_agg | 0.1.4 | +pg18 | |
| floatfile | 1.3.1 | +pg18 | |
| floatvec | 1.1.1 | +pg18 | |
| geoip | 0.3.0 | +pg18 | |
| hashlib | 1.1 | +pg18 | |
| hashtypes | 0.1.5 | +pg18 | |
| hll | 2.18 | +pg18 | |
| hunspell_* | 1.0 | +pg18 | |
| imgsmlr | 1.0 | +pg18 | |
| index_advisor | 0.2.0 | +pg18 | |
| kafka_fdw | 0.0.3 | +pg18 | |
| login_hook | 1.7 | +pg18 | |
| oracle_fdw | 2.8.0 | +pg18 | |
| pg_auth_mon | 3.0 | +pg18 | |
| pg_background | 1.3 | +pg18 | |
| pg_bigm | 1.2 | +pg18 | |
| pg_cron | 1.6.7 | +pg18 | |
| pg_profile | 4.10 | +pg18 | |
| pg_stat_kcache | 2.3.0 | +pg18 | |
| pgdd | 0.6.0 | +pg18 | |
| pgjwt | 0.2.0 | +pg18 | |
| pgnodemx | 1.7 | +pg18 | |
| pgsodium | 3.1.9 | +pg18 | |
| pgtap | 1.3.3 | +pg18 | |
| plprofiler | 4.2.5 | +pg18 | |
| plproxy | 2.11.0 | +pg18 | |
| plr | 8.4.8 | +pg18 | |
| plv8 | 3.2.4 | +pg18 | |
| pointcloud | 1.2.5 | +pg18 | |
| powa | 5.0.1 | +pg18 | |
| prefix | 1.2.10 | +pg18 | |
| q3c | 2.0.1 | +pg18 | |
| redis_fdw | 1.0 | +pg18 | |
| session_variable | 3.4 | +pg18 | |
| set_user | 4.1.0 | +pg18 | |
| system_stats | 3.2 | +pg18 | |
| temporal_tables | 1.2.2 | +pg18 | |
| topn | 2.7.0 | +pg18 | |
| unit | 7.10 | +pg18 | |
| zhparser | 2.3 | +pg18 | |
| zstd | 1.1.2 | +pg18 |
| Name | Old | New | Comment |
|---|---|---|---|
| timesacledb | 2.21.1 | 2.22.0 | |
| citus | 13.1.0 | 13.2.0 | |
| documentdb | 0.105.0 | 0.106.0 | work with ferretdb 2.5 |
| ddlx | 0.29 | 0.30 | + pg18 |
| icu_ext | 1.9.0 | 1.10.0 | + pg18 |
| asn1oid | 1.5 | 1.6 | + pg18 |
| uint128 | 1.0.0 | 1.1.0 | + pg18 |
| toastinfo | 1.5 | 1.6 | + pg18 |
| vchord | 0.4.3 | 0.5.1 | pgrx 0.16.0 |
| pg_idkit | 0.3.0 | 0.3.1 | pgrx 0.15.0 |
| pg_search | 0.17.3 | 0.18.0 | pgrx 0.15.0 |
| pg_parquet | 0.4.0 | 0.4.3 | pgrx 0.16.0 |
| wrappers | 0.5.3 | 0.5.4 | pgrx 0.14.3 |
| pg_rewrite | - | 2.0.0 | + Debian/Ubuntu (PGDG) |
| pg_tracing | - | 0.1.3-2 | + pg 14/18 |
| pg_curl | 2.4 | 2.4.5 | new version epoch |
| pg_rewrite | - | 2.0.0 | Import from PGDG |
| pg_tracing | - | 1.3.0 | + pg14 / pg18 |
| pgactive | 2.1.5 | 2.1.6 | + pg18 |
| sentinel | 1.1 | 1.2 | 1.2 |
| pg_tle | 1.5.1-1 | 1.5.1-2 | + pg18 |
| redis_fdw | + pg18 | ||
| pgextwlist | 1.17 | 1.19 | + pg18 |
| wal2json | 1.6 | + pg18 | |
| pgvector | 0.8.1 | + pg18 |
| Name | Old | New | Comment |
|---|---|---|---|
| OrioleDB | beta11 1.4 | beta12 1.5 | work with oriolepg 17.11 |
| OriolePG | 17.9 | 17.11 | work with orioledb 1.5 beta12 |
| documentdb | 0.104.0 | 0.105.0 | work with ferretdb 2.4 |
| timescaledb | 2.20.0 | 2.21.1 | |
| supautils | 2.9.2 | 2.10.0 | .so location change |
| plv8 | 3.2.3 | 3.2.4 | |
| postgresql_anonymizer | 3.1.1 | 2.3.0 (pgrx 0.14.3) | |
| wrappers | 0.5.0 | 0.5.3 (pgrx 0.14.3) | pgrx version change |
| pgvectorscale | 0.7.1 | 0.8.0 (pgrx 0.12.9) | |
| pg_search | 0.15.8 | 0.17.0 (download) | fix el icu dependency issue |
| Name | Old | New | Comment |
|---|---|---|---|
| citus | 13.0.3 | 13.1.0 | |
| timescaledb | 2.20.0 | 2.21.0 | |
| vchord | 0.3.0 | 0.4.3 | |
| pgactive | - | 2.1.5 | require pgfeutils |
| documentdb | 0.103.0 | 0.104.0 | add arm support |
| Name | Old | New | Comment |
|---|---|---|---|
| pgdd | 0.5.0 | 0.6.0 | |
| convert | - | 0.0.4 | |
| pg_idkit | 0.2.0 | 0.3.0 | |
| pg_tokenizer.rs | - | 0.1.0 | |
| pg_render | - | 0.1.2 | |
| pgx_ulid | - | 0.2.0 | |
| orioledb | 1.4.0b10 | 1.4.0b11 |
| Name | Old | New | Comment |
|---|---|---|---|
| openhalodb | - | 14.10 | |
| spat | - | 0.1.0a4 | |
| pgsentinel | - | 1.1.0 | |
| timescaledb | - | 2.20.0 | |
| sqlite_fdw | - | 2.5.0 | |
| documentdb | - | 0.103.0 | |
| tzf | - | 0.2.2 | |
| pg_vectorize | - | 0.22.2 | |
| wrappers | - | 0.5.0 |
| Name | Old | New | Comment |
|---|---|---|---|
| omnigres | - | 20250507 | |
| citus | - | 12.0.3 | |
| timescaledb | - | 2.19.3 | |
| supautils | - | 2.9.1 | |
| pg_envvar | - | 1.0.1 | |
| pgcollection | - | 1.0.0 | |
| aggs_for_vecs | - | 1.4.0 | |
| pg_tracing | - | 0.1.3 | |
| pgmq | - | 1.5.1 | |
| tzf-pg | - | 0.2.0 | |
| pg_search | - | 0.15.18 | |
| anon | - | 2.1.1 | |
| pg_parquet | - | 0.4.0 | |
| pg_cardano | - | 1.0.5 | |
| pglite_fusion | - | 0.0.5 | |
| vchord_bm25 | - | 0.2.1 | |
| vchord | - | 0.3.0 | |
| timescaledb-toolkit | - | 1.21.0 | |
| pgvectorscale | - | 0.7.1 | |
| pg_session_jwt | - | 0.3.1 |
| Name | Old | New | Comment |
|---|---|---|---|
| timescaledb | - | 2.19.0 | |
| citus | - | 13.0.2 | |
| documentdb | - | 1.102 | |
| pg_analytics | - | 0.3.7 | |
| pg_search | - | 0.15.8 | |
| emaj | - | 4.6.0 | |
| pgsql_tweaks | - | 0.11.0 | |
| pgvectorscale | - | 0.6.0 | |
| pg_session_jwt | - | 0.2.0 | |
| wrappers | - | 0.4.5 | |
| pg_parquet | - | 0.3.1 | |
| vchord | - | 0.2.2 | |
| pg_tle | 1.2.0 | 1.5.0 | |
| supautils | 2.5.0 | 2.6.0 | |
| sslutils | 1.3 | 1.4 | |
| pg_profile | 4.7 | 4.8 | |
| pg_jsonschema | 0.3.2 | 0.3.3 | |
| pg_incremental | 1.1.1 | 1.2.0 | |
| ddl_historization | 0.7 | 0.0.7 | |
| pg_sqlog | 3.1.7 | 1.6 | |
| pg_random | - | - | |
| pg_stat_monitor | 2.1.0 | 2.1.1 | |
| pg_profile | 4.7 | 4.8 |
| Name | Old | New | Comment |
|---|---|---|---|
| pg_timeseries | - | 0.1.6 | |
| pgmq | - | 1.4.4 | |
| pg_protobuf | - | 16 17 | |
| pg_uuidv7 | - | 1.6 | |
| pg_readonly | - | latest | |
| pgddl | - | 0.28 | |
| pg_safeupdate | - | latest | |
| pg_stat_monitor | - | 2.1 | |
| pg_profile | - | 4.7 | |
| system_stats | - | 3.2 | |
| pg_auth_mon | - | 3.0 | |
| login_hook | - | 1.6 | |
| logerrors | - | 2.1.3 | |
| pg-orphaned | - | latest | |
| pgnodemx | - | 1.7 | |
| sslutils | - | 1.4 (+16,17) |
Check pgsty/deb repo for build specs and pigsty-pgsql for usage
| Name | Old | New | Comment |
|---|---|---|---|
| vchord | 0.5.3 | 1.0.0 | |
| pg_later | 0.3.1 | 0.4.0 | |
| pgvectorscale | 0.8.0 | 0.9.0 | -pg13, +pg18 |
| pglite_fusion | 0.0.5 | 0.0.6 | |
| pgx_ulid | 0.2.1 | 0.2.2 | |
| pg_search | 0.19.5 | 0.19.7 | resume PIGSTY building |
| citus | 13.2.0 | 13.2.0 | official tag |
| timescaledb | 2.23.0 | 2.23.1 | |
| pg_profile | 4.10 | 4.11 | |
| pglinter | 1.0.0 | new | |
| pg_typeid | 0.3.0 | head with pg18 support | |
| pg_enigma | 0.4.0 | vonng patched pgrx version | |
| pg_retry | 1.0.0 | new, pg17-18 | |
| pg_biscuit | 1.0 | new, pg16-18 | |
| pg_weighted_statistics | 1.0.0 | new, pg13-18 | |
| documentdb | 0.106 | 0.107 | ferretdb fork |
| PolarDB | 15.15 | 15.15.5.0-38948055 |
Add PostgreSQL 18 support for almost all extensions
| Name | Old | New | Comment |
|---|---|---|---|
| omni_csv | - | 0.1.1 | new |
| omni_datasets | - | 0.1.0 | new |
| omni_shmem | - | 0.1.0 | new |
| pg_csv | - | 1.0.1 | new |
| pljs | - | 1.0.3 | new |
| plxslt | - | 0.20140221 | new |
| credcheck | 3.0 | 4.2 | +pg18 |
| dbt2 | 0.45.0 | 0.61.7 | +pg18 |
| h3 | 4.1.3 | 4.2.3 | +pg18 |
| h3_postgis | 4.1.3 | 4.2.3 | +pg18 |
| mongo_fdw | 1.1 | 5.5.3 | +pg18 |
| multicorn | 3.0 | 3.2 | +pg18 |
| orafce | 4.14.4 | 4.14.6 | +pg18 |
| pg_hint_plan | 1.7.0 | 1.8.0 | +pg18 |
| pg_search | 0.18.1 | 0.19.2 | +pg18 |
| pg_show_plans | 2.1.6 | 2.1.7 | +pg18 |
| pgactive | 2.1.6 | 2.1.7 | +pg18 |
| pgpcre | 1 | 0.20190509 | +pg18 |
| plpgsql_check | 2.8.2 | 2.8.3 | +pg18 |
| roaringbitmap | 0.5.4 | 0.5.5 | +pg18 |
| uint | 1.20231206 | 1.20250815 | +pg18 |
| uint128 | 1.1.0 | 1.1.1 | +pg18 |
| anon | 2.3.0 | 2.4.1 | +pg18 |
| collection | 1.0.0 | 1.1.0 | +pg18 |
| emaj | 4.7.0 | 4.7.1 | +pg18 |
| explain_ui | 0.0.1 | 0.0.2 | +pg18 |
| firebird_fdw | 1.4.0 | 1.4.1 | +pg18 |
| login_hook | 1.6 | 1.7 | +pg18 |
| logerrors | 2.1.3 | 2.1.5 | +pg18 |
| mobilitydb | 1.2.0 | 1.3.0 | +pg18 |
| omni | 0.2.9 | 0.2.14 | +pg18 |
| omni_httpc | 0.1.5 | 0.1.10 | +pg18 |
| omni_httpd | 0.4.6 | 0.4.11 | +pg18 |
| omni_kube | 0.1.1 | 0.4.2 | +pg18 |
| omni_sql | 0.5.1 | 0.5.3 | +pg18 |
| omni_sqlite | 0.1.2 | 0.2.2 | +pg18 |
| omni_worker | 0.1.0 | 0.2.1 | +pg18 |
| pg_cardano | 1.0.5 | 1.1.1 | +pg18 |
| pg_checksums | 1.2 | 1.3 | +pg18 |
| pg_cron | 1.6.5 | 1.6.7 | +pg18 |
| pg_duckdb | 0.3.1 | 1.1.0 | +pg18 |
| pg_failover_slots | 1.1.0 | 1.2.0 | +pg18 |
| pg_graphql | 1.5.11 | 1.5.12 | +pg18 |
| pg_idkit | 0.3.1 | 0.4.0 | +pg18 |
| pg_mooncake | 0.1.2 | 0.2.0 | +pg18 |
| pg_net | 0.9.2 | 0.20.0 | +pg18 |
| pg_parquet | 0.4.3 | 0.5.1 | +pg18 |
| pg_partman | 5.2.4 | 5.3.0 | +pg18 |
| pg_session_jwt | 0.3.1 | 0.3.3 | +pg18 |
| pg_sphere | 1.5.1 | 1.5.2 | +pg18 |
| pg_stat_monitor | 2.2.0 | 2.3.0 | +pg18 |
| pg_statement_rollback | 1.4 | 1.5 | +pg18 |
| pg_store_plans | 1.8 | 1.9 | +pg18 |
| pg_task | 1.0.0 | 2.1.12 | +pg18 |
| pg_tle | 1.5.1 | 1.5.2 | +pg18 |
| pg_uuidv7 | 1.6.0 | 1.7.0 | +pg18 |
| pglogical | 2.4.5 | 2.4.6 | +pg18 |
| pgmq | 1.5.1 | 1.7.0 | +pg18 |
| pgroonga | 4.0.0 | 4.0.4 | +pg18 |
| pgsql_tweaks | 0.11.3 | 1.0.2 | +pg18 |
| pldbgapi | 1.8 | 1.9 | +pg18 |
| plprql | 1.0.0 | 18.0.0 | +pg18 |
| supautils | 2.10.0 | 3.0.2 | +pg18 |
| timescaledb | 2.22.0 | 2.23.0 | +pg18 |
| timescaledb_toolkit | 1.21.0 | 1.22.0 | +pg18 |
| vchord | 0.5.1 | 0.5.3 | +pg18 |
| vectorize | 0.22.2 | 0.25.0 | +pg18 |
| wrappers | 0.5.4 | 0.5.6 | +pg18 |
| acl | 1.0.4 | - | +pg18 |
| aggs_for_arrays | 1.3.3 | - | +pg18 |
| aggs_for_vecs | 1.4.0 | - | +pg18 |
| base36 | 1.0.0 | - | +pg18 |
| hashlib | 1.1 | - | +pg18 |
| hll | 2.18 | - | +pg18 |
| imgsmlr | 1.0 | - | +pg18 |
| index_advisor | 0.2.0 | - | +pg18 |
| kafka_fdw | 0.0.3 | - | +pg18 |
| pg_auth_mon | 3.0 | - | +pg18 |
| pg_background | 1.3 | - | +pg18 |
| pg_bigm | 1.2 | - | +pg18 |
| pg_profile | 4.10 | - | +pg18 |
| pg_stat_kcache | 2.3.0 | - | +pg18 |
| pgdd | 0.6.0 | - | +pg18 |
| pgjwt | 0.2.0 | - | +pg18 |
| pgmp | 1.0.5 | - | +pg18 |
| plprofiler | 4.2.5 | - | +pg18 |
| plv8 | 3.2.4 | - | +pg18 |
| redis_fdw | 1.0 | - | +pg18 |
| repmgr | 5.5.0 | - | +pg18 |
| system_stats | 3.2 | - | +pg18 |
| topn | 2.7.0 | - | +pg18 |
| zhparser | 2.3 | - | +pg18 |
| Name | Old | New | Comment |
|---|---|---|---|
| timesacledb | 2.21.1 | 2.22.0 | |
| citus | 13.1.0 | 13.2.0 | |
| documentdb | 0.105.0 | 0.106.0 | work with ferretdb 2.5 |
| ddlx | 0.29 | 0.30 | + pg18 |
| uint128 | 1.0.0 | 1.1.0 | + pg18 |
| vchord | 0.4.3 | 0.5.1 | pgrx 0.16.0 |
| pg_idkit | 0.3.0 | 0.3.1 | pgrx 0.15.0 |
| pg_search | 0.17.3 | 0.18.0 | pgrx 0.15.0 |
| pg_parquet | 0.4.0 | 0.4.3 | pgrx 0.16.0 |
| wrappers | 0.5.3 | 0.5.4 | pgrx 0.14.3 |
| pg_rewrite | - | 2.0.0 | + Debian/Ubuntu |
| pg_tracing | - | 0.1.3-2 | + pg 14/18 |
| pg_curl | 2.4 | 2.4.5 | |
| pg_ivm | 1.11 | 1.12 | + pg18 |
| pg_rewrite | - | 2.0.0 | new extension |
| pg_tracing | - | 1.3.0 | + pg14 / pg18 |
| pgactive | 2.1.5 | 2.1.6 | + pg18 |
| pgsentinel | 1.1 | 1.2 | 1.2 |
| pg_tle | 1.5.1-1 | 1.5.1-2 | + pg18 |
| redis_fdw | + pg18 | ||
| emaj | 4.6 | 4.7 | |
| table_version | 1.11.0 | 1.11.1 |
| Name | Old | New | Comment |
|---|---|---|---|
| OrioleDB | beta11 1.4 | beta12 1.5 | work with oriolepg 17.11 |
| OriolePG | 17.9 | 17.11 | work with orioledb 1.5 beta12 |
| documentdb | 0.104.0 | 0.105.0 | work with ferretdb 2.4 |
| timescaledb | 2.20.0 | 2.21.1 | |
| supautils | 2.9.2 | 2.10.0 | .so location change |
| plv8 | 3.2.3 | 3.2.4 | |
| postgresql_anonymizer | 3.1.1 | 2.3.0 (pgrx 0.14.3) | |
| wrappers | 0.5.0 | 0.5.3 (pgrx 0.14.3) | pgrx version change |
| pgvectorscale | 0.7.1 | 0.8.0 (pgrx 0.12.9) | |
| pg_search | 0.15.8 | 0.17.0 (download) | fix el icu dependency issue |
| pg_profile | 4.8.0 | 4.10.0 |
| Name | Old | New | Comment |
|---|---|---|---|
| orioledb | 1.4 beta11 | rebuild | |
| pgvectorscale | 0.7.1 | 0.7.1 | rebuild to fix bug |
| pg_stat_monitor | 2.1.1 | 2.2.0 | |
| pgsql-tweaks | 0.11.1 | 0.11.3 | |
| pg_tle | 1.5.0 | 1.5.1 | |
| pg_curl | 2.4 | 2.4.5 |
| Name | Old | New | Comment |
|---|---|---|---|
| citus | 13.0.3 | 13.1.0 | |
| timescaledb | 2.20.0 | 2.21.0 | |
| vchord | 0.3.0 | 0.4.3 | |
| pgactive | - | 2.1.5 | require pgfeutils |
| documentdb | 0.103.0 | 0.104.0 | add arm support |
| Name | Old | New | Comment |
|---|---|---|---|
| pgdd | 0.5.0 | 0.6.0 | |
| convert | - | 0.0.4 | |
| pg_idkit | 0.2.0 | 0.3.0 | |
| pg_tokenizer.rs | - | 0.1.0 | |
| pg_render | - | 0.1.2 | |
| pgx_ulid | - | 0.2.0 | |
| pg_ivm | 1.10.0 | 1.11.0 | |
| orioledb | 1.4.0b10 | 1.4.0b11 |
| Name | Old | New | Comment |
|---|---|---|---|
| openhalodb | - | 14.10 | |
| spat | - | 0.1.0a4 | |
| pgsentinel | - | 1.1.0 | |
| timescaledb | - | 2.20.0 | |
| sqlite_fdw | - | 2.5.0 | |
| documentdb | - | 0.103.0 | |
| tzf | - | 0.2.2 | |
| pg_vectorize | - | 0.22.2 | |
| wrappers | - | 0.5.0 |
| Name | Old | New | Comment |
|---|---|---|---|
| omnigres | - | 20250507 | |
| citus | - | 12.0.3 | |
| timescaledb | - | 2.19.3 | |
| supautils | - | 2.9.1 | |
| pg_envvar | - | 1.0.1 | |
| pgcollection | - | 1.0.0 | |
| aggs_for_vecs | - | 1.4.0 | |
| pg_tracing | - | 0.1.3 | |
| pgmq | - | 1.5.1 | |
| tzf-pg | - | 0.2.0 | |
| pg_search | - | 0.15.18 | |
| anon | - | 2.1.1 | |
| pg_parquet | - | 0.4.0 | |
| pg_cardano | - | 1.0.5 | |
| pglite_fusion | - | 0.0.5 | |
| vchord_bm25 | - | 0.2.1 | |
| vchord | - | 0.3.0 | |
| timescaledb-toolkit | - | 1.21.0 | |
| pgvectorscale | - | 0.7.1 | |
| pg_session_jwt | - | 0.3.1 |
| Name | Old | New | Comment |
|---|---|---|---|
| timescaledb | - | 2.19.0 | |
| citus | - | 13.0.2 | |
| documentdb | - | 1.102 | |
| pg_analytics | - | 0.3.7 | |
| pg_search | - | 0.15.8 | |
| pg_ivm | - | 1.10 | |
| emaj | - | 4.6.0 | |
| pgsql_tweaks | - | 0.11.0 | |
| pgvectorscale | - | 0.6.0 | |
| pg_session_jwt | - | 0.2.0 | |
| wrappers | - | 0.4.5 | |
| pg_parquet | - | 0.3.1 | |
| vchord | - | 0.2.2 | |
| pg_tle | 1.2.0 | 1.5.0 | |
| supautils | 2.5.0 | 2.6.0 | |
| sslutils | 1.3 | 1.4 | |
| pg_profile | 4.7 | 4.8 | |
| pg_jsonschema | 0.3.2 | 0.3.3 | |
| pg_incremental | 1.1.1 | 1.2.0 | |
| ddl_historization | 0.7 | 0.0.7 | |
| pg_sqlog | 3.1.7 | 1.6 | |
| pg_random | - | - | |
| pg_stat_monitor | 2.1.0 | 2.1.1 | |
| pg_profile | 4.7 | 4.8 |
| Name | Old | New | Comment |
|---|---|---|---|
| pg_ivm | - | 1.9 | |
| pg_timeseries | - | 0.1.6 | |
| pgmq | - | 1.4.4 | |
| pg_protobuf | - | 16 17 | |
| pg_uuidv7 | - | 1.6 | |
| pg_readonly | - | latest | |
| pgddl | - | 0.28 | |
| pg_safeupdate | - | latest | |
| pg_stat_monitor | - | 2.1 | |
| pg_profile | - | 4.7 | |
| system_stats | - | 3.2 | |
| pg_auth_mon | - | 3.0 | |
| login_hook | - | 1.6 | |
| logerrors | - | 2.1.3 | |
| pg-orphaned | - | latest | |
| pgnodemx | - | 1.7 | |
| sslutils | - | 1.4 (+16,17) |
Check pgsty/infra-pkg repo for build specs and pigsty-infra for usage
| Name | Old | New | Comment |
|---|---|---|---|
| pgschema | - | 1.4.2 | new |
| pgflo | - | 0.0.15 | new |
| vector | 0.51.0 | 0.51.1 | bugfix release |
| sealos | 5.0.1 | 5.1.1 | |
| etcd | 3.6.5 | 3.6.6 | |
| duckdb | 1.4.1 | 1.4.2 | |
| pg_exporter | 1.0.2 | 1.0.3 | |
| pig | 0.7.1 | 0.7.2 | |
| grafana | 12.1.0 | 12.3.0 | |
| pg_timetable | 6.1.0 | 6.2.0 | |
| genai-toolbox | 0.16.0 | 0.21.0 | |
| timescaledb-tools | 0.18.0 | 0.18.1 | move to infra |
| timescaledb-event-streamer | 0.12.0 | 0.20.0 | |
| tigerbeetle | 0.16.60 | 0.16.65 | |
| victoria-metrics | 1.129.1 | 1.130.0 | |
| victorialogs | 1.37.2 | 1.38.0 | |
| grafana-victorialogs-ds | 0.21.4 | 0.22.1 | |
| grafana-victoriametrics-ds | 0.19.6 | 0.19.7 | |
| grafana-plugins | 12.0.0 | 12.3.0 |
| Name | Old | New | Comment |
|---|---|---|---|
| grafana | 12.1.0 | 12.2.1 | download address changed |
| prometheus | 3.6.0 | 3.7.3 | |
| pushgateway | 1.11.1 | 1.11.2 | |
| alertmanager | 0.28.1 | 0.29.0 | |
| nginx_exporter | 1.5.0 | 1.5.1 | |
| node_exporter | 1.9.1 | 1.10.2 | |
| pgbackrest_exporter | 0.20.0 | 0.21.0 | |
| redis_exporter | 1.77.0 | 1.80.0 | |
| duckdb | 1.4.0 | 1.4.1 | |
| dblab | 0.33.0 | 0.34.2 | |
| pg_timetable | 5.13.0 | 6.1.0 | |
| vector | 0.50.0 | 0.51.0 | |
| rclone | 1.71.1 | 1.71.2 | |
| victoria-metrics | 1.126.0 | 1.129.1 | |
| victoria-logs | 1.35.0 | 1.37.2 | |
| grafana-victorialogs-ds | 0.21.0 | 0.21.4 | |
| grafana-victoriametrics-ds | 0.19.4 | 0.19.6 | |
| grafana-infinity-ds | 3.5.0 | 3.6.0 | |
| genai-toolbox | 0.16.0 | 0.18.0 | |
| pev2 | 1.16.0 | 1.17.0 | |
| pig | 0.6.2 | 0.7.1 |
| Name | Old | New | Comment |
|---|---|---|---|
| prometheus | 3.5.0 | 3.6.0 | |
| nginx_exporter | 1.4.2 | 1.5.0 | |
| mysqld_exporter | 0.17.2 | 0.18.0 | |
| redis_exporter | 1.75.0 | 1.77.0 | |
| mongodb_exporter | 0.47.0 | 0.47.1 | |
| victoria-metrics | 1.121.0 | 1.126.0 | |
| vicotira-logs | 1.25.1 | 1.35.0 | |
| duckdb | 1.3.2 | 1.4.0 | |
| etcd | 3.6.4 | 3.6.5 | |
| restic | 0.18.0 | 0.18.1 | |
| tigerbeetle | 0.16.54 | 0.16.60 | |
| grafana-victorialogs-ds | 0.19.3 | 0.21.0 | |
| grafana-victoriametrics-ds | 0.18.3 | 0.19.4 | |
| grafana-infinity-ds | 3.3.0 | 3.5.0 | |
| genai-toolbox | 0.9.0 | 0.16.0 | |
| grafana | 12.1.0 | 12.2.0 | |
| vector | 0.49.0 | 0.50.0 | |
| rclone | 1.70.3 | 1.71.1 | |
| minio | 20250723155402 | 20250907161309 | |
| mcli | 20250721052808 | 20250813083541 |
| Name | Old | New | Comment |
|---|---|---|---|
| grafana | 12.0.0 | 12.1.0 | |
| pg_exporter | 1.0.1 | 1.0.2 | |
| pig | 0.6.0 | 0.6.1 | |
| vector | 0.48.0 | 0.49.0 | |
| redis_exporter | 1.74.0 | 1.75.0 | |
| mongo_exporter | 0.46.0 | 0.47.0 | |
| victoriametrics | 1.121.0 | 1.123.0 | |
| victorialogs: | 1.25.0 | 1.28.0 | |
| grafana-victoriametrics-ds | 0.17.0 | 0.18.3 | |
| grafana-victorialogs-ds | 0.18.3 | 0.19.3 | |
| grafana-infinity-ds | 3.3.0 | 3.4.1 | |
| etcd | 3.6.1 | 3.6.4 | |
| ferretdb | 2.3.1 | 2.5.0 | |
| tigerbeetle | 0.16.50 | 0.16.54 | |
| genai-toolbox | 0.9.0 | 0.12.0 |
| Name | Old | New | Comment |
|---|---|---|---|
| FerretDB | - | 2.4.0 | work with documentdb 1.105 |
| etcd | - | 3.6.3 | |
| minio | - | 20250723155402 | |
| mcli | - | 20250721052808 | |
| ivorysql | - | 4.5-0ffca11-20250709 | fix libxcrypt deps issue |
| Name | Old | New | Comment |
|---|---|---|---|
| genai-toolbox | 0.8.0 | 0.9.0 | MCP toolbox for various DBMS |
| victoriametrics | 1.120.0 | 1.121.0 | split into various packages |
| victorialogs | 1.24.0 | 1.25.0 | split into various packages |
| prometheus | 3.4.2 | 3.5.0 | |
| duckdb | 1.3.1 | 1.3.2 | |
| etcd | 3.6.1 | 3.6.2 | |
| tigerbeetle | 0.16.48 | 0.16.50 | |
| grafana-victoriametrics-ds | 0.16.0 | 0.17.0 | |
| rclone | 1.69.3 | 1.70.3 | |
| pig | 0.5.0 | 0.6.0 | |
| pev2 | 1.15.0 | 1.16.0 | |
| pg_exporter | 1.0.0 | 1.0.1 |
| Name | Old | New | Comment |
|---|---|---|---|
| prometheus | 3.4.1 | 3.4.2 | - |
| grafana | 12.0.1 | 12.0.2 | - |
| vector | 0.47.0 | 0.48.0 | - |
| rclone | 1.69.0 | 1.70.2 | - |
| vip-manager | 3.0.0 | 4.0.0 | - |
| blackbox_exporter | 0.26.0 | 0.27.0 | - |
| redis_exporter | 1.72.1 | 1.74.0 | - |
| duckdb | 1.3.0 | 1.3.1 | - |
| etcd | 3.6.0 | 3.6.1 | - |
| ferretdb | 2.2.0 | 2.3.1 | - |
| dblab | 0.32.0 | 0.33.0 | - |
| tigerbettle | 0.16.41 | 0.16.48 | - |
| grafana-victorialogs-ds | 0.16.3 | 0.18.1 | - |
| grafana-victoriametrics-ds | 0.15.1 | 0.16.0 | - |
| grafana-inifinity-ds | 3.2.1 | 3.3.0 | - |
| victorialogs | 1.22.2 | 1.24.0 | - |
| victoriametrics | 1.117.1 | 1.120.0 | - |
| Name | Old | New | Comment |
|---|---|---|---|
| grafana | - | 12.0.1 | - |
| prometheus | - | 3.4.1 | - |
| keepalived_exporter | - | 1.7.0 | - |
| redis_exporter | - | 1.73.0 | - |
| victoriametrics | - | 1.118.0 | - |
| victorialogs | - | 1.23.1 | - |
| tigerbeetle | - | 0.16.42 | - |
| grafana-victorialogs-ds | - | 0.17.0 | - |
| grafana-infinity-ds | - | 3.2.2 | - |
| Name | Old | New | Comment |
|---|---|---|---|
| dblab | - | 0.32.0 | - |
| prometheus | - | 3.4.0 | - |
| duckdb | - | 1.3.0 | - |
| etcd | - | 3.6.0 | - |
| pg_exporter | - | 1.0.0 | - |
| ferretdb | - | 2.2.0 | - |
| rclone | - | 1.69.3 | - |
| minio | - | 20250422221226 | The last version with admin GUI |
| mcli | - | 20250416181326 | - |
| nginx_exporter | - | 1.4.2 | - |
| keepalived_exporter | - | 1.6.2 | - |
| pgbackrest_exporter | - | 0.20.0 | - |
| redis_exporter | - | 1.27.1 | - |
| victoriametrics | - | 1.117.1 | - |
| victorialogs | - | 1.22.2 | - |
| pg_timetable | - | 5.13.0 | - |
| tigerbeetle | - | 0.16.41 | - |
| pev2 | - | 1.15.0 | - |
| grafana | - | 12.0.0 | - |
| grafana-victorialogs-ds | - | 0.16.3 | - |
| grafana-victoriametrics-ds | - | 0.15.1 | - |
| grafana-infinity-ds | - | 3.2.1 | - |
| grafana_plugins | - | 12.0.0 | - |
| Name | Old | New | Comment |
|---|---|---|---|
| mtail | - | 3.0.8 | new |
| pig | - | 0.4.0 | - |
| pg_exporter | - | 0.9.0 | - |
| prometheus | - | 3.3.0 | - |
| pushgateway | - | 1.11.1 | - |
| keepalived_exporter | - | 1.6.0 | - |
| redis_exporter | - | 1.70.0 | - |
| victoriametrics | - | 1.115.0 | - |
| victoria_logs | - | 1.20.0 | - |
| duckdb | - | 1.2.2 | - |
| pg_timetable | - | 5.12.0 | - |
| vector | - | 0.46.1 | - |
| minio | - | 20250422221226 | - |
| mcli | - | 20250416181326 | - |
| Name | Old | New | Comment |
|---|---|---|---|
| pig | - | 0.3.4 | - |
| etcd | - | 3.5.21 | - |
| restic | - | 0.18.0 | - |
| ferretdb | - | 2.1.0 | - |
| tigerbeetle | - | 0.16.34 | - |
| pg_exporter | - | 0.8.1 | - |
| node_exporter | - | 1.9.1 | - |
| grafana | - | 11.6.0 | - |
| zfs_exporter | - | 3.8.1 | - |
| mongodb_exporter | - | 0.44.0 | - |
| victoriametrics | - | 1.114.0 | - |
| minio | - | 20250403145628 | - |
| mcli | - | 20250403170756 | - |
| Name | Old | New | Comment |
|---|---|---|---|
| etcd | - | 3.5.20 | - |
| pgbackrest_exporter | - | 0.19.0 | rebuild |
| victorialogs | - | 1.17.0 | - |
| vslogcli | - | 1.17.0 | - |
| Name | Old | New | Comment |
|---|---|---|---|
| kafka | - | 4.0.0 | - |
| Prometheus | - | 3.2.1 | - |
| AlertManager | - | 0.28.1 | - |
| blackbox_exporter | - | 0.26.0 | - |
| node_exporter | - | 1.9.0 | - |
| mysqld_exporter | - | 0.17.2 | - |
| kafka_exporter | - | 1.9.0 | - |
| redis_exporter | - | 1.69.0 | - |
| DuckDB | - | 1.2.1 | - |
| etcd | - | 3.5.19 | - |
| FerretDB | - | 2.0.0 | - |
| tigerbeetle | - | 0.16.31 | - |
| vector | - | 0.45.0 | - |
| VictoriaMetrics | - | 1.114.0 | - |
| VictoriaLogs | - | 1.16.0 | - |
| rclone | - | 1.69.1 | - |
| pev2 | - | 1.14.0 | - |
| grafana-victorialogs-ds | - | 0.16.0 | - |
| grafana-victoriametrics-ds | - | 0.14.0 | - |
| grafana-infinity-ds | - | 3.0.0 | - |
| timescaledb-event-streamer | - | 0.12.0 | new |
| restic | - | 0.17.3 | new |
| juicefs | - | 1.2.3 | new |
| Name | Old | New | Comment |
|---|---|---|---|
| pushgateway | 1.10.0 | 1.11.0 | - |
| alertmanager | 0.27.0 | 0.28.0 | - |
| nginx_exporter | 1.4.0 | 1.4.1 | - |
| pgbackrest_exporter | 0.18.0 | 0.19.0 | - |
| redis_exporter | 1.66.0 | 1.67.0 | - |
| mongodb_exporter | 0.43.0 | 0.43.1 | - |
| VictoriaMetrics | 1.107.0 | 1.111.0 | - |
| VictoriaLogs | v1.3.2 | 1.9.1 | - |
| DuckDB | 1.1.3 | 1.2.0 | - |
| Etcd | 3.5.17 | 3.5.18 | - |
| pg_timetable | 5.10.0 | 5.11.0 | - |
| FerretDB | 1.24.0 | 2.0.0 | - |
| tigerbeetle | 0.16.13 | 0.16.27 | - |
| grafana | 11.4.0 | 11.5.1 | - |
| vector | 0.43.1 | 0.44.0 | - |
| minio | 20241218131544 | 20250207232109 | - |
| mcli | 20241121172154 | 20250208191421 | - |
| rclone | 1.68.2 | 1.69.0 | - |
| Name | Old | New | Comment |
|---|---|---|---|
| Prometheus | 2.54.0 | 3.0.0 | - |
| VictoriaMetrics | 1.102.1 | 1.106.1 | - |
| VictoriaLogs | v0.28.0 | 1.0.0 | - |
| MySQL Exporter | 0.15.1 | 0.16.0 | - |
| Redis Exporter | 1.62.0 | 1.66.0 | - |
| MongoDB Exporter | 0.41.2 | 0.42.0 | - |
| Keepalived Exporter | 1.3.3 | 1.4.0 | - |
| DuckDB | 1.1.2 | 1.1.3 | - |
| etcd | 3.5.16 | 3.5.17 | - |
| tigerbeetle | 16.8 | 0.16.13 | - |
| grafana | - | 11.3.0 | - |
| vector | - | 0.42.0 | - |
Pigsty aims to consolidate the strengths of the PostgreSQL ecosystem and replace manual database operations with auto-pilot software. It’s completely open-source and FREE, with absolutely no warranty.
While Professional Service is important in enterprise environments, we offer expert consultation and subscription plans tailored to organizations seeking expertise and dedicated assistance.
Long-Term subscription plans for Pigsty users
On-Demand expert consultation and one-time support
We (I) have on-demand expert services, 400 $/hour, can be used for:
On-Demand expert consultation services DO NOT guarantee any response time or availability.
If you need long-term, reliable support with SLA commitment, consider our subscription plans.
Contact (email) me ([email protected]) if you need more details.
In addition to the open-source version, Pigsty offers 3 subscription plans: Standard, Professional and Enterprise. You can choose the appropriate subscription plan based on your actual situation and needs.
The number of nodes is defined as the total number of independent IP addresses that exist as Hosts in the config inventory of a Pigsty deployment, i.e., the total number of nodes managed by Pigsty.
| Item / Plan | OSS | Standard | Professional | Enterprise |
|---|---|---|---|---|
| License | AGPLv3 | Commercial | Commercial | Commercial |
| Node Limit | unlimited | ≤ 5 | ≤ 15 | ≤ 50, up to unlimited |
| Warranty | No Warranty | +Pigsty | +Kernel | +Extension |
| Pigsty Bug Fix | latest minor | latest major | all | all |
| PG Support | 17 | 17,16 | 17,16,15,14,13 | back to 9.x+ |
| PG Extension | +Debug Symbol | +All Versions | +Customize Build | |
| OS Support | EL9, D12, U22 | +ARM64 | +EL8, U24 | +EL7,D11,U20 Bespoke |
| Arch Support | x86_64 | x86_64, ARM64 | x86_64, ARM64 | x86_64, ARM64 |
| Offline Package | el9,d12,u22 | +ARM64 | +OS Minor | Bespoke |
| Extra Modules | +ARM64 | +Pro Modules | +Pilot Modules | |
| Advanced CLI | yes | yes | yes | |
| DBA Hours | one-time setup | up to 5h/mo | up to 10h/mo | |
| Expert Support | available | 1 man·day/yr | 2 man·day/yr | |
| Support Grade | standard | professional | enterprise | |
| Support SLA | 5x8, same day | 5x8, < 4h | 7x24, < 30min | |
| Price | Free | 8,000 $/year | 24,000 $/year | 60,000 $/year |
Free under the AGPLv3 License, No Warranty
Pigsty is built on open source and also gives back to the open source community. It is a gift to the PostgreSQL community and all users — you can get the complete core functionality of Pigsty without any payment. Of course, as is typical with open-source software, the Pigsty Open Source Edition does not offer any warranty service and bears no responsibility for any consequences arising from its use. If you require a warranty, please consider our subscription services.
The Pigsty Open Source Edition is released under the AGPLv3 license, which is a copyleft, strict open-source license. If you are an ordinary end user (i.e., users other than public cloud vendors or database vendors), we will not pursue any action against your secondary development of Pigsty. In practice, it is effectively licensed under the more permissive Apache 2.0 license for most end users.
If you discover any defects in Pigsty, we highly encourage you to submit an Issue on GitHub to help us improve. If you have any questions, you can seek help in the Community.
For the open-source version, we provide prebuilt standard offline packages for PostgreSQL 17 on three precisely targeted OS distributions —
EL 9.6, Debian 12.11, Ubuntu 24.04.2 — with the latest minor versions (as a form of open-source support, aarch64 offline packages are also provided for Debian 12).
By using the Pigsty Open Source Edition, entry-level developers and DevOps engineers can access 70%+ of the capabilities of a professional DBA. Even without a dedicated database expert, you can easily set up a high-availability, high-performance, easy-to-maintain, secure, and reliable PostgreSQL database cluster. If self-hosted in the cloud, you can immediately save on the price difference between EC2/ESSD and RDS services, achieving significant cost reductions up to 90+%.
| Code | Distro Major | Minor | x86_64 |
aarch64 |
|---|---|---|---|---|
| EL9 | RHEL 9 / Rocky9 / Alma9 | 9.6 |
1716151413 | 1716151413 |
| D12 | Debian 12 (bookworm) |
12.11 |
1716151413 | 1716151413 |
| U24 | Ubuntu 24.04 (noble) |
24.04.2 |
1716151413 | 1716151413 |
Economical choice for SMBs, startups, and freelancers
The Pigsty Standard subscription provides an affordable safety net for small and medium businesses—we offer warranty and support coverage for the Pigsty software itself. The Standard subscription uses a dedicated commercial license, delivering a written contractual commitment that waives the AGPLv3 derived work open-source obligations of Pigsty.
We provide a one-time architectural consultation service to Standard subscription customers. Based on your environment and available resources, we will propose a suitable database architecture design. Whether you want to use PostgreSQL to build a business system or self-host Odoo, Dify, Supabase, Gitlab, or other applications, we can provide comprehensive support, including offline installation and network solutions.
The Pigsty Standard subscription includes basic expert ticketing and Q&A services. We commit to responding to your questions within working hours. For more complex issues requiring additional support, our expert support (man-day) service is also available for purchase. Our PostgreSQL expertise can help you avoid numerous pitfalls, saving you time, effort, and costs.
For mainstream open-source Linux distributions (EL9, Debian 12, Ubuntu 22.04) at their latest stable minor versions,
the Pigsty Standard subscription provides offline software installation packages for both x86_64 and aarch64.
These packages include the PostgreSQL 17 kernel and all available extensions, tested to ensure quick, stable,
and efficient installation with consistent versions, independent of network environment and upstream repository changes.
The starting price for Pigsty Standard is 8,000 $ / year, roughly equivalent to the annual fee for 4 vCPUs of AWS HA RDS PG or the salary of an intern with a monthly wage of $600.
| Code | Distro Major | Minor | x86_64 |
aarch64 |
|---|---|---|---|---|
| EL9 | RHEL 9 / Rocky9 / Alma9 | 9.6 |
1716151413 | 1716151413 |
| D12 | Debian 12 (bookworm) |
12.11 |
1716151413 | 1716151413 |
| U24 | Ubuntu 24.04 (noble) |
24.04.2 |
1716151413 | 1716151413 |
Suitable choice for typical enterprise users
The Pigsty Professional subscription builds upon the Standard offering with more advanced consultation services. The Professional subscription includes analysis of complex issues and performance bottleneck optimization, ensuring you can access top-level DBA expertise at critical moments.
We provide comprehensive architectural consultation for Professional subscription customers. Based on your business needs and resource availability, we develop the optimal database architecture design and ensure its successful implementation. We also help with high availability testing and PITR exercises, and provide training on Pigsty’s monitoring system, configuration methods, and management commands.
The Pigsty Professional subscription offers enhanced support. We provide one expert man-day per year, along with monthly DBA consultation and Q&A not exceeding five hours. We also offer a faster SLA response time: for routine questions, we guarantee a response within four hours during weekday working hours (5x8).
The Pigsty Professional subscription supports a broader range of operating systems, adding EL 8 and Ubuntu 24.04 to the list of supported distributions,
and provides aarch64 support for all of these versions. If you are not using the latest minor version, we can customize offline software packages for your specified minor version.
Moreover, the offline packages include all Pigsty feature modules, such as PG branch kernels (IvorySQL, PolarDB, Babelfish) and all Pro/Beta modules.
Pigsty Professional provides support for the three most recent major PostgreSQL releases (17, 16, 15), and offers expert guidance for PostgreSQL major version upgrades as well as Pigsty upgrades.
The starting price for Pigsty Professional is 24,000 $ / year, roughly equivalent to the annual fee for 11 vCPUs of AWS HA RDS PG, or the annual salary of a junior DevOps engineer with a monthly wage of $2,000.
| Code | Distro Major | Minor | x86_64 |
aarch64 |
|---|---|---|---|---|
| EL9 | RHEL 9 / Rocky9 / Alma9 | 9.x |
1716151413 | 1716151413 |
| D12 | Debian 12 (bookworm) |
12.x |
1716151413 | 1716151413 |
| U22 | Ubuntu 22.04 (jammy) |
22.04.x |
1716151413 | 1716151413 |
| U24 | Ubuntu 24.04 (noble) |
24.04.x |
1716151413 | 1716151413 |
| EL8 | RHEL 8 / Rocky8 / Alma8 | 8.x |
1716151413 | 1716151413 |
Designed for mission-critical scenarios
Pigsty Enterprise is designed for medium and large enterprises or mission-critical scenarios requiring strict SLAs. With the Enterprise subscription, we offer the highest level of support to meet all your database needs.
Under the Enterprise subscription, we help you design and implement the optimal database architecture solution. Beyond database drills, stress tests, and performance evaluations, we also provide consultancy and training on management systems, helping you build a comprehensive database management framework that meets various security and compliance requirements.
Pigsty Enterprise includes two expert man-days per year, plus a monthly DBA consultation and Q&A of up to 10 hours. For routine issues, we guarantee a response within 30 minutes, 7x24, and always prioritize your requests.
The Pigsty Enterprise subscription offers the widest range of OS support, adding EL7, Debian 11, and Ubuntu 20.04, including EOL releases. We can also customize support for Euler, Anolis, UOS, Kylin, TencentOS, AliOS, OpenCloudOS, and other Linux distributions.
The Pigsty Enterprise subscription covers all PostgreSQL major releases (13–17) within their active lifecycles, ensuring smooth in-place upgrades across different major versions. Using the included man-days, you can migrate your PostgreSQL clusters to the latest major version via a zero-downtime, blue-green deployment process.
Pigsty Enterprise permits usage of Pigsty as DBaaS at a specified scale, allowing you to build and sell cloud database services. It also allows OEM use—you may distribute Pigsty with your own logo, trademarks, and branding within the agreed scope.
The starting price for Pigsty Enterprise is 60,000 $ / year, which is equivalent to 27 vCPUs of AWS RDS for PostgreSQL, or a developer with a monthly salary of $5,000.
| Code | Distro Major | Minor | x86_64 |
aarch64 |
|---|---|---|---|---|
| EL9 | RHEL 9 / Rocky9 / Alma9 | 9.x |
1716151413 | 1716151413 |
| D12 | Debian 12 (bookworm) |
12.x |
1716151413 | 1716151413 |
| U22 | Ubuntu 22.04 (jammy) |
22.04.x |
1716151413 | 1716151413 |
| U24 | Ubuntu 24.04 (noble) |
24.04.x |
1716151413 | 1716151413 |
| EL8 | RHEL 8 … / Anolis8 | 8.x |
1716151413 | 1716151413 |
| EL7 | RHEL 7 … / UOS / Euler | 7.x |
1716151413 | 1716151413 |
| D11 | Debian 11 (bullseye) |
11.x |
1716151413 | 1716151413 |
| U20 | Ubuntu 20.04 (focal) |
20.04.x |
1716151413 | 1716151413 |
Pigsty subscriptions are annual, beginning on the agreed date. Payment before expiration implies automatic renewal. Continuous subscriptions receive discounts: 5% off the second year, 10% off subsequent years, and 15% off for three-year commitments.
After subscription expiration, non-renewal results in cessation of updates, technical support, and consulting, though previously installed Pro software remains usable. Non-renewal gaps do not require back payment upon re-subscription, but loyalty discounts are reset.
Pigsty’s pricing delivers exceptional value—providing immediate access to top-tier DBA expertise and database management practices at a cost that compares favorably to hiring full-time experts or using cloud database services. For reference, market prices for comparable enterprise database services include:
Fair market rates for enterprise database services typically range from $1K - $4K/year per vCPU.
Pigsty’s pricing offers unmatched cost efficiency, especially on high-end servers.
PostgreSQL cluster architecture and concept
Reliable service access via lb, proxy, pool
Define, create, and manage business databases
Define, create, and manage users and roles
Host-Based Authentication in Pigsty
Access Control with default roles and privileges
Replace vanilla PostgreSQL with exotic kernel forks
Harness the synergistic power of PostgreSQL extensions
Describe and configure PostgreSQL clusters
Customize postgres cluster with 120 parameters
Run administrative tasks on PostgreSQL clusters
Control primitives with Ansible playbooks
Backup and point-in-time recovery
Zero-downtime blue-green deployment
Monitor existing PostgreSQL or RDS
Visualized information with Grafana dashboards
There are four types of core entities in Pigsty’s PGSQL module:
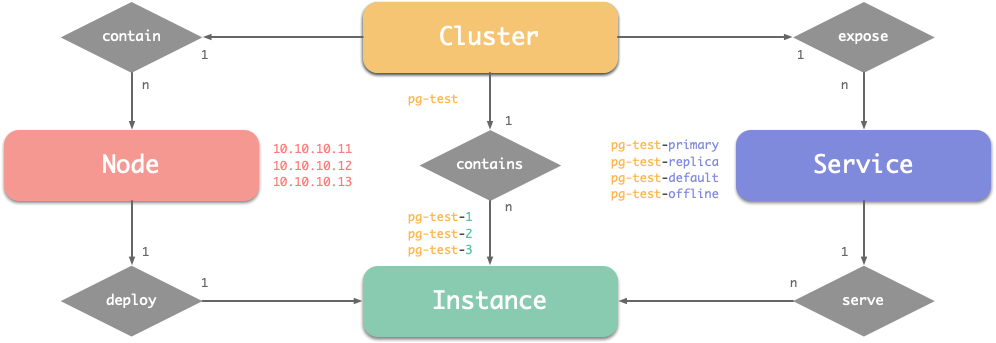
Here’s a PostgreSQL Cluster pg-test described in the config inventory:
It defines a HA PostgreSQL cluster looks like the above, and here are related entities in this cluster:
pg-testprimary & replicapg-test-1, pg-test-2, pg-test-310.10.10.11, 10.10.10.12, 10.10.10.13pg-test-primary: Read-Write Service (route to primary pgbouncer)pg-test-replica: Read-Only Service (route to replicas pgbouncer)pg-test-default: Direct RW Service (route to primary postgres)pg-test-offline: Offline Read Service (route to dedicated postgres)The PostgreSQL cluster is managed by Patroni, which is a battle-tested HA solution for PostgreSQL. It will set up PG Replication on multiple nodes, and perform automatic failover when the primary node is down.
The backup is handled by pgBackRest, which is a powerful backup tool for PostgreSQL, which supports incremental backup/restore, compression, encryption, backup to local disk or S3 / MinIO.
The pgbouncer is a lightweight connection pooler which can increase the performance with high-concurrency. It is 1:1 deployed with the Postgres server and used by primary / replica services by default.
The services are exposed by HAProxy, which is a high-performance TCP/HTTP load balancer, it’s part of NODE module. And 4 default services are auto exposed in an idempotent way on all cluster nodes.
The application can visit any of the haproxy to access the Postgres cluster, and the traffic will be routed to the correct instance based on patroni health check endpoints. So failover is transparent to the apps.
The patroni requires a functioning ETCD in your deployment, and pgbackrest can use the optional MinIO as centralized backup storage; and monitoring exporters will collect metrics & logs into the Infra module.
The PGSQL Node consists of the following components (some can be disabled)
| Component | Port | Description |
|---|---|---|
postgres |
5432 |
PostgreSQL Server Process Managed by Patroni |
pgbouncer |
6432 |
Pgbouncer Connection Pool |
pgbackrest |
- | Backup and point-in-time-recovery tools |
patroni |
8008 |
Patroni HA Component, Manage postgres |
primary @ haproxy |
5433 |
Primary connection pool: Read/Write Service |
replica @ haproxy |
5434 |
Replica connection pool: Read-only Service |
default @ haproxy |
5436 |
Primary Direct Connect Service |
offline @ haproxy |
5438 |
Offline Direct Connect: Offline Read Service |
pg_exporter |
9630 |
postgres Monitoring Metrics Exporter |
pgbouncer_exporter |
9631 |
pgbouncer Monitoring Metrics Exporter |
pgbackrest_exporter |
9854 |
pgbackrest Monitoring Metrics Exporter |
vip-manager |
- | Bind VIP to the primary |
Meanwhile, the Infra Node consists of the following components which interact with PGSQL.
| Component | Port | Domain | Description |
|---|---|---|---|
nginx |
80 |
h.pigsty |
Web Service Portal (YUM/APT Repo) |
alertmanager |
9059 |
a.pigsty |
Alert Aggregation and delivery |
prometheus |
9058 |
p.pigsty |
Monitoring Time Series Database |
grafana |
3000 |
g.pigsty |
Visualization Platform |
lok |
3100 |
- | Logging Collection Server |
pushgateway |
9091 |
- | Collect One-Time Job Metrics |
blackbox_exporter |
9115 |
- | Blackbox Probing |
dnsmasq |
53 |
- | DNS Server |
chronyd |
123 |
- | NTP Time Server |
ansible |
- | - | Run playbooks |
vip-manager, which binds to cluster primary.
vip-manager will acquire cluster leader info written by patroni from etcd cluster directly543x).
patroni.primary/replica services by setting pg_default_service_dest ) to postgrespatroni by default.etcd as DCS: config storage, failure detection, and leader election.pgbackrest_method)
local (default) is used as the backup repo, primary’s pg_fs_backup is used as local backup repominio is used, pgBackRest will create the repo on the dedicated MinIO clusterThere is one config inventory file and one infra corresponding to a Pigsty deployment. And there may have multiple database clusters in a Pigsty deployment.
A Cluster / Instance may have multiple Databases, and Databases contain Tables and other Objects (Query, Index, Function, Seq, …).
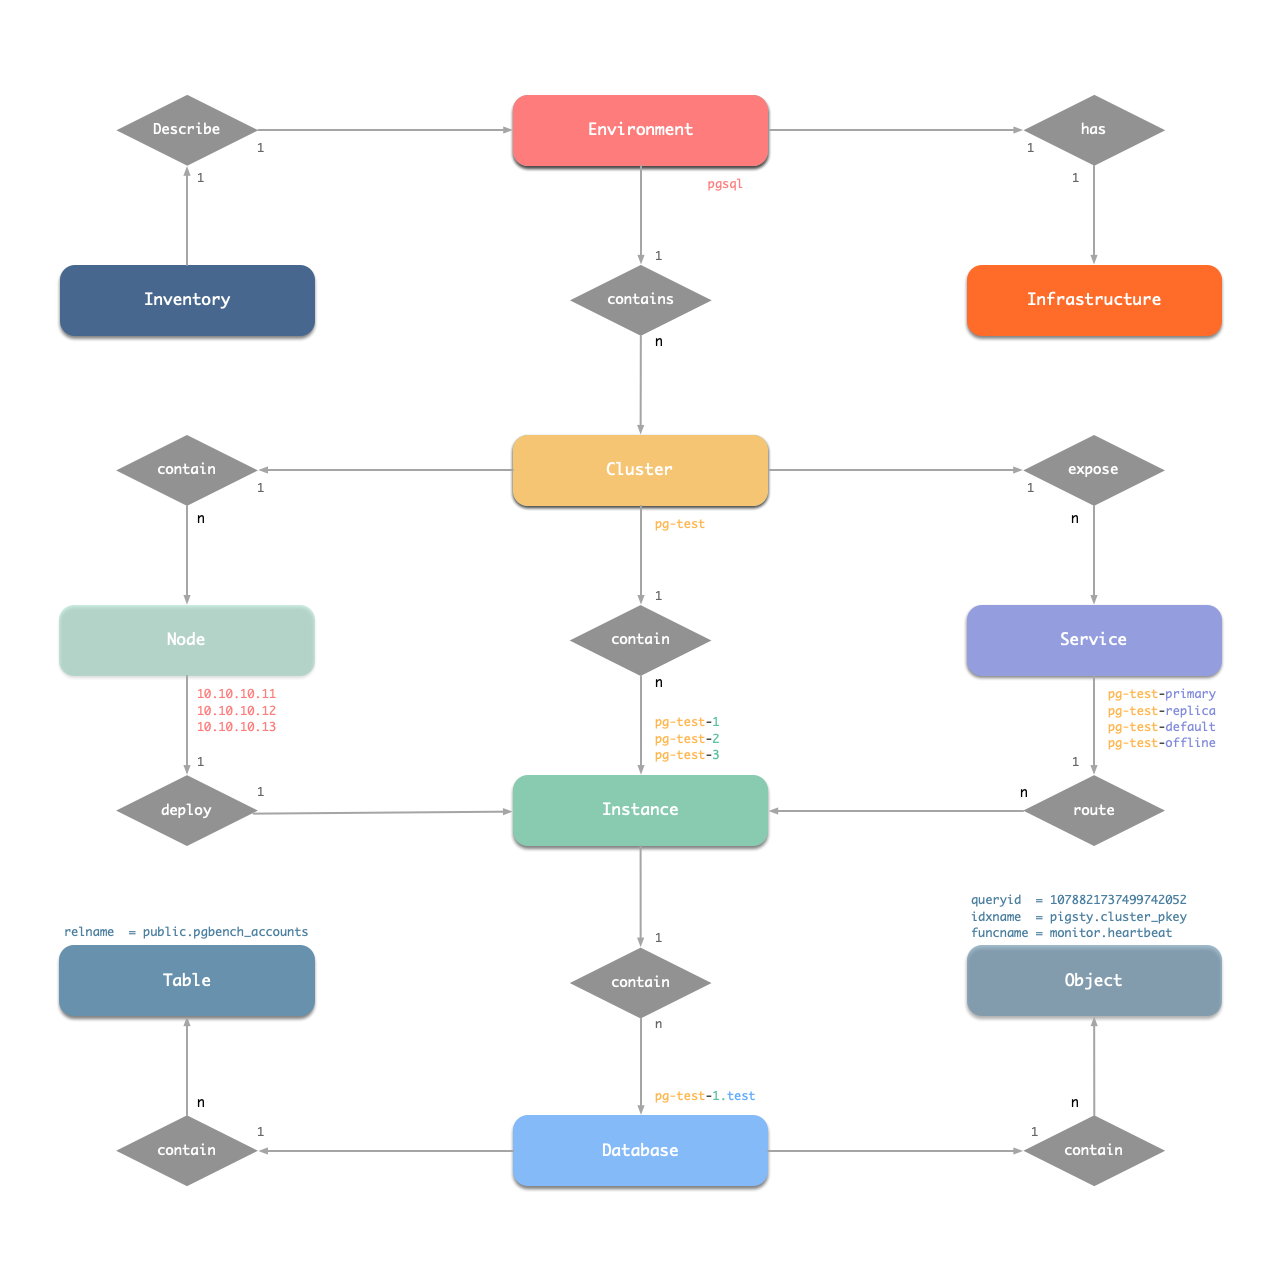
You can define different types of instances & clusters.
There are 4 REQUIRED parameters to describe a PostgreSQL Cluster:
| Name | Type | Level | Description |
|---|---|---|---|
inventory_hostname |
ip |
Instance | PG node IPv4 address |
pg_cluster |
string |
Cluster | PG database cluster name |
pg_seq |
number |
Instance | PG database instance id |
pg_role |
enum |
Instance | PG database instance role |
pg_cluster: Name of the cluster, configured at the cluster level.pg_role: Configured at the instance level, identifies the role of the instance.
primary role will mark this instance as cluster leader (initially).replica is the default role, which marks this instance as common read-only replica.offline marks this instance as special read-only replica that serves the offline service.pg_seq: Used to identify the instance within the cluster, a non-negative integer
{{ pg_cluster }}-{{ pg_seq }} is used to uniquely identify the instance, i.e. pg_instance.{{ pg_cluster }}-{{ pg_role }} is used to identify the services within the cluster, i.e. pg_service.pg_shard and pg_group are used for horizontally sharding clusters, for citus & greenplum only.These identities will be used in the entire system, for example, the metrics may look like:
You can use the OPTIONAL pg_shard and pg_group param to identify horizontal sharded clusters:
| Name | Type | Level | Description |
|---|---|---|---|
pg_shard |
string |
C | PG database shard name of cluster |
pg_group |
number |
C | PG database shard index of cluster |
For example, Horizontal sharding with citus, greenplum or sharding it manually
[a-zA-Z0-9-]+, and ≤ 40 char--| Entity | Naming Examples |
|---|---|
| Cluster | pg-meta, pg-test, … |
| Service | pg-meta-primary, pg-test-replica, pg-test-offline, pg-test-standby, pg-meta-default |
| Instance | pg-meta-1, pg-test-1, pg-test-2, pg-test-3,… |
| Node | 10.10.10.10, 10.10.10.11, 10.10.10.12, 10.10.10.13… |
Pigsty follows the PostgreSQL Version Policy and “Officially” support the following major versions.
| Major | Minor | Comment | RPM EXT | DEB EXT |
|---|---|---|---|---|
18 |
18.1 |
The latest stable version (RECOMMENDED) | 392 | 390 |
17 |
17.7 |
The sendary stable version (RECOMMENDED) | 418 | 413 |
16 |
16.11 |
First release on 2023-09-14 | 420 | 412 |
15 |
15.15 |
First release on 2022-10-13 | 422 | 414 |
14 |
14.20 |
First release on 2021-09-30 | 410 | 402 |
13 |
13.23 |
First release on 2020-09-24, EOLed soon | 382 | 371 |
Pigsty has PG 13 - 18 support. Lower major version (12-) “may” work, with no guarantee. For legacy PG version support, consider our professional services.
To use a different major version, configure the pg_version variable.
Which can be globally configure with -v <ver> option.
No further changed needed as long as they are available in local / upstream repo.
Let’s start with the simplest case, singleton meta:
Use the following command to create a primary database instance on the 10.10.10.11 node.
To add a physical replica, you can assign a new instance to pg-test with pg_role set to replica
You can create an entire cluster or append a replica to the existing cluster:
The offline instance is a dedicated replica to serve slow queries, ETL, OLAP traffic and interactive queries, etc…
To add an offline instance, assign a new instance with pg_role set to offline.
Offline instance works like common replica instances, but it is used as a backup server in pg-test-replica service. That is to say, offline and primary instances serve only when all replica instances are down.
You can have ad hoc access control offline with pg_default_hba_rules and pg_hba_rules. It will apply to the offline instance and any instances with pg_offline_query flag.
Pigsty uses asynchronous stream replication by default, which may have a small replication lag (10KB / 10ms). A small window of data loss may occur when the primary fails (can be controlled with pg_rpo), but it is acceptable for most scenarios.
But in some critical scenarios (e.g., financial transactions), data loss is totally unacceptable or read-your-write consistency is required. In this case, you can enable synchronous commit to ensure that.
To enable sync standby mode, you can simply use crit.yml template in pg_conf
To enable sync standby on existing clusters, config the cluster and enable synchronous_mode:
If synchronous_mode: true, the synchronous_standby_names parameter will be managed by patroni. It will choose a sync standby from all available replicas and write its name to the primary’s configuration file.
When sync standby is enabled, PostgreSQL will pick one replica as the standby instance, and all other replicas as candidates. Primary will wait until the standby instance flushes to disk before a commit is confirmed, and the standby instance will always have the latest data without any lags.
However, you can achieve an even higher/lower consistency level with the quorum commit (trade-off with availability).
For example, to have all 2 replicas to confirm a commit:
If you have more replicas and wish to have more sync standby, increase synchronous_node_count accordingly. Beware of adjust synchronous_node_count accordingly when you append or remove replicas.
The postgres synchronous_standby_names parameter will be managed by patroni:
The classic quorum commit is to use majority of replicas to confirm a commit.
You can clone an existing cluster and create a standby cluster, which can be used for migration, horizontal split, multi-az deployment, or disaster recovery.
A standby cluster’s definition is just the same as any other normal cluster, except there’s a pg_upstream defined on the primary instance.
For example, you have a pg-test cluster, to create a standby cluster pg-test2, the inventory may look like this:
And pg-test2-1, the primary of pg-test2 will be a replica of pg-test and serve as a Standby Leader in pg-test2.
Just make sure that the pg_upstream parameter is configured on the primary of the backup cluster to pull backups from the original upstream automatically.
A delayed cluster is a special type of standby cluster, which is used to recover “drop-by-accident” ASAP.
For example, if you wish to have a cluster pg-testdelay which has the same data as 1-day ago pg-test cluster:
You can also configure a replication delay on the existing standby cluster.
When some tuples & tables are dropped by accident, you can advance this delayed cluster to a proper time point and select data from it.
It takes more resources, but can be much faster and have less impact than PITR
Pigsty has native citus support. Check the conf/citus.yml example.
To define a citus cluster, you have to specify the following parameters:
pg_mode has to be set to citus instead of default pgsqlpg_shard & pg_group has to be defined on each sharding clusterpatroni_primary_db has to be defined to specify the database to be managedpg_dbsu_password has to be set to a non-empty string plain password if you want to use the pg_dbsu postgres rather than default pg_admin_username to perform admin commandsBesides, extra hba rules that allow ssl access from local & other data nodes are required. Which may looks like this
And you can create distributed table & reference table on the coordinator node. Any data node can be used as the coordinator node since citus 11.2.
There are 121 parameters about the PGSQL module.
| Section | Count | Description |
|---|---|---|
PG_ID |
11 | Calculate & Check Postgres Identity - parameters for identifying PGSQL entities like instances and services |
PG_BUSINESS |
12 | Postgres Business Object Definition - configuration for business users, databases, services, and authentication |
PG_INSTALL |
10 | Install PGSQL Packages & Extensions - settings for database user setup, version selection, and package installation |
PG_BOOTSTRAP |
35 | Init a HA Postgres Cluster with Patroni - comprehensive cluster initialization including data directories, networking, and high availability setup |
PG_PROVISION |
9 | Create users, databases, and in-database objects - post-bootstrap provisioning of database objects and default configurations |
PG_BACKUP |
6 | Setup backup repo with pgbackrest - backup and recovery configuration using pgbackrest |
PG_ACCESS |
16 | Exposing pg service, bind vip and register DNS - service exposure, load balancing, VIP management, and DNS registration |
PG_MONITOR |
18 | Add Monitor for PGSQL Instance - monitoring setup with various exporters for metrics collection |
PG_REMOVE : Remove a Postgres Cluster |
| Name | Type | Level | Comment |
|---|---|---|---|
pg_safeguard |
bool |
G/C/A | stop removal when enabled; false by default |
pg_rm_data |
bool |
G/C/A | remove postgres data during removal; true by default |
pg_rm_backup |
bool |
G/C/A | remove primary pgBackRest backup during removal; true by default |
pg_rm_pkg |
bool |
G/C/A | uninstall postgres packages during removal; true by default |
PG_ID
Here are some common parameters used to identify PGSQL entities: instance, service, etc…
pg_mode
name: pg_mode, type: enum, level: C
pgsql cluster mode, pgsql by default, i.e. standard PostgreSQL cluster.
pgsql: Standard PostgreSQL cluster, default value.citus: Horizontal sharding cluster with citus extension.mssql: Babelfish MSSQL wire protocol compatible kernel.ivory: IvorySQL Oracle compatible kernel.polar: PolarDB for PostgreSQL kernel.oracle: PolarDB for Oracle kernel.gpsql: Greenplum / CloudberryIf pg_mode is set to citus or gpsql, pg_shard and pg_group will be required for horizontal sharding clusters.
pg_cluster
name: pg_cluster, type: string, level: C
pgsql cluster name, REQUIRED identity parameter
The cluster name will be used as the namespace for PGSQL related resources within that cluster.
The naming needs to follow the specific naming pattern: [a-z][a-z0-9-]* to be compatible with the requirements of different constraints on the identity.
pg_seq
name: pg_seq, type: int, level: I
pgsql instance seq number, REQUIRED identity parameter
A serial number to identify these instances, unique within its cluster, starting from 0 or 1.
pg_role
name: pg_role, type: enum, level: I
pgsql role, REQUIRED, could be primary,replica,offline
Roles for PGSQL instance, can be: primary, replica, standby or offline.
primary: Primary, there is one and only one primary in a cluster.replica: Replica for carrying online read-only traffic, there may be a slight replication delay through (10ms~100ms, 100KB).standby: Special replica that is always synced with primary, there’s no replication delay & data loss on this replica. (currently same as replica)offline: Offline replica for taking on offline read-only traffic, such as statistical analysis/ETL/personal queries, etc.Identity params, required params, and instance-level params.
pg_instances
name: pg_instances, type: dict, level: I
define multiple pg instances on node in {port:ins_vars} format.
This parameter is reserved for multi-instance deployment on a single node which is not implemented in Pigsty yet.
pg_upstream
name: pg_upstream, type: ip, level: I
Upstream ip address for standby cluster or cascade replica
Setting pg_upstream is set on primary instance indicate that this cluster is a Standby Cluster, and will receiving changes from upstream instance, thus the primary is actually a standby leader.
Setting pg_upstream for a non-primary instance will explicitly set a replication upstream instance, if it is different from the primary IP Address,
this instance will become a cascade replica. And it’s user’s responsibility to ensure that the upstream IP addr is another instance in the same cluster.
pg_shard
name: pg_shard, type: string, level: C
pgsql shard name, required identity parameter for sharding clusters (e.g. citus cluster), optional for common pgsql clusters.
When multiple pgsql clusters serve the same business together in a horizontally sharding style, Pigsty will mark this group of clusters as a Sharding Group.
pg_shard is the name of the shard group name. It’s usually the prefix of pg_cluster.
For example, if we have a sharding group pg-citus, and 4 clusters in it, there identity params will be:
pg_group
name: pg_group, type: int, level: C
pgsql shard index number, required identity for sharding clusters, optional for common pgsql clusters.
Sharding cluster index of a sharding group, used in pairs with pg_shard. You can use any non-negative integer as the index number.
gp_role
name: gp_role, type: enum, level: C
greenplum/matrixdb role of this cluster, could be master or segment
master: mark the postgres cluster as greenplum master, which is the default valuesegment mark the postgres cluster as greenplum segmentThis parameter is only used for greenplum & derived databases, and is ignored for common pgsql cluster.
pg_exporters
name: pg_exporters, type: dict, level: C
additional pg_exporters to monitor remote postgres instances, default values: {}
If you wish to monitor remote postgres instances, define them in pg_exporters and load them with pgsql-monitor.yml playbook.
Check PGSQL Monitoring for details.
pg_offline_query
name: pg_offline_query, type: bool, level: I
set to true to enable offline queries on this instance
default value is false
When this parameter is enabled for a PostgreSQL instance, users belonging to the dbrole_offline group can directly connect to that PostgreSQL instance to perform offline queries (slow queries, interactive queries, ETL/analytical queries).
Instances with this flag are functionally similar to setting pg_role = offline, with the only difference being that offline instances by default do not handle replica service requests, as they exist specifically as dedicated offline/analytical replica instances.
If you don’t have spare instances that can be dedicated to this purpose, you can select a regular replica and enable this parameter at the instance level to accommodate offline queries when needed.
PG_BUSINESS
Database credentials, In-Database Objects that need to be taken care of by Users.
pg_userspg_databasespg_services (Global Definition: pg_default_services)pg_default_servicespgb_hba_rulespg_admin_username / pg_admin_passwordpg_replication_username / pg_replication_passwordpg_monitor_username / pg_monitor_passwordWARNING: YOU HAVE TO CHANGE THESE DEFAULT PASSWORDs in production environment.
pg_users
name: pg_users, type: user[], level: C
postgres business users, defined at cluster level.
default values: [], each object in the array defines a User/Role. Examples:
The only mandatory field of a user definition is name, and the rest are optional.
pg_databases
name: pg_databases, type: database[], level: C
postgres business databases, defined at cluster level.
default values: [], each object in the array defines a Database. Examples:
In each database definition, the DB name is mandatory and the rest are optional.
pg_services
name: pg_services, type: service[], level: C
postgres business services exposed via haproxy, has to be defined at cluster level.
You can define ad hoc services with pg_services in additional to default pg_default_services
default values: [], each object in the array defines a Service. Examples:
pg_hba_rules
name: pg_hba_rules, type: hba[], level: C
business hba rules for postgres
default values: [], each object in array is an HBA Rule definition:
Which are array of hba object, each hba object may look like
title: Rule Title, transform into comment in the hba filerules: Array of strings, each string is a raw hba rule recordrole : Applied roles, where to install these hba rules
common: apply for all instancesprimary, replica,standby, offline: apply on corresponding instances with that pg_role.role == 'offline' will be installed on instance with pg_offline_query flagor you can use another alias form
pg_default_hba_rules is similar to this, but is used for global HBA rule settings
pgb_hba_rules
name: pgb_hba_rules, type: hba[], level: C
business hba rules for pgbouncer, default values: []
Similar to pg_hba_rules, array of hba rule object, except this is for pgbouncer.
pg_replication_username
name: pg_replication_username, type: username, level: G
postgres replication username, replicator by default
This parameter is globally used, it is not wise to change it.
pg_replication_password
name: pg_replication_password, type: password, level: G
postgres replication password, DBUser.Replicator by default
WARNING: CHANGE THIS IN PRODUCTION ENVIRONMENT!!!!
pg_admin_username
name: pg_admin_username, type: username, level: G
postgres admin username, dbuser_dba by default, which is a global postgres superuser.
default values: dbuser_dba
pg_admin_password
name: pg_admin_password, type: password, level: G
postgres admin password in plain text, DBUser.DBA by default
WARNING: CHANGE THIS IN PRODUCTION ENVIRONMENT!!!!
pg_monitor_username
name: pg_monitor_username, type: username, level: G
postgres monitor username, dbuser_monitor by default, which is a global monitoring user.
pg_monitor_password
name: pg_monitor_password, type: password, level: G
postgres monitor password, DBUser.Monitor by default.
Try not using the @:/ character in the password to avoid problems with PGURL string.
WARNING: CHANGE THIS IN PRODUCTION ENVIRONMENT!!!!
pg_dbsu_password
name: pg_dbsu_password, type: password, level: G/C
PostgreSQL dbsu password for pg_dbsu, empty string means no dbsu password, which is the default behavior.
It’s not recommended to set the well-known dbsu (postgres) password for common PGSQL clusters, except for a good reason, such as using pg_mode = citus.
PG_INSTALL
This section is responsible for installing PostgreSQL & Extensions.
If you wish to install a different major version, make sure repo packages exists and overwrite pg_version on cluster level.
To install extra extensions, overwrite pg_extensions on cluster level. Beware that not all extensions are available with other major versions.
pg_dbsu
name: pg_dbsu, type: username, level: C
OS DBSU name, postgres by default, it’s not wise to change it.
When installing Greenplum / MatrixDB, set this parameter to the corresponding default value: gpadmin|mxadmin.
pg_dbsu_uid
name: pg_dbsu_uid, type: int, level: C
OS DBSU uid and gid, 26 for default postgres users and groups, which is consistent with the official pgdg RPM.
For Ubuntu/Debian, there’s no default postgres UID/GID, consider using another ad hoc value, such as 543 instead.
pg_dbsu_sudo
name: pg_dbsu_sudo, type: enum, level: C
OS DBSU sudo privilege, could be none, limit ,all ,nopass. limit by default
none: No Sudo privilegelimit: Limited sudo privilege to execute systemctl commands for database-related components, default.all: Full sudo privilege, password required.nopass: Full sudo privileges without a password (not recommended).default values: limit, which only allow sudo systemctl <start|stop|reload> <postgres|patroni|pgbouncer|...>
Available sudo services:
pg_dbsu_home
name: pg_dbsu_home, type: path, level: C
postgresql home directory, /var/lib/pgsql by default, which is consistent with the official pgdg RPM.
pg_dbsu_ssh_exchange
name: pg_dbsu_ssh_exchange, type: bool, level: C
exchange postgres os dbsu ssh key among pgsql instances?
default value is true, means the dbsu can ssh to each other among the playbook execution hosts.
For scenarios where ssh access is strictly limited, you can set it to false.
Please note that SSH key exchange occurs between instances that are executing the same playbook. If you run the pgsql role for a single PostgreSQL cluster, the key exchange will occur between all instances in that cluster.
If you run the pgsql role for all PostgreSQL clusters, the key exchange will occur between all instances, which can lead to severe combinatorial explosions for large clusters.
If any instance involved in the key exchange does not have the pg_dbsu user, the key exchange will fail for that instance, but will not affect other instances.
pg_version
name: pg_version, type: enum, level: C
postgres major version to be installed, 18 by default
Note that PostgreSQL physical stream replication cannot cross major versions, so do not configure this on instance level.
You can use the parameters in pg_packages and pg_extensions to install rpm/deb for the specific pg major version.
pg_bin_dir
name: pg_bin_dir, type: path, level: C
postgres binary dir, /usr/pgsql/bin by default
The default value is a soft link created manually during the installation process, pointing to the specific Postgres version dir installed.
For example /usr/pgsql -> /usr/pgsql-17. For more details, check PGSQL File Structure for details.
pg_log_dir
name: pg_log_dir, type: path, level: C
postgres log dir, /pg/log/postgres by default.
caveat: if
pg_log_diris prefixed withpg_datait will not be created explicitly (it will be created by postgres itself then).
pg_packages
name: pg_packages, type: string[], level: C
PostgreSQL packages (rpm/deb) to be installed. This is an array of package names, where each element is a comma or space-separated list of PG package names or aliases.
Default value: [ pgsql-main pgsql-common ]
These default values are two aliases that are translated through alias mapping into the main RPM/DEB package names for the current PG major version, as well as version-independent common components (such as Patroni, PgBackrest, etc.)
Since Pigsty v3, you can use the alias lists specified in the system configuration in roles/node_id/vars for this parameter.
The advantage of using package aliases is that you don’t need to worry about package names, architectures, and major version numbers for PostgreSQL-related packages across different system platforms, thus abstracting away differences between operating systems:
Packages defined here will first be translated through the package_map, then undergo PG major version number substitution, and finally install the actual RPM/DEB packages.
You can also directly specify the final RPM/DEB package names to be installed, where version placeholders like ${pg_version} or $v in the package name will be replaced with the specific major version number pg_version.
pg_extensions
name: pg_extensions, type: string[], level: C
PG extensions to be installed (rpm/deb), this is an array of software package names, each element is a comma or space separated PG extension package name.
This parameter is similar to pg_packages, but is usually used to specify the extension to be installed @ global | cluster level, and the software packages specified here will be upgraded to the latest available version.
The default value of this parameter is the three most important extension plugins in the PG extension ecosystem: postgis, timescaledb, pgvector.
The complete list of extensions can be found in auto generated config
The full extension list can be found in roles/node_id/vars and listed in Extension List.
PG_BOOTSTRAP
Bootstrap postgres cluster with patroni.
It also init cluster template databases with default roles, schemas & extensions & default privileges specified in PG_PROVISION
pg_data
name: pg_data, type: path, level: C
postgres data directory, /pg/data by default
default values: /pg/data, DO NOT CHANGE IT.
It’s a soft link that points to the underlying data directory.
pg_fs_main
name: pg_fs_main, type: path, level: C
postgres main data directory, /data/postgres by default.
This directory will be created and owned by the pg_dbsu user, and it will be used as the main data directory for postgres.
If your main data directory node_data is changed, consider changing this parameter as well.
It’s recommended to use NVME SSD for postgres main data storage, Pigsty is optimized for SSD storage by default.
If you are using HDD storage, consider changing the pg_storage_type to HDD to optimize for HDD storage.
pg_fs_backup
name: pg_fs_backup, type: path, level: C
postgres backup data directory, /data/backups by default
This directory will be created and owned by the pg_dbsu user, and it will be used as the local backup storage for postgres.
Local backup is enabled by default on primary pg cluster.
If you are using the default pgbackrest_method = local, it is recommended to have a separate disk for backup storage.
The backup disk should be large enough to hold all your backups, at least enough for 3 base backups + 2-day WAL archive.
This is usually not a problem since you can use affordable and large HDD for that.
It’s optional if you are using remote / centralized backup storage (e.g. pgbackrest_method = minio).
pg_storage_type
name: pg_storage_type, type: enum, level: C
storage type for pg main data, SSD,HDD, SSD by default
default values: SSD, it will affect some tuning parameters, such as random_page_cost & effective_io_concurrency
pg_dummy_filesize
name: pg_dummy_filesize, type: size, level: C
size of /pg/dummy, default values: 64MiB, which hold 64MB disk space for emergency use
When the disk is full, removing the placeholder file can free up some space for emergency use, it is recommended to set at least 8GiB for production use.
pg_listen
name: pg_listen, type: ip, level: C
postgres/pgbouncer listen address, 0.0.0.0 (all ipv4 addr) by default
You can use placeholder in this variable:
${ip}: translate to inventory_hostname, which is primary private IP address in the inventory${vip}: if pg_vip_enabled, this will translate to host part of pg_vip_address${lo}: will translate to 127.0.0.1For example: '${ip},${lo}' or '${ip},${vip},${lo}'.
pg_port
name: pg_port, type: port, level: C
postgres listen port, 5432 by default.
pg_localhost
name: pg_localhost, type: path, level: C
postgres unix socket dir for localhost connection, default values: /var/run/postgresql
The Unix socket dir for PostgreSQL and Pgbouncer local connection, which is used by pg_exporter and patroni.
pg_namespace
name: pg_namespace, type: path, level: C
top level key namespace in etcd, used by patroni & vip, default values is: /pg , and it’s not recommended to change it.
patroni_enabled
name: patroni_enabled, type: bool, level: C
if disabled, no postgres cluster will be created during init
default value is true, If disabled, Pigsty will skip pulling up patroni (thus postgres).
This option is useful when trying to add some components to an existing postgres instance.
patroni_mode
name: patroni_mode, type: enum, level: C
patroni working mode: default, pause, remove
default values: default
default: Bootstrap PostgreSQL cluster with Patronipause: Just like default, but entering maintenance mode after bootstrapremove: Init the cluster with Patroni, them remove Patroni and use raw PostgreSQL instead.patroni_port
name: patroni_port, type: port, level: C
patroni listening port, 8008 by default, changing it is not recommended.
The Patroni API server listens to this port for health checking & API requests.
patroni_log_dir
name: patroni_log_dir, type: path, level: C
patroni log dir, /pg/log/patroni by default, which will be collected by promtail.
patroni_ssl_enabled
name: patroni_ssl_enabled, type: bool, level: G
Secure patroni RestAPI communications with SSL? default value is false
This parameter is a global flag that can only be set before deployment.
Since if SSL is enabled for patroni, you’ll have to perform healthcheck, metrics scrape, and API call with HTTPS instead of HTTP.
patroni_watchdog_mode
name: patroni_watchdog_mode, type: string, level: C
In case of primary failure, patroni can use watchdog to fencing the old primary node to avoid split-brain.
patroni watchdog mode: automatic, required, off:
off: not using watchdog. avoid fencing at all. This is the default value.automatic: Enable watchdog if the kernel has softdog module enabled and watchdog is owned by dbsurequired: Force watchdog, refuse to start if softdog is not availabledefault value is off, you should not enable watchdog on infra nodes to avoid fencing.
For those critical systems where data consistency prevails over availability, it is recommended to enable watchdog.
Beware that if all your traffic is accessed via haproxy, there is no risk of brain split at all.
patroni_username
name: patroni_username, type: username, level: C
patroni restapi username, postgres by default, used in pair with patroni_password
Patroni unsafe RESTAPI is protected by username/password by default, check Config Cluster and Patroni RESTAPI for details.
patroni_password
name: patroni_password, type: password, level: C
patroni restapi password, Patroni.API by default
WARNING: CHANGE THIS IN PRODUCTION ENVIRONMENT!!!!
pg_primary_db
name: pg_primary_db, type: string, level: C
primary database name, used by citus,etc… , postgres by default
Patroni 3.0’s native citus will specify a managed database for citus. which is created by patroni itself.
pg_parameters
Parameter Name: pg_parameters, Type: dict, Level: G/C/I
This parameter is used to specify and manage configuration parameters in postgresql.auto.conf.
After all instances in the cluster have completed initialization, the pg_param task will sequentially overwrite the key/value pairs in this dictionary to /pg/data/postgresql.auto.conf.
Note: Please do not manually modify this configuration file, or use
ALTER SYSTEMto change cluster configuration parameters. Any changes will be overwritten during the next configuration sync.
This variable has a higher priority than the cluster configuration in Patroni/DCS (i.e., it has a higher priority than the cluster configuration edited by Patroni edit-config). Therefore, it can typically override the cluster default parameters at the instance level.
When your cluster members have different specifications (not recommended!), you can fine-tune the configuration of each instance using this parameter.
Please note that some important cluster parameters (which have requirements for primary and replica parameter values) are managed directly by Patroni through command-line parameters and have the highest priority.
These cannot be overridden by this method. For these parameters, you must use Patroni edit-config for management and configuration.
PostgreSQL parameters that must remain consistent across primary and replicas (inconsistency will prevent the replica from starting!):
wal_levelmax_connectionsmax_locks_per_transactionmax_worker_processesmax_prepared_transactionstrack_commit_timestampParameters that should ideally remain consistent across primary and replicas (considering the possibility of primary-replica switch):
listen_addressesportcluster_namehot_standbywal_log_hintsmax_wal_sendersmax_replication_slotswal_keep_segmentswal_keep_sizeYou can set non-existent parameters (such as GUCs from extensions), but changing existing configurations to illegal values may prevent PostgreSQL from starting. Please configure with caution!
pg_files
Parameter Name: pg_files, Type: path[], Level: C
Designates a list of files to be copied to the {{ pg_data }} directory. The default value is an empty array: [].
Files specified in this parameter will be copied to the {{ pg_data }} directory. This is mainly used to distribute license files required by special commercial versions of the PostgreSQL kernel.
Currently, only the PolarDB (Oracle-compatible) kernel requires a license file. For example, you can place the license.lic file in the files/ directory and specify it in pg_files:
pg_conf
name: pg_conf, type: enum, level: C
config template: {oltp,olap,crit,tiny}.yml, oltp.yml by default
tiny.yml: optimize for tiny nodes, virtual machines, small demo, (1oltp.yml: optimize for OLTP workloads and latency-sensitive applications, (4C8GB+), which is the default templateolap.yml: optimize for OLAP workloads and throughput (4C8G+)crit.yml: optimize for data consistency and critical applications (4C8G+)default values: oltp.yml, but configure procedure will set this value to tiny.yml if current node is a tiny node.
You can have your own template, just put it under templates/<mode>.yml and set this value to the template name.
pg_max_conn
name: pg_max_conn, type: int, level: C
postgres max connections, You can specify a value between 50 and 5000, or use auto to use recommended value.
default value is auto, which will set max connections according to the pg_conf and pg_default_service_dest.
It’s not recommended to set this value greater than 5000, otherwise you have to increase the haproxy service connection limit manually as well.
Pgbouncer’s transaction pooling can alleviate the problem of too many OLTP connections, but it’s not recommended to use it in OLAP scenarios.
pg_shared_buffer_ratio
name: pg_shared_buffer_ratio, type: float, level: C
postgres shared buffer memory ratio, 0.25 by default, 0.1~0.4
default values: 0.25, means 25% of node memory will be used as PostgreSQL shard buffers.
Setting this value greater than 0.4 (40%) is usually not a good idea.
Note that shared buffer is only part of shared memory in PostgreSQL, to calculate the total shared memory, use show shared_memory_size_in_huge_pages;.
pg_rto
name: pg_rto, type: int, level: C
recovery time objective in seconds, This will be used as Patroni TTL value, 30s by default.
If a primary instance is missing for such a long time, a new leader election will be triggered.
Decreasing the value can reduce the unavailable time (unable to write) of the cluster during failover, but it will make the cluster more sensitive to network jitter, thus increase the chance of false-positive failover.
Config this according to your network condition and expectation to trade-off between chance and impact, the default value is 30s, and it will be populated to the following patroni parameters:
pg_rpo
name: pg_rpo, type: int, level: C
recovery point objective in bytes, 1MiB at most by default
default values: 1048576, which will tolerate at most 1MiB data loss during failover.
when the primary is down and all replicas are lagged, you have to make a tough choice to trade off between Availability and Consistency:
You can use crit.yml conf template to ensure no data loss during failover, but it will sacrifice some performance.
pg_libs
name: pg_libs, type: string, level: C
shared preloaded libraries, pg_stat_statements,auto_explain by default.
They are two extensions that come with PostgreSQL, and it is strongly recommended to enable them.
For existing clusters, you can configure the shared_preload_libraries parameter of the cluster and apply it.
If you want to use TimescaleDB or Citus extensions, you need to add timescaledb or citus to this list. timescaledb and citus should be placed at the top of this list, for example:
Other extensions that need to be loaded can also be added to this list, such as pg_cron, pgml, etc.
Generally, citus and timescaledb have the highest priority and should be added to the top of the list.
pg_delay
name: pg_delay, type: interval, level: I
replications apply delay for standby cluster leader, default values: 0.
if this value is set to a positive value, the standby cluster leader will be delayed for this time before apply WAL changes.
Check delayed standby cluster for details.
pg_checksum
name: pg_checksum, type: bool, level: C
enable data checksum for postgres cluster? The v3.7.0 default value is true.
This parameter can only be set before PGSQL deployment. (but you can enable it manually later)
If pg_conf crit.yml template is used, data checksum is always enabled regardless of this parameter to ensure data integrity.
pg_pwd_enc
name: pg_pwd_enc, type: enum, level: C
password encryption algorithm: md5, scram-sha-256
default values: scram-sha-256, if you have compatibility issues with old clients, you can set it to md5 instead.
The md5 option is deprecated but remains available in v3.7.0 for legacy clients; prefer scram-sha-256.
pg_encoding
name: pg_encoding, type: enum, level: C
database cluster encoding, UTF8 by default
pg_locale
name: pg_locale, type: enum, level: C
The locale set for PostgreSQL, default is C.
When configure detects that the current PG version is greater than or equal to 17, or the current system explicitly supports C.utf8, it will automatically configure this parameter to C.UTF-8.
When the PostgreSQL version is greater than or equal to 17, the C and C.UTF-8 configurations will use the PostgreSQL internal Locale Provider.
Unless you are very clear about what you are doing, it is strongly recommended to use the default C or C.UTF-8 configuration.
pg_lc_collate
name: pg_lc_collate, type: enum, level: C
The locale set for PostgreSQL, default is C.
When configure detects that the current PG version is greater than or equal to 17, or the current system explicitly supports C.utf8, it will automatically configure this parameter to C.UTF-8.
Unless you are very clear about what you are doing, it is strongly recommended to use the default C or C.UTF-8 configuration.
The parameter behaves like pg_locale, but for collate.
pg_lc_ctype
name: pg_lc_ctype, type: enum, level: C
The locale set for PostgreSQL, default is C.
When configure detects that the current PG version is greater than or equal to 17, or the current system explicitly supports C.utf8, it will automatically configure this parameter to C.UTF-8.
When the PostgreSQL version is greater than or equal to 17, the C and C.UTF-8 configurations will use the PostgreSQL internal Locale Provider.
This parameter behaves like pg_locale, but for ctype.
Unless you are very clear about what you are doing, it is strongly recommended to use the default C or C.UTF-8 configuration.
pgsodium_key
name: pgsodium_key, type: string, level: C
Default value is not defined, which will use the SHA256 hash of the pg_cluster as the key.
You can provide a custom pgsodium key, which should be a 64 hex digit string.
The key will be written to /pg/conf/pgsodium.key.
pgsodium_getkey_script
name: pgsodium_getkey_script, type: path, level: C
default value is pgsodium_getkey, which render the roles/pgsql/templates/pgsodium_getkey to /pg/bin/pgsodium_getkey.
The default getkey script will just read the pgsodium_key from /pg/conf/pgsodium.key, and return it.
If your key is managed by external system like KMS, IAM, …, you can implement your own getkey script to fetch the key from there: examples.
PG_PROVISION
PG_BOOTSTRAP will bootstrap a new postgres cluster with patroni, while PG_PROVISION will create default objects in the cluster, including:
pg_provision
name: pg_provision, type: bool, level: C
provision postgres cluster after bootstrap, default value is true.
If disabled, postgres cluster will not be provisioned after bootstrap.
pg_init
name: pg_init, type: string, level: G/C
Provision init script for cluster template, pg-init by default, which is located in roles/pgsql/templates/pg-init
You can add your own logic in the init script, or provide a new one in templates/ and set pg_init to the new script name.
pg_default_roles
name: pg_default_roles, type: role[], level: G/C
default roles and users in postgres cluster.
Pigsty has a built-in role system, check PGSQL Access Control for details.
pg_default_privileges
name: pg_default_privileges, type: string[], level: G/C
default privileges for each databases:
Pigsty has a built-in privileges based on the default role system, check PGSQL Privileges for details.
pg_default_schemas
name: pg_default_schemas, type: string[], level: G/C
default schemas to be created, default values is: [ monitor ], which will create a monitor schema on all databases.
pg_default_extensions
name: pg_default_extensions, type: extension[], level: G/C
default extensions to be created, default value:
The only 3rd party extension is pg_repack, which is important for database maintenance, all other extensions are built-in postgres contrib extensions.
Monitor related extensions are installed in monitor schema, which is created by pg_default_schemas.
pg_reload
name: pg_reload, type: bool, level: A
reload postgres after hba changes, default value is true
This is useful when you want to check before applying HBA changes, set it to false to disable reload.
pg_default_hba_rules
name: pg_default_hba_rules, type: hba[], level: G/C
postgres default host-based authentication rules, array of hba rule object.
default value provides a fair enough security level for common scenarios, check PGSQL Authentication for details.
pgb_default_hba_rules
name: pgb_default_hba_rules, type: hba[], level: G/C
pgbouncer default host-based authentication rules, array or hba rule object.
default value provides a fair enough security level for common scenarios, check PGSQL Authentication for details.
PG_BACKUP
This section defines variables for pgBackRest, which is used for PGSQL PITR (Point-In-Time-Recovery).
Check PGSQL Backup & PITR for details.
pgbackrest_enabled
name: pgbackrest_enabled, type: bool, level: C
enable pgBackRest on pgsql host? default value is true
When using the local file system backup repository (local), only the primary instance of the cluster will actually enable pgbackrest. Other instances will only initialize an empty repository.
pgbackrest_clean
name: pgbackrest_clean, type: bool, level: C
remove pg backup data during init? default value is true
pgbackrest_log_dir
name: pgbackrest_log_dir, type: path, level: C
pgBackRest log dir, /pg/log/pgbackrest by default, which is referenced by promtail the logging agent.
pgbackrest_method
name: pgbackrest_method, type: enum, level: C
pgBackRest repo method: local, minio, or other user-defined methods, local by default
This parameter is used to determine which repo to use for pgBackRest, all available repo methods are defined in pgbackrest_repo.
Pigsty will use local backup repo by default, which will create a backup repo on primary instance’s /pg/backup directory. The underlying storage is specified by pg_fs_backup.
pgbackrest_init_backup
name: pgbackrest_init_backup, type: bool, level: C
Take a full backup after pgBackRest is initialized? default value is true.
An initial pgbackrest backup is created after repo init if:
pgbackrest_init_backup is true (and pgbackrest_enabled is true of course)/etc/pgbackrest/initial.done marker file doesn’t exist (will be created after the initial backup is done).If you don’t want to take an initial full backup at all, just set this parameter tofalse.
pgbackrest_repo
name: pgbackrest_repo, type: dict, level: G/C
pgBackRest repo document: https://pgbackrest.org/configuration.html#section-repository
default value includes two repo methods: local and minio, which are defined as follows:
You can define a new backup repository, for example, using AWS S3, GCP or another cloud provider’s S3-compatible storage service.
In the backup repository definition parameters, you can use ${pg_cluster} variable to reference the cluster name, for example, as part of the backup path or encryption key.
But if you have cross-cluster PITR requirements, you should keep the backup repository path and encryption key the same.
PG_ACCESS
This section is about exposing PostgreSQL service to the outside world: including:
pgbouncerhaproxyvip-managerdnsmasq on infra nodespgbouncer_enabled
name: pgbouncer_enabled, type: bool, level: C
default value is true, if disabled, pgbouncer will not be launched on pgsql host
pgbouncer_port
name: pgbouncer_port, type: port, level: C
pgbouncer listen port, 6432 by default
pgbouncer_log_dir
name: pgbouncer_log_dir, type: path, level: C
pgbouncer log dir, /pg/log/pgbouncer by default, referenced by promtail the logging agent.
pgbouncer_auth_query
name: pgbouncer_auth_query, type: bool, level: C
query postgres to retrieve unlisted business users? default value is false
If enabled, pgbouncer user will be authenticated against postgres databases with SELECT username, password FROM monitor.pgbouncer_auth($1), otherwise, only the users with pgbouncer: true will be allowed to connect to pgbouncer.
pgbouncer_poolmode
name: pgbouncer_poolmode, type: enum, level: C
Pgbouncer pooling mode: transaction, session, statement, transaction by default
session: Session-level pooling with the best compatibility.transaction: Transaction-level pooling with better performance (lots of small conns), could break some session level features such as notify/listen, etc…statements: Statement-level pooling which is used for simple read-only queries.If your application has some compatibility issues with pgbouncer, you can try to change this value to session instead.
pgbouncer_sslmode
name: pgbouncer_sslmode, type: enum, level: C
pgbouncer client ssl mode, disable by default
default values: disable, beware that this may have a huge performance impact on your pgbouncer.
disable: Plain TCP. If a client requests TLS, it’s ignored. Default.allow: If a client requests TLS, it is used. If not, plain TCP is used. If the client presents a client certificate, it is not validated.prefer: Same as allow.require: Client must use TLS. If not, the client connection is rejected. If the client presents a client certificate, it is not validated.verify-ca: Client must use TLS with valid client certificate.verify-full: Same as verify-ca.pgbouncer_ignore_param
name: pgbouncer_ignore_param, type: string[], level: G/C
default values: [ extra_float_digits, application_name, TimeZone, DateStyle, IntervalStyle, search_path ]
This will be used as value of ignore_startup_parameters in pgbouncer.
pg_weight
name: pg_weight, type: int, level: G
relative load balance weight in service, 100 by default, 0~255
default values: 100. you have to define it at instance vars, and reload-service to take effect.
pg_service_provider
name: pg_service_provider, type: string, level: G/C
dedicate haproxy node group name, or empty string for local nodes by default.
If specified, PostgreSQL Services will be registered to the dedicated haproxy node group instead of this pgsql cluster nodes.
Do remember to allocate unique ports on dedicated haproxy nodes for each service!
For example, if we define the following parameters on 3-node pg-test cluster:
pg_default_service_dest
name: pg_default_service_dest, type: enum, level: G/C
When defining a service, if svc.dest= default, this parameter will be used as the default value.
default values: pgbouncer, means 5433 the primary service and 5434 the replicas service will route traffic to pgbouncer by default.
If you don’t want to use pgbouncer, set it to postgres instead. traffic will be routed to postgres directly.
pg_default_services
name: pg_default_services, type: service[], level: G/C
postgres default service definitions
default value is four default services definitions, which are explained in PGSQL Service
pg_vip_enabled
name: pg_vip_enabled, type: bool, level: C
enable a l2 vip for pgsql primary?
default value is false, means no L2 VIP is created for this cluster.
L2 VIP can only be used in the same L2 network, which may incur extra restrictions on your network topology.
pg_vip_address
name: pg_vip_address, type: cidr4, level: C
vip address in <ipv4>/<mask> format, if vip is enabled, this parameter is required.
default values: 127.0.0.1/24. This value is consist of two parts: ipv4 and mask, separated by /.
pg_vip_interface
name: pg_vip_interface, type: string, level: C/I
vip network interface to listen, eth0 by default.
It should be the same primary intranet interface of your node, which is the IP address you used in the inventory file.
If your nodes have different interface, you can override it on instance vars:
pg_dns_suffix
name: pg_dns_suffix, type: string, level: C
pgsql dns suffix, empty string by default, cluster DNS name is defined as {{ pg_cluster }}{{ pg_dns_suffix }}
For example, if you set pg_dns_suffix to .db.vip.company.tld for cluster pg-test, then the cluster DNS name will be pg-test.db.vip.company.tld
pg_dns_target
name: pg_dns_target, type: enum, level: C
Could be: auto, primary, vip, none, or an ad hoc ip address, which will be the target IP address of cluster DNS record.
default values: auto , which will bind to pg_vip_address if pg_vip_enabled, or fallback to cluster primary instance ip address.
vip: bind to pg_vip_addressprimary: resolve to cluster primary instance ip addressauto: resolve to pg_vip_address if pg_vip_enabled, or fallback to cluster primary instance ip address.none: do not bind to any ip address<ipv4>: bind to the given IP addressPG_MONITOR
pg_exporter_enabled
name: pg_exporter_enabled, type: bool, level: C
enable pg_exporter on pgsql hosts?
default value is true, if you don’t want to install pg_exporter, set it to false.
pg_exporter_config
name: pg_exporter_config, type: string, level: C
pg_exporter configuration file name, used by pg_exporter & pgbouncer_exporter
default values: pg_exporter.yml, if you want to use a custom configuration file, you can specify its relative path here.
Your config file should be placed in files/<filename>.yml. For example, if you want to monitor a remote PolarDB instance, you can use the sample config: files/polar_exporter.yml.
pg_exporter_cache_ttls
name: pg_exporter_cache_ttls, type: string, level: C
pg_exporter collector ttl stage in seconds, 1,10,60,300 by default
default values: 1,10,60,300, which will use 1s, 10s, 60s, 300s for different metric collectors.
This should be set in pair with prometheus_scrape_interval
pg_exporter_port
name: pg_exporter_port, type: port, level: C
pg_exporter listen port, 9630 by default
pg_exporter_params
name: pg_exporter_params, type: string, level: C
extra url parameters for pg_exporter dsn
default values: sslmode=disable, which will disable SSL for monitoring connection (since it’s local unix socket by default)
pg_exporter_url
name: pg_exporter_url, type: pgurl, level: C
overwrite auto-generate pg dsn if specified
default value is empty string, If specified, it will be used as the pg_exporter dsn instead of constructing from other parameters:
This could be useful if you want to monitor a remote pgsql instance, or you want to use a different user/password for monitoring.
pg_exporter_auto_discovery
name: pg_exporter_auto_discovery, type: bool, level: C
enable auto database discovery? enabled by default
default value is true, which will auto-discover all databases on the postgres server and spawn a new pg_exporter connection for each database.
pg_exporter_exclude_database
name: pg_exporter_exclude_database, type: string, level: C
csv of databases that WILL NOT be monitored during auto-discovery
default values: template0,template1,postgres, which will be excluded for database auto discovery.
pg_exporter_include_database
name: pg_exporter_include_database, type: string, level: C
csv of databases that WILL BE monitored during auto-discovery
the default value is empty string. If set, only the databases in this list will be monitored during auto discovery.
pg_exporter_connect_timeout
name: pg_exporter_connect_timeout, type: int, level: C
pg_exporter connect timeout in ms, 200 by default
default values: 200ms , which is enough for most cases.
If your remote pgsql server is in another continent, you may want to increase this value to avoid connection timeout.
pg_exporter_options
name: pg_exporter_options, type: arg, level: C
overwrite extra options for pg_exporter
the default value is empty string, which will fall back the following default options:
If you want to customize logging options or other pg_exporter options, you can set it here.
pgbouncer_exporter_enabled
name: pgbouncer_exporter_enabled, type: bool, level: C
enable pgbouncer_exporter on pgsql hosts?
default value is true, which will enable pg_exporter for pgbouncer connection pooler.
pgbouncer_exporter_port
name: pgbouncer_exporter_port, type: port, level: C
pgbouncer_exporter listen port, 9631 by default
pgbouncer_exporter_url
name: pgbouncer_exporter_url, type: pgurl, level: C
overwrite auto-generate pgbouncer dsn if specified
the default value is empty string, If specified, it will be used as the pgbouncer_exporter dsn instead of constructing from other parameters:
This could be useful if you want to monitor a remote pgbouncer instance, or you want to use a different user/password for monitoring.
pgbouncer_exporter_options
name: pgbouncer_exporter_options, type: arg, level: C
overwrite extra options for pgbouncer_exporter, default value is empty string.
the default value is empty string, which will fall back the following default options:
If you want to customize logging options or other pgbouncer_exporter options, you can set it here.
but do not overwrite pgbouncer_exporter_port here.
pgbackrest_exporter_enabled
name: pgbackrest_exporter_enabled, type: bool, level: C
enable pgbackrest_exporter on pgsql hosts? default value is true
If pgbackrest_enabled is false, this parameter will be short-circuited and disabled.
pgbackrest_exporter_port
name: pgbackrest_exporter_port, type: port, level: C
pgbackrest_exporter listen port, 9854 by default
pgbackrest_exporter_options
name: pgbackrest_exporter_options, type: arg, level: C
extra cli args for pgbackrest_exporter, default value is empty string "".
PG_REMOVE
These flags control the pgsql-rm.yml
playbook and match roles/pg_remove/defaults/main.yml in v3.7.0.
pg_safeguard
name: pg_safeguard, type: bool, level: G/C/A
When true, the pgsql-rm.yml playbook aborts before changing the cluster.
The v3.7.0 default is false.
pg_rm_data
name: pg_rm_data, type: bool, level: G/C/A
Remove PostgreSQL data during removal. The default is true; set it to
false to preserve the data directories.
pg_rm_backup
name: pg_rm_backup, type: bool, level: G/C/A
Remove the pgBackRest repository when removing a primary instance. The
default is true; set it to false to preserve backups.
pg_rm_pkg
name: pg_rm_pkg, type: bool, level: G/C/A
Uninstall PostgreSQL and extension packages during removal. The v3.7.0
role default is true; set it to false to keep installed packages.
How to maintain an existing PostgreSQL cluster with Pigsty?
Here are some SOP for common pgsql admin tasks
PGSQL playbooks and shortcuts:
Patroni admin command and shortcuts:
pgBackRest backup & restore command and shortcuts:
Systemd components quick reference
To create a new Postgres cluster, define it in the inventory first, then init with:
Beware, perform
bin/node-addfirst, thenbin/pgsql-add, PGSQL works on managed nodes only.
To create a new business user on the existing Postgres cluster, add user definition to all.children.<cls>.pg_users, then create the user as follows:
To create a new database user on the existing Postgres cluster, add database definition to all.children.<cls>.pg_databases, then create the database as follows:
Note: If the database has specified an owner, the user should already exist, or you’ll have to Create User first.
Services are exposed access point served by HAProxy.
This task is used when cluster membership has changed, e.g., append/remove replicas, switchover/failover / exposing new service or updating existing service’s config (e.g., LB Weight)
To create new services or reload existing services on entire proxy cluster or specific instances:
This task is used when your Postgres/Pgbouncer HBA rules have changed, you may have to reload hba to apply changes.
If you have any role-specific HBA rules, you may have to reload hba after a switchover/failover, too.
To reload postgres & pgbouncer HBA rules on entire cluster or specific instances:
To change the config of a existing Postgres cluster, you have to initiate control command on admin node with admin user:
Change patroni parameters & postgresql.parameters, save & apply changes with the wizard.
To add a new replica to the existing Postgres cluster, you have to add its definition to the inventory: all.children.<cls>.hosts, then:
It will add node <ip> to pigsty and init it as a replica of the cluster <cls>.
Cluster services will be reloaded to adopt the new member
To remove a replica from the existing PostgreSQL cluster:
It will remove instance <ip> from cluster <cls>. Cluster services will be reloaded to kick the removed instance from load balancer.
To remove the entire Postgres cluster, just run:
You can perform a PostgreSQL cluster switchover with patroni cmd.
To create a backup with pgBackRest, run as local dbsu:
Check Backup & PITR for details.
To restore a cluster to a previous time point (PITR), run as local dbsu:
Check Backup & Restore docs for more details.
To add the newer version of RPM/DEB packages, you have to add them to repo_packages and repo_url_packages
Then rebuild repo on infra nodes with ./infra.yml -t repo_build subtask, Then you can install these packages with ansible module package:
If you want to install extension on pg clusters, Add them to pg_extensions and make sure them installed with:
Some extension needs to be loaded in shared_preload_libraries, You can add them to pg_libs, or Config an existing cluster.
Finally, CREATE EXTENSION <extname>; on the cluster primary instance to install it.
Check PGSQL Extensions: Install for details.
To perform a minor server version upgrade/downgrade, you have to add packages to yum/apt repo first.
Then perform a rolling upgrade/downgrade from all replicas, then switchover the cluster to upgrade the leader.
The simplest way to achieve a major version upgrade is to create a new cluster with the new version, then migration with logical replication & green/blue deployment.
You can also perform an in-place major upgrade, which is not recommended, especially when certain extensions are installed. But it is possible.
Assume you want to upgrade PostgreSQL 14 to 15, you have to add packages to yum/apt repo, and guarantee the extensions have the exact same version too.
Pigsty provides four scenario-specific parameter templates by default, which can be specified and used via the pg_conf parameter.
tiny.yml: Optimized for small nodes, virtual machines, and small demos (1-8 cores, 1-16GB)oltp.yml: Optimized for OLTP workloads and latency-sensitive applications (4C8GB+) (default template)olap.yml: Optimized for OLAP workloads and throughput (4C8G+)crit.yml: Optimized for data consistency and critical applications (4C8G+)Pigsty adopts different parameter optimization strategies for these four default scenarios, as shown below:
Pigsty automatically detects system memory size and uses it as the basis for setting maximum connections and memory-related parameters.
pg_max_conn: PostgreSQL maximum connections, auto will use recommended values for different scenariospg_shared_buffer_ratio: Shared buffer memory ratio, defaults to 0.25By default, Pigsty uses 25% of memory as PostgreSQL shared buffers, leaving the remaining 75% for the operating system cache.
By default, if users don’t set a pg_max_conn maximum connection count, Pigsty will use default values according to these rules:
For OLTP and CRIT templates, if services point directly to the PostgreSQL database instead of the pgbouncer connection pool, maximum connections double to 1000.
After determining maximum connections, work_mem is calculated based on shared memory amount / maximum connections, constrained within a 64MB ~ 1GB range.
In PostgreSQL, there are 4 important parameters related to parallel queries. Pigsty automatically optimizes these parameters based on the current system’s CPU core count. Across all strategies, the total parallel process count (total budget) is typically set to CPU cores + 8, with a minimum of 16, thus reserving sufficient background worker capacity for logical replication and extensions. OLAP and TINY templates vary slightly based on scenario.
| OLTP | Configuration Logic | Range Constraints |
|---|---|---|
max_worker_processes |
max(100% CPU + 8, 16) | Cores + 4, minimum 12 |
max_parallel_workers |
max(ceil(50% CPU), 2) | 1/2 CPU rounded up, minimum 2 |
max_parallel_maintenance_workers |
max(ceil(33% CPU), 2) | 1/3 CPU rounded up, minimum 2 |
max_parallel_workers_per_gather |
min(max(ceil(20% CPU), 2),8) | 1/5 CPU rounded down, minimum 2, maximum 8 |
| OLAP | Configuration Logic | Range Constraints |
|---|---|---|
max_worker_processes |
max(100% CPU + 12, 20) | Cores + 12, minimum 20 |
max_parallel_workers |
max(ceil(80% CPU, 2)) | 4/5 CPU rounded up, minimum 2 |
max_parallel_maintenance_workers |
max(ceil(33% CPU), 2) | 1/3 CPU rounded up, minimum 2 |
max_parallel_workers_per_gather |
max(floor(50% CPU), 2) | 1/2 CPU rounded up, minimum 2 |
| CRIT | Configuration Logic | Range Constraints |
|---|---|---|
max_worker_processes |
max(100% CPU + 8, 16) | Cores + 8, minimum 16 |
max_parallel_workers |
max(ceil(50% CPU), 2) | 1/2 CPU rounded up, minimum 2 |
max_parallel_maintenance_workers |
max(ceil(33% CPU), 2) | 1/3 CPU rounded up, minimum 2 |
max_parallel_workers_per_gather |
0, enable as needed |
| TINY | Configuration Logic | Range Constraints |
|---|---|---|
max_worker_processes |
max(100% CPU + 4, 12) | Cores + 4, minimum 12 |
max_parallel_workers |
max(ceil(50% CPU) 1) | 50% CPU rounded down, minimum 1 |
max_parallel_maintenance_workers |
max(ceil(33% CPU), 1) | 33% CPU rounded down, minimum 1 |
max_parallel_workers_per_gather |
0, enable as needed |
Note that CRIT and TINY templates disable parallel queries directly by setting max_parallel_workers_per_gather = 0.
Users can set this parameter as needed to enable parallel queries.
Both OLTP and CRIT templates set the following additional parameters, doubling parallel query costs to reduce the tendency to use parallel queries:
Note that max_worker_processes parameter adjustments only take effect after a restart. Additionally, when a replica’s configuration value for this parameter exceeds the primary’s, the replica cannot start.
This parameter must be adjusted through Patroni configuration management. The parameter is managed by Patroni to ensure consistent primary-replica configuration and prevent new replicas from failing to start during failover.
Pigsty automatically detects the total disk space where the /data/postgres main data directory resides and uses it as the basis for specifying the following parameters:
temp_file_limit defaults to 5% of disk space, capped at 200GB maximum.min_wal_size defaults to 5% of disk space, capped at 200GB maximum.max_wal_size defaults to 20% of disk space, capped at 2TB maximum.max_slot_wal_keep_size defaults to 30% of disk space, capped at 3TB maximum.As a special case, the OLAP template allows 20% for temp_file_limit, capped at 2TB maximum.
Ensuring healthy and stable operation of Pigsty and PostgreSQL clusters requires routine maintenance work.
Pigsty provides an out-of-the-box monitoring platform. We recommend reviewing monitoring dashboards daily to track system status. At minimum, we suggest weekly monitoring reviews, focusing on alert events to proactively avoid most failures and issues.
Here’s a list of predefined alert rules in Pigsty.
Pigsty’s high availability architecture allows PostgreSQL clusters to automatically perform primary-replica switching, meaning operations and DBAs don’t require immediate intervention. However, users still need to perform follow-up tasks at appropriate times (e.g., next business day), including:
bin/pgsql-svc to update service routing statebin/pgsql-hba to prevent primary-replica specific rule driftbin/pgsql-rm and expand with new replicas using bin/pgsql-addLong-running PostgreSQL instances develop “table bloat” / “index bloat”, degrading system performance.
Regular online rebuilding of tables and indexes using pg_repack helps maintain optimal PostgreSQL performance.
Pigsty installs and enables this extension by default in all databases, ready for immediate use.
You can check table and index bloat through Pigsty’s PGCAT Database - Table Bloat panel.
Select tables and indexes with high bloat rates (larger tables with >50% bloat) for online reorganization using pg_repack:
Normal reads/writes continue during reorganization, but the switch moment at completion requires an AccessExclusive lock, blocking all access. For high-throughput operations, schedule during low-traffic periods or maintenance windows. For more details, see: Managing Relation Bloat
Freezing expired transaction IDs (VACUUM FREEZE) is a critical PostgreSQL maintenance task preventing transaction ID (XID) exhaustion outages. While PostgreSQL provides AutoVacuum mechanisms, for high-standard production environments, we recommend combining automatic and manual approaches, regularly executing database-wide VACUUM FREEZE to ensure XID safety.
This document outlines potential failures in PostgreSQL and Pigsty, along with SOPs for diagnosing, handling, and analyzing issues.
Disk space exhaustion is the most common type of failure.
When the disk hosting the database runs out of space, PostgreSQL cannot function properly. You may observe: database logs repeatedly reporting “no space left on device”, inability to write new data, or PostgreSQL triggering a PANIC and forcing shutdown.
Pigsty includes a NodeFsSpaceFull alert rule that triggers when filesystem available space drops below 10%. Use the monitoring system’s NODE Instance panel to review FS metric panels for diagnosis.
You can also log into the database node and use df -h to check usage rates for each mount point, determining which partition is full.
For database nodes, focus on these directories and their sizes to determine which file category is consuming space:
/pg/data/base): Stores table and index data files, watch for heavy writes and temporary filespg/data/pg_wal): Stores PG WAL, WAL accumulation/replication slot retention are common causes of disk exhaustionpg/log): If PG logs aren’t rotated timely and massive errors are written, this can consume significant spacedata/backups): When using pgBackRest to save backups locally, this can also fill the diskFor Pigsty admin nodes or monitoring nodes, also consider:
After identifying directories consuming the most space, use du -sh <directory> to drill down for specific large files or subdirectories.
Disk exhaustion is an emergency requiring immediate action to free space and maintain database operation:
Emergency scenario: When data and system disks aren’t separated, disk exhaustion can prevent shell commands from executing. In this case, delete the /pg/dummy placeholder file to free emergency space for shell command recovery.
After freeing space with above measures, PostgreSQL should resume normal operation. If the database crashed due to pg_wal exhaustion, restart the database service after clearing space and carefully verify data integrity.
PostgreSQL uses 32-bit transaction IDs (XIDs) cyclically. When XIDs are exhausted, “transaction ID wraparound” failure occurs.
Initial symptoms include PGSQL Persist - Age Usage panel age saturation entering the warning zone.
Database logs begin showing: WARNING: database "postgres" must be vacuumed within xxxxxxxx transactions.
If the problem worsens, PostgreSQL enters protection mode: when remaining transaction IDs drop below ~1 million, the database switches to read-only mode; at the limit of ~2.1 billion (2^31), it refuses new transactions and forces server shutdown to prevent data corruption.
PostgreSQL and Pigsty enable AutoVacuum by default, so this failure usually indicates deeper root causes. Common causes include: super-aged transactions (SAGE), misconfigured Autovacuum, blocked replication slots, insufficient resources, storage engine/extension bugs, disk corruption.
First identify the database with the oldest age, then use the Pigsty PGCAT Database - Tables panel to check table age distribution. Review database error logs for clues to identify root causes.
VACUUM FREEZE tablename; on tables with highest relfrozenxid, prioritizing tables with oldest XID age. This quickly reclaims significant transaction ID space.VACUUM FREEZE database_name; to freeze-clean the entire database. Then restart in multi-user mode. This releases wraparound locks and restores write capability. Exercise extreme caution in single-user mode and ensure sufficient transaction ID headroom for freezing.PostgreSQL has a maximum connection limit (max_connections). When client connections exceed this limit, new connection requests are rejected. Typical symptoms include applications unable to connect with errors like
FATAL: remaining connection slots are reserved for non-replication superuser connections or too many clients already.
This indicates regular connection slots are exhausted, leaving only slots reserved for superusers or replication.
Connection exhaustion typically results from massive concurrent client requests. You can review current active sessions through PGCAT Instance / PGCAT Database / PGCAT Locks to determine what queries are filling the system for further action. Pay special attention to numerous Idle in Transaction connections and long-running transactions (and slow queries).
Kill queries: For exhaustion blocking business operations, immediately use pg_terminate_backend(pid) for emergency relief.
For connection pool users, adjust pool size parameters and reload to reduce database-level connections.
You can also use pg edit-config to increase max_connections, but this parameter requires database restart to take effect.
etcd quota exhaustion causes PG high availability control plane failure, preventing configuration changes. Versions between Pigsty v2.0.0 - v2.5.1 are affected by default.
Pigsty uses etcd as distributed configuration storage (DCS) for high availability. etcd has a storage quota (default ~2GB). When etcd storage reaches the quota limit, etcd refuses write operations with error “etcdserver: mvcc: database space exceeded”. In this state, Patroni cannot write heartbeats or update configurations to etcd, causing cluster management failure.
Pigsty v2.6.0 adds auto-compaction configuration for deployed etcd. If you only use it for PG high availability leases, regular use cases won’t encounter this issue.
Currently, TimescaleDB’s experimental Hypercore storage engine has proven defects, with documented cases of VACUUM failing to reclaim XIDs causing wraparound failures. Users of this feature should migrate promptly to PostgreSQL native tables or TimescaleDB’s default engine.
Details: PG New Storage Engine Failure Case
For small-batch DELETE operations performed in error, consider using the pg_surgery extension for in-place surgical recovery.
If the deleted data has already been reclaimed by VACUUM, follow the general data loss recovery workflow.
When DROP/DELETE operations are performed in error, follow this workflow to determine the recovery approach:
In cases where an entire database cluster is accidentally deleted, such as mistakenly executing the pgsql-rm.yml playbook:
Unless you explicitly specified pg_rm_backup: false beforehand, backups will typically be deleted along with the database cluster.
How to manage PostgreSQL cluster with ansible playbooks
Pigsty has a series of playbooks for PostgreSQL:
pgsql.yml : Init HA PostgreSQL clusters or add new replicas.pgsql-rm.yml : Remove PostgreSQL cluster, or remove replicaspgsql-db.yml : Add a new business database to existing PostgreSQL clusterpgsql-user.yml : Add new business user to existing PostgreSQL clusterpgsql-pitr.yml : Perform point-in-time recovery on existing PostgreSQL clusterpgsql-monitor.yml : Monitor remote PostgreSQL instance with local exporterspgsql-migration.yml : Generate Migration manual & scripts for existing PostgreSQLIf you are afraid of accidentally deleting your PostgreSQL cluster, you can enable the safeguard feature.
Setting the pg_safeguard parameter to true will stop the pgsql-rm.yml from running.
Pigsty v3.5 remove the pg purge logic from pgsql.yml,
So the only way to remove a PostgreSQL now is running pgsql-rm.yml.
pgsql.yml
The pgsql.yml is used for init HA PostgreSQL clusters or adding new replicas.
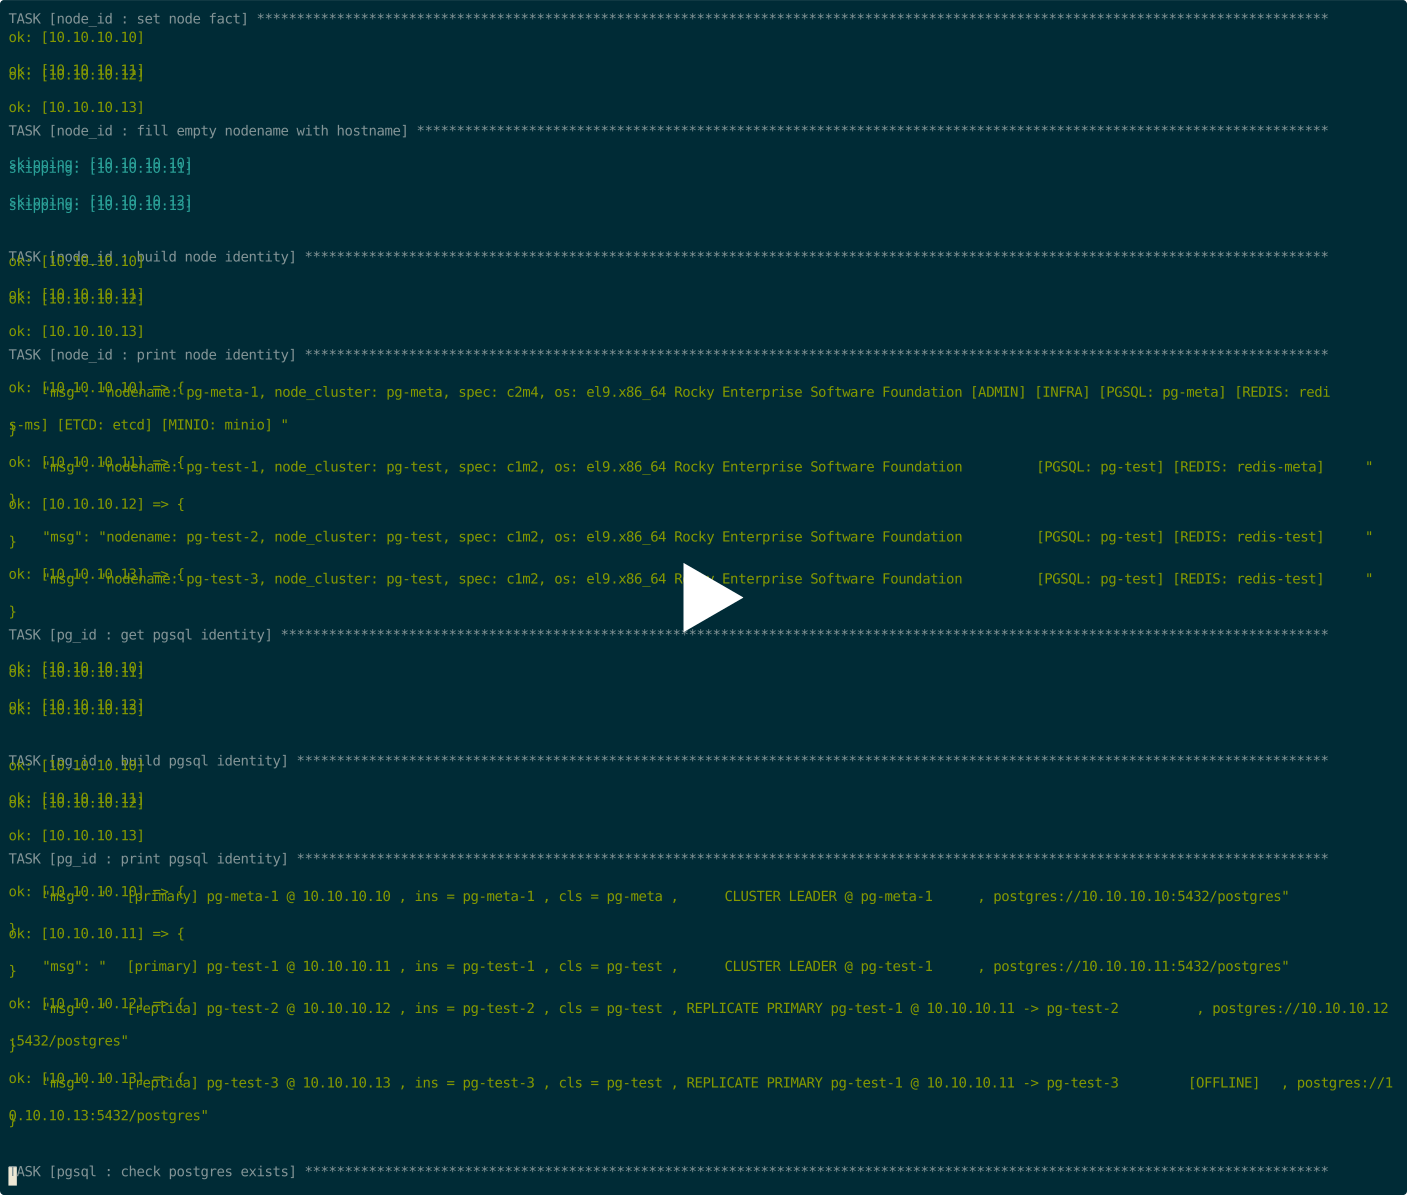
This playbook contains the following subtasks:
Administration Tasks that use this playbook
Reload HBARule and Append Replica after replica init.pgsql-add will do this, check SOP: Add Instance for details.pgsql-rm.yml
The playbook pgsql-rm.yml can remove PostgreSQL cluster, or specific replicas from cluster.
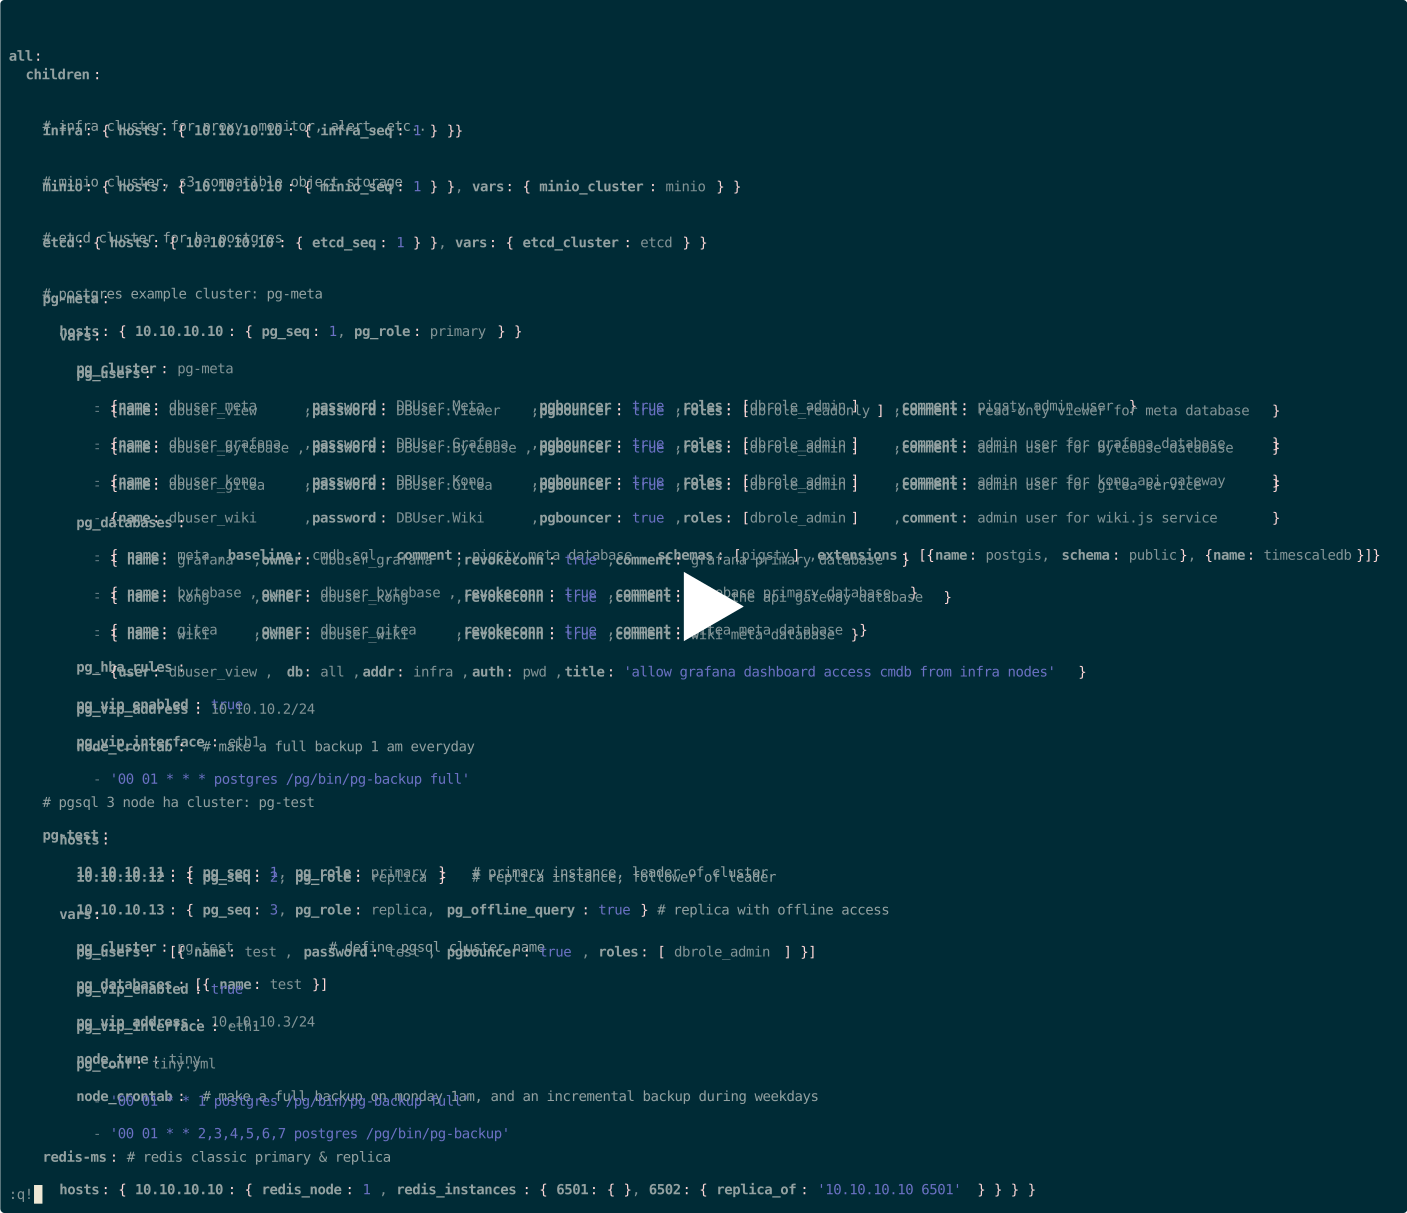
This playbook contains the following subtasks:
Some arguments can affect the behavior of this playbook:
Administration Tasks that use this playbook
Some notes about this playbook
pgsql-db.yml
The playbook pgsql-db.yml can add new business database to existing PostgreSQL cluster.
Check admin SOP: Create Database
pgsql-user.yml
The playbook pgsql-user.yml can add new business user to existing PostgreSQL cluster.
Check admin SOP: Create User
pgsql-pitr.yml
The playbook pgsql-pitr.yml can perform point-in-time recovery on existing PostgreSQL cluster.
Check admin SOP: Restore
pgsql-monitor.yml
The playbook pgsql-monitor.yml can monitor remote postgres instance with local exporters.
Check admin SOP: Monitor Postgres
pgsql-migration.yml
The playbook pgsql-migration.yml can generate migration manual & scripts for existing PostgreSQL cluster.
Check admin SOP: Migration
Pigsty uses the modern observability stack for PostgreSQL monitoring:
PostgreSQL’s metrics are defined by collector files: pg_exporter.yml. Prometheus record rules and alert evaluation will further process it: files/prometheus/rules/pgsql.yml
There are three identity labels: cls, ins, ip, which will be attached to all metrics & logs. node & haproxy will try to reuse the same identity to provide consistent metrics & logs.
PostgreSQL-related logs are collected by promtail and sent to Loki on infra nodes by default.
pg_log_dir : postgres log dir, /pg/log/postgres by defaultpgbouncer_log_dir : pgbouncer log dir, /pg/log/pgbouncer by defaultpatroni_log_dir : patroni log dir, /pg/log/patroni by defaultpgbackrest_log_dir : pgbackrest log dir, /pg/log/pgbackrest by defaultPrometheus monitoring targets are defined in static files under /etc/prometheus/targets/pgsql/. Each instance will have a corresponding file. Take pg-meta-1 as an example:
When the global flag patroni_ssl_enabled is set, the patroni target will be managed as /etc/prometheus/targets/patroni/<ins>.yml because it requires a different scrape endpoint (https).
Prometheus monitoring target will be removed when a cluster is removed by bin/pgsql-rm or pgsql-rm.yml. You can use playbook subtasks, or remove them manually:
Remote RDS targets are managed as /etc/prometheus/targets/pgrds/<cls>.yml. It will be created by the pgsql-monitor.yml playbook or bin/pgmon-add script.
There are three ways to monitor PostgreSQL instances in Pigsty:
| Item \ Level | L1 | L2 | L3 |
|---|---|---|---|
| Name | Remote Database Service | Existing Deployment | Fully Managed Deployment |
| Abbr | RDS | MANAGED | FULL |
| Scenes | connect string URL only | ssh-sudo-able | Instances created by Pigsty |
| PGCAT Functionality | ✅ Full Availability | ✅ Full Availability | ✅ Full Availability |
| PGSQL Functionality | ✅ PG metrics only | ✅ PG and node metrics | ✅ Full Support |
| Connection Pool Metrics | ❌ Not available | ⚠️ Optional | ✅ Pre-Configured |
| Load Balancer Metrics | ❌ Not available | ⚠️ Optional | ✅ Pre-Configured |
| PGLOG Functionality | ❌ Not Available | ⚠️ Optional | ⚠️ Optional |
| PG Exporter | ⚠️ On infra nodes | ✅ On DB nodes | ✅ On DB nodes |
| Node Exporter | ❌ Not Deployed | ✅ On DB nodes | ✅ On DB nodes |
| Intrusion into DB nodes | ✅ Non-Intrusive | ⚠️ Installing Exporter | ⚠️ Fully Managed by Pigsty |
| Instance Already Exists | ✅ Yes | ✅ Yes | ⚠️ Created by Pigsty |
| Monitoring users and views | ⚠️Manually Setup | ⚠️Manually Setup | ✅ Auto configured |
| Deployment Usage Playbook | bin/pgmon-add <cls> |
subtasks of pgsql.ym/node.yml |
pgsql.yml |
| Required Privileges | connectable PGURL from infra nodes | DB node ssh and sudo privileges | DB node ssh and sudo privileges |
| Function Overview | PGCAT + PGRDS | Most Functionality | Full Functionality |
Suppose the target DB node can be managed by Pigsty (accessible via ssh and sudo is available). In that case, you can use the pg_exporter task in the pgsql.yml playbook to deploy the monitoring component PG Exporter on the target node in the same manner as a standard deployment.
You can also deploy the connection pool and its monitoring on existing instance nodes using the pgbouncer and pgbouncer_exporter tasks from the same playbook. Additionally, you can deploy host monitoring, load balancing, and log collection components using the node_exporter, haproxy, and promtail tasks from the node.yml playbook, achieving a similar user experience with the native Pigsty cluster.
The definition method for existing clusters is very similar to the normal clusters managed by Pigsty. Selectively run certain tasks from the pgsql.yml playbook instead of running the entire playbook.
Since the target database cluster already exists, you must manually setup monitoring users, schemas, and extensions on the target database cluster.
If you can only access the target database via PGURL (database connection string), you can refer to the instructions here for configuration. In this mode, Pigsty deploys the corresponding PG Exporter on the INFRA node to fetch metrics from the remote database, as shown below:
The monitoring system will no longer have host/pooler/load balancer metrics. But the PostgreSQL metrics & catalog info are still available. Pigsty has two dedicated dashboards for that: PGRDS Cluster and PGRDS Instance. Overview and Database level dashboards are reused. Since Pigsty cannot manage your RDS, you have to setup monitor on the target database in advance.
Below, we use a sandbox environment as an example: now we assume that the pg-meta cluster is an RDS instance pg-foo-1 to be monitored, and the pg-test cluster is an RDS cluster pg-bar to be monitored:
Create monitoring schemas, users, and permissions on the target. Refer to Monitor Setup for details.
Declare the cluster in the configuration list. For example, suppose we want to monitor the “remote” pg-meta & pg-test clusters:
The databases listed in the pg_databases field will be registered in Grafana as a PostgreSQL data source, providing data support for the PGCAT monitoring panel. If you don’t want to use PGCAT and register the database in Grafana, set pg_databases to an empty array or leave it blank.
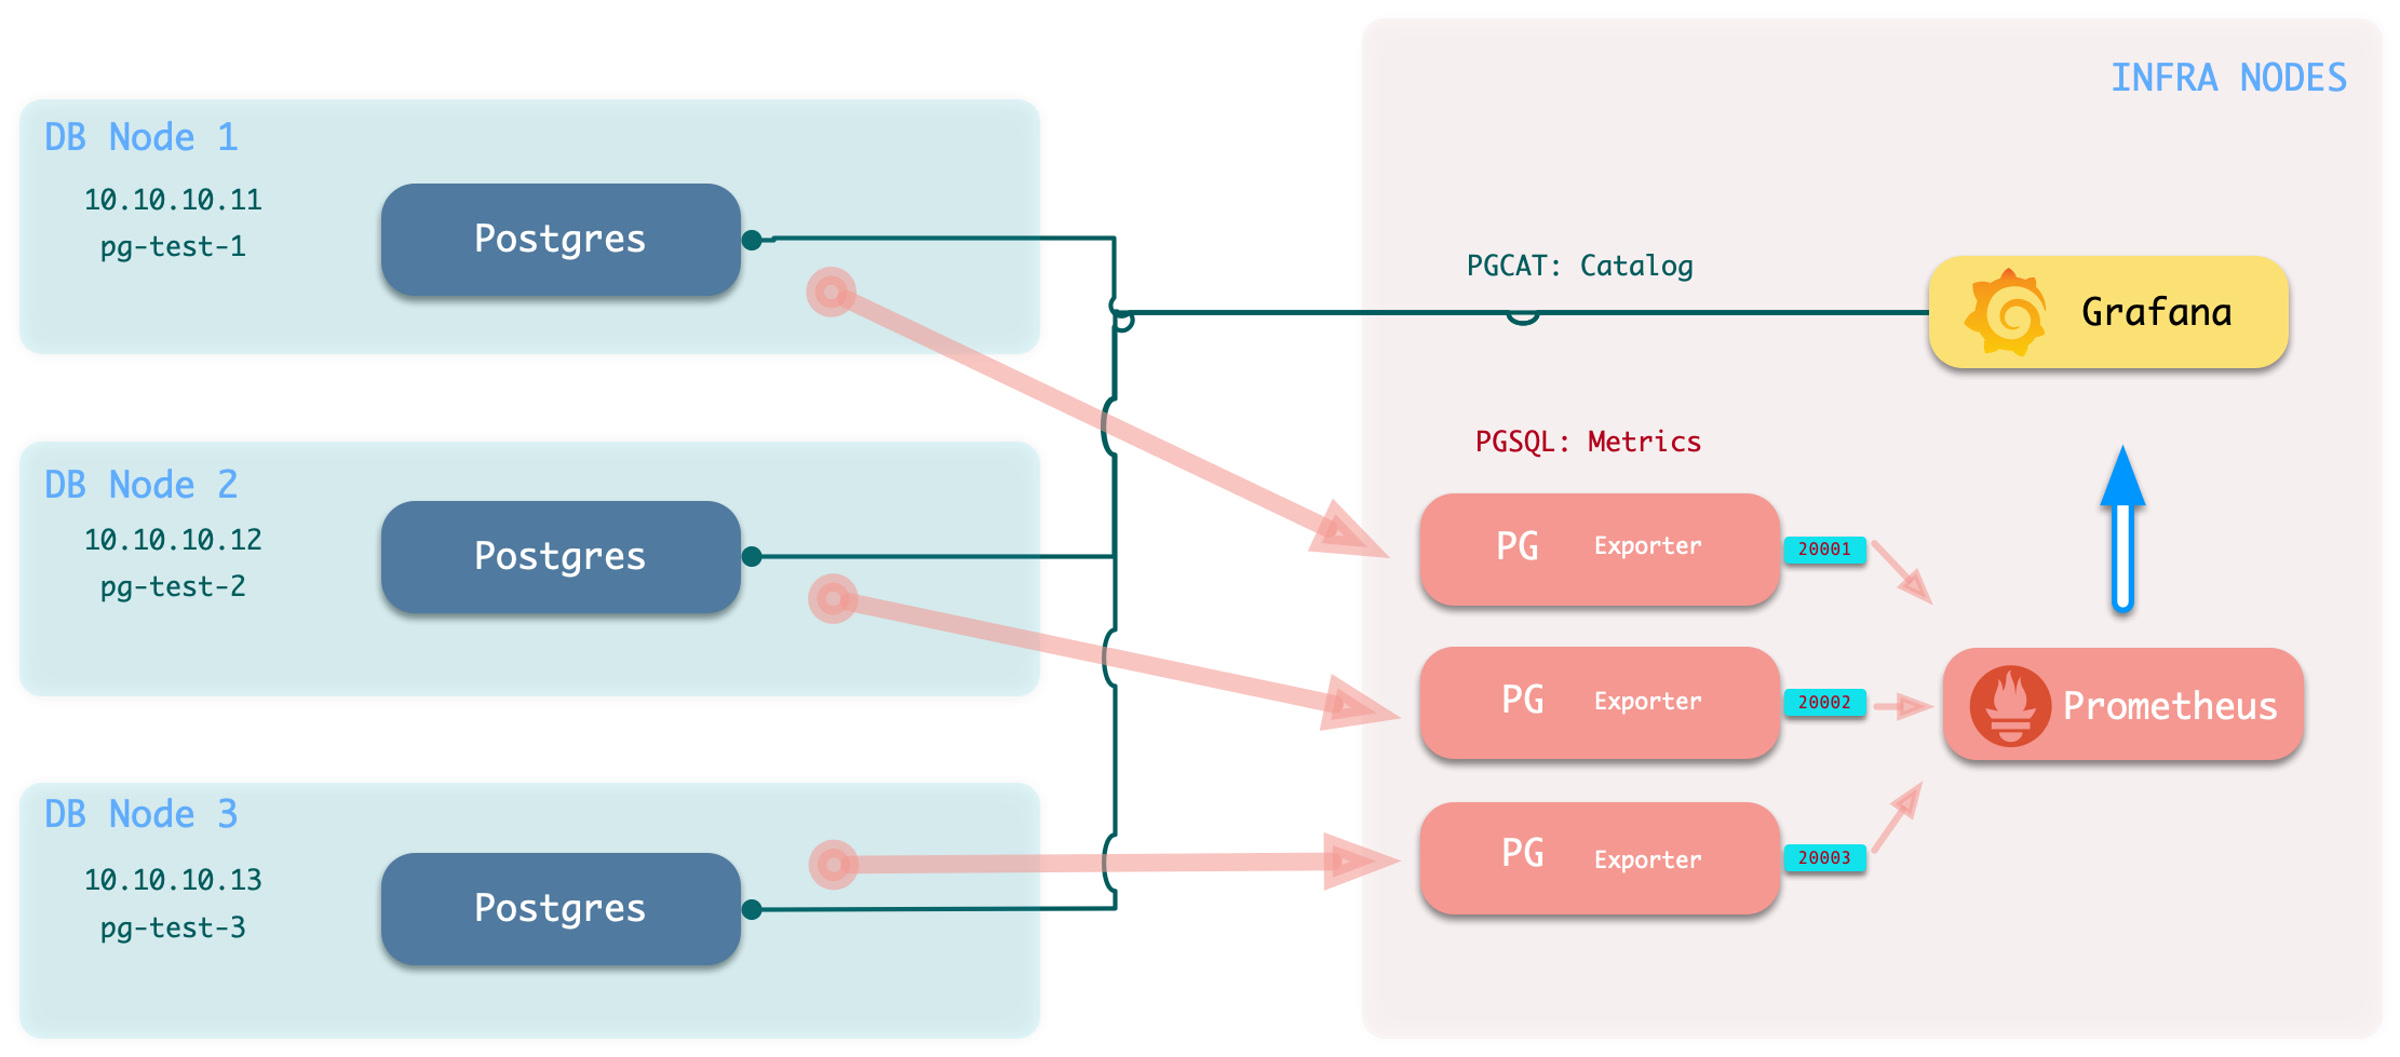
bin/pgmon-add <clsname>bin/pgmon-rm <clsname>You can use more parameters to override the default pg_exporter options. Here is an example for monitoring Aliyun RDS and PolarDB with Pigsty:
When you want to monitor existing instances, whether it’s RDS or a self-built PostgreSQL instance, you need to make some configurations on the target database so that Pigsty can access them.
To bring an external existing PostgreSQL instance into monitoring, you need a connection string that can access that instance/cluster. Any accessible connection string (business user, superuser) can be used, but we recommend using a dedicated monitoring user to avoid permission leaks.
dbuser_monitor. This user belongs to the pg_monitor group, or ensure it has the necessary view permissions.DBUser.Monitor. You need to ensure that the HBA policy allows the monitoring user to access the database from the infra nodes.monitor for monitoring views and extensions.pg_stat_statements.Create a monitor user on the target database cluster. For example, dbuser_monitor is used by default in Pigsty.
The monitor user here should have consistent pg_monitor_username and pg_monitor_password with Pigsty config inventory.
You also need to configure pg_hba.conf to allow monitoring user access from infra/admin nodes.
If your RDS does not support the RAW HBA format, add admin/infra node IP to the whitelist.
Monitor schema is optional, but we strongly recommend creating one.
Monitor extension is optional, but we strongly recommend enabling pg_stat_statements extension.
Note that this extension must be listed in shared_preload_libraries to take effect, and changing this parameter requires a database restart.
You should create this extension inside the admin database: postgres. If your RDS does not grant CREATE on the database postgres. You can create that extension in the default public schema:
As long as your monitor user can access pg_stat_statements view without schema qualification, it should be fine.
It’s recommended to create the monitor views in all databases that need to be monitored.
Monitor Schema & View Definition
This happens when you run pgsql.yml on a node with postgres running.
If there’s a running postgres instance, you can explicitly remove it with pgsql-rm.yml playbook:
Disable
pg_safeguardto remove the Postgres instance.
If pg_safeguard is enabled, you cannot remove the running pgsql instance with bin/pgsql-rm and pgsql-rm.yml playbook.
To disable pg_safeguard, you can set pg_safeguard to false in the inventory or pass -e pg_safeguard=false as cli arg to the playbook:
There are several possible reasons for this error, and you need to check the system logs to determine the actual cause.
This usually happens when the cluster is misconfigured, or the previous primary is improperly removed. (e.g., trash metadata in DCS with the same cluster name).
You must check /pg/log/* to find the reason.
To delete trash meta from etcd, you can use etcdctl del --prefix /pg/<cls>, do with caution!
etcdctl del --prefix /pg/<cls> to manually delete the residual data.pg_lc_collate and pg_lc_ctype does not exist in OSFeel free to submit an issue or seek help from the community.
Failed Immediately: Usually, this happens because of misconfiguration, network issues, broken DCS metadata, etc…, you have to inspect /pg/log to find out the actual reason.
Failed After a While: This may be due to source instance data corruption. Check PGSQL FAQ: How to create replicas when data is corrupted?
Timeout: If the wait for postgres replica task takes 30min or more and fails due to timeout, This is common for a huge cluster (e.g., 1TB+, which may take hours to create a replica). In this case, the underlying creating replica procedure is still proceeding. You can check cluster status with pg list <cls> and wait until the replica catches up with the primary. Then continue the following tasks:
To install PostgreSQL 13 ~ 17, you have to set pg_version to 13, 14, 15, 16, or 17 in the inventory. (usually at cluster level)
use
node_hugepage_countandnode_hugepage_ratioor/pg/bin/pg-tune-hugepage
If you plan to enable hugepage, consider using node_hugepage_count and node_hugepage_ratio and apply with ./node.yml -t node_tune .
It’s good to allocate enough hugepage before postgres start, and use pg_tune_hugepage to shrink them later.
If your postgres is already running, you can use /pg/bin/pg-tune-hugepage to enable hugepage on the fly. Note that this only works on PostgreSQL 15+
Use
crit.ymltemplate, or settingpg_rpoto0, or config cluster with synchronous mode.
Consider using Sync Standby and Quorum Comit to guarantee 0 data loss during failover.
rm -rf /pg/dummywill free some emergency space.
The pg_dummy_filesize is set to 64MB by default. Consider increasing it to 8GB or larger in the production environment.
It will be placed on /pg/dummy same disk as the PGSQL main data disk. You can remove that file to free some emergency space. At least you can run some shell scripts on that node.
Disable
clonefromon bad instances and reload patroni config.
Pigsty sets the cloneform: true tag on all instances’ patroni config, which marks the instance available for cloning replica.
If this instance has corrupt data files, you can set clonefrom: false to avoid pulling data from the evil instance. To do so:
Disable
clonefromon bad instances and reload patroni config.
Pigsty sets the cloneform: true tag on all instances’ patroni config, which marks the instance available for cloning replica.
If this instance has corrupt data files, you can set clonefrom: false to avoid pulling data from the evil instance. To do so:
Not very much, 200ms per 10 ~ 15 seconds, won’t affect the database performance.
The default scrape interval for prometheus is 10s in pigsty, make sure the exporter can finish the scrape within that period.
Check PGSQL Monitor for details.
Or
You can manage PostgreSQL users and roles with Pigsty, in an IaC manner.
You can define roles/users with the following parameters, they are both arrays consisting of user objects:
pg_users : Define business users & roles at cluster level (Cluster Definition)pg_default_roles : Define system-wide roles & global users (Global Defaults)The former defines global roles and users shared across the entire environment, while the latter defines business roles and users specific to a single cluster. Here are some examples of user definitions:
You can customize users with more attributes, the full example is as follows:
name, which should be a valid & unique username in PostgreSQL.password, while it could be necessary for a login-able user.password can be plain text or a scram-sha-256 / md5 hash string.pg_default_roles first, pg_users later, in sequence order.login, superuser, createdb, createrole, inherit, replication, bypassrlspgbouncer is disabled by default. Set it to true explicitly to enable it in pgbouncer.Pigsty has a battery-included ACL system, which can be easily used by assigning roles to users:
dbrole_readonly : The role for global read-only accessdbrole_readwrite : The role for global read-write accessdbrole_admin : The role for object creationdbrole_offline : The role for restricted read-only access (offline instance)If you wish to re-design your ACL system, check the following parameters and SQL templates.
pg_default_roles : System-wide roles & global userspg_default_privileges : Default privileges for newly created objectsroles/pgsql/templates/pg-init-roles.sql: Role creation SQL templateroles/pgsql/templates/pg-init-template.sql: Privilege SQL templateUsers and roles defined in pg_default_roles and pg_users will be automatically created one by one during module installation.
It only runs on cluster leader, the primary instance.
To create users on an existing cluster,
add new user/role definitions to all.children.<cls>.pg_users, and create the database with the bin/pgsql-user util or pgsql-user.yml playbook:
Create user is an idempotent operation, meaning it can be run multiple times safely.
Pigsty will manage the pgbouncer userlist, so please create business databases with the Pigsty playbook/utils. Check create user SOP for details. If you are not using pgbouncer or able to maintain it by yourself, you can create users in any way you like.
In PostgreSQL, users belong to the database cluster, not a specific database.
If your user is an owner of any databases, make sure the user is created before creating the database.
Modifying PostgreSQL user attributes is the same as creating users.
Adjust your user definition by modifying the config inventory, then re-run create user.
There are two exceptions: name and roles, which require manual intervention:
The username is used as the identity of the user, so if you really want to do that, use the standard SQL:
Note that modifying a user does not delete the user, but modifies user attributes using the ALTER USER command.
It also DOES NOT revoke user permissions and group memberships, and uses the GRANT command to grant new roles.
Check PostgreSQL Docs for more details on ALTER USER.
For security reasons, Pigsty does not automatically delete users, even if you remove user definitions from the configuration, Pigsty will not delete existing users.
You need to use the SQL command DROP USER to manually delete users:
If the role you want to delete is a group (has other users belonging to it), you need to first remove other users from the group before deleting the group:
If the user you want to delete owns database objects, you need to first change the ownership of these objects to another user before deleting the user:
Check PostgreSQL Docs for more details on DROP USER, REASSIGN OWNED, and REVOKE.
Pigsty helps manage users in pgbouncer userlist, and keep it in sync with the postgres.
It requires explicitly setting the pgbouncer: true flag in the user definition to be enrolled in the pgbouncer user list.
The system admin user (pg_admin_username) and monitoring user (pg_monitor_username)
will always be added to the pgbouncer user list for administration & monitoring.
Users in the Pgbouncer connection pool are listed in /etc/pgbouncer/userlist.txt, examples:
User-level parameters are maintained in a separate file: /etc/pgbouncer/useropts.txt, examples:
The userlist.txt and useropts.txt will be automatically refreshed when you create users
and take effect with systemctl reload pgbouncer, normally without affecting existing connections.
To reload pgbouncer configuration, you can use the ansible playbook, or systemctl command
Pgbouncer runs with the same dbsu as PostgreSQL, defaulting to the postgres os user.
You can use the pgb alias to access pgbouncer management functions using dbsu.
If all database users are managed by Pigsty, you can just regenerate pgbouncer userlist (without the removed user in the list in the config inventory) and reload it:
To manually remove a user from the pgbouncer pool, simply delete the corresponding line from /etc/pgbouncer/userlist.txt and reload pgbouncer:
Note that the pgbouncer_auth_query parameter allows you to use dynamic queries to complete connection pool user authentication, which is a compromise when you don’t want to manage users in the connection pool.
CREATE DATABASE.A PostgreSQL server can serve multiple databases simultaneously. You can manage them with Pigsty.
Business databases are defined by pg_databases, which is a cluster-level parameter.
For example, the default meta database is defined in the pg-meta cluster:
Each database definition is a dict with the following fields:
The only required field is name, which should be a valid and unique database name in PostgreSQL.
Newly created databases are forked from template1 database by default. Which is customized by PG_PROVISION during cluster bootstrap.
Check ACL: Database Privilege for details about database-level privilege.
Databases defined in pg_databases will be automatically created during module installation.
If you wish to create database on an existing cluster, the bin/pgsql-db util can be used.
Add new database definition to all.children.<cls>.pg_databases, and create that database with:
This playbook is usually idempotent and can be re-run to flush the database definition.
But if you have non-trivial baseline schema (like drop stuff), you should NOT re-run this on existing databases.
Pigsty will manage pgbouncer database list, so please create business databases with the Pigsty playbook/utils. Check create database SOP for details. If you are not using pgbouncer or able to maintain it by yourself, you can create databases in any way you like.
Pgbouncer is enabled by default and serves as connection pool middleware.
Pigsty will add all databases in pg_databases to the pgbouncer database list by default.
You can disable the pgbouncer proxy for a specific database by setting pgbouncer: false in the database definition.
The Pgbouncer database list will be updated when create database with Pigsty util & playbook.
Databases are listed in /etc/pgbouncer/database.txt, with extra database-level parameters:
When you create databases, the Pgbouncer database list definition file will be refreshed and take effect through online configuration reload, without affecting existing connections.
To access pgbouncer admin functionality, you can use the pgb alias as dbsu (postgres).
Check pgbouncer usage for available commands:
There’s a util function defined in /etc/profile.d/pg-alias.sh, allowing you to reroute pgbouncer database traffic to a new host quickly, which can be used during zero-downtime migration.
In Pigsty, services are implemented using haproxy on nodes, differentiated by different ports on the host node.
Every node has Haproxy enabled to expose services. From the database perspective, nodes in the cluster may be primary or replicas, but from the service perspective, all nodes are the same. This means even if you access a replica node, as long as you use the correct service port, you can still use the primary’s read-write service. This design seals the complexity: as long as you can access any instance on the PostgreSQL cluster, you can fully access all services.
This design is akin to the NodePort service in Kubernetes. Similarly, in Pigsty, every service includes these two core elements:
The boundary of Pigsty’s service delivery stops at the cluster’s HAProxy. Users can access these load balancers in various ways. Please refer to Access Service.
All services are declared through configuration files. For instance, the default PostgreSQL service is defined by the pg_default_services parameter:
You can also define new service in pg_services. And pg_default_services and pg_services are both arrays of Service Definition.
The default services are defined in pg_default_services.
While you can define your extra PostgreSQL services with pg_services @ the global or cluster level.
These two parameters are both arrays of service objects. Each service definition will be rendered as a haproxy config in /etc/haproxy/<svcname>.cfg, check service.cfg for details.
Here is an example of an extra service definition: standby
And it will be translated to a haproxy config file /etc/haproxy/pg-test-standby.conf:
When cluster membership has changed, such as append / remove replicas, switchover/failover, or adjust relative weight, You have to reload service to make the changes take effect.
You can override the default service configuration in several ways:
Bypass Pgbouncer
When defining a service, if svc.dest='default', this parameter pg_default_service_dest will be used as the default value. pgbouncer is used by default, you can use postgres instead, so the default primary & replica service will bypass pgbouncer and route traffic to postgres directly
If you don’t need connection pooling at all, you can change pg_default_service_dest to postgres, and remove default and offline services.
If you don’t need read-only replicas for online traffic, you can remove replica from pg_default_services too.
Pigsty exposes PostgreSQL services with haproxy on node. All haproxy instances among the cluster are configured with the same service definition.
However, you can delegate pg service to a specific node group (e.g., dedicate haproxy lb cluster) rather than cluster members.
To do so, you will have to override the default service definition with pg_default_services and set pg_service_provider to the proxy group name.
For example, this configuration will expose pg cluster primary service on haproxy node group proxy with port 10013.
It’s user’s responsibility to make sure each delegate service port is unique among the proxy cluster.
Split read & write, route traffic to the right place, and achieve stable & reliable access to the PostgreSQL cluster.
Service is an abstraction to seal the details of the underlying cluster, especially during cluster failover/switchover.
Service is meaningless to personal users. You can access the database with raw IP address or whatever method you like.
We utilize a PostgreSQL database cluster based on replication in real-world production environments. Within the cluster, only one instance is the leader (primary) that can accept writes. Other instances (replicas) continuously fetch WAL from the leader to stay synchronized. Additionally, replicas can handle read-only queries and offload the primary in read-heavy, write-light scenarios. Thus, distinguishing between write and read-only requests is a common practice.
Moreover, we pool requests through a connection pooling middleware (Pgbouncer) for high-frequency, short-lived connections to reduce the overhead of connection and backend process creation. And, for scenarios like ETL and change execution, we need to bypass the connection pool and directly access the database servers. Furthermore, high-availability clusters may undergo failover during failures, causing a change in the cluster leadership. Therefore, the RW requests should be re-routed automatically to the new leader.
These varied requirements (read-write separation, pooling vs. direct connection, and client request failover) have led to the abstraction of the service concept.
Typically, a database cluster must provide this basic service:
For production database clusters, at least these two services should be provided:
Additionally, there might be other services, such as:
Pigsty will enable four default services for each PostgreSQL cluster:
| service | port | description |
|---|---|---|
| primary | 5433 | pgbouncer read/write, connect to primary 5432 or 6432 |
| replica | 5434 | pgbouncer read-only, connect to replicas 5432/6432 |
| default | 5436 | admin or direct access to primary |
| offline | 5438 | OLAP, ETL, personal user, interactive queries |
Take the default pg-meta cluster as an example, you can access these services in the following ways:
Here the pg-meta domain name is point to the cluster’s L2 VIP, which in turn points to the haproxy load balancer on the primary instance.
It is responsible for routing traffic to different instances, check Access Services for details.
The primary service may be the most critical service for production usage.
It will route traffic to the primary instance, depending on pg_default_service_dest:
pgbouncer: route traffic to primary pgbouncer port (6432), which is the default behaviorpostgres: route traffic to primary postgres port (5432) directly if you don’t want to use pgbouncerIt means all cluster members will be included in the primary service (selector: "[]"), but the one and only one instance that past health check (check: /primary) will be used as the primary instance. Patroni will guarantee that only one instance is primary at any time, so the primary service will always route traffic to THE primary instance.
The replica service is used for production read-only traffic.
There may be many more read-only queries than read-write queries in real-world scenarios. You may have many replicas.
The replica service will route traffic to Pgbouncer or postgres depending on pg_default_service_dest, just like the primary service.
The replica service traffic will try to use common pg instances with pg_role = replica to alleviate the load on the primary instance as much as possible. It will try NOT to use instances with pg_role = offline to avoid mixing OLAP & OLTP queries as much as possible.
All cluster members will be included in the replica service (selector: "[]") when it passes the read-only health check (check: /read-only). primary and offline instances are used as backup servers, which will take over in case of all replica instances are down.
The default service will route to primary postgres (5432) by default.
It is quite like the primary service, except it will always bypass pgbouncer, regardless of pg_default_service_dest. Which is useful for administration connection, ETL writes, CDC changing data capture, etc…
The Offline service will route traffic to dedicate postgres instance directly.
Which could be a pg_role = offline instance, or a pg_offline_query flagged instance.
If no such instance is found, it will fall back to any replica instances. the bottom line is: it will never route traffic to the primary instance.
Pigsty exposes service with haproxy. Which is enabled on all nodes by default.
haproxy load balancers are idempotent among the same pg cluster by default, you use ANY / ALL of them by all means.
The typical method is access via cluster domain name, which resolves to cluster L2 VIP, or all instances ip address in a round-robin manner.
Service can be implemented in different ways. You can even implement your own access method such as L4 LVS, F5, etc… instead of haproxy.
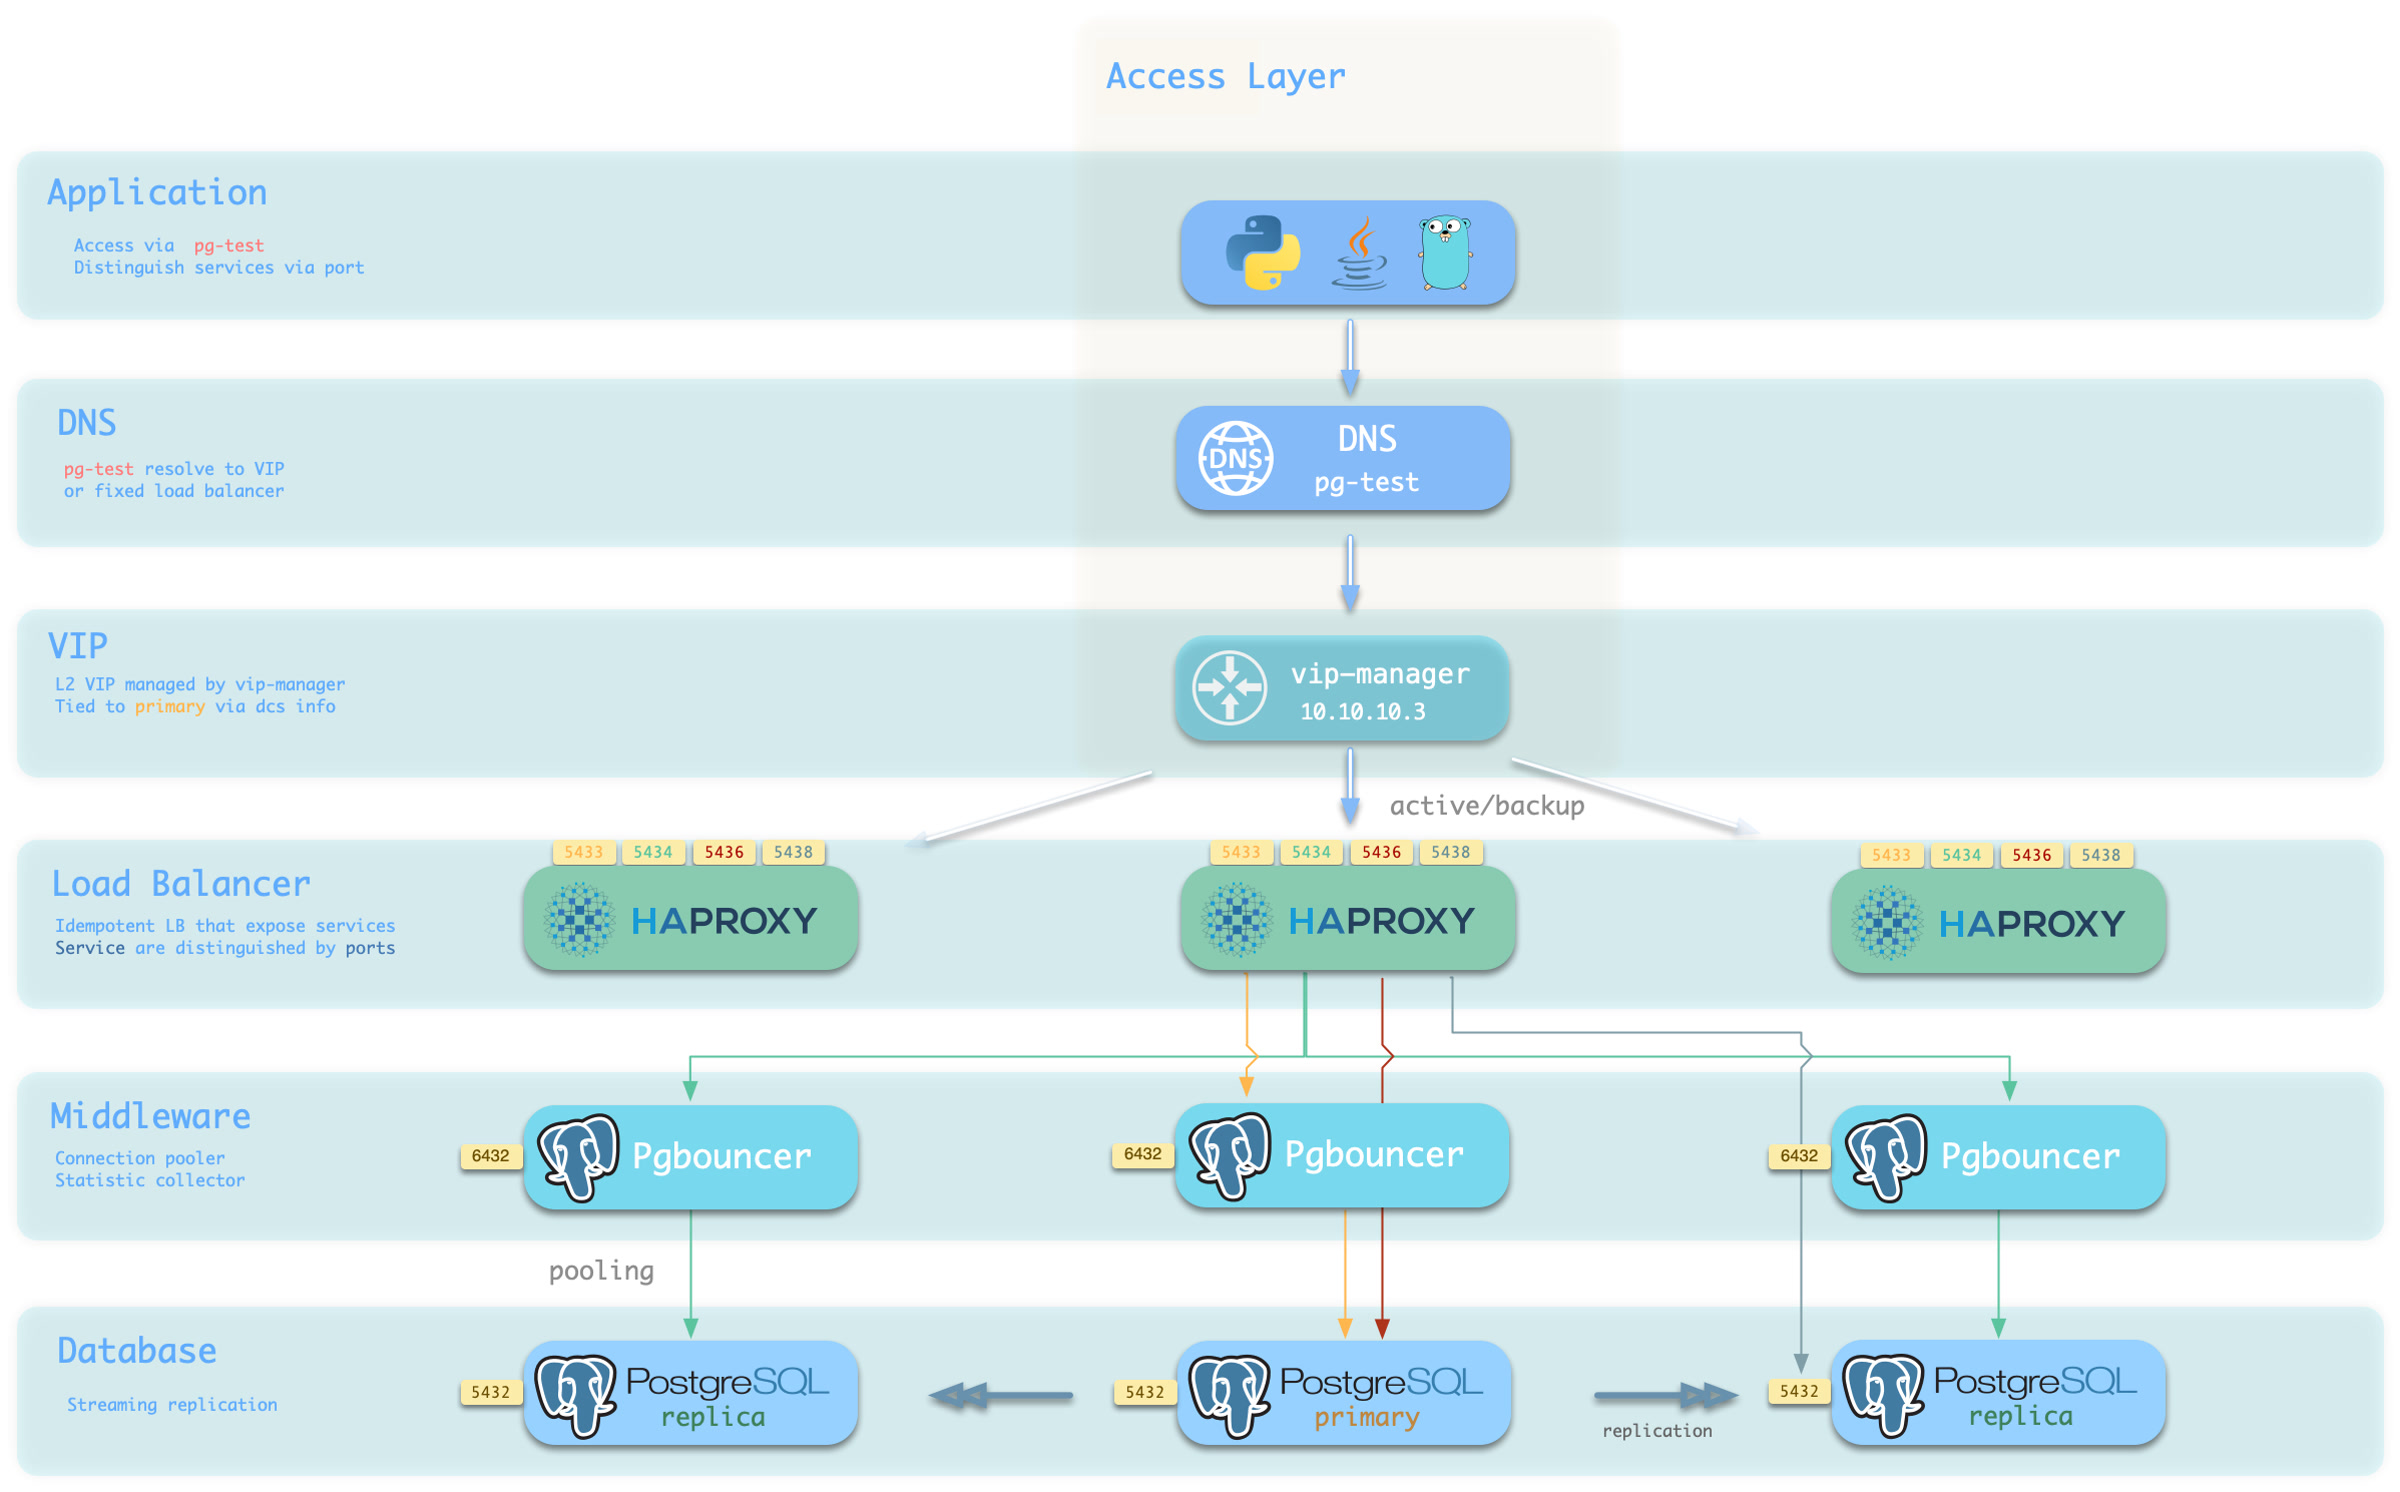
You can use a different combination of host & port, they are providing PostgreSQL service in different ways.
Host
| type | sample | description |
|---|---|---|
| Cluster Domain Name | pg-test |
via cluster domain name (resolved by dnsmasq @ infra nodes) |
| Cluster VIP Address | 10.10.10.3 |
via a L2 VIP address managed by vip-manager, bind to primary |
| Instance Hostname | pg-test-1 |
Access via any instance hostname (resolved by dnsmasq @ infra nodes) |
| Instance IP Address | 10.10.10.11 |
Access any instance ip address |
Port
Pigsty uses different ports to distinguish between pg services:
| port | service | type | description |
|---|---|---|---|
| 5432 | postgres | database | Direct access to postgres server |
| 6432 | pgbouncer | middleware | Go through connection pool middleware before postgres |
| 5433 | primary | service | Access primary pgbouncer (or postgres) |
| 5434 | replica | service | Access replica pgbouncer (or postgres) |
| 5436 | default | service | Access primary postgres |
| 5438 | offline | service | Access offline postgres |
Combinations
PostgreSQL has various authentication methods. You can use all of them, while pigsty’s battery-included ACL system focuses on HBA, password, and SSL authentication.
To connect to a PostgreSQL database, the user has to be authenticated (with a password by default).
You can provide the password in the connection string (not secure) or use the PGPASSWORD env or .pgpass file. Check psql docs and PostgreSQL connection string for more details.
The default connection string for the meta database:
To connect with the SSL certificate, you can use the PGSSLCERT and PGSSLKEY env or sslkey & sslcert parameters.
While the client certificate (CN = username) can be issued with local CA & cert.yml.
There are four parameters for HBA Rules in Pigsty:
pg_hba_rules: postgres ad-hoc hba rulespg_default_hba_rules: postgres default hba rulespgb_hba_rules: pgbouncer ad-hoc hba rulespgb_default_hba_rules: pgbouncer default hba rulesWhich are array of hba rule objects, and each hba rule is one of the following forms:
In the form, the title will be rendered as a comment line, followed by the rules as hba string one by one.
An HBA Rule is installed when the instance’s pg_role is the same as the role.
HBA Rule with role: common will be installed on all instances.
HBA Rule with role: offline will be installed on instances with pg_role = offline or pg_offline_query = true.
The alias form, which replace rules with addr, auth, user, and db fields.
addr: where
world: all IP addressesintra: all intranet cidr: '10.0.0.0/8', '172.16.0.0/12', '192.168.0.0/16'infra: IP addresses of infra nodesadmin: admin_ip addresslocal: local unix socketlocalhost: local unix socket + tcp 127.0.0.1/32cluster: all IP addresses of pg cluster members<cidr>: any standard CIDR blocks or IP addressesauth: how
deny: reject accesstrust: trust authenticationpwd: use md5 or scram-sha-256 password auth according to pg_pwd_encsha/scram-sha-256: enforce scram-sha-256 password authenticationmd5: md5 password authenticationssl: enforce host ssl in addition to pwd authssl-md5: enforce host ssl in addition to md5 password authssl-sha: enforce host ssl in addition to scram-sha-256 password authos/ident: use ident os user authenticationpeer: use peer authenticationcert: use certificate-based client authenticationuser: who
all: all users${dbsu}: database superuser specified by pg_dbsu${repl}: replication user specified by pg_replication_username${admin}: admin user specified by pg_admin_username${monitor}: monitor user specified by pg_monitor_usernamedb: which
all: all databasesreplication: replication databaseTypically, global HBA is defined in all.vars. If you want to modify the global default HBA rules, you can copy from the full.yml template to all.vars for modification.
pg_default_hba_rules: postgres global default HBA rulespgb_default_hba_rules: pgbouncer global default HBA rulesCluster-specific HBA rules are defined in the cluster-level configuration of the database:
pg_hba_rules: postgres HBA rules for the clusterpgb_hba_rules: pgbouncer HBA rules for the clusterHere are some examples of cluster HBA rule definitions.
To reload postgres/pgbouncer hba rules:
The underlying command: are:
Pigsty has a default set of HBA rules, which is pretty secure for most cases.
The rules are self-explained in alias form.
For those critical cases, we have a safe.yml template with the following hba rule set as a reference:
Pigsty has a default role system consisting of four default roles and four default users:
| Default User | User Description | Default Role | Role Description |
|---|---|---|---|
postgres |
system superuser | dbrole_readonly |
role for global read-only access |
replicator |
system replicator | dbrole_readwrite |
role for global read-write access |
dbuser_dba |
pgsql admin user | dbrole_admin |
role for object creation |
dbuser_monitor |
pgsql monitor user | dbrole_offline |
role for restricted read-only access |
| Role name | Attributes | Member of | Description |
|---|---|---|---|
dbrole_readonly |
NOLOGIN |
role for global read-only access | |
dbrole_readwrite |
NOLOGIN |
dbrole_readonly | role for global read-write access |
dbrole_admin |
NOLOGIN |
pg_monitor,dbrole_readwrite | role for object creation |
dbrole_offline |
NOLOGIN |
role for restricted read-only access | |
postgres |
SUPERUSER |
system superuser | |
replicator |
REPLICATION |
pg_monitor,dbrole_readonly | system replicator |
dbuser_dba |
SUPERUSER |
dbrole_admin | pgsql admin user |
dbuser_monitor |
pg_monitor | pgsql monitor user |
There are four default roles in pigsty:
dbrole_readonly): Role for global read-only accessdbrole_readwrite): Role for global read-write access, inherits dbrole_readonly.dbrole_admin): Role for DDL commands, inherits dbrole_readwrite.dbrole_offline): Role for restricted read-only access (offline instance)Default roles are defined in pg_default_roles, changing default roles is not recommended.
There are four default users in pigsty, too.
postgres), the owner and creator of the cluster, same as the OS dbsu.replicator), the system user used for primary-replica.dbuser_monitor), a user used to monitor database and connection pool metrics.dbuser_dba), the admin user who performs daily operations and database changes.Default users’ username/password are defined with dedicated parameters (except for dbsu password):
pg_dbsu : os dbsu name, postgres by default, better not change itpg_replication_username : postgres replication username, replicator by defaultpg_replication_password : postgres replication password, DBUser.Replicator by defaultpg_admin_username : postgres admin username, dbuser_dba by defaultpg_admin_password : postgres admin password in plain text, DBUser.DBA by defaultpg_monitor_username : postgres monitor username, dbuser_monitor by defaultpg_monitor_password : postgres monitor password, DBUser.Monitor by default!> Remember to change these password in production deployment !
To define extra options, specify them in pg_default_roles:
Pigsty has a battery-included privilege model that works with default roles.
pg_role = 'offline' or pg_offline_query = true)CREATE privileges of database & public schema are revoked from PUBLIC by defaultDefault object privileges are defined in pg_default_privileges.
Newly created objects will have corresponding privileges when it is created by admin users
The \ddp+ may looks like:
| Type | Access privileges |
|---|---|
| function | =X |
| dbrole_readonly=X | |
| dbrole_offline=X | |
| dbrole_admin=X | |
| schema | dbrole_readonly=U |
| dbrole_offline=U | |
| dbrole_admin=UC | |
| sequence | dbrole_readonly=r |
| dbrole_offline=r | |
| dbrole_readwrite=wU | |
| dbrole_admin=rwU | |
| table | dbrole_readonly=r |
| dbrole_offline=r | |
| dbrole_readwrite=awd | |
| dbrole_admin=arwdDxt |
ALTER DEFAULT PRIVILEGES allows you to set the privileges that will be applied to objects created in the future. It does not affect privileges assigned to already-existing objects, and objects created by non-admin users.
Pigsty will use the following default privileges:
Which will be rendered in pg-init-template.sql alone with ALTER DEFAULT PRIVILEGES statement for admin users.
These SQL commands will be executed on postgres & template1 during cluster bootstrap, and newly created databases will inherit it from template1 by default.
That is to say, to maintain the correct object privilege, you have to run DDL with admin users, which could be:
{{ pg_dbsu }}, postgres by default{{ pg_admin_username }}, dbuser_dba by defaultdbrole_adminIt’s wise to use postgres as the global object owner to perform DDL changes.
If you wish to create objects with business admin user, YOU MUST USE SET ROLE dbrole_admin before running that DDL to maintain the correct privileges.
You can also ALTER DEFAULT PRIVILEGE FOR ROLE <some_biz_admin> XXX to grant default privilege to business admin user, too.
Database privilege is covered by database definition.
There are 3 database level privileges: CONNECT, CREATE, TEMP, and a special ‘privilege’: OWNERSHIP.
owner exists, it will be used as the database owner instead of default {{ pg_dbsu }}revokeconn is false, all users have the CONNECT privilege of the database, this is the default behavior.revokeconn is set to true explicitly:CONNECT privilege of the database will be revoked from PUBLICCONNECT privilege will be granted to {{ pg_replication_username }}, {{ pg_monitor_username }} and {{ pg_admin_username }}CONNECT privilege will be granted to the database owner with GRANT OPTIONrevokeconn flag can be used for database access isolation, you can create different business users as the owners for each database and set the revokeconn option for all of them.
Pigsty revokes the CREATE privilege on database from PUBLIC by default, for security consideration. And this is the default behavior since PostgreSQL 15.
The database owner has the full ability to adjust these privileges as they see fit.
There are 26 default grafana dashboards about PostgreSQL and categorized into 4 levels. and categorized into PGSQL, PGCAT & PGLOG by datasource.
Overview
Cluster
Instance
Database
PGSQL Overview : The main dashboard for PGSQL module
PGSQL Alert : Global PGSQL key metrics and alerting events
PGSQL Shard : Overview of a horizontal sharded PGSQL cluster, e.g. CITUS / GPSQL cluster
PGSQL Cluster: The main dashboard for a PGSQL cluster
PGRDS Cluster: The PGSQL Cluster dashboard for RDS, focus on all postgres metrics only.
PGSQL Service: Cares about PGSQL cluster services, proxies, routes, and load balancers.
PGSQL Activity: Cares about the Session/Load/QPS/TPS/Locks of a PGSQL cluster
PGSQL Replication: Cares about PGSQL cluster replication, slots, and pub/sub.
PGSQL Databases: Cares about database CRUD, slow queries, and table statistics cross all instances.
PGSQL Patroni: Cares about cluster HA agent: patroni status.
PGSQL PITR: Cares about context of cluster status during PITR procedure
PGSQL Instance: The main dashboard for a single PGSQL instance
PGRDS Instance: The PGSQL Instance dashboard for RDS, focus on all postgres metrics only.
PGSQL Proxy: Metrics about haproxy the service provider
PGSQL Pgbouncer: Metrics about one single pgbouncer connection pool instance
PGSQL Persist: Metrics about persistence: WAL, XID, Checkpoint, Archive, IO
PGSQL Xacts: Metrics about transactions, locks, queries, etc…
PGSQL Session: Metrics about sessions and active/idle time in a single instance
PGSQL Exporter: Postgres & Pgbouncer exporter self monitoring metrics
PGSQL Database: The main dashboard for a single PGSQL database
PGSQL Tables : Table/Index access metrics inside a single database
PGSQL Table: Detailed information (QPS/RT/Index/Seq…) about a single table
PGSQL Query: Detailed information (QPS/RT) about a single query
PGCAT Instance: Instance information from database catalog directly
PGCAT Database: Database information from database catalog directly
PGCAT Schema: Detailed information about one single schema from database catalog directly
PGCAT Table: Detailed information about one single table from database catalog directly
PGCAT Query: Detailed information about one single type of query from database catalog directly
PGCAT Locks: Detailed information about live locks & activity from database catalog directly
PGLOG Overview: Overview of csv log sample in pigsty meta database
PGLOG Overview: Detail of one single session of csv log sample in pigsty meta database
Pigsty has a built-in playbook pgsql-migration.yml to perform online database migration based on logical replication.
With proper automation, the downtime could be minimized to several seconds. But beware that logical replication requires PostgreSQL 10+ to work. You can still use the facility here and use a pg_dump | psql instead of logical replication.
You have to create a migration task definition file to use this playbook.
Check files/migration/pg-meta.yml for example.
It will try to migrate the pg-meta.meta to pg-test.test.
You have to tell pigsty where is the source cluster and destination cluster. The database to be migrated, and the primary IP address.
You should have superuser privileges on both sides to proceed
You can overwrite the superuser connection to the source cluster with src_pg, and logical replication connection string with sub_conn, Otherwise, pigsty default admin & replicator credentials will be used.
The playbook does not migrate src to dst, but it will generate everything your need to do so.
After the execution, you will find migration context dir under ~/migration/pg-meta.meta by default
Following the README.md and executing these scripts one by one, you will do the trick!
Caveats
You can use ./copy-seq 1000 to advance all sequences by a number (e.g. 1000) after syncing sequences. Which may prevent potential serial primary key conflict in new clusters.
You have to implement your own ./re-routing script to route your application traffic from src to dst. Since we don’t know how your traffic is routed (e.g dns, VIP, haproxy, or pgbouncer). Of course, you can always do that by hand…
You have to implement your own ./disable-src script to restrict the src cluster. You can do that by changing HBA rules & reload (recommended), or just shutting down postgres, pgbouncer, or haproxy…
Pigsty uses pgBackRest to manage PostgreSQL backups, it may be the most powerful open-source backup tools in the ecosystem. With incremental / parallel backup & restore, encryption, MinIO / S3 support, and many other features. Pigsty has pre-configured it for every PGSQL cluster by default.
Backup scripts, scheduling, pgbackrest, repo and admin
Backup policy, disk planning, recovery window trade-off
Restore to specific time point with playbook
Sandbox example: Perform recovery with bare hands
Pigsty try its best to provide a reliable PITR solution, but we do not take any responsibility for the data loss caused by the PITR operation, use it at your own risk. For professional support, consider our pro service.
[Backup Policy](/docs/pgsql/backup/mechanism): Schedule Base Backups with Crontab
[WAL Archiving](/docs/pgsql/backup/policy): Continuously record write activities
[Restore & Recovery](/docs/pgsql/backup/restore): Recover from backup and wal archive
Backups can be invoked by built-in scripts, scheduled with node crontab, managed by pgbackrest, and stored in backup repo, which could be local disk filesystem or MinIO / S3, with different retention policies.
You can create a backup with pgbackrest command with pg_dbsu user (postgres by default):
The stanza here is the database cluster name: pg_cluster, which is pg-meta for the default setup.
Pigsty has an alias pb and wrapper script pg-backup that fills the current cluster name as stanza:
Pigsty is leveraging Linux’s crontab to schedule backups. You can define your backup policies with it
For example, most one-node config template will have the following node_crontab for backup.
You can design more sophisticated backup policies with crontab and pg-backup script, such as:
To apply crontab change, use the node.yml to update the crontab on all nodes.
Here’s pigsty’s setup details for pgbackrest:
pgbackrest_enabled)pg_install task in the pgsql.yml playbook, defined in pg_packagespg_backup task in the pgsql.yml playbook, PARAM: PG_BACKUPpgbackrest_init task, fails if repo exists! (errors can be ignored)pgbackrest_backup task, controlled by pgbackrest_init_backup/usr/bin/pgbackrest, from the PGDG’s pgbackrest package, in the group alias pgsql-common./etc/pgbackrest, the main config is /etc/pgbackrest/pgbackrest.conf./pg/log/pgbackrest/*, controlled by pgbackrest_log_dir/pg/spool is used as the temp spool directory for pgbackrest/pg/backup is used, if the default local filesystem backup repo is selected.Moreover, during the PITR Recovery process,
Pigsty will create a temp /pg/conf/pitr.conf pgbackrest config file.
And write postgres recovery log to the /pg/tmp/recovery.log file.
There is a pgbackrest_exporter service running on (pgbackrest_exporter_port: 9854) to export the pgbackrest metrics.
You can customize it by pgbackrest_exporter_options and disable it with setting pgbackrest_exporter_enabled to false.
When a postgres cluster is created, pigsty will create an initial backup automatically.
It’s a tiny backup since the new cluster is almost empty.
It will leave a marker file /etc/pgbackrest/initial.done to avoid creating the initial backup again.
Set the pgbackrest_init_backup to false if you don’t want it.
If you database cluster is created with pgbackrest_enable set to true, the backup will be enabled automatically.
If it created with the false value, you can enable the pgbackrest component with:
Pigsty will remove pgbackrest backup stanza when removing the primary instance (pg_role = primary).
Use the pg_backup subtask to remove the backup only, and use the pg_rm_backup arg to keep backups.
If your backup repo is locked, (e.g., S3 / MinIO has a lock option), this operation will fail.
Removing backup may lead to permanent data loss, it’s a dangerous operation, do with extreme caution.
This command will list all backups in the pgbackrest repository (shared by all clusters)
Pigsty has a built-in script /pg/bin/pg-backup which wraps the pgbackrest backup command.
Pigsty has an alternative backup script /pg/bin/pg-basebackup which does not rely on pgbackrest, and gives you a physical copy of the database cluster.
The default backup dir is /pg/backup.
Backup are compressed with lz4, You can unzip and extract the tarball with the following command:
You can also use the pg_dump command to perform a logical backup.
Logical backups cannot be used for PITR (Point In Time Recovery), but they are useful for migrating data between different major versions, or implement flexible data export logic.
Now let’s say you have an existing cluster pg-meta, and want to FORK it as pg-meta2:
You’ll need to create the new pg-meta2 cluster fork, then run pitr on it.
You can to configure WHERE to store the backups by specifying the pgbackrest_repo parameter.
You can define multiple repo there, and Pigsty will pick it according to the value of pgbackrest_method.
By default, Pigsty has two default backup repo definition: the local and minio backup repo.
local: The default, use the local /pg/backup dir (Softlink point to pg_fs_backup: /data/backups)minio: Use the SNSD 1-node MinIO cluster (Supported by pigsty, but not enabled by default)If you take backups every day without deleting them, the backup repo will grow larger and larger and blow your disk space. You’ll need to define a retention policy to only keep a limited number of backups.
The default backup policy is defined in the pgbackrest_repo parameter, change them on demand.
local: keep last 2 full backups, at most 3 during backupminio: keep all full backups in the last 14 daysObject storage provides virtually unlimited storage capacity, so you don’t need to worry about the disk space. You can optimize space usage with a hybrid full & diff backup policy.
For local disk backup repo, pigsty recommends using a retention policy of keeping the last 2 full backups, which means keep the two most-recent full backups on disk (a third copy may exist while a new backup is running).
This gives you a guaranteed recovery window of at least last 24 hours. Check backup policy for details.
You can also use other services as backup repo, check pgbackrest documentation for details:
You can even specify a repo target time to get a snapshot of object storage.
You can enable MinIO versioning by adding versioning flag to the minio_buckets:
Some object storage service (S3, MinIO, etc.) supports the locking, which can prevent the backup from being deleted, even by DBA themselves.
You can enable MinIO locking feature by adding lock flag to the minio_buckets:
Object storage service provides virtually unlimited storage capacity, and provides a remote disaster tolerance for your system. If you don’t have one, Pigsty has built-in MinIO support.
You can enable minio backup repo by uncommenting the following settings. Beware that pgbackrest only takes HTTPS / domain names, so you have to run MinIO with a domain name and HTTPS endpoint.
If you only have one node, the meaningful backup policy could be using a cloud vendor’s object storage service such as AWS S3, Aliyun OSS, or Google Cloud, etc… To achieve this, you can define a new repo:
If you database cluster is created with pgbackrest_enable set to true, the backup will be enabled automatically.
If it created with the false value, you can enable the pgbackrest component with:
Pigsty will remove pgbackrest backup stanza when removing the primary instance (pg_role = primary).
Use the pg_backup subtask to remove the backup only, and use the pg_rm_backup arg to keep backups.
If your backup repo is locked, (e.g., S3 / MinIO has a lock option), this operation will fail.
Removing backup may lead to permanent data loss, it’s a dangerous operation, do with extreme caution.
This command will list all backups in the pgbackrest repository (shared by all clusters)
Pigsty has a built-in script /pg/bin/pg-backup which wraps the pgbackrest backup command.
Pigsty has an alternative backup script /pg/bin/pg-basebackup which does not rely on pgbackrest, and gives you a physical copy of the database cluster.
The default backup dir is /pg/backup.
Backup are compressed with lz4, You can unzip and extract the tarball with the following command:
You can also use the pg_dump command to perform a logical backup.
Logical backups cannot be used for PITR (Point In Time Recovery), but they are useful for migrating data between different major versions, or implement flexible data export logic.
Now let’s say you have an existing cluster pg-meta, and want to FORK it as pg-meta2:
You’ll need to create the new pg-meta2 cluster fork, then run pitr on it.
The first problem is WHEN to backup your database — Trade off between backup frequency and recovery time. Since you’ll need to replay the WAL logs to your recovery target since the last previous backup, the more frequent you backup, the less WAL logs you’ll need to replay, and the faster your recovery will be.
For a production database, it is recommended to start with the simplest everyday full backup policy. Where is the default backup policy in pigsty, implemented with crontab.
When using with the default local filesystem backup repo, it provides a 24~48h recovery window.
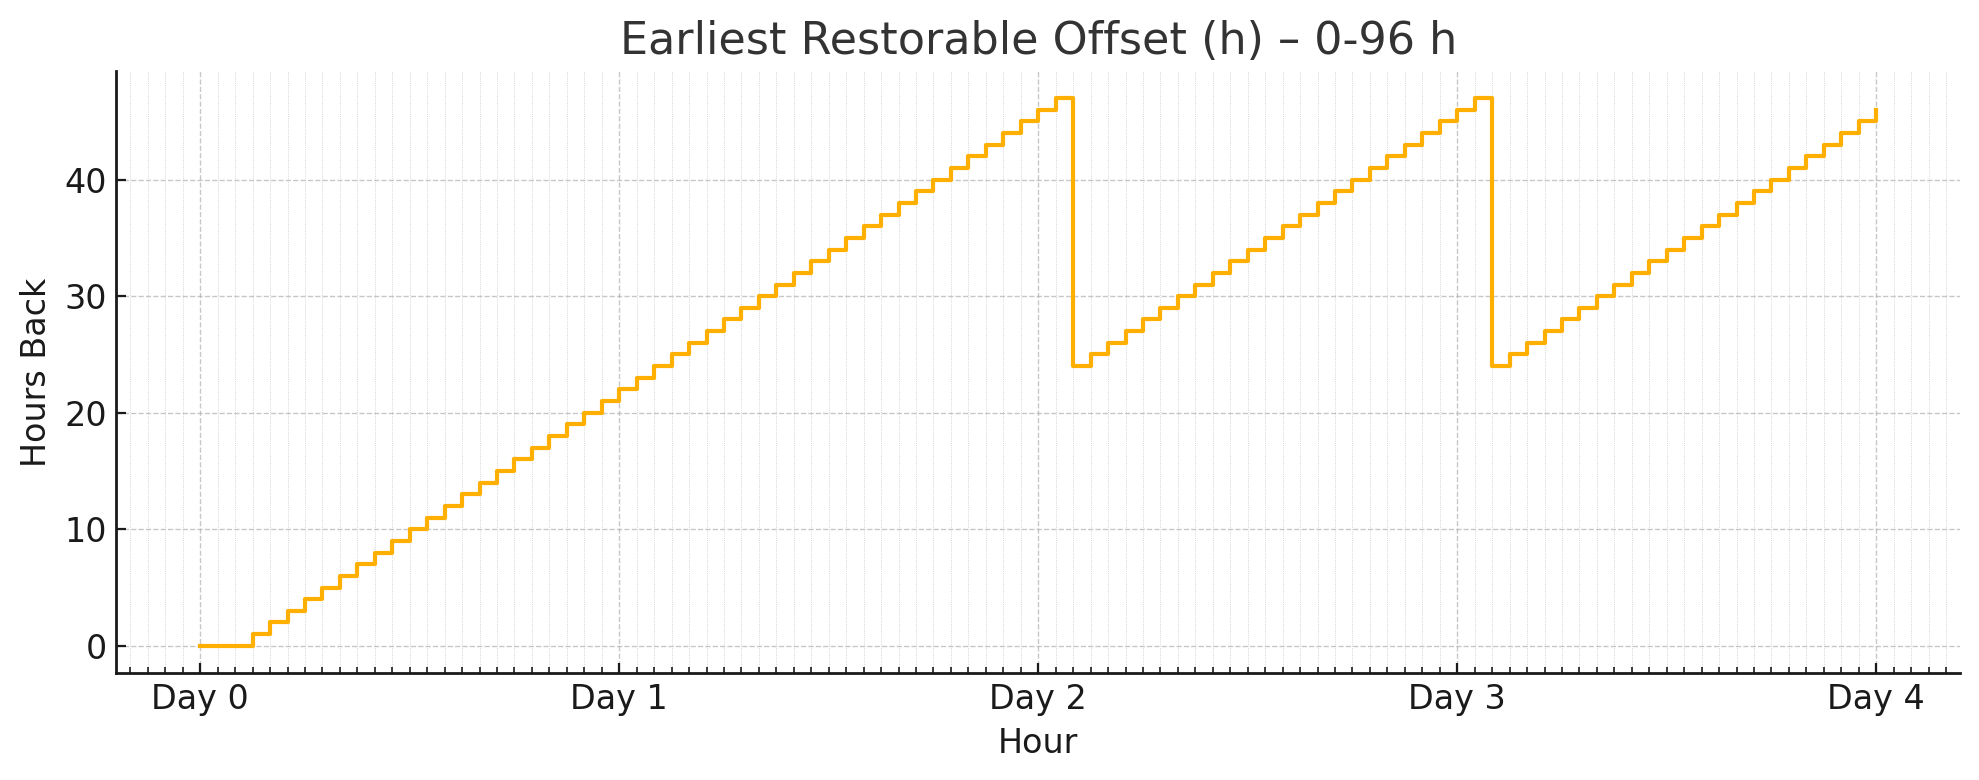
Let’s assume your database size is 100GB, and 10GB writes per day, and your backup size will be.
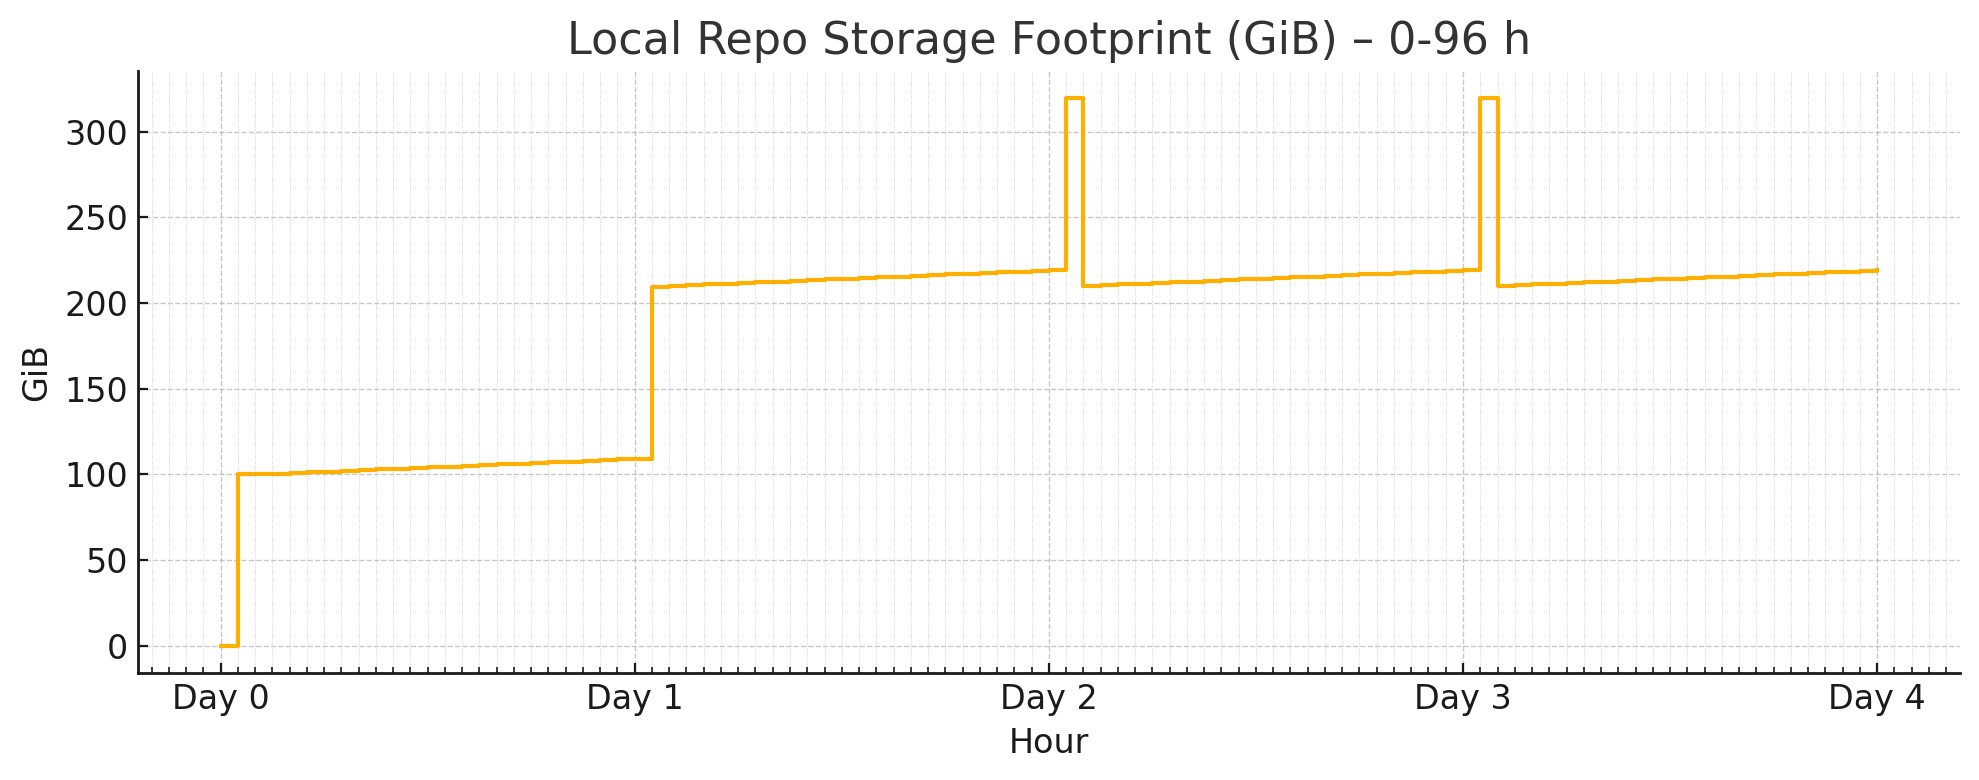
It will consume 2 ~ 3x of your database size, plus a 2 day’s WAL.
So in practice, you may have to prepare a backup disk with at least 3 ~ 5x of your database size
to use the default backup policy.
You can optimize backup space usage by changing these parameters.
If you are using MinIO / S3 as centralized backup repo, you can use more space than your disk limitation. Then consider the full + incr backup with 2-week retention policy:
When using with the built-in minio filesystem backup repo, it provides a guaranteed 1-week pitr window.
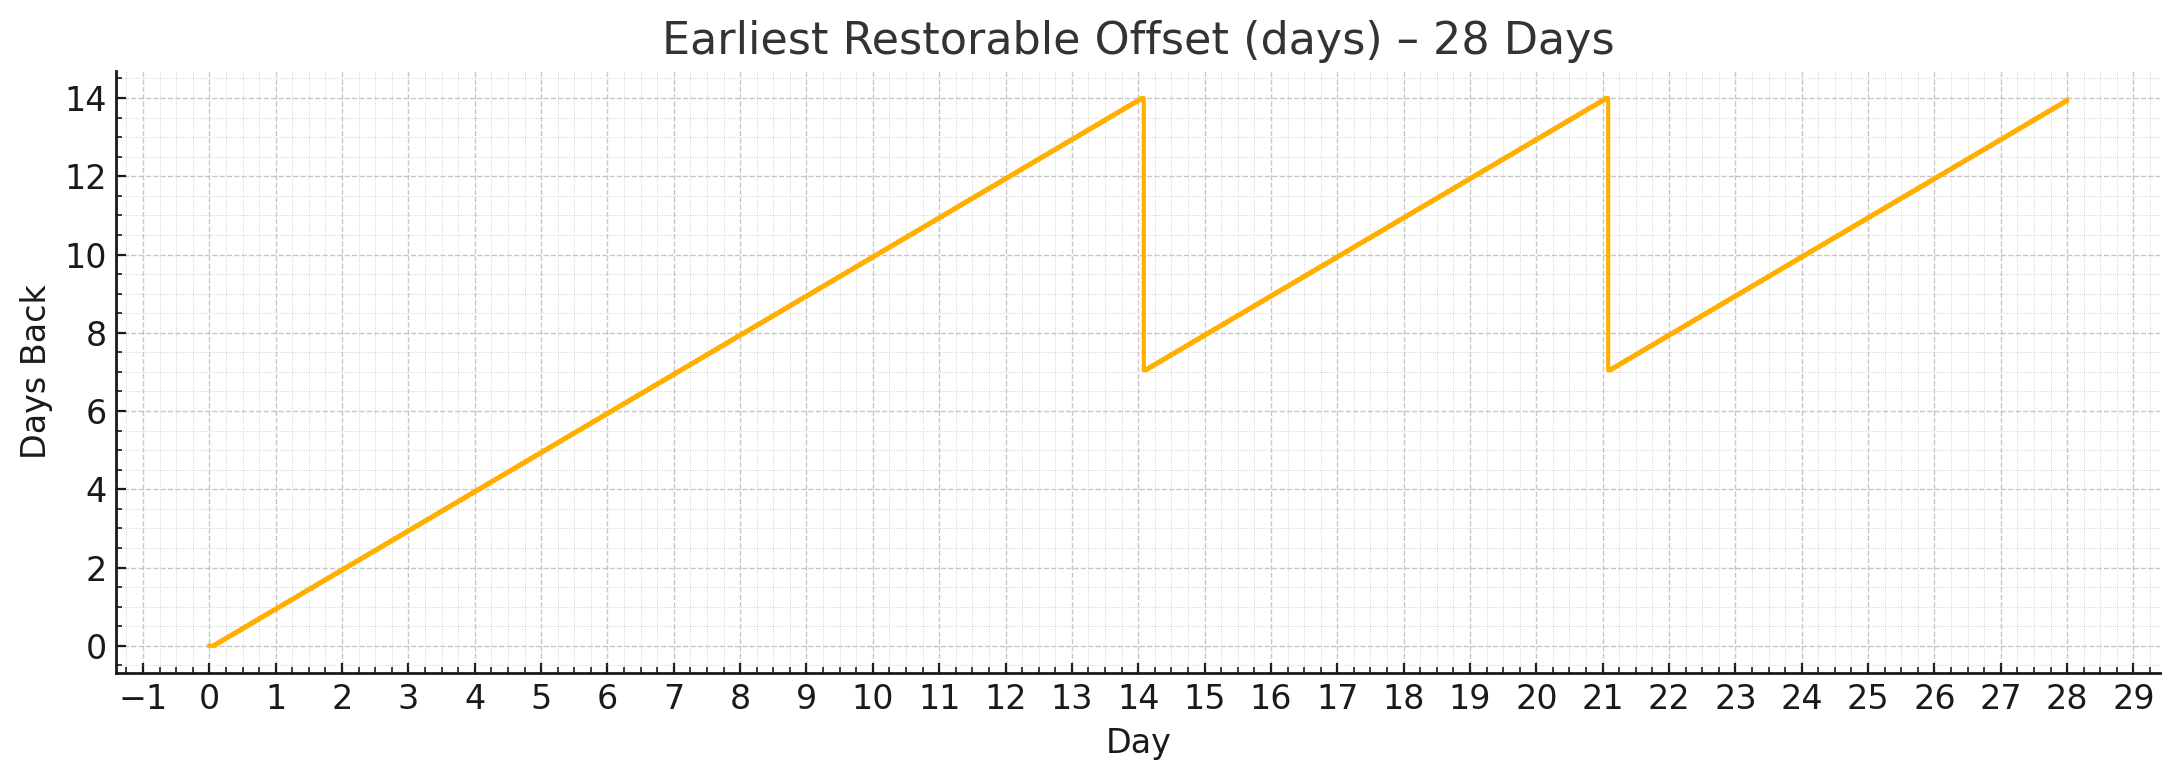
Let’s assume your database size is 100GB, and 10GB writes per day, and your backup size will be like:
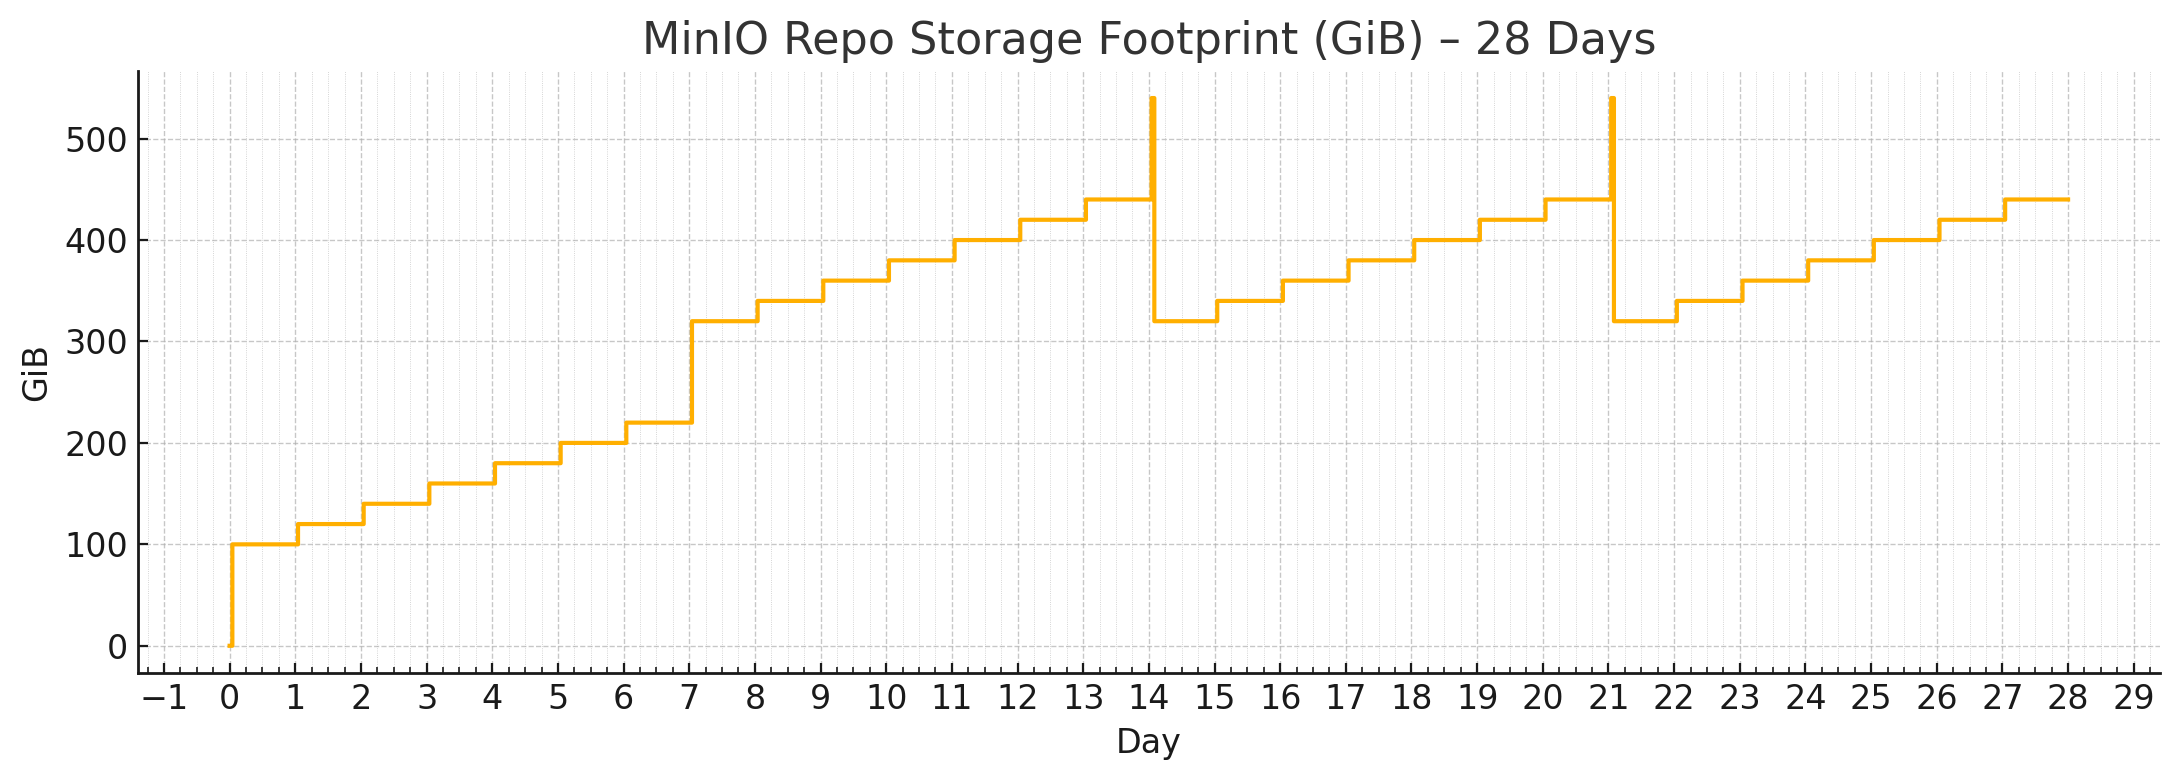
By default, Pigsty has two default backup repo definition: the local and minio backup repo.
local: The default, use the local /pg/backup dir (Softlink point to pg_fs_backup: /data/backups)minio: Use the SNSD 1-node MinIO cluster (Supported by pigsty, but not enabled by default)If you database cluster is created with pgbackrest_enable set to true, the backup will be enabled automatically.
If it created with the false value, you can enable the pgbackrest component with:
Pigsty will remove pgbackrest backup stanza when removing the primary instance (pg_role = primary).
Use the pg_backup subtask to remove the backup only, and use the pg_rm_backup arg to keep backups.
If your backup repo is locked, (e.g., S3 / MinIO has a lock option), this operation will fail.
Removing backup may lead to permanent data loss, it’s a dangerous operation, do with extreme caution.
This command will list all backups in the pgbackrest repository (shared by all clusters)
Pigsty has a built-in script /pg/bin/pg-backup which wraps the pgbackrest backup command.
Pigsty has an alternative backup script /pg/bin/pg-basebackup which does not rely on pgbackrest, and gives you a physical copy of the database cluster.
The default backup dir is /pg/backup.
Backup are compressed with lz4, You can unzip and extract the tarball with the following command:
You can also use the pg_dump command to perform a logical backup.
Logical backups cannot be used for PITR (Point In Time Recovery), but they are useful for migrating data between different major versions, or implement flexible data export logic.
Now let’s say you have an existing cluster pg-meta, and want to FORK it as pg-meta2:
You’ll need to create the new pg-meta2 cluster fork, then run pitr on it.
You can use the pre-configured pgbackrest to perform Point-in-Time Recovery (PITR) in Pigsty.
pg-pitr hint script, do it manually, more flexible with more complexity.pgsql-pitr.yml playbook, automatic, but less flexible and more error-prone.If you are very convenient with your configuration, you can use the fully automatic playbook, otherwise, consider do it step by step manually
If you want to roll back the pg-meta cluster to the previous timepoint, adding the pg_pitr:
Then run the pgsql-pitr.yml playbook, it will roll back the pg-meta cluster to the specified timepoint.
The archive_mode will be disabled on recovered cluster to prevent unwanted WAL writes.
If the recovered database status is ok, you can enable the archive_mode and make a full backup.
You can specify different types of recovery targets in pg_pitr, but they are mutually exclusive:
time: which time point to restore?name: restore to a named restore point (created by pg_create_restore_point)xid: restore to a specific transaction ID (TXID/XID)lsn: restore to a specific LSN (Log Sequence Number) pointThe recovery type will be set accordingly if any of the above parameters is specified,
otherwise it will be set to latest (the end of the WAL archive stream).
The special immediate type can be used to instruct pgbackrest to minimize the recovery time by stop at the first consistent point.
The most frequently used target is the time point; you can specify the time point to restore to:
Time should be a valid PostgreSQL TIMESTAMP, YYYY-MM-DD HH:MM:SS+TZ is recommended.
You can create a named restore point with pg_create_restore_point:
And use that named restore point in PITR:
If you have a transaction that accidentally deleted some data, the best way to recover is to restore the database to the state before that transaction.
You can find the exact transaction id from monitoring dashboard, or find it from TXID from the CSVLOG.
The target parameter is “inclusive” by default, which means the recovery will include the target point.
The exclusive flag will exclude that exact target, like the xid 24999 will be the last transaction being replayed
This only applies to time, xid, lsn recovery targets, check recovery_target_inclusive for details.
PostgreSQL uses the LSN (Log Sequence Number) to identify the position of a WAL record. You can find it everywhere, like the PG LSN panel from Pigsty dashboards.
To restore to an exact point in the WAL stream, you may also specify the timeline parameter (default to latest)
cluster: which cluster to restore? the current pg_cluster will be used by default, you can use any other cluster in the same pgbackrest reporepo: overwrite the backup repo, use the same format in pgbackrest_reposet: the latest backup set is used by default, but you can specify a specific pgbackrest backup by labelPigsty will recover from the pgbackrest backup repository, if you are using a centralized backup repo (like MinIO/S3), you can specify another “stanza” (another cluster’s backup directory) to restore from.
The above configuration will mark the PITR procedure to use the pg-meta stanza.
You can also pass the pg_pitr parameter via CLI args:
You can also use these targets when pitr from another cluster:
This approach is semi-automatic, you will participate in the PITR process to make key decisions.
For example, this configuration will restore the pg-meta cluster itself to the specified timepoint
Let’s do this one step by step:
There are more options available in the pg_pitr parameter:
You can do PITR with the pgsql-pitr playbook, while in some case, you may want to perform PITR manually.
We’ll illustrate the procedure with the 4-node sandbox cluster with minio backup repo.
Prepare the 4-node sandbox environment with vagrant or terraform, then:
Now operate as the admin user (or dbsu) on the admin node to proceed.
To check the backup status, you’ll need to switch to the postgres user and use the pb command:
The pb is the alias for pgbackrest, with auto scraped stanza name from pgbackrest config.
You can see the initial backup info, which is a full backup created at
The backup finish at 2025-07-13 02:27:33+00, this is the earliest time you can restore to.
Since wal archive is active, you can restore to any point in time after the backup, until the WAL end (now).
You can generate some heartbeat to simulate the workload. the /pg-bin/pg-heartbeat is for this purpose,
It will write a heartbeat timestamp to the monitor.heartbeat table every second.
You can even add more workload to the cluster, let’s use pgbench to generate some random writes:
Now let’s choose a time point to recovery, let’s say 2025-07-13 03:03:03+00, which is a timepoint after the initial backup (and heartbeat).
To perform the manual PITR, use the pg-pitr util:
It will generate the instructions for you to perform the recovery, it usually takes four steps:
Let’s start with the simple 1-node pg-meta cluster as an example, which is simpler.
Make sure the local postgres is not running, then perform the recovery command given in the manual:
We don’t want patroni HA to take over until we are sure the data is correct, so we start postgres manually:
Now you can check the data to see if the it is at the timepoint you want. You can validate it by checking some latest timestamp from business tables, or in this case, check via the heartbeat table.
The timestamp is right before the timepoint we specified! (2025-07-13 03:03:00+00).
If this is not the timepoint you want, you can repeat the restore with a different timepoint.
It’s rapid since recovery is performed in an incremental and parallel way.
It’s ok to retry until you get the right point.
The recovered postgres cluster is in recovery mode, so it will reject any write operations until you promote it to primary.
These recovery params are generated by pgBackRest in the config file.
If data is correct, you can promote it to primary, mark it as the new leader and ready to accept writes.
Once promoted, the database cluster will enter a new timeline (the leader epoch). If there’s any write traffic, it will be written to the new timeline.
Finally, it’s not only the data that need recovery, but also the cluster state, such as:
You postgres is start directly, to restore HA takeover; you’ll have to start the patroni service:
The archive_mode is disabled by pgbackrest during recovery。
If you want the new leader’s writes to be archived in the backup repo, you also need to enable the archive_mode config.
It’s usually a good idea to take a new full backup after PITR, but it’s optional.
If your postgres cluster has replicas, you’ll need to perform the PITR on each replica as well. Or, the simple way is to nuke the replica data directory and restart patroni, which will re-initialize the replica from the primary. We will cover this case in the next multi-node cluster example.
Now let’s play with the 3-node pg-test cluster as an PITR example.
Pigsty supports various PostgreSQL kernels and compatible forks, enabling you to simulate different database systems while leveraging PostgreSQL’s ecosystem. Each kernel provides unique capabilities and compatibility layers.
Vanilla Postgres with 437 Extensions
Native Distributive Extension
SQL Server wire-compatible
Oracle grammar & PL/SQL compatible
MySQL wire-compatibility
Transparent Data Encryption
OLTP-optimized cloud-native storage engine
Aurora-like RAC with china domestic compliance
Backend as a Service, self-hosting Firebase
Mongo Wire-Compatibility over PostgreSQL
Flexible Kernel: Choose the right kernel for your specific use case - whether you need MSSQL compatibility, Oracle features, or horizontal scaling capabilities.
| Kernel | Key Feature | Description |
|---|---|---|
| PostgreSQL | Original Flavor | Vanilla PostgreSQL with 437 extensions |
| Citus | Horizontal Scaling | Distributive PostgreSQL via native extension |
| WiltonDB | SQL Server Migration | SQL Server wire-compatibility |
| IvorySQL | Oracle Migration | Oracle Grammar and PL/SQL compatible |
| OpenHalo | MySQL Migration | MySQL wire-protocol compatibility |
| Percona | Transparent Data Encryption | Percona Distribution with pg_tde |
| FerretDB | MongoDB Migration | MongoDB wire-protocol compatibility |
| OrioleDB | OLTP Optimization | Zheap, No bloat, S3 Storage |
| PolarDB | Aurora flavor RAC | RAC, China domestic compliance |
| Supabase | Backend as Service | BaaS based on PostgreSQL, Firebase alternative |
| Cloudberry (WIP) | MPP DW & Analytics | Massively parallel processing database warehouse |
Citus Native Distributive
Citus transforms PostgreSQL into a distributed database system, enabling horizontal scaling across multiple nodes. Deploy native HA Citus clusters with Pigsty for better throughput and performance.
Planning Required: Proper shard key selection is crucial for optimal performance and avoiding cross-shard queries.
Babelfish SQL Server Wire Compatible
SQL Server Compatible
Beta
Create SQL Server-compatible PostgreSQL clusters with WiltonDB and Babelfish, providing wire protocol-level compatibility with Microsoft SQL Server.
Migration Path: Ideal for organizations looking to reduce licensing costs while maintaining existing SQL Server application compatibility.
Babelfish Oracle Grammar Compatible
Run Oracle-compatible PostgreSQL clusters with the IvorySQL kernel, open-sourced by HighGo, providing Oracle syntax and feature compatibility.
Enterprise Focus: Particularly valuable for enterprises with significant Oracle investments looking for migration paths.
OpenHalo MySQL Wire-Compatible
The OpenHalo kernel provides MySQL-compatible PostgreSQL functionality, accessible using standard MySQL clients and protocols.
Early Stage: Currently experimental - evaluate thoroughly before production use.
OrioleDB OLTP Optimized Cloud Native
A PostgreSQL storage engine optimized for OLTP workloads, eliminating transaction ID wraparound issues and table bloat while supporting cloud storage.
Compatible with PostgreSQL 17, Available on all support platforms.
Early Stage: Currently in Beta - evaluate thoroughly before production use.
PolarDB Aurora Flavor RAC
Replace vanilla PostgreSQL with PolarDB PG, an open-source Aurora-like solution similar to Oracle RAC with shared storage architecture.
Cloud Architecture: Designed for cloud environments with disaggregated compute and storage.
Supabase Backend as a Service
Self-host Supabase with existing managed HA PostgreSQL clusters, launching the stateless components with docker-compose for a complete Firebase alternative.
Full Stack: Provides a complete backend solution with PostgreSQL as the foundation.
Cloudberry MPP Data Warehouse
Install and monitor Greenplum / Cloudberry / YMatrix MPP clusters with Pigsty for large-scale analytical processing and data warehousing.
Enterprise Analytics: Designed for enterprise-scale analytical workloads requiring massive parallel processing capabilities.
PostgreSQL is the most advanced & popular open source database in the world.
Pigsty supports PostgreSQL 13 ~ 18, and provides 437 extensions alone with it.
install Pigsty’s with the pgsql config template.
Most of the config template is use the PostgreSQL kernel by default, such as:
meta : DEFAULT, postgres with core extensions (vector, postgis, timescale)rich : postgres with all extensions installedslim : postgres only without monitor infrafull : the 4-node sandbox for HA demonstrationpgsql : the minimal postgres kernel config example (THIS CONFIG)Nothing special needs to be tuned for vanilla PostgreSQL kernel:
To use a different PostgreSQL major version, you can configure with -v parameter:
If PostgreSQL cluster is already installed, you’ll need to uninstall it before installing the new version
To use PostgreSQL beta version (19 not released), you’ll also need to add the beta repo to your node_repo_modules
(or repo_modules if you are building a local repo)
The configure will do that for you if you are use the -v 19 argument:
Beware Pigsty is not build extensions for PostgreSQL 19 yet, so only those existing extensions in the PGDG repo are currently available. We will start building them after the PostgreSQL 19 is released.
To setup a multi-node PostgreSQL cluster, you can check the PGSQL: Configure for details:
This is the example 3-node pg-test cluster in the full config template:
Citus is a PostgreSQL extension that transforms PostgreSQL into a distributed database, enabling horizontal scaling across multiple nodes to handle large amounts of data and queries.
Since Patroni v3.0, native support for Citus high availability has been provided, simplifying the setup of Citus clusters. Pigsty also offers native support for this.
Pigsty v3.7.0 pins the Citus template to PostgreSQL 17; Citus packages are not available for PostgreSQL 18 in this release.
Pigsty natively supports Citus. Refer to conf/citus.yml.
This example uses a four-node sandbox with a Citus cluster named pg-citus, consisting of a two-node coordinator cluster pg-citus0 and two worker clusters pg-citus1 and pg-citus2.
Compared to a standard PostgreSQL cluster, Citus cluster configuration has some specific requirements. First, ensure that the Citus extension is downloaded, installed, loaded, and enabled. This involves the following four parameters:
repo_packages: Must include the citus extension, or you need to use a PostgreSQL offline package with the Citus extension.pg_extensions: Must include the citus extension, meaning you need to install the citus extension on each node.pg_libs: Must include the citus extension, and it must be first in the list, but now Patroni will automatically handle this.pg_databases: Define a primary database with the citus extension installed.Additionally, ensure the configuration for the Citus cluster is correct:
pg_mode: Must be set to citus to inform Patroni to use the Citus mode.pg_primary_db: Specify the primary database name, which must have the citus extension (named citus here).pg_shard: Specify a unified name as a prefix for all horizontal shard PG clusters (e.g., pg-citus).pg_group: Specify a shard number, starting from zero for the coordinator cluster and incrementing for worker clusters.pg_cluster: Must match the combination of [pg_shard] and [pg_group].pg_dbsu_password: Set a non-empty plain-text password for proper Citus functionality.pg_parameters: It is recommended to set the citus.node_conninfo parameter, which enforces SSL access and requires node-to-node client certificate verification.Once configured, deploy the Citus cluster just like a regular PostgreSQL cluster using pgsql.yml.
After defining the Citus cluster, use the same playbook pgsql.yml to deploy the Citus cluster:
Any DBSU user (postgres) can use patronictl (alias: pg) to list the status of the Citus cluster:
Each horizontal shard cluster can be treated as a separate PGSQL cluster, managed with the pg (patronictl) command. Note that when using pg to manage the Citus cluster, the --group parameter must be used to specify the cluster shard number:
Citus has a system table called pg_dist_node to record node information, which Patroni automatically maintains.
Additionally, you can view user authentication information (restricted to superusers):
You can then access the Citus cluster with regular business users (e.g., dbuser_citus with DDL permissions):
When using a Citus cluster, we highly recommend reading the Citus Official Documentation to understand its architecture and core concepts.
Key to this is understanding the five types of tables in Citus, their characteristics, and use cases:
On the coordinator node, you can create distributed and reference tables and query them from any data node. Since version 11.2, any Citus database node can act as a coordinator.
We can use pgbench to create some tables, distributing the main table (pgbench_accounts) across the nodes, and using other smaller tables as reference tables:
Run read-write bench:
Production citus deployment usually requires physical replication for both coordinator and each worker cluster.
For example, in simu.yml there’s a 10-node cluster cluster:
We’ll cover a range of advanced topics in subsequent tutorials:
Pigsty allows users to create a Microsoft SQL Server compatible PostgreSQL cluster using Babelfish and WiltonDB!
Babelfish is a PostgreSQL extension, but it works on a slightly modified PostgreSQL kernel Fork, WiltonDB provides compiled kernel binaries and extension binary packages on EL/Ubuntu systems.
Pigsty can replace the native PostgreSQL kernel with WiltonDB, providing an out-of-the-box MSSQL compatible cluster along with all the supported by common PostgreSQL clusters, such as HA, PITR, IaC, monitoring, etc.
WiltonDB is very similar to PostgreSQL 15, but it can not use vanilla PostgreSQL extensions directly. WiltonDB has several re-compiled extensions such as system_stats, pg_hint_plan and tds_fdw.
The cluster will listen on the default PostgreSQL port and the default MSSQL 1433 port, providing MSSQL services via the TDS WireProtocol on this port. You can connect to the MSSQL service provided by Pigsty using any MSSQL client, such as SQL Server Management Studio, or using the sqlcmd command-line tool.
install Pigsty’s with the mssql config template.
For production deployments, make sure to modify the password parameters in the pigsty.yml config before running the install playbook.
When installing and deploying the MSSQL module, please pay special attention to the following points:
pg_version: 15.wiltondb binary is installed by default in the /usr/bin/ directory, while on Ubuntu systems, it is installed in the /usr/lib/postgresql/15/bin/ directory, which is different from the official PostgreSQL binary location.md5 instead of scram-sha-256. Therefore, you need to override Pigsty’s default HBA rule set and insert the md5 authentication rule required by SQL Server before the dbrole_readonly wildcard authentication rule.mssql and dbuser_myssql. If you change this, you should also modify the user in files/mssql.sql.babelfishpg_tds needs to be enabled in shared_preload_libraries.1433. You can override Pigsty’s default service definitions to redirect the primary and replica services to port 1433 instead of the 5432 / 6432ports.The following parameters need to be configured for the MSSQL database cluster:
You can define business databases & users in the pg_databases and pg_users section:
You can use any SQL Server compatible client tool to access this database cluster.
Microsoft provides sqlcmd as the official command-line tool.
Besides, they have a go version cli tool: go-sqlcmd
Install go-sqlcmd:
Get started with go-sqlcmd
You can route service traffic to MSSQL 1433 port instead of 5433/5434:
If you have the Internet access, you can add the WiltonDB repository to the node and install it as a node package directly:
Install wiltondb with the following command:
It’s OK to install vanilla PostgreSQL and WiltonDB on the same node, but you can only run one of them at a time, and this is not recommended for production environments.
Most of the PGSQL module’s extensions (non-SQL class) cannot be used directly on the WiltonDB core of the MSSQL module and need to be recompiled.
WiltonDB currently comes with the following extension plugins:
| Name | Version | Comment |
|---|---|---|
| dblink | 1.2 | connect to other PostgreSQL databases from within a database |
| adminpack | 2.1 | administrative functions for PostgreSQL |
| dict_int | 1.0 | text search dictionary template for integers |
| intagg | 1.1 | integer aggregator and enumerator (obsolete) |
| dict_xsyn | 1.0 | text search dictionary template for extended synonym processing |
| amcheck | 1.3 | functions for verifying relation integrity |
| autoinc | 1.0 | functions for autoincrementing fields |
| bloom | 1.0 | bloom access method - signature file based index |
| fuzzystrmatch | 1.1 | determine similarities and distance between strings |
| intarray | 1.5 | functions, operators, and index support for 1-D arrays of integers |
| btree_gin | 1.3 | support for indexing common datatypes in GIN |
| btree_gist | 1.7 | support for indexing common datatypes in GiST |
| hstore | 1.8 | data type for storing sets of (key, value) pairs |
| hstore_plperl | 1.0 | transform between hstore and plperl |
| isn | 1.2 | data types for international product numbering standards |
| hstore_plperlu | 1.0 | transform between hstore and plperlu |
| jsonb_plperl | 1.0 | transform between jsonb and plperl |
| citext | 1.6 | data type for case-insensitive character strings |
| jsonb_plperlu | 1.0 | transform between jsonb and plperlu |
| jsonb_plpython3u | 1.0 | transform between jsonb and plpython3u |
| cube | 1.5 | data type for multidimensional cubes |
| hstore_plpython3u | 1.0 | transform between hstore and plpython3u |
| earthdistance | 1.1 | calculate great-circle distances on the surface of the Earth |
| lo | 1.1 | Large Object maintenance |
| file_fdw | 1.0 | foreign-data wrapper for flat file access |
| insert_username | 1.0 | functions for tracking who changed a table |
| ltree | 1.2 | data type for hierarchical tree-like structures |
| ltree_plpython3u | 1.0 | transform between ltree and plpython3u |
| pg_walinspect | 1.0 | functions to inspect contents of PostgreSQL Write-Ahead Log |
| moddatetime | 1.0 | functions for tracking last modification time |
| old_snapshot | 1.0 | utilities in support of old_snapshot_threshold |
| pgcrypto | 1.3 | cryptographic functions |
| pgrowlocks | 1.2 | show row-level locking information |
| pageinspect | 1.11 | inspect the contents of database pages at a low level |
| pg_surgery | 1.0 | extension to perform surgery on a damaged relation |
| seg | 1.4 | data type for representing line segments or floating-point intervals |
| pgstattuple | 1.5 | show tuple-level statistics |
| pg_buffercache | 1.3 | examine the shared buffer cache |
| pg_freespacemap | 1.2 | examine the free space map (FSM) |
| postgres_fdw | 1.1 | foreign-data wrapper for remote PostgreSQL servers |
| pg_prewarm | 1.2 | prewarm relation data |
| tcn | 1.0 | Triggered change notifications |
| pg_trgm | 1.6 | text similarity measurement and index searching based on trigrams |
| xml2 | 1.1 | XPath querying and XSLT |
| refint | 1.0 | functions for implementing referential integrity (obsolete) |
| pg_visibility | 1.2 | examine the visibility map (VM) and page-level visibility info |
| pg_stat_statements | 1.10 | track planning and execution statistics of all SQL statements executed |
| sslinfo | 1.2 | information about SSL certificates |
| tablefunc | 1.0 | functions that manipulate whole tables, including crosstab |
| tsm_system_rows | 1.0 | TABLESAMPLE method which accepts number of rows as a limit |
| tsm_system_time | 1.0 | TABLESAMPLE method which accepts time in milliseconds as a limit |
| unaccent | 1.1 | text search dictionary that removes accents |
| uuid-ossp | 1.1 | generate universally unique identifiers (UUIDs) |
| plpgsql | 1.0 | PL/pgSQL procedural language |
| babelfishpg_money | 1.1.0 | babelfishpg_money |
| system_stats | 2.0 | EnterpriseDB system statistics for PostgreSQL |
| tds_fdw | 2.0.3 | Foreign data wrapper for querying a TDS database (Sybase or Microsoft SQL Server) |
| babelfishpg_common | 3.3.3 | Transact SQL Datatype Support |
| babelfishpg_tds | 1.0.0 | TDS protocol extension |
| pg_hint_plan | 1.5.1 | |
| babelfishpg_tsql | 3.3.1 | Transact SQL compatibility |
IvorySQL is an open-source “Oracle-compatible” PostgreSQL kernel, developed by HighGo, licensed under Apache 2.0.
The Oracle compatibility here refers to compatibility at the PL/SQL, syntax, built-in functions, data types, system views, MERGE, and GUC parameter levels. It’s not a wire protocol compatibility like Babelfish, openHalo, or FerretDB that allows using the original client drivers. Users still need to use PostgreSQL client tools to access IvorySQL, but can use Oracle-compatible syntax.
Currently, IvorySQL’s latest version 5.0 maintains compatibility with PostgreSQL’s latest minor version 18.0, and provides binary RPM/DEB packages for mainstream Linux distributions. Pigsty offers the option to replace the native PostgreSQL with the IvorySQL kernel in PG RDS.
Use the standard procedure to install Pigsty with the ivory configuration template:
For production deployments, you should edit the auto-generated pigsty.yml configuration file to modify parameters like passwords before executing ./install.yml for deployment.
The latest IvorySQL 5.0 is equivalent to PostgreSQL 18.0 Any client tool compatible with PostgreSQL’s wire protocol can access IvorySQL clusters.
By default, you can use a PostgreSQL client to access through the alternative 1521 port, which enables Oracle compatibility mode by default.
To use the IvorySQL kernel in Pigsty, modify the following four configuration parameters:
pg_mode: Use ivory compatibility moderepo_extra_packages: Download ivorysql packagespg_packages: Install ivorysql packagespg_libs: Load Oracle syntax compatibility extensionsIt’s that simple — just add these four lines to the global variables in the configuration file, and Pigsty will replace the native PostgreSQL kernel with IvorySQL:
IvorySQL also provides a series of new GUC parameters that can be specified in pg_parameters.
Most of the PGSQL modules’ extension (non-SQL classes) cannot be used directly on the IvorySQL kernel. If you need to use them, you need to recompile and install from source code for the new kernel.
pigsty-infra repository, not in pigsty-pgsql or pigsty-ivory repositories.Percona Postgres is a patched Postgres kernel with pg_tde (Transparent Data Encryption) extension.
It is compatible with PostgreSQL 18.1, and available on all supported platforms in Pigsty.
install Pigsty’s with the pgtde config template.
The following parameters need to be tuned to deploy a percona cluster:
Percona Postgres has 80 available extensions, including pg_tde, pgvector, postgis, pgaudit, set_user, pg_stat_monitor,….
| name | version | comment |
|---|---|---|
| hstore_plperlu | 1.0 | transform between hstore and plperlu |
| jsonb_plperl | 1.0 | transform between jsonb and plperl |
| intagg | 1.1 | integer aggregator and enumerator (obsolete) |
| pltcl | 1.0 | PL/Tcl procedural language |
| isn | 1.3 | data types for international product numbering standards |
| pgstattuple | 1.5 | show tuple-level statistics |
| postgis_topology-3 | 3.5.4 | PostGIS topology spatial types and functions |
| postgis_raster | 3.5.4 | PostGIS raster types and functions |
| tsm_system_rows | 1.0 | TABLESAMPLE method which accepts number of rows as a limit |
| lo | 1.2 | Large Object maintenance |
| hstore_plperl | 1.0 | transform between hstore and plperl |
| ltree | 1.3 | data type for hierarchical tree-like structures |
| postgis_raster-3 | 3.5.4 | PostGIS raster types and functions |
| postgis_topology | 3.5.4 | PostGIS topology spatial types and functions |
| pgrowlocks | 1.2 | show row-level locking information |
| address_standardizer_data_us-3 | 3.5.4 | Address Standardizer US dataset example |
| uuid-ossp | 1.1 | generate universally unique identifiers (UUIDs) |
| postgis-3 | 3.5.4 | PostGIS geometry and geography spatial types and functions |
| hstore_plpython3u | 1.0 | transform between hstore and plpython3u |
| postgis | 3.5.4 | PostGIS geometry and geography spatial types and functions |
| set_user | 4.2.0 | similar to SET ROLE but with added logging |
| postgis_tiger_geocoder-3 | 3.5.4 | PostGIS tiger geocoder and reverse geocoder |
| jsonb_plperlu | 1.0 | transform between jsonb and plperlu |
| pg_surgery | 1.0 | extension to perform surgery on a damaged relation |
| xml2 | 1.2 | XPath querying and XSLT |
| pg_stat_monitor | 2.3 | The pg_stat_monitor is a PostgreSQL Query Performance Monitoring tool, based on PostgreSQL contrib module pg_stat_statements. pg_stat_monitor provides aggregated statistics, client information, plan details including plan, and histogram information. |
| pg_tde | 2.1 | pg_tde access method |
| plpgsql | 1.0 | PL/pgSQL procedural language |
| address_standardizer-3 | 3.5.4 | Used to parse an address into constituent elements. Generally used to support geocoding address normalization step. |
| tablefunc | 1.0 | functions that manipulate whole tables, including crosstab |
| hstore | 1.8 | data type for storing sets of (key, value) pairs |
| vector | 0.8.1 | vector data type and ivfflat and hnsw access methods |
| postgis_tiger_geocoder | 3.5.4 | PostGIS tiger geocoder and reverse geocoder |
| dblink | 1.2 | connect to other PostgreSQL databases from within a database |
| pltclu | 1.0 | PL/TclU untrusted procedural language |
| pg_trgm | 1.6 | text similarity measurement and index searching based on trigrams |
| sslinfo | 1.2 | information about SSL certificates |
| pg_stat_statements | 1.12 | track planning and execution statistics of all SQL statements executed |
| bool_plperlu | 1.0 | transform between bool and plperlu |
| cube | 1.5 | data type for multidimensional cubes |
| ltree_plpython3u | 1.0 | transform between ltree and plpython3u |
| amcheck | 1.5 | functions for verifying relation integrity |
| postgis_sfcgal | 3.5.4 | PostGIS SFCGAL functions |
| plpython3u | 1.0 | PL/Python3U untrusted procedural language |
| tsm_system_time | 1.0 | TABLESAMPLE method which accepts time in milliseconds as a limit |
| intarray | 1.5 | functions, operators, and index support for 1-D arrays of integers |
| btree_gist | 1.8 | support for indexing common datatypes in GiST |
| plperlu | 1.0 | PL/PerlU untrusted procedural language |
| fuzzystrmatch | 1.2 | determine similarities and distance between strings |
| bool_plperl | 1.0 | transform between bool and plperl |
| btree_gin | 1.3 | support for indexing common datatypes in GIN |
| pg_prewarm | 1.2 | prewarm relation data |
| pg_repack | 1.5.3 | Reorganize tables in PostgreSQL databases with minimal locks |
| citext | 1.8 | data type for case-insensitive character strings |
| pgcrypto | 1.4 | cryptographic functions |
| moddatetime | 1.0 | functions for tracking last modification time |
| plperl | 1.0 | PL/Perl procedural language |
| seg | 1.4 | data type for representing line segments or floating-point intervals |
| earthdistance | 1.2 | calculate great-circle distances on the surface of the Earth |
| unaccent | 1.1 | text search dictionary that removes accents |
| postgres_fdw | 1.2 | foreign-data wrapper for remote PostgreSQL servers |
| pg_logicalinspect | 1.0 | functions to inspect logical decoding components |
| tcn | 1.0 | Triggered change notifications |
| bloom | 1.0 | bloom access method - signature file based index |
| dict_int | 1.0 | text search dictionary template for integers |
| autoinc | 1.0 | functions for autoincrementing fields |
| address_standardizer_data_us | 3.5.4 | Address Standardizer US dataset example |
| postgis_sfcgal-3 | 3.5.4 | PostGIS SFCGAL functions |
| jsonb_plpython3u | 1.0 | transform between jsonb and plpython3u |
| file_fdw | 1.0 | foreign-data wrapper for flat file access |
| pgaudit | 18.0 | provides auditing functionality |
| dict_xsyn | 1.0 | text search dictionary template for extended synonym processing |
| pg_walinspect | 1.1 | functions to inspect contents of PostgreSQL Write-Ahead Log |
| pg_buffercache | 1.6 | examine the shared buffer cache |
| refint | 1.0 | functions for implementing referential integrity (obsolete) |
| pg_freespacemap | 1.3 | examine the free space map (FSM) |
| insert_username | 1.0 | functions for tracking who changed a table |
| address_standardizer | 3.5.4 | Used to parse an address into constituent elements. Generally used to support geocoding address normalization step. |
| pg_visibility | 1.2 | examine the visibility map (VM) and page-level visibility info |
| pageinspect | 1.13 | inspect the contents of database pages at a low level |
PolarDB is an aurora RAC flavor “cloud native” database system developed & open-sourced by Aliyun.
The latest version is v15.15.5.0, compatible with PostgreSQL 15, and available on all linux distributions supported by Pigsty.
install Pigsty’s with the polar config template.
The following parameters need to be tuned to deploy a PolarDB cluster:
PolarDB for PostgreSQL is essentially equivalent to PostgreSQL 15, and any client tools compatible with the PostgreSQL wire protocol can access the PolarDB cluster.
Most of the PGSQL module’s extension (non pure-SQL) cannot be used directly on the PolarDB kernel. If you need to use them, you need to recompile and install from source code for the new kernel.
Currently, the PolarDB kernel comes with the following 61 extension plugins. In addition to Contrib extensions, the additional extensions provided include:
| name | Version | comment |
|---|---|---|
| adminpack | 2.1 | administrative functions for PostgreSQL |
| amcheck | 1.3 | functions for verifying relation integrity |
| autoinc | 1.0 | functions for autoincrementing fields |
| bloom | 1.0 | bloom access method - signature file based index |
| bool_plperl | 1.0 | transform between bool and plperl |
| bool_plperlu | 1.0 | transform between bool and plperlu |
| btree_gin | 1.3 | support for indexing common datatypes in GIN |
| btree_gist | 1.7 | support for indexing common datatypes in GiST |
| citext | 1.6 | data type for case-insensitive character strings |
| cube | 1.5 | data type for multidimensional cubes |
| dblink | 1.2 | connect to other PostgreSQL databases from within a database |
| dict_int | 1.0 | text search dictionary template for integers |
| dict_xsyn | 1.0 | text search dictionary template for extended synonym processing |
| earthdistance | 1.1 | calculate great-circle distances on the surface of the Earth |
| file_fdw | 1.0 | foreign-data wrapper for flat file access |
| fuzzystrmatch | 1.1 | determine similarities and distance between strings |
| hll | 2.18 | type for storing hyperloglog data |
| hstore | 1.8 | data type for storing sets of (key, value) pairs |
| hstore_plperl | 1.0 | transform between hstore and plperl |
| hstore_plperlu | 1.0 | transform between hstore and plperlu |
| hstore_plpython3u | 1.0 | transform between hstore and plpython3u |
| hypopg | 1.3.1 | Hypothetical indexes for PostgreSQL |
| insert_username | 1.0 | functions for tracking who changed a table |
| intagg | 1.1 | integer aggregator and enumerator (obsolete) |
| intarray | 1.5 | functions, operators, and index support for 1-D arrays of integers |
| isn | 1.2 | data types for international product numbering standards |
| jsonb_plperl | 1.0 | transform between jsonb and plperl |
| jsonb_plperlu | 1.0 | transform between jsonb and plperlu |
| jsonb_plpython3u | 1.0 | transform between jsonb and plpython3u |
| lo | 1.1 | Large Object maintenance |
| log_fdw | 1.4 | foreign-data wrapper for Postgres log file access |
| ltree | 1.2 | data type for hierarchical tree-like structures |
| ltree_plpython3u | 1.0 | transform between ltree and plpython3u |
| moddatetime | 1.0 | functions for tracking last modification time |
| old_snapshot | 1.0 | utilities in support of old_snapshot_threshold |
| pageinspect | 1.11 | inspect the contents of database pages at a low level |
| pase | 0.0.1 | ant ai similarity search |
| pg_bigm | 1.2 | text similarity measurement and index searching based on bigrams |
| pg_buffercache | 1.4 | examine the shared buffer cache |
| pg_freespacemap | 1.2 | examine the free space map (FSM) |
| pg_jieba | 1.1.0 | a parser for full-text search of Chinese |
| pg_prewarm | 1.2 | prewarm relation data |
| pg_repack | 1.5.1-1 | Reorganize tables in PostgreSQL databases with minimal locks |
| pg_stat_statements | 1.10 | track planning and execution statistics of all SQL statements executed |
| pg_surgery | 1.0 | extension to perform surgery on a damaged relation |
| pg_trgm | 1.6 | text similarity measurement and index searching based on trigrams |
| pg_visibility | 1.2 | examine the visibility map (VM) and page-level visibility info |
| pg_walinspect | 1.0 | functions to inspect contents of PostgreSQL Write-Ahead Log |
| pgcrypto | 1.3 | cryptographic functions |
| pgrowlocks | 1.2 | show row-level locking information |
| pgstattuple | 1.5 | show tuple-level statistics |
| plperl | 1.0 | PL/Perl procedural language |
| plperlu | 1.0 | PL/PerlU untrusted procedural language |
| plpgsql | 1.0 | PL/pgSQL procedural language |
| plpython3u | 1.0 | PL/Python3U untrusted procedural language |
| pltcl | 1.0 | PL/Tcl procedural language |
| pltclu | 1.0 | PL/TclU untrusted procedural language |
| polar_audit | 1.0 | provides auditing functionality |
| polar_feature_utils | 1.0 | PolarDB feature utilization |
| polar_io_stat | 1.0 | polar io stat in multi dimension |
| polar_login_history | 1.0 | record user login information |
| polar_masking | 1.0.0 | provides data masking for polardb |
| polar_monitor | 1.0 | monitor functions for PolarDB |
| polar_monitor_preload | 1.0 | examine the polardb information |
| polar_parameter_manager | 1.1 | Extension to select parameters for manger. |
| polar_password_policy | 1.0 | create password policies and check user passwords based on the policies |
| polar_proxy_utils | 1.0 | Extension to provide operations about proxy. |
| polar_resource_manager | 1.0 | a background process that forcibly frees user session process memory |
| polar_smgrperf | 1.0 | smgr perf test extension |
| polar_sql_mapping | 1.0 | Record error sqls and mapping them to correct one |
| polar_stat_env | 1.0 | env stat functions for PolarDB |
| polar_vfs | 1.0 | polar virtual file system for different storage |
| polar_worker | 1.0 | polar_worker |
| postgres_fdw | 1.1 | foreign-data wrapper for remote PostgreSQL servers |
| refint | 1.0 | functions for implementing referential integrity (obsolete) |
| roaringbitmap | 0.5 | support for Roaring Bitmaps |
| seg | 1.4 | data type for representing line segments or floating-point intervals |
| sslinfo | 1.2 | information about SSL certificates |
| tablefunc | 1.0 | functions that manipulate whole tables, including crosstab |
| tcn | 1.0 | Triggered change notifications |
| tsm_system_rows | 1.0 | TABLESAMPLE method which accepts number of rows as a limit |
| tsm_system_time | 1.0 | TABLESAMPLE method which accepts time in milliseconds as a limit |
| unaccent | 1.1 | text search dictionary that removes accents |
| uuid-ossp | 1.1 | generate universally unique identifiers (UUIDs) |
| vector | 0.6.2 | vector data type and ivfflat and hnsw access methods |
| xml2 | 1.1 | XPath querying and XSLT |
There’s 2nd fork of PolarDB, which is PolarDB for Oracle, which is not open source.
Pigsty Pro has support for Running PolarDB for Oracle as RDS.
OrioleDB is a PostgreSQL storage engine extension that claims to deliver 4x OLTP performance without the xid wraparound & table bloat, and “cloud native” (data on s3) capabilities.
The latest version of OrioleDB is based on a Patched PostgreSQL 17.0 with an additional extension
You can run OrioleDB as RDS with pigsty, it is compatible with PG 17 and available on all supported Linux platforms. The latest version is beta12 over patchset 17_11.
Follow the Pigsty standard installation and use the oriole config template.
For production deployments, make sure to modify the password parameters in the pigsty.yml config before running the install playbook.
To use OrioleDB, you need to install the orioledb_17 and oriolepg_17 packages (currently only available as RPMs).
Initialize TPC-B-like tables with 100 warehouses using pgbench:
Next, you can rebuild these tables using the orioledb storage engine and observe the performance differences:
OpenHalo is an open-source PostgreSQL kernel that provides MySQL wire protocol compatibility.
OpenHalo is based on PostgreSQL 14.10 kernel version and provides wire protocol compatibility with MySQL 5.7.32-log / 8.0 version.
Pigsty provides deployment support for OpenHalo on all supported Linux platforms.
Use Pigsty’s standard installation process with the mysql configuration template.
For production deployment, please ensure to modify the password parameters in the pigsty.yml
configuration file before running the installation playbook.
When accessing MySQL, the actual connection uses the postgres database. Please note that the concept of “database” in MySQL actually corresponds to “Schema” in PostgreSQL. Therefore, use mysql actually uses the mysql Schema within the postgres database.
The usernames and passwords used for MySQL are the same as those in PostgreSQL. You can manage users and permissions using the standard PostgreSQL approach.
OpenHalo provides MySQL wire protocol compatibility, listening on port 3306 by default, allowing direct connections from MySQL clients and drivers.
Pigsty’s conf/mysql configuration installs the mysql client tool by default.
You can access MySQL using the following command:
Currently, OpenHalo officially ensures that Navicat can access this MySQL port normally, but Intellij IDEA’s DataGrip access will result in errors.
The OpenHalo kernel installed by Pigsty is based on the HaloTech-Co-Ltd/openHalo kernel with minor modifications:
halo0root back to postgres1.0. prefix from the default version number, reverting to 14.103306 by defaultPlease note that Pigsty does not provide any warranty for using the OpenHalo kernel. Any issues or requirements encountered while using this kernel should be addressed with the original vendor.
You can deploy and monitor Cloudberry clusters, which is a Greenplum fork.
To define a Greenplum cluster, you need to specify the following parameters:
We are waiting for the official release of Apache Cloudberry 2.0, so do not use it in production now
To install cloudberry, you’ll have to enable the gpsql repo module:
Set pg_mode = gpsql and the extra identity parameters pg_shard and gp_role.
See the maintained self-hosting tutorial: Supabase
Supabase is great, but having your own Supabase is even better. Pigsty helps you build enterprise-grade Supabase on your own servers (physical/virtual machines/cloud servers) with one-click deployment — more extensions, better performance, deeper control, and much more cost-effective.
Pigsty is one of the three 3rd party self-hosting tutorials listed in the official Supabase docs
Prepare a Linux server, follow the Pigsty standard installation process, select the supabase configuration template, and execute the following commands:
After installation, visit port 8000 in your browser to access Supa Studio, username supabase, password pigsty.
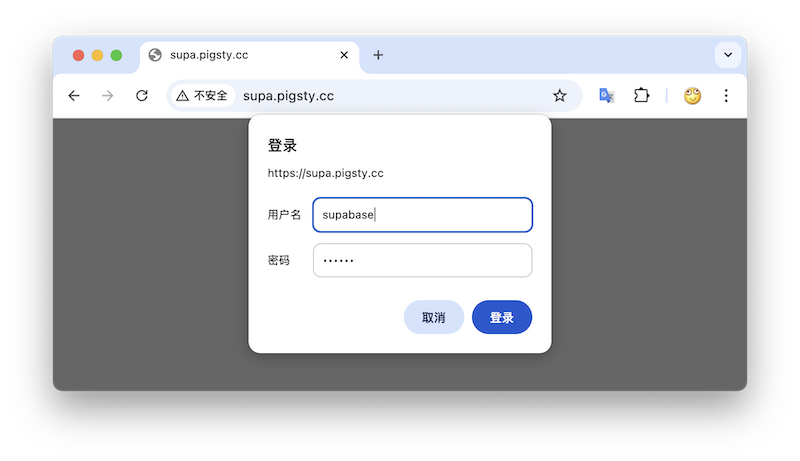
Supabase is a BaaS (Backend as Service), an open-source Firebase alternative, and the most popular database + backend solution in the AI Agent era. Supabase wraps PostgreSQL and provides authentication, messaging, edge functions, object storage, and automatically generates REST API and GraphQL API based on PostgreSQL database schemas.
Supabase aims to provide developers with a one-stop backend solution, reducing the complexity of developing and maintaining backend infrastructure. It allows developers to eliminate most backend development work — developers only need to understand database design and frontend to quickly deliver applications! Developers can quickly complete a full application with just frontend development and database schema design using Vibe Coding.
Currently, Supabase is the most popular open-source project in the PostgreSQL open-source ecosystem, with 80,000 stars on GitHub. Supabase also provides “generous” free cloud service quotas for small entrepreneurs — 500 MB of free space, which is sufficient for storing user tables, view counts, and similar data.
Since Supabase cloud service is so attractive, why self-host?
The most intuitive reason is what we mentioned in “Are Cloud Databases an Intelligence Tax?”: when your data/computing scale exceeds the cloud computing applicable spectrum (Supabase: 4C/8G/500MB free storage), costs can easily explode. Moreover, currently, sufficiently reliable local enterprise-grade NVMe SSDs have a three to four order of magnitude advantage in cost-effectiveness compared to cloud storage, and self-hosting can better leverage this advantage.
Another important reason is functionality — Supabase cloud service functionality is limited. Many powerful PostgreSQL extensions cannot be provided as cloud services due to multi-tenant security challenges and licensing issues. Therefore, although extensions are PostgreSQL’s core feature, only 64 extensions are available on Supabase cloud service. Self-built Supabase with Pigsty provides up to 437 ready-to-use PostgreSQL extensions.
Additionally, autonomy and avoiding vendor lock-in are important reasons for self-hosting — although Supabase aims to provide an open-source alternative to Google Firebase without vendor lock-in, the threshold for self-building enterprise-grade Supabase to high standards is actually quite high. Supabase includes a series of PostgreSQL extension plugins developed and maintained by them, and plans to replace the native PostgreSQL kernel with the acquired OrioleDB, but these kernels and extensions are not provided in the official PGDG repository.
This is actually a form of implicit vendor lock-in, preventing users from self-building using methods other than the supabase/postgres Docker image. Pigsty provides an open-source, transparent, and universal solution to solve this problem. We package all 10 missing extensions developed and used by Supabase into ready-to-use RPM/DEB packages, ensuring they are available on all mainstream Linux operating system distributions:
| Extension | Description |
|---|---|
pg_graphql |
Provides GraphQL support within PostgreSQL (RUST), Rust extension, provided by PIGSTY |
pg_jsonschema |
Provides JSON Schema validation capability, Rust extension, provided by PIGSTY |
wrappers |
Supabase’s external data source wrapper bundle, Rust extension, provided by PIGSTY |
index_advisor |
Query index advisor, SQL extension, provided by PIGSTY |
pg_net |
Extension for asynchronous non-blocking HTTP/HTTPS requests with SQL (supabase), C extension, provided by PIGSTY |
vault |
Extension for storing encrypted credentials in Vault (supabase), C extension, provided by PIGSTY |
pgjwt |
PostgreSQL implementation of JSON Web Token API (supabase), SQL extension, provided by PIGSTY |
pgsodium |
Table data encryption storage TDE, extension, provided by PIGSTY |
supautils |
Used to ensure database cluster security in cloud environments, C extension, provided by PIGSTY |
pg_plan_filter |
Filter and block specific query statements using execution plan costs, C extension, provided by PIGSTY |
Meanwhile, we install most extensions by default in Supabase self-hosting deployment. You can refer to the available extension list to enable them as needed.
Additionally, Pigsty handles the automatic setup of underlying high availability PostgreSQL database clusters, high availability MinIO object storage clusters, and even Docker container infrastructure deployment and Nginx reverse proxy, domain configuration and HTTPS certificate issuance. You can deploy any number of stateless Supabase container clusters using Docker Compose and store state in external Pigsty self-hosted database services.
In this self-hosting deployment architecture, you gain the freedom to use different kernels (PostgreSQL 15-18, OrioleDB), the freedom to install 437 extensions, the freedom to scale Supabase/Postgres/MinIO, the freedom from database operational chores, and the freedom from vendor lock-in to run locally indefinitely. Compared to the cost of using cloud services, the price is just preparing servers and typing a few more commands.
Let’s start with single-node Supabase deployment. We’ll introduce multi-node high availability deployment methods later.
Prepare a fresh Linux server, use the supabase configuration template provided by Pigsty to execute the standard installation process,
then additionally run docker.yml and app.yml to deploy the stateless Supabase containers (default ports 8000/8433).
Before deploying Supabase, please modify the parameters (domain and passwords) in the automatically generated pigsty.yml configuration file according to your actual situation.
If it’s just local development testing, you can skip this for now. We’ll introduce how to further customize through configuration file modifications later.
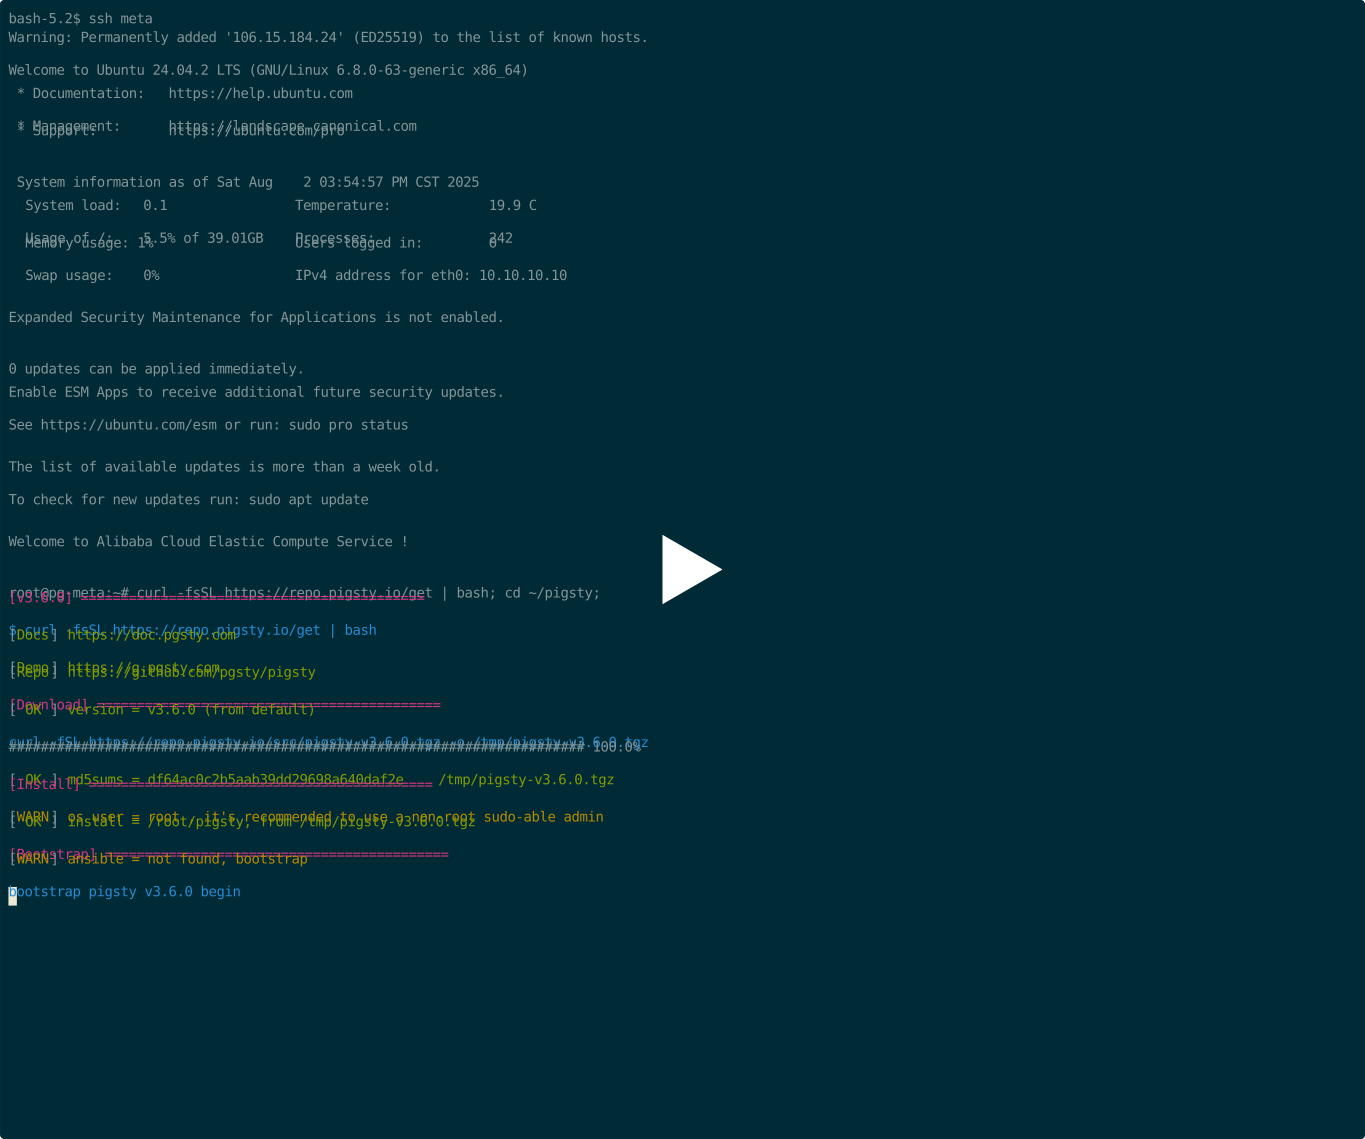
If configured correctly, after about ten minutes, you can access the Supabase Studio graphical management interface locally via http://<your_ip_address>:8000.
The default username and password are: supabase and pigsty.
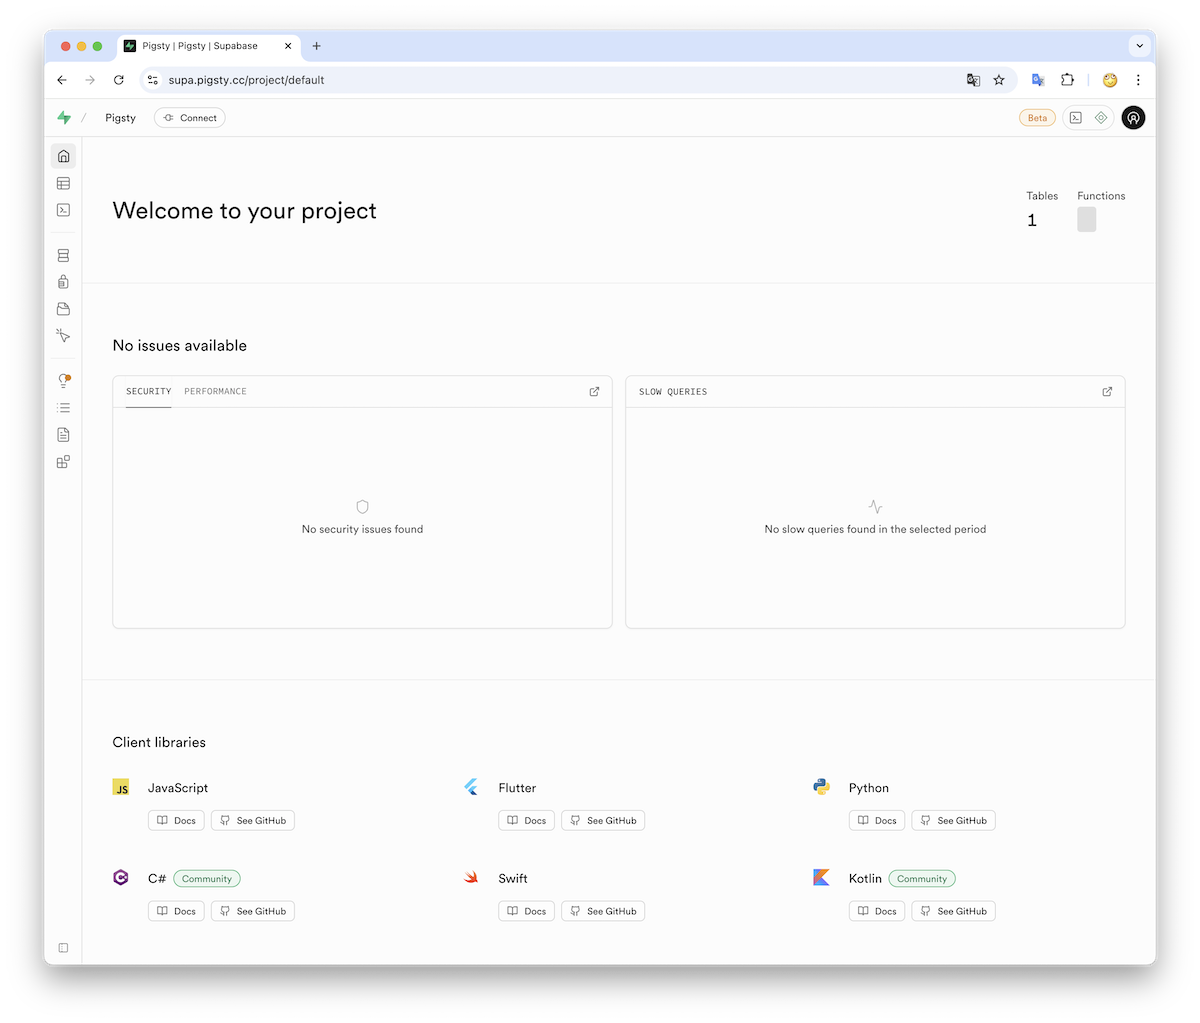
In mainland China, Pigsty uses DockerHub mirror sites provided by 1Panel and 1ms to download Supabase-related images by default, which may be slow.
You can also configure proxy and mirror sites yourself, or manually pull images with cd /opt/supabase; docker compose pull.
We also provide Supabase self-hosting expert consulting services including complete offline installation solutions.
If you need to use object storage functionality, you need to access Supabase via domain and HTTPS, otherwise errors will occur.
For serious production deployments, must change all default passwords!
Here are some key technical decisions involved in self-hosting Supabase for your reference:
Using the default single-node deployment, Supabase cannot enjoy PostgreSQL/MinIO high availability capabilities. Nevertheless, single-node deployment still has significant advantages compared to the official pure Docker Compose solution: for example, out-of-the-box monitoring systems, the ability to freely install extensions, component scaling capabilities, and providing fallback database point-in-time recovery capabilities.
If you only have one server or choose to self-host on cloud servers, Pigsty recommends using external S3 instead of local MinIO as object storage to store PostgreSQL backups and support Supabase Storage services. Such deployment can provide a fallback-level RTO (hour-level recovery time)/RPO (MB-level data loss) disaster recovery level under single-machine deployment conditions during failures.
In serious production deployments, Pigsty recommends using at least 3-4 node deployment strategies to ensure both MinIO and PostgreSQL use multi-node deployments that meet enterprise-grade high availability requirements. In this case, you need to prepare more nodes and disks accordingly and adjust cluster configurations in the pigsty.yml configuration manifest, as well as access information in supabase cluster configuration to use high availability access points.
Some Supabase functionality requires sending emails, so SMTP services are needed. Unless purely for internal networks, for serious production deployments, using SMTP cloud services is recommended. Self-built email servers easily have their emails marked as spam and rejected.
If your service is directly exposed to the public network, we strongly recommend using real domains and HTTPS certificates and accessing through Nginx Portal.
Next, we’ll discuss some advanced topics in sequence: how to further improve Supabase security, availability, and performance based on single-node deployment.
Pigsty Base Components
For serious production deployments, we strongly recommend changing Pigsty default passwords. Because these default values are public and well-known, going to production without changing passwords is like streaking:
grafana_admin_password: pigsty, Grafana admin passwordpg_admin_password: DBUser.DBA, PostgreSQL superuser passwordpg_monitor_password: DBUser.Monitor, PostgreSQL monitoring user passwordpg_replication_password: DBUser.Replicator, PostgreSQL replication user passwordpatroni_password: Patroni.API, Patroni high availability component passwordhaproxy_admin_password: pigsty, load balancer management passwordminio_secret_key: minioadmin, MinIO root user keyDBUser.SupaThe above passwords are for Pigsty component modules and are strongly recommended to be set before installation and deployment.
Supabase Keys
In addition to Pigsty component passwords, you also need to modify Supabase keys, including:
JWT_SECRETANON_KEYSERVICE_ROLE_KEYPG_META_CRYPTO_KEYDASHBOARD_USERNAME: Supabase Studio Web interface default username, default is supabaseDASHBOARD_PASSWORD: Supabase Studio Web interface default password, default is pigstyPlease refer to the Supabase tutorial: Securing your services instructions:
JWT_SECRET longer than 40 characters and use the tools in the tutorial to sign ANON_KEY and SERVICE_ROLE_KEY JWTs.ANON_KEY JWT based on JWT_SECRET and expiration time attributes. This is the credential for anonymous users.SERVICE_ROLE_KEY based on JWT_SECRET and expiration time attributes. This is the credential for higher-privilege service roles.PG_META_CRYPTO_KEY with a random string at least 32 char long for securing connection strings between Studio and postgres-metaPOSTGRES_PASSWORD value accordinglyS3_ACCESS_KEY and S3_SECRET_KEY values accordinglyAfter modifying Supabase credentials, you can restart Docker Compose containers to apply the new configuration:
If you’re using Supabase on localhost or within a LAN, you can choose IP:Port direct connection to Kong’s exposed HTTP port 8000 to access Supabase.
You can use an internal static DNS domain, but for serious production deployments, we recommend using real domain + HTTPS to access Supabase.
In this case, your server should have a public IP address, you should own a domain, use DNS resolution services provided by cloud/DNS/CDN providers to point it to the installation node’s public IP (optional fallback: local /etc/hosts static resolution).
A simple approach is to batch replace the placeholder domain (supa.pigsty) with your actual domain, say supa.pigsty.cc:
If you haven’t configured it beforehand, reload Nginx and Supabase configurations:
The modified configuration should look like the following snippet:
Complete domain/HTTPS configuration can refer to the Certificate Management tutorial. You can also use Pigsty’s built-in local static resolution and self-signed HTTPS certificates as fallback.
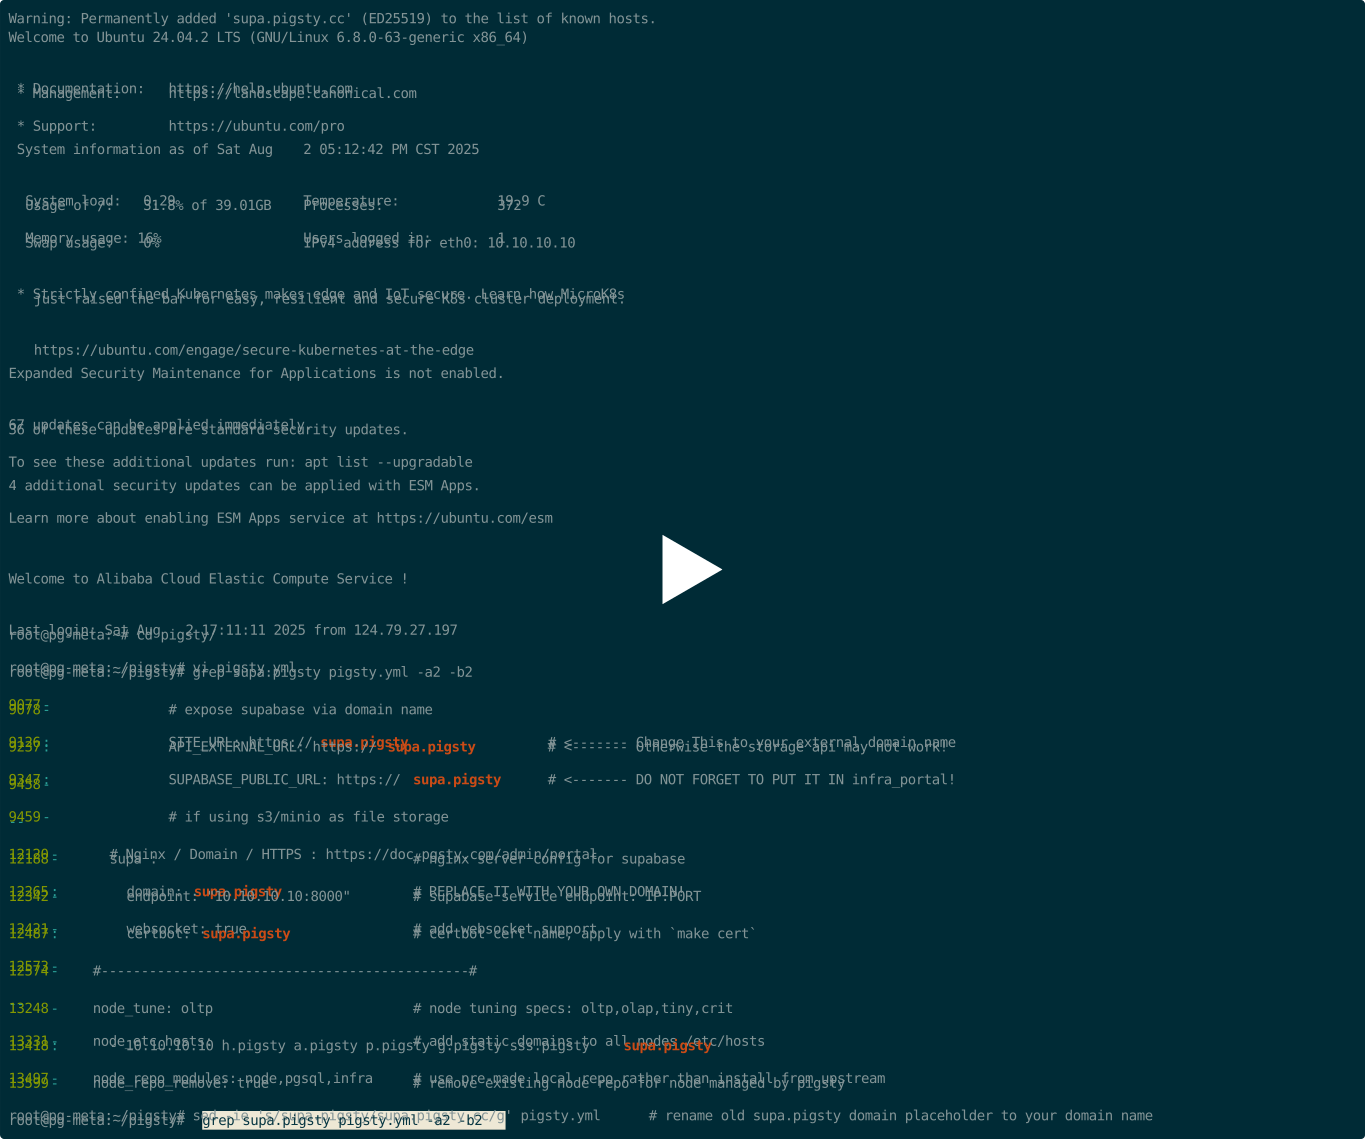
You can use S3 or S3-compatible services as object storage for PostgreSQL backups and Supabase usage. Here we use Alibaba Cloud OSS object storage as an example.
Pigsty provides a
terraform/spec/aliyun-meta-s3.tftemplate that can be used to deploy a server and an OSS bucket on Alibaba Cloud.
First, modify the S3-related configuration in all.children.supa.vars.apps.[supabase].conf, pointing it to the Alibaba Cloud OSS bucket:
Reload Supabase configuration with the following command:
You can also use S3 as PostgreSQL backup repository by adding an aliyun backup repository definition in all.vars.pgbackrest_repo:
Then specify using the aliyun backup repository in all.vars.pgbackrest_method and reset pgBackrest backup:
Pigsty will switch the backup repository to external object storage. More backup configurations can refer to PostgreSQL Backup documentation.
You can use SMTP to send emails by modifying the supabase application configuration and adding SMTP information:
Don’t forget to use app.yml to reload the configuration
After these configurations, you have an enterprise-grade Supabase (basic single-machine version) with public domain, HTTPS certificate, SMTP, PITR backup, monitoring, IaC, and 400+ extensions. For high availability configuration, please refer to other parts of Pigsty documentation. If you’re too lazy to read and learn, we provide hands-on Supabase self-hosting expert consulting services — ¥2000 to save you from the hassle of tinkering and downloading.
Single-node RTO/RPO relies on external object storage services for fallback. If your node fails, backups are retained in external S3 storage, and you can redeploy Supabase on a new node and restore from backup. Such deployment can provide a minimum standard RTO (hour-level recovery time)/RPO (MB-level data loss) fallback disaster recovery level during failures.
To achieve RTO < 30s with zero data loss failover, you need to use multi-node high availability deployment, which involves:
In this case, you also need to modify PostgreSQL and MinIO access points to use DNS/L2 VIP/HAProxy and other high availability access points
For these parts, you only need to refer to the documentation of each module in Pigsty for configuration and deployment.
We recommend referring to the configurations in conf/ha/trio.yml and conf/ha/safe.yml to upgrade cluster scale to three nodes or more.
FerretDB is an open-source MongoDB wire protocol compatible middleware that allows you to use PostgreSQL as a drop-in replacement for MongoDB. It enables applications that rely on MongoDB’s wire protocol to work seamlessly with PostgreSQL, providing a bridge between the two databases.
To enable FerretDB, you’ll need the FerretDB patched documentdb extension, which is also available in the Pigsty repository.
The latest combo is FerretDB 2.7 and DocumentDB 0.107.0.
Use Pigsty’s standard installation process with the mongo configuration template.
For production deployment, please ensure to modify the password parameters in the pigsty.yml configuration file before running the installation playbook.
Check the FERRET docs for the details.
You can use MongoDB’s command-line tool MongoSH to access FerretDB.
Use the pig command to add MongoDB repository, then install mongosh using yum or apt:
You can access FerretDB using MongoDB connection strings with any MongoDB driver in any language. Here’s an example using the mongosh CLI tool:
You can log in with different users. See FerretDB: Authentication for details.
You can connect to FerretDB and use it as if it were a MongoDB cluster.
MongoDB commands are translated to SQL and executed in the underlying PostgreSQL:
If you’re not familiar with MongoDB, here’s a quick tutorial that works with FerretDB: Perform CRUD Operations with MongoDB Shell
To generate sample workload, you can use this simple test script with mongosh:
You can check FerretDB’s supported MongoDB commands and known differences. For basic usage, these differences are usually not significant.
Pigsty allows you to harness the synergistic superpower of the Postgres extensions ecosystem with 3 things: Catalog, Repo, and pig.
The complete list of <span class="text-lg font-black text-emerald-500">437</span> available PostgreSQL extensions
The APT/YUM repo that deliver PostgreSQL extensions
The missing package manager for PostgreSQL & Extensions
How to get, install, config, manage these extensions?
There are 437 PostgreSQL extensions in the v3.7.0 catalog. PostgreSQL 18 is the default in v3.7.0.
The per-major figures below are the archive’s PG13–17 compatibility snapshot; the final PG18 breakdown was not recorded in this table. Use the v3.7.0 package aliases and release note for PG18.
| Distro | All | PGDG | PIGSTY | CONTRIB | OTHER | MISS | PG17 | PG16 | PG15 | PG14 | PG13 |
|---|---|---|---|---|---|---|---|---|---|---|---|
| EL | 417 | 119 | 227 | 71 | 0 | 6 | 399 | 407 | 410 | 394 | 368 |
| Debian | 410 | 103 | 236 | 71 | 0 | 13 | 397 | 400 | 403 | 391 | 363 |
TIME GIS RAG FTS OLAP FEAT LANG TYPE UTIL FUNC ADMIN STAT SEC FDW SIM ETL
MIT ISC PostgreSQL BSD-0 BSD-2 BSD-3 Artistic Apache-2.0 MPL-2.0 GPL-2.0 GPL-3.0 LGPL-2.1 LGPL-3.0 AGPL-3.0 Timescale
Download and install extensions with package alias
Download Extensions from PGDG / Pigsty Repo
Install Postgres Extension Packages
Configure extensions and setup pre-loading
Download Extensions from PGDG / Pigsty Repo
Install Postgres Extension Packages
Configure extensions and setup pre-loading
CREATE Postgres Extension in Database
Upgrade Postgres Extension
Uninstall Postgres Extension
There are unparalleled 437 extensions available in Pigsty for 14 mainstream Linux distros.
It takes 4 steps to deliver an extension: downloads, installs, config, and create:
[**Download**](#download-extension) : Which extension packages to download
```yaml tab="config" title="define which extensions to be downloaded"
repo_extra_packages: [ postgis, timescaledb, vector ]
```
```bash tab="apply" title="download package"
make repo
```
[Install](#install-extension) : Which extensions to be installed
```yaml tab="config"
pg_extensions: [ postgis, pgvector, timescaledb ]
```
```bash tab="apply"
./pgsql.yml -t pg_ext # install extensions
```
[**Load**](#load-extension) : Which extensions to be pre-loaded
```yaml tab="config"
pg_libs: 'timescaledb, pg_stat_statements, auto_explain' # add extension to preload libraries (not all extensions need this)
```
```bash tab="apply" title="edit existing cluster config and reload"
pg edit-config --force -p shared_preload_libraries='timescaledb, pg_stat_statements, auto_explain'
```
[**Create**](#create-extension) : Create extension in the [database](/docs/pgsql/db)
```yaml tab="config"
pg_databases:
- { name: meta ,extensions: [ postgis, timescaledb, vector ] }
```
```sql tab="apply" title="create extension in existing database"
CREATE EXTENSION postgis CASCADE;
```
You can describe extensions in the config inventory, and pigsty will
download, install, configure, and enable extensions for you.
This example makes postgis, pgvector, timescaledb out-of-the-box:
When you init this PG cluster, these extensions will be made available for you in the pg-meta cluster.
Here’s a more complicated example: launch Postgres with required extensions for self-hosting supabase:
All available extensions for PG 17 are downloaded and installed, and required ones are loaded & enabled.
Mange extensions and packages are not that simple, here are two common extension examples:
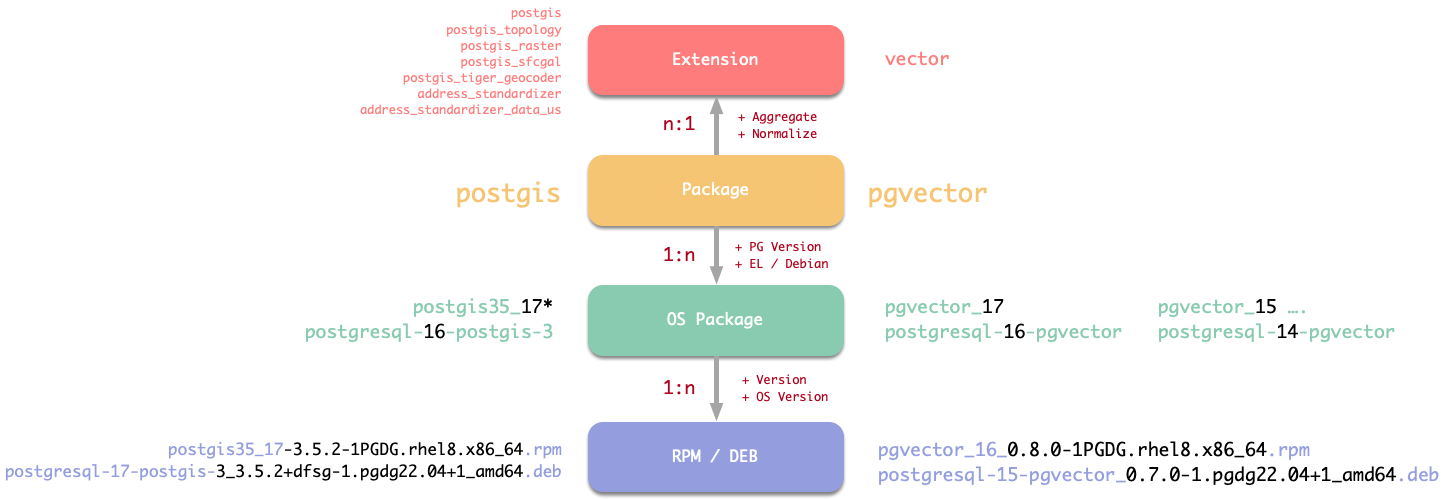
| Entity | Example pgvector |
Example postgis… |
|---|---|---|
| Extension | vector |
postgis, postgis_topology, postgis_raster,… |
| Package | pgvector |
postgis |
| OS PKG | pgvector_18 | postgresql-16-postgis-3 |
| RPM/DEB | pgvector_18_0.8.1-1PGDG.rhel8.x86_64.rpm | postgresql-17-postgis-3_3.5.2+dfsg-1.pgdg22.04+1_amd64.deb |
To install the right RPM / DEB with minimal effort, we need to use the abstract layer: package alias.
So you can install these extensions by specifying the “Normalized” names, like pgvector or postgis.
Without knowing any details about PG & OS version, Arch, Extension versions, and any other details.
Package alias pkg are used for extension download & install, but you’ll have to use the extension name ext when CREATE EXTENSION in the database (like the vector in meta database).
And beware some extensions require explicit preloading, like the timescaledb in the above example.
Besides, all the extensions are categorized into 16 major categories, we also have alias for the entire extension category so that you can download and install them in batch, such as:
All extensions CAN be installed simultaneously, except the olap category, where citus conflict with hydra, and pg_duckdb conflict with pg_mooncake.
So you can download them all, but install one at a time.
In Pigsty, downloading and installing extensions are separate steps. During INFRA module installation, Pigsty downloads all required software to the local machine and creates a local YUM/APT repo for the entire deployment.
This approach accelerates installation, eliminates redundant downloads, removes the need for database nodes to access the internet, reduces network traffic, improves delivery reliability, and ensures consistent versions across your environment - all best practices for production deployments.
For development environments, installing extensions directly from internet repo is also acceptable
Packages defined in repo_packages and repo_extra_packages are automatically downloaded to your local repo during Pigsty installation.
For PostgreSQL-related packages (core and extensions), typically put them in repo_extra_packages while leaving repo_packages with its os-specific global defaults.
The default value for repo_extra_packages is [pgsql-main], an alias representing core PostgreSQL and critical extensions for the current active major version.
To add specific extensions, simply add Pigsty extension package name (pkg) to this parameter. Pigsty automatically downloads the appropriate packages for your active PG version and current OS distro.
To download all available extensions for the current PG version, add all 16 extension category aliases (as in the rich config template):
Alternatively, use version-specific aliases to download extensions for multiple PostgreSQL versions:
To add new extensions to your local repo, modify the parameters above and run:
To refresh the repo metadata on all other nodes in your environment, run:
PostgreSQL has a rich open-source ecosystem with numerous packages across different systems and architectures.
Pigsty provides an abstraction layer that categorizes PostgreSQL packages into “aliases,” hiding differences between systems, architectures, and PG versions.
In the Quick Start section, we used aliases like pgsql-main and pgsql-core. These aliases are translated into specific package names based on your system and architecture. For EL systems, pgsql-main expands to postgresql$v* kernel packages with pgvector_$v*, pg_repack_$v*, and wal2json_$v* extension packages.
The $v placeholder is replaced by the pg_version value (default: 18) to target the correct version. The * wildcard expands to include all package variants (e.g., server, libs, contrib, devel). Pigsty handles these details automatically.
The complete list of available packages and aliases is in roles/node_id/vars/<os_package>.yml. Here are commonly used aliases available across all supported systems:
When using these aliases, the $v placeholder is replaced with the PostgreSQL major version number from pg_version (default: 18).
To download packages for different PostgreSQL versions, either:
pg_version parameter, orpgsql- prefix with pg18-, pg17-, pg16-, etc.Not all extensions are available on all systems. Some extensions are commented out in the aliases because they:
pl/R)oracle_fdw)You can still manually add these extensions if needed.
Pigsty piggyback on standard OS package managers (yum/apt) to install PostgreSQL extensions.
When installing extensions, Pigsty uses the same alias mapping in the download section.
Install all extensions explicitly specified in the pg_extensions parameter, for the cluster pg-meta:
Or install all extensions by category aliases globally:
You can also specify the PG major version explicitly in these alias:
Install all extensions simultaneously is applicable (except two conflicts in the olap category) but not recommended. Just install the extensions you need by explicitly specifying them in the pg_extensions parameter.
During PGSQL cluster init, Pigsty will automatically install packages (& alias) specified in pg_packages and pg_extensions.
Both parameters can be used to install PostgreSQL-related packages. Typically, pg_packages is used to globally specify packages that should be installed across all PostgreSQL clusters in your environment: such as the PostgreSQL kernel, high-availability agent like Patroni, connection pooling with pgBouncer, monitoring with pgExporter, etc.
By default, Pigsty also specifies 3 important extensions here: pgvector, pg_repack, and wal2json for vector search, bloat management, and CDC change extraction.
Meanwhile, pg_extensions is usually used to specify extension for a specific cluster. The default is an empty list, indicating no other extensions will be installed by default.
An important distinction: packages installed via pg_packages are merely ensured to be present, whereas those installed via pg_extensions are automatically upgraded to the latest available version.
When using a local software repo, this distinction isn’t an issue. However, when using upstream internet repo, consider this carefully and move extensions you don’t want automatically upgraded to pg_packages.
Extensions pre-defined in the pg_extensions (and pg_packages) will be installed during cluster provisioning.
To install new extensions on a provisioned PostgreSQL cluster:
First, add extensions to pg_extensions, then execute the playbook subtask:
Note that extension plugins specified in the pg_extension task will be upgraded to the latest available version in your current environment by default.
To install extension, you need to ensure one of the following conditions is met:
For production environments, we recommend using Pigsty’s local software repo to manage and install extensions uniformly: First download extensions to the local repo, then install them from there. This ensures consistent extension versions across your environment and prevents database nodes from directly accessing the internet. You have to do nothing when installed from local repo, just make sure they are downloaded to the local repo.
For development environments, you may choose to directly use upstream internet repo for convenience. Use the following commands to add Internet repo and install extensions on the target cluster directly:
When installing extensions, users can use extension aliases to specify extension.
The aliases will be translated to the current active PG major version and OS environment.
and translated to the corresponding RPM/DEB package names by alias translation mechanism.
citus and hydra are mutually exclusive, since hydra is a fork of citus columnar without renamingpg_duckdb, pg_mooncake, duckdb_fdw, they all use their own libduckdbpgaudit got a different naming pattern on el for pg 15-: pg16+ = pgaudit, pg15=pgaudit17, pg14=pgaudit16 pg13=pgaudit15 pg12=pgaudit14postgis got its own version in el package name: postgis35 by default, and postgis33 for legacy el7While most PostgreSQL extensions written in SQL can be directly enabled with CREATE EXTENSION, some extensions that use special postgres hook will require an extra step to preload them before using.
Most extensions have one or more corresponding dynamic library (.so, .dylib, .dll), some of them require preloading before using.
Attempting to CREATE these extensions without proper preloading will result in an error.
And a wrongly configured preload library may lead to a failure on database restart/start.
Some extensions can partially work without preloading, which means part of the extension features are available directly, and the rest of the features are available after preloading.
To preload an extension, add it to the shared_preload_libraries and restart the database server.
The Extension Catalog gives the complete list of extensions that require dynamic preloading.
To configure a preload on new postgres cluster, the pg_libs parameter can be used.
It will be populated to the shared_preload_libraries parameter during postgres cluster bootstrap.
This example show how to specify pre-loaded extensions with pg_libs parameter.
shared_preload_libraries is a comma-separated list of extensions.
Beware that only works before cluster creation. After that,
you’ll have to config cluster to change the shared_preload_libraries parameter on existing cluster. (with patronictl, ALTER SYSTEM, etc…)
If you want to configure preloading manually, you can just change the postgresql.conf by yourself
The default value of pg_libs is pg_stat_statements, auto_explain,
which preload these two Contrib extensions by default, these two extensions provide essential observability:
auto_explain: Automatic logging of slow query execution planspg_stat_statements: Tracks planning and execution statistics for grouped SQL statementsPreload libraries are loaded one by one, so the order of extensions in shared_preload_libraries matters,
Here are some known rules to follow:
pg_stat_statements to ensure using the same query_id.timescaledb and citus should be placed at the BEGINNING of shared_preload_librariescitus and timescaledb together, place citus before timescaledb.pg_documentdb and pg_documentdb_core as library name for documentdb.pg_search does not require preloading in PostgreSQL 17 and later, but earlier versions do.Some extensions have configurable parameters, you can manage them in different places.
pg_parameters: write to /pg/data/postgresql.auto.confConsult the official docs of each extension for details.
You can enable (create) extension using the CREATE EXTENSION statement:
Extensions need to be installed first, some extension also requires preloading before using.
Some extensions have dependencies on other extensions.
In such cases, you can either install the dependencies first
or use the CASCADE clause to install all dependencies at once.
You can also provision extension with Pigsty, which will automatically create the extensions for you.
Extensions (database logical objects) are logically part of PostgreSQL databases.
In Pigsty, you can specify which extensions to be created in a database with pg_databases parameter.
But you can explicitly specify extension details with the object format, like create them in a specific schema.
Or install a specific version. Here’s a complete example (self-hosting supabase):
The extensions field is a list of extension (name or object) to be created in the database.
It will be created under the first schema in dbsu’s search_path, (usually the public schema).
Here, the extensions in the database object is a list where each element can be:
vectorname: Extension name, REQUIRED, beware it may differ from the extension package name.schema: Schema for installing the extension, OPTIONAL, defaults to the first schema in the current dbsu search path, usually the default public.version: Specifies the extension version, OPTIONAL, defaults to the latest version, rarely used.If the database doesn’t exist yet, the extensions defined here will be automatically created when creating a cluster or creating a database through Pigsty.
Re-creating database with non-trivial baseline schema may be dangerous (if you put some DROP there)
So for existing clusters / databases, it’s advised to use your own schema migration tool to manage extensions. (pgadmin, psql, bytebase, flyway, sqlitch,…)
But it’s helpful to enlist them in the config inventory for bookkeeping purposes. (So if you want to fork this cluster, it includes these extensions)
Some built-in extensions and one special pg_repack are created by default in Pigsty.
These extensions are defined by pg_default_extensions, created in the template1 database and the postgres database by default.
Newly created databases will inherit these extensions from template1, so you don’t need to create them again.
One extra default schema monitor is defined by pg_default_schemas is also created by default.
Which is used to contain monitoring related extensions, tables, functions and views.
There are three 3rd-party extensions that are available by default in Pigsty:
| Extension | What | Where |
|---|---|---|
pg_repack |
Online Bloat Control Tools | in the pg_default_extensions |
wal2json |
Changing data capture in JSON | extension without DDL, install means available |
vector |
vector data type & indexes | in pg_databases as an example |
The pg_repack extension is an important utility for maintaining bloat tables online.
vector is a very popular extension for RAG,
It is installed by default (in the pgsql-main alias) and created in the placeholder meta database in most config template.
The wal2json is another important extension for Changing Data Capture (CDC). It is installed by default, but it is an extension without DDL,
So you don’t need to CREATE it explicitly.
Extension without DDL does not require the CREATE EXTENSION command to work
PostgreSQL extensions typically consist of three parts: a required control file, optional SQL files, and optional libraries.
If an extension does not have SQL file, CREATE EXTENSION command is not needed.
| Component | Description | Required |
|---|---|---|
| Control file | Key metadata, name, dependencies, schema, version,… | REQUIRED |
| SQL file | SQL DDL statements, Types, Functions, etc… | OPTIONAL |
| Library file | binary shared libraries (.so, .dylib, .dll) |
OPTIONAL |
Since SQL / LIB files are optional, there are four possible combinations of extension types:
| LOAD / DDL | Requires CREATE EXTENSION |
Doesn’t require CREATE EXTENSION |
|---|---|---|
Requires LOAD |
Extensions using hooks | Headless extensions |
Doesn’t Require LOAD |
Extensions not using hooks | Logical decoding output plugins |
To update an existing extension, you need to first update the RPM/DEB package with your OS’s package manager,
then alter the extension to the new version in PostgreSQL with ALTER EXTENSION ... UPDATE.
You can upgrade extension packages with the following commands
All extensions listed in pg_extensions will be upgraded using during the pgsql.yml playbook execution.
Extensions (Package Alias) listed in pg_extensions will be upgraded with pgsql.yml’s pg_ext subtask:
This playbook will automatically install the latest available version of extension RPM/DEB packages in your current environment.
(from built local repo or via Internet directly).
You can also upgrade extensions with linux system’s yum/apt upgrade command directly, but you need to specify the full package names:
Pigsty’s pig cli can also help you with that, without the burden of specifying full package names:
Execute the ALTER EXTENSION ... UPDATE SQL command to update the extension to the new version:
If the TO new_version clause is omitted, the extension will be updated to the latest version available.
To uninstall an extension, you typically need to run the DROP EXTENSION SQL statement:
If other extensions or database objects depend on this extension, you’ll need to remove those dependencies first before uninstalling the extension.
Or remove all of them with CASCADE option:
The CASCADE option will delete all objects that depend on this extension,
including database objects, functions, views, etc. Use with caution!
Some extensions don’t have DDL, these extensions do not require the DROP EXTENSION statement to uninstall.
Instead, you can simply remove the extension from the shared_preload_libraries (if configured) and uninstall the package.
Refer to the Extensions Without DDL section for more details.
If you’re using an extension that requires dynamic loading (which modifies the shared_preload_libraries parameter), you need to first re-confnigure the shared_preload_libraries parameter.
Remove the extension name from shared_preload_libraries and restart the database cluster for the changes to take effect.
For extensions that need dynamic loading, refer to the Extensions that Need Loading list.
After removing the extension (logical object) from all databases in the cluster, you can safely uninstall the extension’s software package. Ansible commands can help you do this conveniently:
You can also use pig, or apt/yum commands directly to uninstall.
If you don’t know the extension package name, you can refer to the Extension List or check the extension package name mapping defined in roles/node_id/vars.
Architecture, core concepts, identity management
Configure infra module, and use multiple infra nodes.
Customize infra components with 57+ parameters
Manage local repo, nginx portal, domain, certs, and more
Ansible playbooks that can be used in this module
Dashboards, metrics, record & alerting rules.
Frequently Asked Questions about infra module
A standard Pigsty deployment comes with an INFRA module that provides the following services:
These are essential for a production-grade PostgreSQL service, and will be installed by default.
| Component | Port | Domain | Description |
|---|---|---|---|
nginx |
80 |
h.pigsty |
Web Service Portal (YUM/APT Repo) |
alertmanager |
9059 |
a.pigsty |
Alert Aggregation and delivery |
prometheus |
9058 |
p.pigsty |
Monitoring Time Series Database |
grafana |
3000 |
g.pigsty |
Visualization Platform |
loki |
3100 |
- | Logging Collection Server |
pushgateway |
9091 |
- | Collect One-Time Job Metrics |
blackbox_exporter |
9115 |
- | ICMP, TCP, HTTP Probing |
dnsmasq |
53 |
- | DNS Server, optional |
chronyd |
123 |
- | NTP Time Server, optional |
If you don’t want these, the Minimal Install mode deploy HA Postgres without the Infra module.
The INFRA module isn’t mandatory for HA PostgreSQL - for instance, it’s omitted in Slim Install mode.
However, since INFRA provides essential supporting services for production-grade HA PostgreSQL clusters, it’s strongly recommended for most deployments.
If you already have your own infrastructure (Nginx, local repos, monitoring, DNS, NTP), you can disable INFRA and configure Pigsty to use your existing stack instead.
Nginx is the gateway for all WebUI services in Pigsty, serving on HTTP (80) / HTTPS (443) by default.
It exposes web UIs like Grafana, Prometheus, AlertManager, and HAProxy console, while also serving static resources like local yum/apt repos.
Nginx configuration follows infra_portal definitions, for example:
These endpoint definitions are referenced by other services - logs go to loki endpoint, Grafana datasources register to grafana endpoint, alerts route to alertmanager endpoint.
Pigsty allows rich Nginx customization as a local file server or reverse proxy, with self-signed or real HTTPS certs.
For more details, check these tutorials:
During installation, Pigsty creates a local software repository on the INFRA node to speed up subsequent software installations.
Located at /www/pigsty and served by Nginx, it’s accessible via http://h.pigsty/pigsty.
Pigsty’s offline package is a tarball of a pre-built repo directory. If /www/pigsty exists with a /www/pigsty/repo_complete marker, Pigsty skips downloading from upstream - perfect for air-gapped environments!
Repo definition lives in /www/pigsty.repo, fetchable via http://${admin_ip}/pigsty.repo:
You can also use the file repository directly without Nginx:
Local repo configs are in: Config: INFRA - REPO
Prometheus, our TSDB for monitoring, listens on port 9058 (access via IP:9058 or http://p.pigsty).
Key features:
AlertManager handles alerts on port 9059 (IP:9059 or http://a.pigsty). While it receives Prometheus alerts, you’ll need extra config (e.g., SMTP) for notifications.
Configs for Prometheus, AlertManager, PushGateway, and BlackboxExporter are in: Config: INFRA - PROMETHEUS
Grafana, our visualization powerhouse, runs on port 3000 (IP:3000 or http://g.pigsty).
Pigsty’s monitoring is dashboard-based with URL-driven navigation. Drill down or up quickly to pinpoint issues.
Fun fact: We’ve supercharged Grafana with extra viz plugins like ECharts - it’s not just monitoring, it’s a low-code data app platform!
Loki handles logs on port 3100, with Promtail shipping logs from nodes to the mothership.
Configs live in: Config: INFRA - GRAFANA and Config: INFRA - Loki
Ansible is already installed on the Admin Node during bootstrap.
So the ansible on infra nodes are not actually used.
But it gives you a viable backup option in case your admin node is compromised.
DNSMASQ handles DNS resolution, with other modules registering their domains to INFRA’s DNSMASQ service.
DNS records live in /etc/hosts.d/ on all INFRA nodes.
Configs: Config: INFRA - DNS
Pigsty sets it up just for your convenience, and Pigsty actually does NOT use it internally (static DNS records in /etc/hosts are used instead).
Chronyd helps keep all nodes in sync!
NTP configs: Config: NODES - NTP
This is purely optional, if you already have your own NTP servers configured, just leave it alone.
The INFRA module primarily provides monitoring infrastructure and is optional for PostgreSQL service.
Unless you have manually configured dependencies on DNS/NTP services from INFRA nodes elsewhere, failures in the INFRA module typically won’t affect the normal operation of PostgreSQL database clusters.
In most cases, a single INFRA node is sufficient for typical scenarios. For production environments with higher requirements, we recommend using 2-3 INFRA nodes for high availability.
To improve resource utilization, PostgreSQL high availability typically relies on the ETCD module, which can share nodes with the INFRA module.
Using more than 3 INFRA nodes provides limited benefits, but you can use more ETCD nodes (e.g., 5) to enhance the availability and reliability of DCS services.
To install the INFRA module on nodes, first add node IPs to the infra group in the inventory and assign them an Infra instance number infra_seq.
By default, a single INFRA node configuration meets most requirements. All configuration templates include a default infra group definition:
The 10.10.10.10 IP placeholder in the infra group will be replaced with the current node’s primary IP address during configuration, meaning the INFRA module will be installed on the current node.
Then use the infra.yml playbook to initialize the INFRA module on the node.
To configure two INFRA nodes, add new IPs to infra.hosts:
To configure three INFRA nodes with custom cluster/node parameters:
Most components in the Infra module are “stateless/shared-state”. For these components, high availability primarily requires addressing load balancing.
Infra component load balancing can be achieved through two methods: Keepalived L2 VIP or HAProxy Layer 4 Load Balancing.
If your network environment supports Layer 2 connectivity, you can use Keepalived L2 VIP for high availability:
In addition to configuring VIP-related parameters like vip_address, you need to modify endpoints for Infra services in infra_portal.
Parameters for Pigsty infrastructure components: local YUM repository, Nginx, DNSMasq, Prometheus, Grafana, Loki, AlertManager, PushGateway, Blackbox Exporter, etc.
There are 9 sections in total, and 57 parameters in this module.
META: infra meta dataCA: self-signed CAINFRA_ID: Portals and identityREPO: local YUM/APT repositoryINFRA_PACKAGE: packages to be installedNGINX: Nginx web serverDNS: DNSMasq nameserverPROMETHEUS: Prometheus, AlertManager, PushGateway & Blackbox ExporterGRAFANA: Grafana, the visualization platformLOKI: Loki, the logging server| Name | Section | Type | Level | Comment |
|---|---|---|---|---|
version |
META |
string |
G | pigsty version string |
admin_ip |
META |
ip |
G | admin node ip address |
region |
META |
enum |
G | upstream mirror region: default, china, europe |
proxy_env |
META |
dict |
G | global proxy env when downloading packages |
ca_create |
CA |
bool |
G | create the CA when missing; true by default |
ca_cn |
CA |
string |
G | CA common name, fixed as pigsty-ca |
cert_validity |
CA |
interval |
G | cert validity, 20 years by default |
infra_seq |
INFRA_ID |
int |
I | infra node identity, REQUIRED |
infra_portal |
INFRA_ID |
dict |
G | infra services exposed via portal |
repo_enabled |
REPO |
bool |
G/I | create a yum repo on this infra node? |
repo_home |
REPO |
path |
G | repo home dir, /www by default |
repo_name |
REPO |
string |
G | repo name, pigsty by default |
repo_endpoint |
REPO |
url |
G | access point to this repo by domain or ip:port |
repo_remove |
REPO |
bool |
G/A | remove existing upstream repo |
repo_modules |
REPO |
string |
G/A | which repo modules are installed in repo_upstream |
repo_upstream |
REPO |
upstream[] |
G | where to download upstream packages |
repo_packages |
REPO |
string[] |
G | which packages to be included |
repo_extra_packages |
REPO |
string[] |
G/C/I | extra packages to be included |
repo_url_packages |
REPO |
string[] |
G | extra packages from url |
infra_packages |
INFRA_PACKAGE |
string[] |
G | packages to be installed on infra nodes |
infra_packages_pip |
INFRA_PACKAGE |
string |
G | pip installed packages for infra nodes |
nginx_enabled |
NGINX |
bool |
G/I | enable nginx on this infra node? |
nginx_exporter_enabled |
NGINX |
bool |
G/I | enable nginx_exporter on this infra node? |
nginx_sslmode |
NGINX |
enum |
G | nginx ssl mode? disable, enable, enforce |
nginx_cert_validity |
NGINX |
duration |
G | nginx self-signed cert validity, 397d by default |
nginx_home |
NGINX |
path |
G | nginx content dir, /www by default |
nginx_port |
NGINX |
port |
G | nginx listen port, 80 by default |
nginx_ssl_port |
NGINX |
port |
G | nginx ssl listen port, 443 by default |
nginx_navbar |
NGINX |
index[] |
G | nginx index page navigation links |
certbot_sign |
NGINX |
bool |
G/A | sign nginx cert with certbot during setup? |
certbot_email |
NGINX |
string |
G/A | certbot email address, used for free ssl |
certbot_options |
NGINX |
string |
G/A | certbot extra options |
dns_enabled |
DNS |
bool |
G/I | setup dnsmasq on this infra node? |
dns_port |
DNS |
port |
G | dns server listen port, 53 by default |
dns_records |
DNS |
string[] |
G | dynamic dns records resolved by dnsmasq |
prometheus_enabled |
PROMETHEUS |
bool |
G/I | enable prometheus on this infra node? |
prometheus_port |
PROMETHEUS |
port |
G | prometheus listen port, 9058 by default |
prometheus_clean |
PROMETHEUS |
bool |
G/A | clean prometheus data during init? |
prometheus_data |
PROMETHEUS |
path |
G | prometheus data dir, /data/prometheus by default |
prometheus_sd_dir |
PROMETHEUS |
path |
G | prometheus file service discovery directory |
prometheus_sd_interval |
PROMETHEUS |
interval |
G | prometheus target refresh interval, 5s by default |
prometheus_scrape_interval |
PROMETHEUS |
interval |
G | prometheus scrape & eval interval, 10s by default |
prometheus_scrape_timeout |
PROMETHEUS |
interval |
G | prometheus global scrape timeout, 8s by default |
prometheus_options |
PROMETHEUS |
arg |
G | prometheus extra server options |
pushgateway_enabled |
PROMETHEUS |
bool |
G/I | setup pushgateway on this infra node? |
pushgateway_options |
PROMETHEUS |
arg |
G | pushgateway extra server options |
blackbox_enabled |
PROMETHEUS |
bool |
G/I | setup blackbox_exporter on this infra node? |
blackbox_options |
PROMETHEUS |
arg |
G | blackbox_exporter extra server options |
alertmanager_enabled |
PROMETHEUS |
bool |
G/I | setup alertmanager on this infra node? |
alertmanager_port |
PROMETHEUS |
port |
G | alertmanager listen port, 9059 by default |
alertmanager_options |
PROMETHEUS |
arg |
G | alertmanager extra server options |
exporter_metrics_path |
PROMETHEUS |
path |
G | exporter metric path, /metrics by default |
exporter_install |
PROMETHEUS |
enum |
G | how to install exporter? none, yum, binary |
exporter_repo_url |
PROMETHEUS |
url |
G | exporter repo file url if install exporter via yum |
grafana_enabled |
GRAFANA |
bool |
G/I | enable grafana on this infra node? |
grafana_clean |
GRAFANA |
bool |
G/A | clean grafana data during init? |
grafana_admin_username |
GRAFANA |
username |
G | grafana admin username, admin by default |
grafana_admin_password |
GRAFANA |
password |
G | grafana admin password, pigsty by default |
loki_enabled |
LOKI |
bool |
G/I | enable loki on this infra node? |
loki_clean |
LOKI |
bool |
G/A | whether remove existing loki data? |
loki_data |
LOKI |
path |
G | loki data dir, /data/loki by default |
loki_retention |
LOKI |
interval |
G | loki log retention period, 15d by default |
META
This section contains metadata for current Pigsty deployments, such as version string, admin node IP address, repository mirror region and HTTP(S) proxy when downloading packages.
version
type: string, level: G
pigsty version string
default value:v3.7.0
It will be used for pigsty introspection & content rendering.
admin_ip
type: ip, level: G
admin node ip address
default value:10.10.10.10
Node with this ip address will be treated as admin node, usually point to the first node that install Pigsty.
The default value 10.10.10.10 is a placeholder that will be replaced during configure
This parameter is referenced by many other parameters, such as:
The exact string ${admin_ip} will be replaced with the actual admin_ip for above parameters.
region
type: enum, level: G
upstream mirror region: default,china,europe
default value: default
If a region other than default is set, and there’s a corresponding entry in repo_upstream.[repo].baseurl, it will be used instead of default.
For example, if china is used, pigsty will use China mirrors designated in repo_upstream if applicable.
proxy_env
type: dict, level: G
global proxy env when downloading packages
default value:
It’s quite important to use an HTTP proxy in restricted production environments, or when your Internet access is blocked (e.g., Mainland China).
Please note that if the Docker module is used, the proxy server configuration will also be written to the Docker Daemon configuration file.
Please note that if the -x parameter is specified during ./configure, the proxy configuration information in the current environment will be automatically filled into the generated pigsty.yaml file.
CA
Self-Signed CA used by Pigsty. It is required to support advanced security features.
ca_create
type: bool, level: G
Default value: true. The ca role creates files/pki/ca/ca.key and
files/pki/ca/ca.crt only when they are missing. Existing CA material is
always reused. Set this to false when supplying an existing key and
certificate; the role aborts if the key is then missing.
ca_cn
type: string, level: G
CA common name, not recommended to change it.
default value: pigsty-ca
You can check that with openssl x509 -text -in /etc/pki/ca.crt.
cert_validity
type: interval, level: G
certificate validity, 20 years by default, which is sufficient for most scenarios
default value: 7300d
INFRA_ID
Infrastructure identity and portal definition.
infra_seq
type: int, level: I
infra node identity, REQUIRED, no default value, you have to assign it explicitly.
infra_portal
type: dict, level: G
infra services exposed via portal.
default value will expose home, grafana, prometheus, alertmanager via nginx with corresponding domain names.
Each record consists of a Key and a Value dictionary, where name is the key, representing the component name, and the value is an object that can configure the following parameters:
Each record consists of a Key and a Value dictionary, where name is the key, representing the component name, and the value is an object that can configure the following parameters:
Each record consists of a Key and a Value dictionary, where name is the key, representing the component name, and the value is an object that can configure the following parameters:
name: REQUIRED, specify the name of the Nginx server
/etc/nginx/conf.d/<name>.confdomain: OPTIONAL, when the service needs to be exposed to the outside world via Nginx, it is a REQUIRED field, specifying the domain name used
endpoint: Usually used as an alternative to path, specifies the upstream server address. Setting endpoint indicates this is a reverse proxy server
${admin_ip} can be used as a placeholder, and will be dynamically replaced with admin_ip during deploymentpath: Usually used as an alternative to endpoint, specifies the local file server path. Setting path means this is a local web server
certbot: Certbot certificate name, if configured, will use Certbot to apply for a certificate
cert: Cert file path, if configured, will override the default certificate pathkey: Cert key file path, if configured, will override the default certificate key pathwebsocket: Whether to enable WebSocket support
schema: Protocol used by the upstream server, if configured, will override the default protocol
index: Whether to enable file index page
log: Nginx log file path
/var/log/nginx/<name>.log as the default log file pathconf: Nginx configuration file path
config: Nginx configuration code block
enforce_https: Redirect HTTP to HTTPS
REPO
This section is about the local software repository. Pigsty will create a local software repository (APT/YUM) when initializing an infra node.
During the initialization process, Pigsty will download all packages and their dependencies (specified by repo_packages) from the Internet upstream repository (specified by repo_upstream) to {{ nginx_home }} / {{ repo_name }} (default is /www/pigsty), and the total size of all dependent software is approximately 1GB.
When creating a local repository, Pigsty will skip the software download phase if the directory already exists and there is a marker file named repo_complete in the directory.
If the download speed of some packages is too slow, you can set the download proxy to complete the initial download by using the proxy_env configuration entry or directly download the pre-packaged offline package, which is essentially a local software source built on the same operating system.
repo_enabled
type: bool, level: G/I
create a YUM repository on this infra node? default value: true
If you have multiple infra nodes, you can disable the YUM repository on other standby nodes to reduce Internet traffic.
repo_home
type: path, level: G
repository home directory, /www by default
repo_name
type: string, level: G
repository name, pigsty by default, it is not recommended to change this value
repo_endpoint
type: url, level: G
access point to this repository by domain or IP:port, default value: http://${admin_ip}:80
If you have changed the nginx_port or nginx_ssl_port, or use a different infra node from admin node, please adjust this parameter accordingly.
The ${admin_ip} will be replaced with actual admin_ip during runtime.
repo_remove
type: bool, level: G/A
remove existing upstream repository, default value: true
If you want to keep existing upstream repository, set this value to false.
repo_modules
type: string, level: G/A
which repository modules are installed in repo_upstream, default value: infra,node,pgsql
This is a comma separated value string, it is used to filter entries in repo_upstream with corresponding module field.
For Ubuntu / Debian users, you can add redis to the list: infra,node,pgsql,redis
repo_upstream
type: upstream[], level: G
This parameter defines the upstream software repository for Pigsty. It DOES NOT have default values; you can specify it explicitly, or leave it empty if you want to use the default values.
When leaving it empty, Pigsty will use the default values from the repo_upstream_default defined in roles/node_id/vars according to your OS.
For EL (8, 9, 10) system, the default values are:
For Debian (11,12,13) or Ubuntu (22.04, 24.04) systems, the default values are:
repo_packages
type: string[], level: G
This parameter is an array of strings, with each string being a list of software packages separated by spaces, specifying which packages to be included and downloaded.
This param DOES NOT have a default value, you can specify it explicitly, or leaving it empty if you want to use the default values.
When leaving it empty, Pigsty will use the default values from the repo_packages_default defined in roles/node_id/vars according to your OS.
Each element in repo_packages will be translated into a list of package names according to the package_map defined in the above file, for specific OS distro version.
For example, on EL systems, it will be translated into:
And on Debian/Ubuntu systems, it will be translated into:
As a convention, repo_packages usually includes software packages that are not related to the major version of PostgreSQL (such as Infra, Node, and PGDG Common), while software packages related to the major version of PostgreSQL (kernel, extensions) are usually specified in repo_extra_packages to facilitate switching between PG major versions.
repo_extra_packages
type: string[], level: G/C/I
This parameter is the same as repo_packages, but it is used for additional software packages that need to be downloaded (usually PostgreSQL version-specific packages).
The default value is an empty list. You can override it at the cluster & instance level to specify additional software packages that need to be downloaded.
If this parameter is not explicitly defined, Pigsty will load the default value from the repo_extra_packages_default defined in roles/node_id/vars, which is:
Each element in repo_packages will be translated into a list of package names according to the package_map defined in the above file, for specific OS distro version.
For example, on EL systems, it will be translated into:
And on Debian/Ubuntu systems, it will be translated into:
Here $v will be replaced with the actual PostgreSQL major version number pg_version, So you can add any PG version related packages here, and Pigsty will download them for you.
repo_url_packages
type: object[] | string[], level: G
extra packages from URL, default values: []
You can use object list or string list in this parameter, in the latter case, Pigsty will use the url basename as the filename.
Note that if the region is set to china, pigsty.io will be replaced with pigsty.cc automatically.
INFRA_PACKAGE
These packages are installed on infra nodes only, including common rpm/deb/pip packages.
infra_packages
type: string[], level: G
This parameter is an array of strings, with each string being a list of common software packages separated by spaces, specifying which packages to be installed on INFRA nodes.
This parameter DOES NOT have a default value; you can specify it explicitly, or leave it empty if you want to use the default values.
When leaving it empty, Pigsty will use the default values from the repo_packages_default defined in roles/node_id/vars according to your OS.
For EL (7/8/9) system, the default values are:
For Debian (11,12) or Ubuntu (22.04, 22.04) systems, the default values are:
infra_packages_pip
type: string, level: G
pip installed packages for infra nodes, default value is empty string
NGINX
Pigsty exposes all web services through Nginx: Home Page, Grafana, Prometheus, AlertManager, etc., and other optional tools such as PGWeb, Jupyter Lab, pgAdmin, Bytebase, and other static resources & reports such as pev, schemaspy & pgbadger.
This Nginx also serves as a local YUM/APT repository.
nginx_enabled
type: bool, level: G/I
enable nginx on this infra node? default value: true
nginx_exporter_enabled
type: bool, level: G/I
enable nginx_exporter on this infra node? default value: true.
Setting this to false will also disable the /nginx health check stub: If your Nginx does not support the /nginx stub, you can set this value to false to disable it.
nginx_sslmode
type: enum, level: G
nginx ssl mode? which could be: disable, enable, enforce, the default value: enable
disable: listen on nginx_port and serve plain HTTP onlyenable: also listen on nginx_ssl_port and serve HTTPSenforce: all links will be rendered as https:// by default
infra_portalnginx_cert_validity
type: duration, level: G
nginx self-signed cert validity, 397d by default
Use longer validity is not recommended, as the latest browsers require the website certificate to be valid for at most 397 days, so this is the default value.
nginx_home
type: path, level: G
nginx web server static content dir, /www by default
Nginx root directory which contains static resource and repo resource. It’s wise to set this value same as repo_home so that local repo content is automatically served.
nginx_port
type: port, level: G
Nginx listening port which serves the HTTP requests, 80 by default.
If your default 80 port is occupied or unavailable, you can consider using another port, and change repo_endpoint and repo_upstream (the local entry) accordingly.
nginx_ssl_port
type: port, level: G
nginx ssl listen port, 443 by default
nginx_navbar
type: index[], level: G
nginx index page navigation links
default value:
Each record is rendered as a navigation link to the Pigsty home page App drop-down menu, and the apps are all optional, mounted by default on the Pigsty default server under http://h.pigsty/.
The url parameter specifies the URL PATH for the app, with the exception that if the ${grafana} string is present in the URL, it will be automatically replaced with the Grafana domain name defined in infra_portal.
certbot_sign
type: bool, level: G/A
sign nginx cert with certbot during setup? default value: false
When set to true, Pigsty will use certbot to automatically apply for free SSL certificates from Let’s Encrypt during the execution of infra.yml and install.yml playbooks (the nginx role).
In the infra_portal defined domain, if the certbot parameter is defined, Pigsty will use certbot to apply for the domain domain certificate, and the certificate name will be the value of the certbot parameter. If multiple servers/domains specify the same certbot parameter, Pigsty will merge and apply for a certificate for these domains, and use the value of the certbot parameter as the certificate name.
Enabling this option requires:
This option is disabled by default, you can manually execute the make cert command after installation to manually execute it, it actually calls the rendered /etc/nginx/sign-cert script, using certbot to update or apply certificates.
certbot_email
type: string, level: G/A
The email address used to receive certificate expiration reminder emails, default value: [email protected]
When certbot_sign is set to true, it is recommended to provide this parameter. Let’s Encrypt will send reminder emails to this email when the certificate is about to expire.
certbot_options
type: string, level: G/A
Additional configuration parameters passed to certbot, default value: empty string.
You can pass additional command line options to certbot through this parameter, for example --dry-run, then certbot will not actually apply for a certificate, but will preview and test it.
DNS
Pigsty will launch a default DNSMASQ server on infra nodes to serve DNS inquiry. such as h.pigsty a.pigsty p.pigsty g.pigsty and sss.pigsty for optional MinIO service.
All records will be added to infra node’s /etc/hosts.d/*.
You have to add nameserver {{ admin_ip }} to your /etc/resolv to use this dns server, and node_dns_servers will do the trick.
dns_enabled
type: bool, level: G/I
setup dnsmasq on this infra node? default value: true
If you don’t want to use the default DNS server, you can set this value to false to disable it. And use node_default_etc_hosts and node_etc_hosts instead.
dns_port
type: port, level: G
dns server listen port, 53 by default
dns_records
type: string[], level: G
dynamic dns records resolved by dnsmasq, Some auxiliary domain names will be written to /etc/hosts.d/default on infra nodes by default
PROMETHEUS
Prometheus is used as the time-series database for metrics scrape, storage & analysis.
prometheus_enabled
type: bool, level: G/I
enable prometheus on this infra node?
default value: true
prometheus_port
type: port, level: G
The listening port for Prometheus, default value is 9058.
Newly added since 3.7, with previous default value changing from 9090 to 9058.
Because the EL10 distro has a new default web service cockpit-ws which also uses port 9090.
prometheus_clean
type: bool, level: G/A
clean prometheus data during init? default value: true
prometheus_data
type: path, level: G
prometheus data dir, /data/prometheus by default
prometheus_sd_dir
type: path, level: G, default value: /etc/prometheus/targets
prometheus static file service discovery target dir, prometheus will find dynamic monitoring targets from this directory.
prometheus_sd_interval
type: interval, level: G, default value: 5s
Prometheus will check prometheus_sd_interval dir per 5s by default to find out new monitoring targets.
prometheus_scrape_interval
type: interval, level: G
prometheus scrape & eval interval, 10s by default
prometheus_scrape_timeout
type: interval, level: G
prometheus global scrape timeout, 8s by default
DO NOT set this larger than prometheus_scrape_interval
prometheus_options
type: arg, level: G
prometheus extra server options
default value: --storage.tsdb.retention.time=15d
Extra cli args for prometheus server, the default value will set up a 15-day data retention to limit disk usage.
pushgateway_enabled
type: bool, level: G/I
setup pushgateway on this infra node? default value: true
pushgateway_options
type: arg, level: G
pushgateway extra server options, default value: --persistence.interval=1m
blackbox_enabled
type: bool, level: G/I
setup blackbox_exporter on this infra node? default value: true
blackbox_options
type: arg, level: G
blackbox_exporter extra server options, default value is empty string
alertmanager_enabled
type: bool, level: G/I
setup alertmanager on this infra node? default value: true
alertmanager_port
type: port, level: G
The listening port for AlertManager, default value is 9059.
The default value change from 9093 since v3.7.
Because the kafka’s default peer port is also 9093
alertmanager_options
type: arg, level: G
alertmanager extra server options, default value is empty string
exporter_metrics_path
type: path, level: G
exporter metric path, /metrics by default
exporter_install
type: enum, level: G
(OBSOLETE) how to install exporter? none,yum,binary
default value: none
Specify how to install Exporter:
none: No installation, (by default, the Exporter has been previously installed by the node_pkg task)yum: Install using yum (if yum installation is enabled, run yum to install node_exporter and pg_exporter before deploying Exporter)binary: Install using a copy binary (copy node_exporter and pg_exporter binary directly from local file dir, not recommended)When installing with yum, if exporter_repo_url is specified (not empty), the installation will first install the REPO file under that URL into /etc/yum.repos.d. This feature allows you to install Exporter directly without initializing the node infrastructure. It is not recommended for regular users to use binary installation. This mode is usually used for emergency troubleshooting and temporary problem fixes.
exporter_repo_url
type: url, level: G
(OBSOLETE) exporter repo file url if install exporter via yum
default value is empty string
Default is empty; when exporter_install is yum, the repo specified by this parameter will be added to the node source list.
GRAFANA
Grafana is the visualization platform for Pigsty’s monitoring system.
It can also be used as a low code data visualization environment
grafana_enabled
type: bool, level: G/I
enable grafana on this infra node? default value: true
grafana_clean
type: bool, level: G/A
clean grafana data during init? default value: true
grafana_admin_username
type: username, level: G
grafana admin username, admin by default
grafana_admin_password
type: password, level: G
grafana admin password, pigsty by default
default value: pigsty
WARNING: Change this to a strong password before deploying to production environment
LOKI
loki_enabled
type: bool, level: G/I
enable loki on this infra node? default value: true
loki_clean
type: bool, level: G/A
whether remove existing loki data? default value: false
loki_data
type: path, level: G
loki data dir, default value: /data/loki
loki_retention
type: interval, level: G
loki log retention period, 15d by default
Here are some admin tasks related to the INFRA module
Nginx Portal for WebUI services
Manage local APT / YUM repository
Use local / public domain names
Use self-signed or real HTTPS certificates
Use the infra.yml playbook to install the INFRA module on Infra nodes:
Use the infra-rm.yml playbook to uninstall the INFRA module from Infra nodes:
To scale out an existing INFRA deployment, first modify the infra group by adding new node IPs and assigning unique infra_seq numbers:
Then use the infra.yml playbook to install INFRA on the new node:
Use these playbook tasks to manage local package repositories (YUM/APT) on Infra nodes :
Commonly used commands:
If users specify a cert name in the certbot field of infra_portal, you can get free HTTPS certs with certbot:
Use these playbook tasks to manage infrastructure components on Infra nodes
Other useful tasks
There are three playbooks related to the INFRA module:
infra.yml: Initialize Pigsty infrastructure on infra nodesinfra-rm.yml: Remove infrastructure components from infra nodesinstall.yml: Perform a complete one-time installation of Pigsty on the current nodeinfra.yml
The INFRA module playbook infra.yml initializes the infrastructure module on Infra nodes defined in the infra group of your config file.
This playbook performs the following tasks:
This playbook executes on the infra group by default:
INFRA module on the group named infra in the config file10.10.10.10 in the config template with the current node’s primary IP addressPlaybook notes:
This is an idempotent playbook - repeated execution will overwrite infra components on Infra nodes
prometheus_clean is set to false, Prometheus time series metrics will be lostloki_clean is set to false, Loki log data will be lostgrafana_clean is set to false, Grafana dashboards and configuration changes will be lostWhen the local software repo /www/pigsty/repo_complete exists, this playbook skips downloading software from the internet
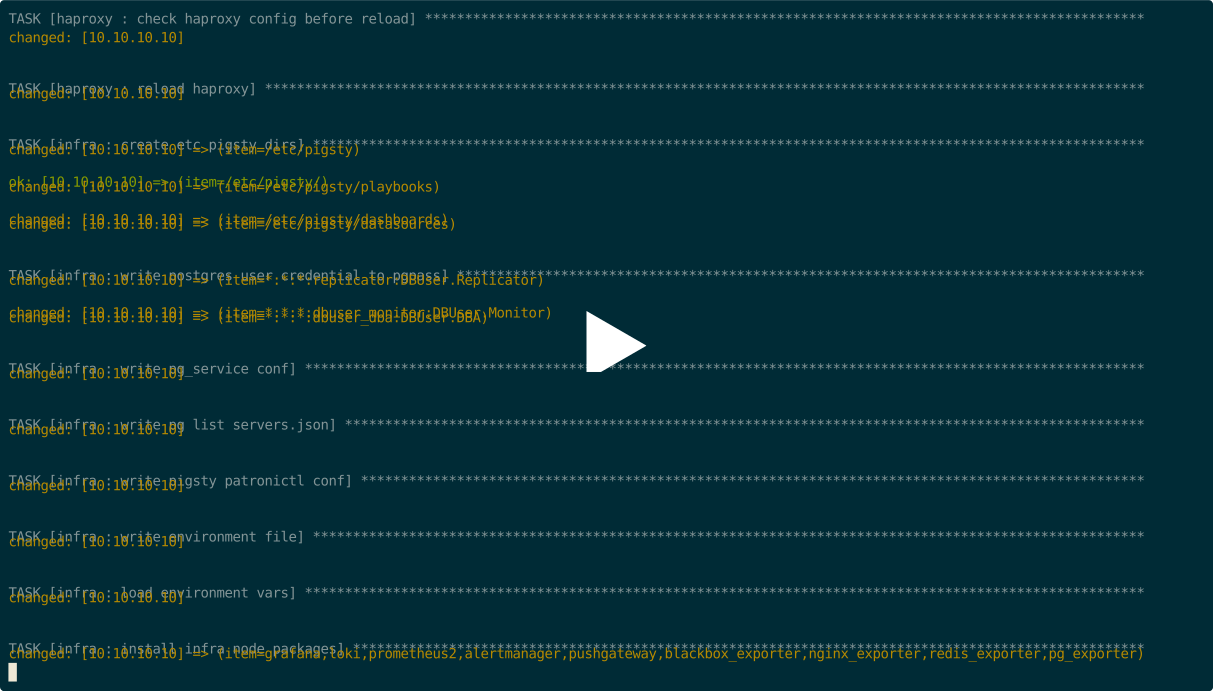
Here’s the list of available tasks in the infra.yml playbook:
infra-rm.yml
The INFRA module playbook infra-rm.yml removes Pigsty infrastructure from Infra nodes defined in the infra group of your config file.
Common subtasks include:
install.yml
The INFRA module playbook install.yml performs a complete one-time installation of Pigsty on all nodes.
This playbook is described in more detail in Playbook: One-Pass Deployment.
Pigsty provides the following two alert rules for the INFRA module:
InfraDown : Infrastructure components are downAgentDown : Monitoring agent is downYou can modify or add new infrastructure alert rules in files/prometheus/rules/infra.yml.
If you accidentally deleted the Prometheus targets dir, you can register monitoring targets to Prometheus again with the:
PGSQL Databases in pg_databases are registered as Grafana datasource by default.
If you accidentally deleted the registered postgres datasource in Grafana, you can register them again with
The haproxy admin page is proxied by Nginx under the default server.
If you accidentally deleted the registered haproxy proxy settings in /etc/nginx/conf.d/haproxy, you can restore them again with
PGSQL cluster/instance domain names are registered to /etc/hosts.d/<name> on infra nodes by default.
You can restore them with the following command:
If you wish to expose a new WebUI service via the Nginx portal, you can add the service definition to the infra_portal parameter.
And re-run ./infra.yml -t nginx_config,nginx_launch to update & apply the Nginx configuration.
If you wish to access with HTTPS, you must remove files/pki/csr/pigsty.csr, files/pki/nginx/pigsty.{key,crt} to force re-generating the Nginx SSL/TLS certificate to include the new upstream’s domain name.
While you can directly access services via IP:Port, we still recommend consolidating access points by using domain names and uniformly accessing various web-based services through the Nginx portal. This approach helps centralize access, reduce the number of exposed ports, and facilitates access control and auditing.
If you wish to expose a new WebUI service through the Nginx portal, you can add the service definition to the infra_portal parameter. For example, here is the config used by the public demo site, which exposes several additional web services:
After completing the Nginx upstream service definition, use the following commands to register the new service with Nginx.
If you wish to access via HTTPS, you must delete files/pki/csr/pigsty.csr and files/pki/nginx/pigsty.{key,crt} to force the regeneration of the Nginx SSL/TLS certificate to include the new upstream domain names. If you prefer to use an SSL certificate issued by an authoritative organization instead of a certificate issued by Pigsty’s self-signed CA, you can place it in the /etc/nginx/conf.d/cert/ directory and modify the corresponding configuration: /etc/nginx/conf.d/<name>.conf.
Pigsty has a built-in wrapper script bin/repo-add, which will invoke Ansible playbook node.yml to add repository files to corresponding nodes.
To deploy modules, you’ll have to enroll your linux servers into pigsty by installing the NODE module on them.
Architecture, core concepts, identity management
Configure node identities
Customize node components with 64 parameters
Setup VIP, manage monitoring node targets
Ansible playbooks that can be used in node module
Dashboards, metrics, record & alerting rules.
Frequently Asked Questions about node module
A "node" refers to a resource that is SSH accessible and offers a bare Linux OS environment.
It could be a physical machine, a virtual machine, or an OS-like container equipped with systemd, sudo and sshd.
There are three different types of nodes in Pigsty, In a one-node deployment, they are the same one.
| Node Type | Description |
|---|---|
| Admin node | The node where Pigsty is installed and admin commands are issued |
| Infra node | The node where the INFRA module is installed |
| Common node | Any nodes managed by Pigsty, including admin & infra nodes |
In the following 4-node sandbox config snippet, we have 4 common nodes.
And the 10.10.10.10 is marked as Infra Node and Admin Node simultaneously.
Common nodes have the following components enabled by default in Pigsty:
| Component | Port | Description | Default |
|---|---|---|---|
node_exporter |
9100 |
Node Monitoring Metrics Exporter | Enabled |
haproxy |
9101 |
HAProxy admin / metrics port | Enabled |
promtail |
9080 |
Log collecting agent | Enabled |
These components are optional, can be enabled with parameters.
| Component | Port | Description | Default |
|---|---|---|---|
docker |
9323 |
Enable Container Service | Disabled |
keepalived |
N/A | Manage Node Cluster L2 VIP | Disabled |
keepalived_exporter |
9650 |
Monitoring Keepalived Status | Disabled |
Admin Node is the first node where Pigsty is installed, all control commands are issued from it.
There is one and only one admin node in a pigsty deployment, which is specified by admin_ip.
This parameter will be set during the configure procedure, to the value of primary IP address.
The admin node is the first node where Pigsty is installed, and it is used to issue commands to other nodes.
The admin node is usually overlapped with the infra node, same as the first infra node
It is possible to install pigsty on your local laptop / macbook, install ansible and issue commands from there.
A pigsty deployment may have one or more infra nodes, at least 1, 2 or more for production deployment.
The infra group specifies infra nodes in the inventory.
And infra nodes will have INFRA module installed (DNS, Nginx, Prometheus, Grafana, etc…).
| Component | Port | Domain | Description |
|---|---|---|---|
nginx |
80 |
h.pigsty |
Web Service Portal (YUM/APT Repo) |
alertmanager |
9059 |
a.pigsty |
Alert Aggregation and delivery |
prometheus |
9058 |
p.pigsty |
Monitoring Time Series Database |
grafana |
3000 |
g.pigsty |
Visualization Platform |
lok |
3100 |
- | Logging Collection Server |
pushgateway |
9091 |
- | Collect One-Time Job Metrics |
blackbox_exporter |
9115 |
- | Blackbox Probing |
dnsmasq |
53 |
- | DNS Server |
chronyd |
123 |
- | NTP Time Server |
ansible |
- | - | Run playbooks |
The node with PGSQL module installed is called a PGSQL node. The node and PG instance are 1:1 deployed.
And node identities can be borrowed from pg instances with node_id_from_pg option.
Here are additional components & service port on PGSQL nodes:
| Component | Port | Description | Status |
|---|---|---|---|
postgres |
5432 |
PostgreSQL Server Process Managed by Patroni | Enabled |
pgbouncer |
6432 |
Pgbouncer Connection Pool | Enabled |
patroni |
8008 |
Patroni HA Component, Manage postgres |
Enabled |
primary @ haproxy |
5433 |
Primary connection pool: Read/Write Service | Enabled |
replica @ haproxy |
5434 |
Replica connection pool: Read-only Service | Enabled |
default @ haproxy |
5436 |
Primary Direct Connect Service | Enabled |
offline @ haproxy |
5438 |
Offline Direct Connect: Offline Read Service | Enabled |
pg_exporter |
9630 |
postgres Monitoring Metrics Exporter | Enabled |
pgbouncer_exporter |
9631 |
pgbouncer Monitoring Metrics Exporter | Enabled |
pgbackrest_exporter |
9854 |
pgbackrest Monitoring Metrics Exporter | Enabled |
vip-manager |
- | Bind VIP to the primary | Disabled |
You don’t need to define node cluster and node instances explicitly. It is often implied by other database module’s cluster definition. If you define a PGSQL cluster, it defines a node cluster implicitly.
But there are some cases where you may want to use explicit named node clusters / instances. Such as running node groups for dedicated purpose (e.g., haproxy groups, node buffer pool, etc…)
Pigsty uses node’s primary IPv4 address (inventory_hostname) as its identity.
| Name | Type | Level | Necessity | Comment |
|---|---|---|---|---|
inventory_hostname |
ip |
- | Required | Node IP |
nodename |
string |
I | Optional | Node Name |
node_cluster |
string |
C | Optional | Node cluster name |
The nodename & node_cluster can be used as optional secondary identity for monitoring purpose.
This can be useful when you just want to monitor these nodes rather than running database on them.
Because Pigsty is using a 1:1 mapping between NODE and PG instance (there’s only one PG instance per node), the node’s identity can be borrowed from corresponding PG instances:
| Name | Label | Level | Borrowed Identity | Comment |
|---|---|---|---|---|
nodename |
ins |
I | {{ pg_cluster }}-{{ pg_seq }} |
PG Instance Name |
node_cluster |
cls |
C | {{ pg_cluster }} |
PG Cluster Name |
This is default behavior, it’s convenient to have PG & NODE with the same cls / ins identity labels in the monitoring system.
This can be disabled by overwriting the node_id_from_pg param to false
If there’s no corresponding PG instance defined, and no explicit nodename & node_cluster defined,
the node will be labeled with cls as nodes and ins as the current hostname.
The inventory_hostname is used by Ansible to connect to the node via SSH.
If your node cannot be simply access via ssh <inventory_hostname>, ssh alias and more ansible conn param (even a different IP) can be used.
But the inventory_hostname is still the core identity of the node.
There are 10 sections, 65 parameters in the NODE module.
NODE_ID : Node identity parametersNODE_DNS : Node Domain Name ResolutionNODE_PACKAGE : Upstream Repo & Install PackagesNODE_TUNE : Node Tuning & FeaturesNODE_ADMIN : Admin User & SSH KeysNODE_TIME : Timezone, NTP, CrontabNODE_VIP : Optional L2 VIP among clusterHAPROXY : Expose services with HAProxyNODE_EXPORTER : Node monitoring agentPROMTAIL : Promtail logging agent| Name | Section | Type | Level | Comment |
|---|---|---|---|---|
nodename |
NODE_ID |
string |
I | node instance identity, use hostname if missing, optional |
node_cluster |
NODE_ID |
string |
C | node cluster identity, use ’nodes’ if missing, optional |
nodename_overwrite |
NODE_ID |
bool |
C | overwrite node’s hostname with nodename? |
nodename_exchange |
NODE_ID |
bool |
C | exchange nodename among play hosts? |
node_id_from_pg |
NODE_ID |
bool |
C | use postgres identity as node identity if applicable? |
node_write_etc_hosts |
NODE_DNS |
bool |
G/C/I | modify /etc/hosts on target node? |
node_default_etc_hosts |
NODE_DNS |
string[] |
G | static dns records in /etc/hosts |
node_etc_hosts |
NODE_DNS |
string[] |
C | extra static dns records in /etc/hosts |
node_dns_method |
NODE_DNS |
enum |
C | how to handle dns servers: add,none,overwrite |
node_dns_servers |
NODE_DNS |
string[] |
C | dynamic nameserver in /etc/resolv.conf |
node_dns_options |
NODE_DNS |
string[] |
C | dns resolv options in /etc/resolv.conf |
node_repo_modules |
NODE_PACKAGE |
string |
C | upstream repo to be added on node, local by default |
node_repo_remove |
NODE_PACKAGE |
bool |
C | remove existing repo on node? |
node_packages |
NODE_PACKAGE |
string[] |
C | packages to be installed current nodes |
node_default_packages |
NODE_PACKAGE |
string[] |
G | default packages to be installed on all nodes |
node_disable_firewall |
NODE_TUNE |
bool |
C | disable node firewall? true by default |
node_disable_selinux |
NODE_TUNE |
bool |
C | disable node selinux? true by default |
node_disable_numa |
NODE_TUNE |
bool |
C | disable node numa, reboot required |
node_disable_swap |
NODE_TUNE |
bool |
C | disable node swap, use with caution |
node_static_network |
NODE_TUNE |
bool |
C | preserve dns resolver settings after reboot |
node_disk_prefetch |
NODE_TUNE |
bool |
C | setup disk prefetch on HDD to increase performance |
node_kernel_modules |
NODE_TUNE |
string[] |
C | kernel modules to be enabled on this node |
node_hugepage_count |
NODE_TUNE |
int |
C | number of 2MB hugepage, take precedence over ratio |
node_hugepage_ratio |
NODE_TUNE |
float |
C | node mem hugepage ratio, 0 disable it by default |
node_overcommit_ratio |
NODE_TUNE |
float |
C | node mem overcommit ratio, 0 disable it by default |
node_tune |
NODE_TUNE |
enum |
C | node tuned profile: none,oltp,olap,crit,tiny |
node_sysctl_params |
NODE_TUNE |
dict |
C | sysctl parameters in k:v format in addition to tuned |
node_data |
NODE_ADMIN |
path |
C | node main data directory, /data by default |
node_admin_enabled |
NODE_ADMIN |
bool |
C | create a admin user on target node? |
node_admin_uid |
NODE_ADMIN |
int |
C | uid and gid for node admin user |
node_admin_username |
NODE_ADMIN |
username |
C | name of node admin user, dba by default |
node_admin_ssh_exchange |
NODE_ADMIN |
bool |
C | exchange admin ssh key among node cluster |
node_admin_pk_current |
NODE_ADMIN |
bool |
C | add current user’s ssh pk to admin authorized_keys |
node_admin_pk_list |
NODE_ADMIN |
string[] |
C | ssh public keys to be added to admin user |
node_aliases |
NODE_ADMIN |
dict |
C | extra shell aliases to be added, k:v dict |
node_timezone |
NODE_TIME |
string |
C | setup node timezone, empty string to skip |
node_ntp_enabled |
NODE_TIME |
bool |
C | enable chronyd time sync service? |
node_ntp_servers |
NODE_TIME |
string[] |
C | ntp servers in /etc/chrony.conf |
node_crontab_overwrite |
NODE_TIME |
bool |
C | overwrite or append to /etc/crontab? |
node_crontab |
NODE_TIME |
string[] |
C | crontab entries in /etc/crontab |
vip_enabled |
NODE_VIP |
bool |
C | enable vip on this node cluster? |
vip_address |
NODE_VIP |
ip |
C | node vip address in ipv4 format, required if vip is enabled |
vip_vrid |
NODE_VIP |
int |
C | required, integer, 1-254, should be unique among same VLAN |
vip_role |
NODE_VIP |
enum |
I | optional, master/backup, backup by default, use as init role |
vip_preempt |
NODE_VIP |
bool |
C/I | optional, true/false, false by default, enable vip preemption |
vip_interface |
NODE_VIP |
string |
C/I | node vip network interface to listen, eth0 by default |
vip_dns_suffix |
NODE_VIP |
string |
C | node vip dns name suffix, empty string by default |
vip_exporter_port |
NODE_VIP |
port |
C | keepalived exporter listen port, 9650 by default |
haproxy_enabled |
HAPROXY |
bool |
C | enable haproxy on this node? |
haproxy_clean |
HAPROXY |
bool |
G/C/A | cleanup all existing haproxy config? |
haproxy_reload |
HAPROXY |
bool |
A | reload haproxy after config? |
haproxy_auth_enabled |
HAPROXY |
bool |
G | enable authentication for haproxy admin page |
haproxy_admin_username |
HAPROXY |
username |
G | haproxy admin username, admin by default |
haproxy_admin_password |
HAPROXY |
password |
G | haproxy admin password, pigsty by default |
haproxy_exporter_port |
HAPROXY |
port |
C | haproxy admin/exporter port, 9101 by default |
haproxy_client_timeout |
HAPROXY |
interval |
C | client side connection timeout, 24h by default |
haproxy_server_timeout |
HAPROXY |
interval |
C | server side connection timeout, 24h by default |
haproxy_services |
HAPROXY |
service[] |
C | list of haproxy service to be exposed on node |
node_exporter_enabled |
NODE_EXPORTER |
bool |
C | setup node_exporter on this node? |
node_exporter_port |
NODE_EXPORTER |
port |
C | node exporter listen port, 9100 by default |
node_exporter_options |
NODE_EXPORTER |
arg |
C | extra server options for node_exporter |
promtail_enabled |
PROMTAIL |
bool |
C | enable promtail logging collector? |
promtail_clean |
PROMTAIL |
bool |
G/A | purge existing promtail status file during init? |
promtail_port |
PROMTAIL |
port |
C | promtail listen port, 9080 by default |
promtail_positions |
PROMTAIL |
path |
C | promtail position status file path |
NODE
The Node module tunes target nodes into the desired state and integrates them into the Pigsty monitoring system.
NODE_ID
Each node has identity parameters that are configured through the parameters in <cluster>.hosts and <cluster>.vars. Check NODE Identity for details.
nodename
name: nodename, type: string, level: I
node instance identity, use hostname if missing, optional
no default value, Null or empty string means nodename will be set to node’s current hostname.
If node_id_from_pg is true (by default) and nodename is not explicitly defined, nodename will try to use ${pg_cluster}-${pg_seq} first, if PGSQL is not defined on this node, it will fall back to default HOSTNAME.
If nodename_overwrite is true, the node name will also be used as the HOSTNAME.
node_cluster
name: node_cluster, type: string, level: C
node cluster identity, use ’nodes’ if missing, optional
default values: nodes
If node_id_from_pg is true (by default) and node_cluster is not explicitly defined, node_cluster will try to use ${pg_cluster} first, if PGSQL is not defined on this node, it will fall back to default HOSTNAME.
nodename_overwrite
name: nodename_overwrite, type: bool, level: C
overwrite node’s hostname with nodename?
default value is true, a non-empty node name nodename will override the hostname of the current node.
When the nodename parameter is undefined or an empty string, but node_id_from_pg is true, the node name will try to use {{ pg_cluster }}-{{ pg_seq }}, borrow identity from the 1:1 PostgreSQL Instance’s ins name.
No changes are made to the hostname if the nodename is undefined, empty, or an empty string and node_id_from_pg is false.
nodename_exchange
name: nodename_exchange, type: bool, level: C
exchange nodename among play hosts?
default value is false
When this parameter is enabled, node names are exchanged between the same group of nodes executing the node.yml playbook, written to /etc/hosts.
node_id_from_pg
name: node_id_from_pg, type: bool, level: C
use postgres identity as node identity if applicable?
default value is true
Borrow PostgreSQL cluster & instance identity if applicable.
It’s useful to use same identity for postgres & node if there’s a 1:1 relationship
NODE_DNS
Pigsty configs static DNS records and dynamic DNS resolver for nodes.
If you already have a DNS server, set node_dns_method to none to disable dynamic DNS setup.
name: node_write_etc_hosts, type: ‘bool’, level: G|C|I
modify /etc/hosts on target node?
For example, the docker VM can not modify /etc/hosts by default, so you can set this value to false to disable the modification.
node_default_etc_hosts
name: node_default_etc_hosts, type: string[], level: G
static dns records in /etc/hosts
default value:
node_default_etc_hosts is an array. Each element is a DNS record with format <ip> <name>.
It is used for global static DNS records. You can use node_etc_hosts for ad hoc records for each cluster.
Make sure to write a DNS record like 10.10.10.10 h.pigsty a.pigsty p.pigsty g.pigsty to /etc/hosts to ensure that the local yum repo can be accessed using the domain name before the DNS Nameserver starts.
node_etc_hosts
name: node_etc_hosts, type: string[], level: C
extra static dns records in /etc/hosts
default values: []
Same as node_default_etc_hosts, but in addition to it.
node_dns_method
name: node_dns_method, type: enum, level: C
how to handle dns servers: add,none,overwrite
default values: add
add: Append the records in node_dns_servers to /etc/resolv.conf and keep the existing DNS servers. (default)overwrite: Overwrite /etc/resolv.conf with the record in node_dns_serversnone: If a DNS server is provided in the production env, the DNS server config can be skipped.node_dns_servers
name: node_dns_servers, type: string[], level: C
dynamic nameserver in /etc/resolv.conf
default values: ["${admin_ip}"] , the default nameserver on admin node will be added to /etc/resolv.conf as the first nameserver.
node_dns_options
name: node_dns_options, type: string[], level: C
dns resolv options in /etc/resolv.conf, default value:
NODE_PACKAGE
This section is about upstream yum repos & packages to be installed.
node_repo_modules
name: node_repo_modules, type: string, level: C/A
upstream repo to be added on node, default value: local
This parameter specifies the upstream repo to be added to the node. It is used to filter the repo_upstream entries and only the entries with the same module value will be added to the node’s software source. Which is similar to the repo_modules parameter.
node_repo_remove
name: node_repo_remove, type: bool, level: C/A
remove existing repo on node?
default value is true, and thus Pigsty will move existing repo file in /etc/yum.repos.d to a backup dir: /etc/yum.repos.d/backup before adding upstream repos On Debian/Ubuntu, Pigsty will backup & move /etc/apt/sources.list(.d) to /etc/apt/backup.
node_packages
name: node_packages, type: string[], level: C
packages to be installed current nodes, default values: [openssh-server].
Each element is a comma-separated list of package names, which will be installed on the current node in addition to node_default_packages
Packages specified in this parameter will be upgraded to the latest version, and the default value is [openssh-server], which will upgrade sshd by default to avoid SSH CVE.
This parameter is usually used to install additional software packages that are ad hoc for the current node/cluster.
node_default_packages
name: node_default_packages, type: string[], level: G
default packages to be installed on all nodes, the default values is not defined.
This param is an array of strings, each string is a comma-separated list of package names, which will be installed on all nodes by default.
This param DOES NOT have a default value, you can specify it explicitly, or leave it empty if you want to use the default values.
When leaving it empty, Pigsty will use the default values from the node_packages_default defined in roles/node_id/vars according to you OS.
For EL system, the default values are:
For debian / ubuntu nodes, use this default value explicitly:
NODE_TUNE
Configure tuned templates, features, kernel modules, sysctl params on node.
node_disable_firewall
name: node_disable_firewall, type: bool, level: C
disable node firewall? true by default
default value is true
node_disable_selinux
name: node_disable_selinux, type: bool, level: C
disable node selinux? true by default
default value is true
node_disable_numa
name: node_disable_numa, type: bool, level: C
disable node numa, reboot required
default value is false
Boolean flag, default is not off. Note that turning off NUMA requires a reboot of the machine before it can take effect!
If you don’t know how to set the CPU affinity, it is recommended to turn off NUMA.
node_disable_swap
name: node_disable_swap, type: bool, level: C
disable node swap, use with caution
default value is false
Turning off SWAP is not recommended. However, SWAP should be disabled when your node is used for a Kubernetes deployment.
If there is enough memory and the database is deployed exclusively, it may slightly improve performance
node_static_network
name: node_static_network, type: bool, level: C
preserve dns resolver settings after reboot, default value is true
Enabling static networking means that machine reboots will not overwrite your DNS Resolv config with NIC changes. It is recommended to enable it in production environment.
node_disk_prefetch
name: node_disk_prefetch, type: bool, level: C
setup disk prefetch on HDD to increase performance
default value is false, Consider enable this when using HDD.
node_kernel_modules
name: node_kernel_modules, type: string[], level: C
kernel modules to be enabled on this node
default value:
An array consisting of kernel module names declaring the kernel modules that need to be installed on the node.
node_hugepage_count
name: node_hugepage_count, type: int, level: C
number of 2MB hugepage, take precedence over ratio, 0 by default
Take precedence over node_hugepage_ratio. If a non-zero value is given, it will be written to /etc/sysctl.d/hugepage.conf
If node_hugepage_count and node_hugepage_ratio are both 0 (default), hugepage will be disabled at all.
Negative value will not work, and number higher than 90% node mem will be ceil to 90% of node mem.
It should slightly larger than pg_shared_buffer_ratio, if not zero.
node_hugepage_ratio
name: node_hugepage_ratio, type: float, level: C
node mem hugepage ratio, 0 disable it by default, valid range: 0 ~ 0.40
default values: 0, which will set vm.nr_hugepages=0 and not use HugePage at all.
Percent of this memory will be allocated as HugePage, and reserved for PostgreSQL.
It should be equal or slightly larger than pg_shared_buffer_ratio, if not zero.
For example, if you have default 25% mem for postgres shard buffers, you can set this value to 0.27 ~ 0.30, Wasted hugepage can be reclaimed later with /pg/bin/pg-tune-hugepage
node_overcommit_ratio
name: node_overcommit_ratio, type: int, level: C
node mem overcommit ratio, 0 disable it by default. this is an integer from 0 to 100+ .
default values: 0, which will set vm.overcommit_memory=0, otherwise vm.overcommit_memory=2 will be used, and this value will be used as vm.overcommit_ratio.
It is recommended to set use a vm.overcommit_ratio on dedicated pgsql nodes. e.g. 50 ~ 100.
node_tune
name: node_tune, type: enum, level: C
node tuned profile: none,oltp,olap,crit,tiny
default values: oltp
tiny: Micro Virtual Machine (1 ~ 3 Core, 1 ~ 8 GB Mem)oltp: Regular OLTP templates with optimized latencyolap : Regular OLAP templates to optimize throughputcrit: Core financial business templates, optimizing the number of dirty pagesUsually, the database tuning template pg_conf should be paired with the node tuning template: node_tune
node_sysctl_params
name: node_sysctl_params, type: dict, level: C
sysctl parameters in k:v format in addition to tuned
default values: {}
Dictionary K-V structure, Key is kernel sysctl parameter name, Value is the parameter value.
You can also define sysctl parameters with tuned profile
NODE_ADMIN
This section is about admin users and it’s credentials.
node_data
name: node_data, type: path, level: C
node main data directory, /data by default
default values: /data
If specified, this path will be used as major data disk mountpoint. And a dir will be created and throwing a warning if path not exists.
The data dir is owned by root with mode 0777.
node_admin_enabled
name: node_admin_enabled, type: bool, level: C
create a admin user on target node?
default value is true
Create an admin user on each node (password-free sudo and ssh), an admin user named dba (uid=88) will be created by default, which can access other nodes in the env and perform sudo from the meta node via SSH password-free.
node_admin_uid
name: node_admin_uid, type: int, level: C
uid and gid for node admin user
default values: 88
node_admin_username
name: node_admin_username, type: username, level: C
name of node admin user, dba by default
default values: dba
node_admin_ssh_exchange
name: node_admin_ssh_exchange, type: bool, level: C
exchange admin ssh key among node cluster
default value is true
When enabled, Pigsty will exchange SSH public keys between members during playbook execution, allowing admins node_admin_username to access each other from different nodes.
node_admin_pk_current
name: node_admin_pk_current, type: bool, level: C
add current user’s ssh pk to admin authorized_keys
default value is true
When enabled, on the current node, the SSH public key (~/.ssh/id_rsa.pub) of the current user is copied to the authorized_keys of the target node admin user.
When deploying in a production env, be sure to pay attention to this parameter, which installs the default public key of the user currently executing the command to the admin user of all machines.
node_admin_pk_list
name: node_admin_pk_list, type: string[], level: C
ssh public keys to be added to admin user
default values: []
Each element of the array is a string containing the key written to the admin user ~/.ssh/authorized_keys, and the user with the corresponding private key can log in as an admin user.
When deploying in production envs, be sure to note this parameter and add only trusted keys to this list.
node_aliases
name: node_aliases, type: dict, level: C/I
extra aliases to be added to admin user’s shell profile
default values: {}
You can add extra shell aliases to it, pigsty will add these aliases to the /etc/profile.d/node.alias.sh file on the target node:
This will generate:
NODE_TIME
node_timezone
name: node_timezone, type: string, level: C
setup node timezone, empty string to skip
default value is empty string, which will not change the default timezone (usually UTC)
node_ntp_enabled
name: node_ntp_enabled, type: bool, level: C
enable chronyd time sync service?
default value is true, and thus Pigsty will override the node’s /etc/chrony.conf by with node_ntp_servers.
If you already a NTP server configured, just set to false to leave it be.
node_ntp_servers
name: node_ntp_servers, type: string[], level: C
ntp servers in /etc/chrony.conf, default value: ["pool pool.ntp.org iburst"]
It only takes effect if node_ntp_enabled is true.
You can use ${admin_ip} to sync time with ntp server on admin node rather than public ntp server.
node_crontab_overwrite
name: node_crontab_overwrite, type: bool, level: C
overwrite or append to /etc/crontab?
default value is true, and pigsty will render records in node_crontab in overwrite mode rather than appending to it.
node_crontab
name: node_crontab, type: string[], level: C
crontab entries in /etc/crontab
default values: []
NODE_VIP
You can bind an optional L2 VIP among one node cluster, which is disabled by default.
L2 VIP can only be used in same L2 LAN, which may incurs extra restrictions on your network topology.
If enabled, You have to manually assign the vip_address and vip_vrid for each node cluster.
It is user’s responsibility to ensure that the address / vrid is unique among the same LAN.
vip_enabled
name: vip_enabled, type: bool, level: C
enable vip on this node cluster? default value is false, means no L2 VIP is created for this node cluster.
L2 VIP can only be used in same L2 LAN, which may incurs extra restrictions on your network topology.
vip_address
name: vip_address, type: ip, level: C
node vip address in IPv4 format, required if node vip_enabled.
no default value. This parameter must be explicitly assigned and unique in your LAN.
vip_vrid
name: vip_vrid, type: int, level: C
integer, 1-254, should be unique in same VLAN, required if node vip_enabled.
no default value. This parameter must be explicitly assigned and unique in your LAN.
vip_role
name: vip_role, type: enum, level: I
node vip role, could be master or backup, will be used as initial keepalived state.
vip_preempt
name: vip_preempt, type: bool, level: C/I
optional, true/false, false by default, enable vip preemption
default value is false, means no preempt is happening when a backup have higher priority than living master.
vip_interface
name: vip_interface, type: string, level: C/I
node vip network interface to listen, eth0 by default.
It should be the same primary intranet interface of your node, which is the IP address you used in the inventory file.
If your node have different interface, you can override it on instance vars
vip_dns_suffix
name: vip_dns_suffix, type: string, level: C/I
node vip dns name suffix, empty string by default. It will be used as the DNS name of the node VIP.
vip_exporter_port
name: vip_exporter_port, type: port, level: C/I
keepalived exporter listen port, 9650 by default.
HAPROXY
HAProxy is installed on every node by default, exposing services in a NodePort manner.
haproxy_enabled
name: haproxy_enabled, type: bool, level: C
enable haproxy on this node?
default value is true
haproxy_clean
name: haproxy_clean, type: bool, level: G/C/A
cleanup all existing haproxy config?
default value is false
haproxy_reload
name: haproxy_reload, type: bool, level: A
reload haproxy after config?
default value is true, it will reload haproxy after config change.
If you wish to check before apply, you can turn off this with cli args and check it.
haproxy_auth_enabled
name: haproxy_auth_enabled, type: bool, level: G
enable authentication for haproxy admin page
default value is true, which will require a http basic auth for admin page.
disable it is not recommended, since your traffic control will be exposed
haproxy_admin_username
name: haproxy_admin_username, type: username, level: G
haproxy admin username, admin by default
haproxy_admin_password
name: haproxy_admin_password, type: password, level: G
haproxy admin password, pigsty by default
PLEASE CHANGE IT IN YOUR PRODUCTION ENVIRONMENT!
haproxy_exporter_port
name: haproxy_exporter_port, type: port, level: C
haproxy admin/exporter port, 9101 by default
haproxy_client_timeout
name: haproxy_client_timeout, type: interval, level: C
client side connection timeout, 24h by default
haproxy_server_timeout
name: haproxy_server_timeout, type: interval, level: C
server side connection timeout, 24h by default
haproxy_services
name: haproxy_services, type: service[], level: C
list of haproxy service to be exposed on node, default values: []
Each element is a service definition, here is an ad hoc haproxy service example:
It will be rendered to /etc/haproxy/<service.name>.cfg and take effect after reload.
NODE_EXPORTER
node_exporter_enabled
name: node_exporter_enabled, type: bool, level: C
setup node_exporter on this node? default value is true
node_exporter_port
name: node_exporter_port, type: port, level: C
node exporter listen port, 9100 by default
node_exporter_options
name: node_exporter_options, type: arg, level: C
extra server options for node_exporter, default value: --no-collector.softnet --no-collector.nvme --collector.tcpstat --collector.processes
Pigsty enables tcpstat, processes collectors and disable nvme, softnet metrics collectors by default.
PROMTAIL
Promtail will collect logs from other modules, and send them to LOKI
INFRA: Infra logs, collected only on infra nodes.
nginx-access: /var/log/nginx/access.lognginx-error: /var/log/nginx/error.loggrafana: /var/log/grafana/grafana.logNODES: Host node logs, collected on all nodes.
syslog: /var/log/messagesdmesg: /var/log/dmesgcron: /var/log/cronPGSQL: PostgreSQL logs, collected when a node is defined with pg_cluster.
postgres: /pg/log/postgres/*patroni: /pg/log/patroni.logpgbouncer: /pg/log/pgbouncer/pgbouncer.logpgbackrest: /pg/log/pgbackrest/*.logREDIS: Redis logs, collected when a node is defined with redis_cluster.
redis: /var/log/redis/*.logLog directory are customizable according to
pg_log_dir,patroni_log_dir,pgbouncer_log_dir,pgbackrest_log_dir
promtail_enabled
name: promtail_enabled, type: bool, level: C
enable promtail logging collector?
default value is true
promtail_clean
name: promtail_clean, type: bool, level: G/A
purge existing promtail status file during init?
default value is false, if you choose to clean, Pigsty will remove the existing state file defined by promtail_positions which means that Promtail will recollect all logs on the current node and send them to Loki again.
promtail_port
name: promtail_port, type: port, level: C
promtail listen port, 9080 by default
default values: 9080
promtail_positions
name: promtail_positions, type: path, level: C
promtail position status file path
default values: /var/log/positions.yaml
Promtail records the consumption offsets of all logs, which are periodically written to the file specified by promtail_positions.
Node admin SOP, add & remove node, setup admin, bind vip and miscellany
Here are some common administration tasks for NODE module.
To add a node into Pigsty, you need to have nopass ssh/sudo access to the node
To remove a node from Pigsty, you can use the following:
If the current user does not have nopass ssh/sudo access to the node, you can use another admin user to bootstrap the node:
You can bind an optional L2 VIP on a node cluster with vip_enabled.
Pigsty has four pre-defined tuned profiles for different work loads:
| Profile | Description | Scenario |
|---|---|---|
TINY |
Optimize for running on small VM | spec < 4c8g |
OLTP |
Optimize for latency | Default, transaction processing |
OLAP |
Optimize for throughput | analytic workloads |
CRIT |
Optimize for reliability | finance, critical |
You can also manage tuned profiles with tuned-adm command on nodes:
You can manage kernel modules with node_kernel_modules in node.yml.
To manage kernel modules manually, you can use the following commands on nodes:
Pigsty provides two playbooks for node management:
| Playbook | Purpose | Usage | Scope |
|---|---|---|---|
node.yml |
Add node to pigsty | ./node.yml -l <target> |
Single node or cluster |
node-rm.yml |
Remove node from pigsty | ./node-rm.yml -l <target> |
Single node or cluster |
node.yml
The node.yml playbook transforms bare computing resources into fully configured, monitored, and service-ready nodes within your Pigsty infrastructure. This comprehensive automation handles everything from basic OS configuration to advanced monitoring setup.
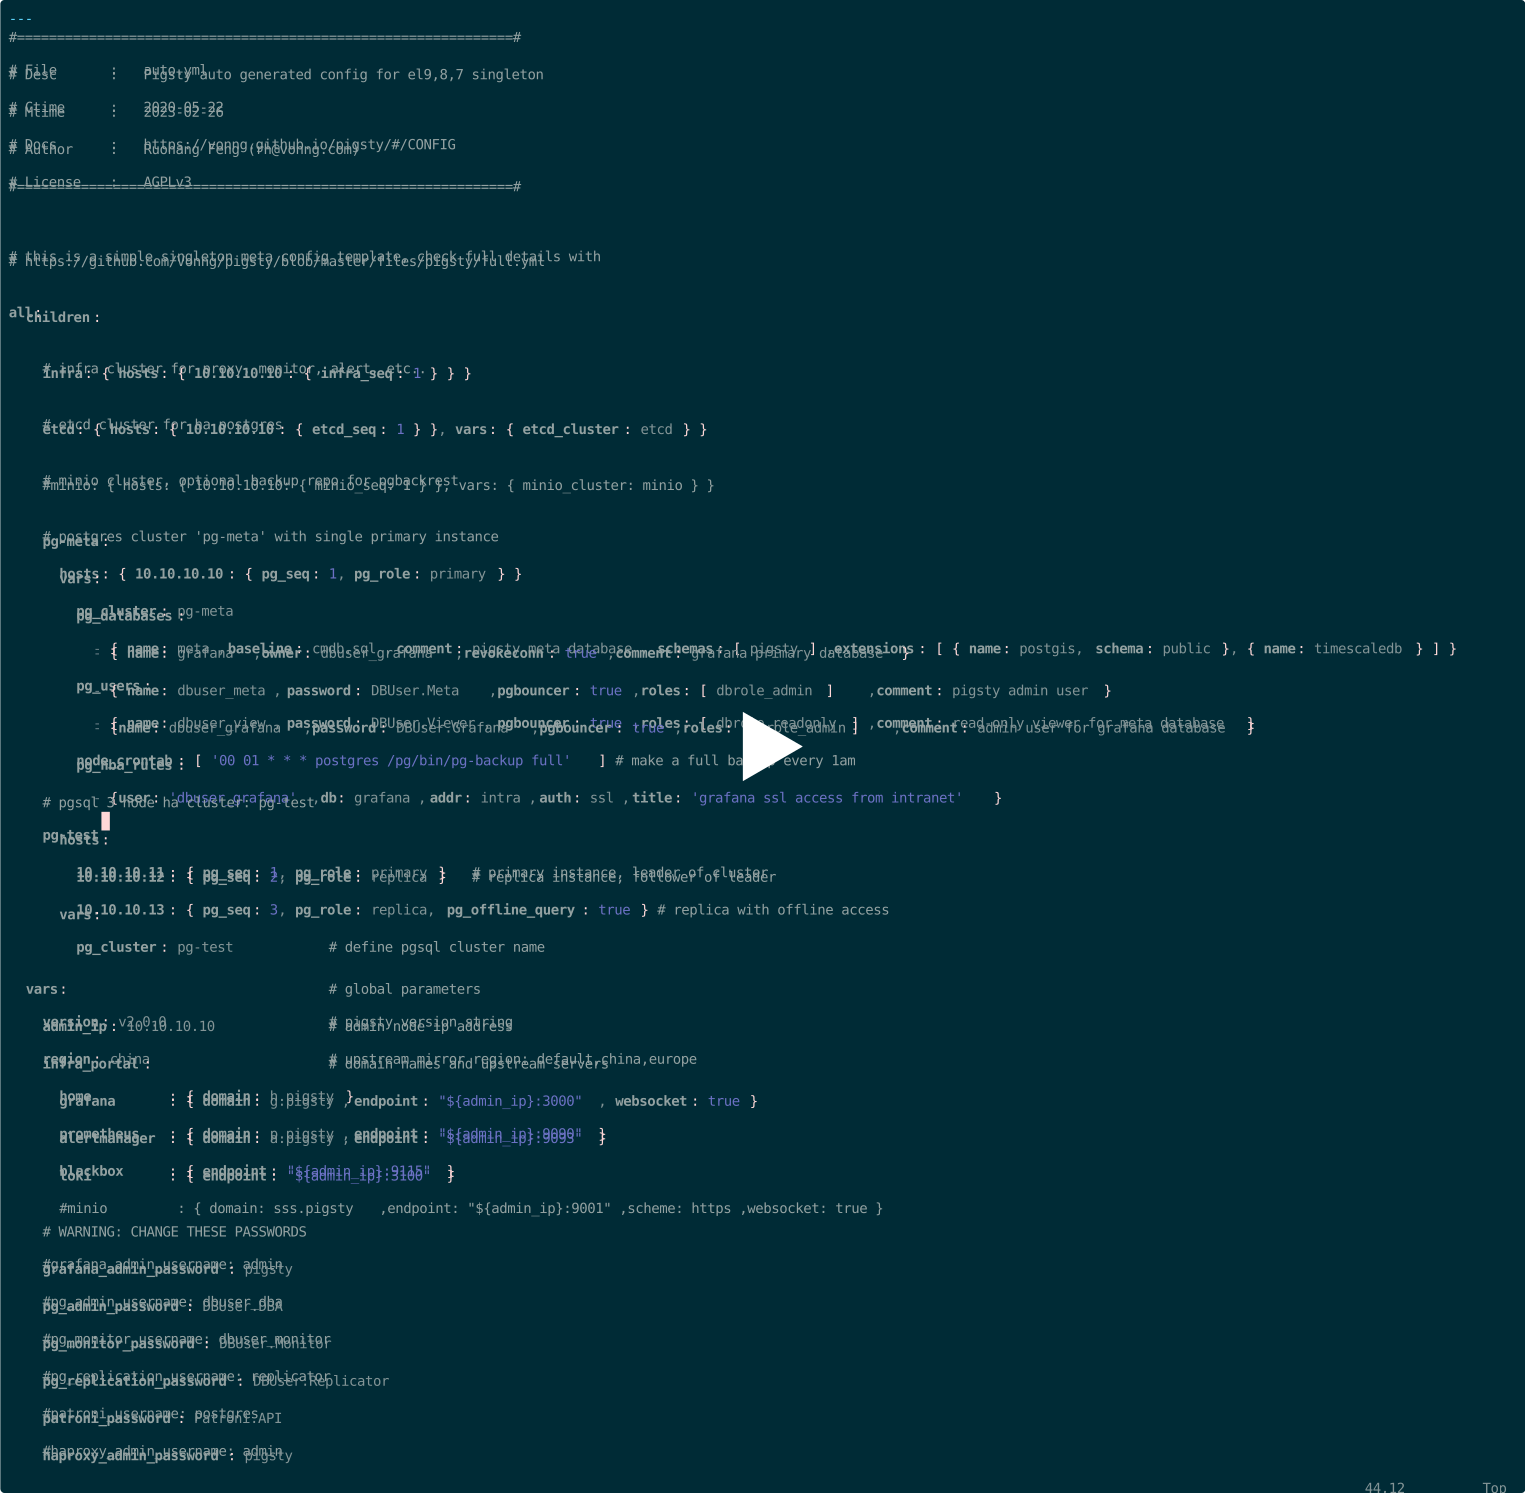
node-rm.yml
The node-rm.yml playbook performs clean, comprehensive removal of nodes from your Pigsty infrastructure. This automation ensures all services, configurations, and monitoring integrations are properly deregistered and cleaned up, preventing orphaned resources and maintaining system hygiene.
There are 6 dashboards for NODE module.
NODE Overview: Overview of all nodes
NODE Cluster: Detail information about one dedicated node cluster
NODE Instance : Detail information about one single node instance
NODE Alert: Overview of key metrics of all node clusters/instances
NODE VIP: Detail information about a L2 VIP on a node cluster
NODE Haproxy : Detail information about haproxy load balancer
Here are default alerting rules for node module:
If NTP is not configured, use a public NTP service or sync time with the admin node.
If your nodes already have NTP configured, you can leave it there by setting node_ntp_enabled to false.
Otherwise, if you have Internet access, you can use public NTP services such as pool.ntp.org.
If you don’t have Internet access, at least you can sync time with the admin node with the following:
Use chronyc to sync time. You have to configure the NTP service first.
You can replace all with any group or host IP address to limit execution scope.
Consider using Ansible connection parameters if the target machine is hidden behind an SSH springboard machine, or if some customizations have been made that cannot be accessed directly using ssh ip. Additional SSH ports can be specified with ansible_port or ansible_host for SSH Alias.
When performing deployments and changes, the admin user used must have ssh and sudo privileges for all nodes. Password-free is not required.
You can pass in ssh and sudo passwords via the -k|-K parameter when executing the playbook or even use another user to run the playbook via -eansible_host=<another_user>. However, Pigsty strongly recommends configuring SSH passwordless login with passwordless sudo for the admin user.
This will create an admin user specified by node_admin_username using the existing admin user on that node.
You can expose service with haproxy_services in node.yml.
And here’s an example of exposing MinIO service with it: Expose MinIO Service
Pigsty will try to include all dependencies in the local yum repo on infra nodes. This repo file will be added according to node_repo_modules. And existing repo files will be removed by default according to the default value of node_repo_remove. This will prevent the node from using the Internet repo or some stupid issues.
If you want to keep existing repo files during node init, just set node_repo_remove to false.
If you want to keep existing repo files during infra node local repo bootstrap, just set repo_remove to false.
The pigsty prompt is defined with the environment variable PS1 in /etc/profile.d/node.sh.
To restore your existing prompt, just remove that file and login again.
OpenCloudOS does not have softdog module, overwrite node_kernel_modules on global vars:
ETCD is a distributed, reliable key-value store for the most critical data of a distributed system. etcd is used as DCS (Distributed configuration storage) for patroni, the PostgreSQL HA Agent for config management and leader election.
In short, PGSQL depends on a global ETCD module, and ETCD depends on NODE module to work properly (use the node CA).
Define etcd cluster at different size
Customize etcd components with 10 parameters
Adding / Removing etcd members, refresh endpoints...
Ansible playbooks that can be used in etcd module
Dashboards, metrics, record & alerting rules.
Frequently Asked Questions about etcd module
You have to define the etcd cluster in the config inventory before deploying it.
Usually you can choose an etcd cluster with:
Use even number of etcd nodes is meaningless, and more than five nodes is not common.
Define the group etcd in the inventory, It will create a singleton etcd instance.
This line exists almost in all single-node config template, where the placeholder IP address 10.10.10.10 will be replaced with the current admin node IP.
The only necessary parameters are etcd_seq and etcd_cluster, which uniquely identify the cluster and each instance.
Three-node etcd cluster is quite common, which tolerates one-node failure, suitable for most cases.
The trio and safe config templates use a three-node etcd cluster, as shown below:
Five nodes etcd cluster can tolerate two node failure, suitable for large prod env.
There’s a five-node etcd cluster example in the prod template:
You can use even more nodes, but 3 or 5 nodes are recommended.
Use odd number for cluster size, like 1, 3, 5, 7, …
These are the services that currently use Etcd:
You’ll have to reload etcd config after any permanent change to the etcd cluster members.
e.g, update patroni reference to etcd endpoints:
e.g., update vip-manager reference to etcd endpoints (if you are using PGSQL L2 VIP):
There are 12 parameters about the ETCD module.
ETCD: 9 Parameters:
| Parameter | Type | Level | Comment |
|---|---|---|---|
etcd_seq |
int | I | etcd instance identifier, REQUIRED |
etcd_cluster |
string | C | etcd cluster & group name, etcd by default |
etcd_learner |
bool | I | prevent purging running etcd instance? |
etcd_data |
path | C | etcd data directory, /data/etcd by default |
etcd_port |
port | C | etcd client port, 2379 by default |
etcd_peer_port |
port | C | etcd peer port, 2380 by default |
etcd_init |
enum | C | etcd initial cluster state, new or existing |
etcd_election_timeout |
int | C | etcd election timeout, 1000ms by default |
etcd_heartbeat_interval |
int | C | etcd heartbeat interval, 100ms by default |
ETCD_REMOVE: 3 Parameters:
| Parameter | Type | Level | Comment |
|---|---|---|---|
etcd_safeguard |
bool | G/C/A | prevent purging running etcd instance? |
etcd_rm_data |
bool | G/C/A | remove etcd data during removal? (default: true) |
etcd_rm_pkg |
bool | G/C/A | uninstall etcd packages during removal? (default: false) |
The default parameters are defined in roles/etcd/defaults/main.yml
Additional removal parameters are defined in roles/etcd_remove/defaults/main.yml
ETCD_REMOVE Parameters
etcd_seq
name: etcd_seq, type: int, level: I
etcd instance identifier, REQUIRED
no default value, you have to specify it explicitly. Here is a 3-node etcd cluster example:
etcd_cluster
name: etcd_cluster, type: string, level: C
etcd cluster & group name, etcd by default
default values: etcd, which is a fixed group name, can be useful when you want to use deployed some extra etcd clusters
etcd_learner
name: etcd_learner, type: bool, level: I
Init etcd instance as learner? default value is false
When set to true, the etcd instance will be init as leaner, so it will not be able to vote in the etcd cluster.
You can promote it to a full member later with etcdctl member promote command.
etcd_data
name: etcd_data, type: path, level: C
etcd data directory, /data/etcd by default
etcd_port
name: etcd_port, type: port, level: C
etcd client port, 2379 by default
etcd_peer_port
name: etcd_peer_port, type: port, level: C
etcd peer port, 2380 by default
etcd_init
name: etcd_init, type: enum, level: C
etcd initial cluster state, new or existing
default values: new, which will create a standalone new etcd cluster.
The value existing is used when trying to append new member to existing etcd cluster.
etcd_election_timeout
name: etcd_election_timeout, type: int, level: C
etcd election timeout, 1000 (ms) by default
etcd_heartbeat_interval
name: etcd_heartbeat_interval, type: int, level: C
etcd heartbeat interval, 100 (ms) by default
ETCD_REMOVE
This section contains parameters for the etcd_remove role,
which are action flags for the etcd-rm.yml playbook.
etcd_safeguard
name: etcd_safeguard, type: bool, level: G/C/A
prevent purging etcd instance? default value is false
If enabled, running etcd instance will not be purged by etcd-rm.yml playbook.
etcd_rm_data
name: etcd_rm_data, type: bool, level: G/C/A
remove etcd data during removal? default value is true
When enabled, the etcd-rm.yml playbook will remove etcd data directories and configuration files during cluster or member removal.
etcd_rm_pkg
name: etcd_rm_pkg, type: bool, level: G/C/A
uninstall etcd packages during removal? default value is false
When enabled, the etcd-rm.yml playbook will uninstall etcd packages during cluster or member removal.
Here are some administration SOP for etcd:
Check ETCD: FAQ for more questions.
To create an etcd cluster, define the etcd cluster in inventory first:
Then run the etcd.yml playbook.
If there’s an existing etcd cluster, this playbook will update the config and restart all the etcd instances
Pigsty has a safeguard mechanism to prevent accidental purge. etcd_safeguard is false by default,
For provisioned etcd cluster in prod env, you can enable safeguard to prevent accidental clean.
Since Pigsty v3.6+, the etcd.yml playbook and etcd role are focused solely on cluster installation and member addition. All removal operations have been moved to the dedicated etcd-rm.yml playbook using the etcd_remove role.
To remove an existing etcd cluster, you can use the dedicated etcd-rm.yml:
If the etcd_safeguard is set to true, the playbook will abort.
Pigsty use etcd v3 API by default. (v2 support is dropped since v3.6.0)
Here’s an example of client environment config.
You can do CRUD with the following commands after setting up the envs:
In case of permanent etcd cluster membership changes, You’ll have to refresh the 4 etcd endpoints references:
To refresh etcd config file /etc/etcd/etcd.conf on existing members and client env vars:
Update patroni reference to etcd endpoints:
Update vip-manager reference to etcd endpoints (if you are using PGSQL L2 VIP):
ETCD Reference: Add a member
Pigsty can perform etcd cluster expansion with bin/etcd-add script or the etcd.yml playbook.
You can add new members to existing etcd cluster in 5 steps:
etcdctl member add command to tell existing cluster that a new member is coming (use learner mode)etcd with new instanceetcd_init=existing, to join the existing cluster rather than create a new one (VERY IMPORTANT)Manual Approach
Automated Approach (Recommended)
Use the bin/etcd-add script to simplify the process:
The etcd-add script will:
To remove a member from existing etcd cluster, you have two approaches:
Automated Approach (Recommended)
Use the bin/etcd-rm script for simplified removal:
Or use the dedicated removal playbook:
Manual Approach
For manual removal, it usually takes 3 steps:
etcdctl member remove <server_id> command and kick it out of the clusterRemoval Parameters
The etcd_remove role supports several configuration options:
etcd_safeguard=true: Prevents accidental removaletcd_rm_data=true: Removes etcd data directories (default: true)etcd_rm_pkg=false: Uninstalls etcd packages (default: false)Example with custom parameters:
There’s a built-in playbook: etcd.yml for etcd cluster installation.
etcd.yml
To create a new etcd cluster, run the following playbook:
Here are available sub tasks:
etcd_assert : generate etcd identityetcd_install : install etcd rpm packagesetcd_dir : create etcd data & conf diretcd_config : generate etcd config
etcd_conf : generate etcd main configetcd_cert : generate etcd ssl certetcd_launch : launch etcd serviceetcd_register : register etcd to prometheusIf you want to append a new member to an existing etcd cluster,
you have to add it to the config inventory, and run the playbook with etcd_init = existing
against the new member:
It’s usually OK to re-run the playbook, it will update the etcd cluster config and restart etcd instances.
Since Pigsty v3.6+, the etcd.yml playbook no longer has cluster removal capabilities. Use the dedicated etcd-rm.yml playbook and etcd_remove role for etcd cluster removal operations.
etcd-rm.yml
To remove the etcd cluster, run the following playbook:
Here are available sub tasks:
etcd_safeguard : check safeguard and abort if enabledprometheus : remove etcd targets registration from prometheusetcd_leave : try graceful leaving etcd cluster before purgeetcd_stop : stop and disable etcd service with systemdetcd_data : remove etcd data (disable with etcd_rm_data=false)etcd_pkg : uninstall etcd packages (enable with etcd_rm_pkg=true)To remove a member from an existing etcd cluster, you can run the playbook
The removal playbook uses the new etcd_remove role with configurable parameters:
etcd_safeguard: Prevents accidental removal when set to trueetcd_rm_data: Controls whether ETCD data is deleted (true by default)etcd_rm_pkg: Controls whether ETCD packages are uninstalled (false by default)The ETCD module provides a monitoring dashboard: Etcd Overview.
ETCD Overview: Overview of the ETCD cluster
This dashboard provides key information about the ETCD status, with the most notable being ETCD Aliveness, which displays the overall service status of the ETCD cluster.
Red bands indicate periods when instances are unavailable, while the blue-gray bands below show when the entire cluster is unavailable.
Pigsty provides the following two alert rules for the INFRA module:
| Alert Rule | Description | Severity |
|---|---|---|
EtcdServerDown |
Etcd node down, critical alert | Critical |
EtcdNoLeader |
Etcd cluster has no leader, critical alert | Critical |
EtcdQuotaFull |
Etcd quota usage exceeds 90%, warning | Warning |
EtcdNetworkPeerRTSlow |
Etcd network latency is slow, notice | Notice |
EtcdWalFsyncSlow |
Etcd disk fsync is slow, notice | Notice |
You can modify or add new etcd alert rules in files/prometheus/rules/etcd.yml.
etcd is a distributed, reliable key-value store used to store the most critical config / consensus data in the deployment. Pigsty uses etcd as the DCS (Distributed Configuration Store) service for Patroni, which will store the high availability status information of the PostgreSQL cluster.
If more than (include) half of the etcd instances are down, the etcd cluster, and its service will be unavailable.
For example, a 3-node etcd cluster can tolerate at most one node failure, and the other two nodes can still work normally; while a 5-node etcd cluster can tolerate 2 node failures.
Beware that the learner instances in the etcd cluster do not count in the member number. So in a 3-node etcd cluster, if there is a learner instance, the actual member count is 2, so no node failure can be tolerated.
It is advisable to choose an odd number of etcd instances to avoid split-brain scenarios. It is recommended to use 3 or 5 nodes for the production environment.
If etcd cluster is unavailable, it will affect the control plane of Pigsty, but not the data plane — the existing PostgreSQL cluster will continue to serve, but admin operations through Patroni will not work.
During etcd failure, PostgreSQL HA is unable to perform automatic failover; and most of the Patroni operations will be blocked, such as edit-config, restart, switchover, etc… Admin tasks through Ansible playbooks are usually not affected by etcd failure, such as create database, create user, reload HBA and Service, etc…, and you can always operate the PostgreSQL cluster directly to achieve most of the patroni functions.
Beware that the above description is only applicable to newer versions of Patroni (>=3.0, Pigsty >= 2.0). If you are using an older version of Patroni (<3.0, corresponding to Pigsty version 1.x), etcd / consul failure will cause a serious impact:
All PostgreSQL clusters will be demoted and reject write requests, and etcd failure will be amplified as a global PostgreSQL failure. After Patroni 3.0’s DCS Failsafe feature, this situation has been significantly improved.
etcd is only used for PostgreSQL HA consensus in Pigsty, no other data is stored in etcd by default.
These consensus data are managed by Patroni, and when these data are lost in etcd, Patroni will automatically rebuild them.
Thus, by default, the etcd in Pigsty can be regarded as a “stateless service” that is disposable, which brings great convenience to maintenance work.
If you use etcd for other purposes, such as storing metadata for Kubernetes, or storing other data, you need to back up the etcd data yourself and restore the data after the etcd cluster is restored.
Since etcd is disposable in Pigsty, you can quickly stop the bleeding by “restarting” or “redeploying” etcd in case of failure.
To Restart the etcd cluster, you can use the following Ansible command (or systemctl restart etcd):
To Reset the etcd cluster, you can run this playbook, it will nuke the etcd cluster and redeploy it:
Beware that if you use etcd to store other data, don’t forget to backup etcd data before nuking the etcd cluster.
In short: do not use all the quota of etcd.
etcd has a default quota for database size of 2GB, if your etcd database size exceeds this limit, etcd will reject write requests. Meanwhile, as etcd’s data model illustrates, each write will generate a new version (a.k.a. revision), so if your etcd cluster writes frequently, even with very few keys, the etcd database size may continue to grow, and may fail when it reaches the quota limit.
You can achieve this by Auto Compact, Manual Compact, Defragmentation, and Quota Increase, etc., please refer to the etcd official maintenance guide.
Pigsty has auto compact enabled by default since v2.6, so you usually don’t have to worry about etcd full. For versions before v2.6, we strongly recommend enabling etcd’s auto compact feature in the production environment.
For Pigsty v2.0 - v2.5 users, we strongly recommend upgrading to a newer version, or following the instructions below to enable etcd auto compaction!
If you are using an earlier version of Pigsty (v2.0 - v2.5), we strongly recommend that you enable etcd’s auto compaction feature in the production environment.
Edit the etcd config template in roles/etcd/templates/etcd.conf with these 3 new lines:
You can set all the PostgreSQL cluster to maintenance mode and then redeploy the etcd cluster with ./etcd.yml to apply the these changes.
It will increase the etcd default quota from 2 GiB to 16 GiB, and ensure that only the most recent day’s write history is retained, avoiding the infinite growth of the etcd database size.
Patroni will use the pg_namespace (default is /pg) as the prefix for all metadata keys in etcd, followed by the PostgreSQL cluster name.
For example, a PG cluster named pg-meta, its metadata keys will be stored under /pg/pg-meta, which may look like this:
The hard-coded group, etcd, will be used as DCS servers for PGSQL. You can initialize them with etcd.yml or assume it is an existing external etcd cluster.
To use an existing external etcd cluster, define them as usual and make sure your current etcd cluster certificate is signed by the same CA as your self-signed CA for PGSQL.
Check Add a member to etcd cluster
Check Remove member from etcd cluster
Min.IO: S3-Compatible Open-Source Multi-Cloud Object Storage designed to be scalable, secure, and handy. It has native multi-node multi-driver HA support and can store documents, pictures, videos, and backups. It’s an optional module in Pigsty.
You can use MinIO as an optional PostgreSQL backup storage repo, in addition to the default local posix FS repo. If the MinIO repo is used,
the MINIO module should be installed before any PGSQL modules. MinIO requires a trusted CA to work, so you have to install it after NODE.
Configure minio module, and use multiple minio nodes.
Customize minio components with 15 parameters
Create, remove, expand, shrink, upgrade minio cluster
Ansible playbooks that can be used in this module
Dashboards, metrics, record & alerting rules.
How to use the mcli and configure backup repo
After MinIO cluster is configured and deployed with the playbook, you can start using and accessing the MinIO cluster by following the instructions here.
It is straightforward to deploy a single-node MinIO instance with Pigsty.
Define it in the config inventory, then run the playbook:
The install.yml playbook will automatically create the MinIO cluster defined in the inventory, so you don’t need to run the minio.yml playbook manually, if you choose the default one-pass installation.
If you plan to deploy a production-grade large-scale multi-node MinIO cluster, we strongly recommend you to read the Pigsty MinIO configuration document and the MinIO document before proceeding.
You have to access MinIO via HTTPS, so make sure the default minio service domain (sss.pigsty) point to the right place:
node_etc_hosts or manually modify the /etc/hosts filedns_records if you are using the DNSMASQ on infra nodesIt is recommended to use the first method: static DNS resolution records to avoid MinIO’s additional dependency on DNS in production environments.
You have to point the MinIO service domain to the IP address and service port of the MinIO server node, or the IP address and service port of the load balancer. Pigsty will use the default domain name sss.pigsty and default port 9000.
For example, if you are using haproxy to expose MinIO service like this, the port may be 9002.
To access the MinIO server cluster using the mcli client, you need to configure the server alias first:
There’s a pre-configured MinIO alias named sss on the admin user of the admin node, you can use it directly.
For the full functionality of the MinIO client tool mcli, please refer to the documentation: MinIO Client.
You can manage biz users in MinIO using mcli, for example, you can create the two default biz users using the command line:
You can manage bucket with mcli:
You can perform object CRUD with cli, for example:
Check the Tutorial: Object Management for detail
Pigsty repo has rclone available, a convenient cloud object storage client that you can use to access MinIO services.
The MinIO is used as a backup repository for pgBackRest by default in Pigsty. When you modify the pgbackrest_method to minio, the PGSQL module will automatically switch the backup repository to MinIO.
Beware that if you are using MinIO through load balancer, you should use the corresponding domain name and port number here.
You have to define a MinIO cluster in the config inventory before deploying it.
There are 3 major deployment modes for MinIO clusters:
We recommend using SNSD and MNMD for development and production deployment, respectively, and SNMD only when resources are extremely limited (only one server).
Besides, you can use multi-pool deployment to scale an existing MinIO cluster, or directly deploy multiple clusters.
When using a multi-node MinIO cluster, you can access the service from any node, so the best practice is to use a load balancer and HA access.
There’s one and only one core param for MinIO deployment, which is MINIO_VOLUMES, which specifies the nodes, drivers, pools of a minio cluster
Pigsty will auto-generate MINIO_VOLUMES according to the config inventory for you, but you can always override it directly. If not explicitly specified, Pigsty will generate it according to the following rules:
SNSD: MINIO_VOLUMES points to any dir on local node, from minio_data
SNMD: MINIO_VOLUMES points to a series of real drivers on local node, from minio_data
MNMD: MINIO_VOLUMES points to multiple nodes & multiple drivers, according to minio_data and minio_node
Use minio_data to specify drivers on each node, such as /data{1...4}
Use minio_node to specify node name pattern, such as ${minio_cluster}-${minio_seq}.pigsty
Multi-Pool: MINIO_VOLUMES need to be explicitly specified
Tutorial: deploy-minio-single-node-single-drive
To define a singleton MinIO instance, it’s straightforward:
The only required params are minio_seq and minio_cluster, which generate a unique identity for each MinIO instance.
Single-Node Single-Driver mode is for dev purposes, so you can use a common dir as the data dir. The default data dir for SNSD minio is specified by minio_data, which is /data/minio by default. Beware that in multi-driver or multi-node mode, MinIO will refuse to start if using a common dir as the data dir rather than a mount point.
We strongly recommend using a static domain name record to access MinIO. For example, the default sss.pigsty if minio_domain can be added to all nodes through:
Reference: deploy-minio-single-node-multi-drive
To use multiple disks on a single node, you have to specify the minio_data in the format of {{ prefix }}{x...y}, which defines a series of disk mount points.
Beware that in multi-driver or multi-node mode, MinIO will refuse to start if using a common dir as the data dir rather than a mount point.
This example defines a single-node MinIO cluster with 4 drivers: /data1, /data2, /data3, /data4. You have to mount them properly before launching MinIO:
The vagrant MinIO sandbox has a pre-defined 4-node MinIO cluster with 4 drivers. You have to properly mount them before starting MinIO (be sure to format disks with xfs):
Disk management is beyond this topic, just make sure your /etc/fstab is properly configured to auto-mount disks after reboot.
SNMD mode can utilize multiple disks on a single server to provide higher performance and capacity, and tolerate partial disk failures.
But it can do nothing with node failure, and you can’t add new nodes at runtime, so we don’t recommend using SNMD mode in production unless you have a special reason.
Reference: deploy-minio-multi-node-multi-drive
The extra minio_node param will be used for a multi-node deployment in addition to the minio_data
For example, this configuration defines a 4-node MinIO cluster with 4 drivers per node:
The minio_node param specifies the MinIO node name pattern, which is ${minio_cluster}-${minio_seq}.pigsty by default. The server name is very important for MinIO to identify and access other nodes in the cluster. It will be populated with minio_cluster and minio_seq, and write to /etc/hosts of all minio cluster members.
In this case, the MINIO_VOLUMES will be set to https://minio-{1...4}.pigsty/data{1...4} to identify the 16 disks on 4 nodes.
MinIO’s architecture allows for cluster expansion by adding new storage pools. In Pigsty, you can achieve this by explicitly specifying the minio_volumes param to specify nodes/disks for each pool.
For example, suppose you have already created a MinIO cluster as defined in the Multi-Node Multi-Disk example, and now you want to add a new storage pool consisting of four nodes.
You can specify minio_volumes here to allocate nodes for each pool to scale out the cluster.
Here, the two space-separated parameters represent two storage pools, each with four nodes and four disks per node.
For more information on storage pools, please refer to Management Plan: MinIO Cluster Expansion.
You can deploy new MinIO nodes as a completely new MinIO cluster by defining a new group with a different cluster name.
The following configuration declares two independent MinIO clusters:
Please note that by default, Pigsty allows only one MinIO cluster per deployment. If you need to deploy multiple MinIO clusters, some parameters with default values need to be explicitly set and cannot be omitted to avoid naming conflicts, as shown above.
MinIO will serve on port 9000 by default. If a multi-node MinIO cluster is deployed, you can access its service via any node. It would be better to expose MinIO service via a load balancer, such as the default haproxy on NODE, or use the L2 vip.
To expose MinIO service with haproxy, you have to define an extra service with haproxy_services:
MinIO uses port 9000 by default. A multi-node MinIO cluster can be accessed by connecting to any one of its nodes.
Service access falls under the scope of the NODE module, and we’ll provide only a basic introduction here.
High-availability access to a multi-node MinIO cluster can be achieved using an L2 VIP or HAProxy. For example, you can use Keepalived to bind an L2 VIP to the MinIO cluster,
or use the haproxy component provided by the NODE module to expose MinIO services through a load balancer.
In the configuration above, HAProxy is enabled on all nodes of the MinIO cluster, exposing MinIO services on port 9002, and a Layer 2 VIP is bound to the cluster.
When in use, users should point the sss.pigsty domain name to the VIP address 10.10.10.9 and access MinIO services using port 9002.
This ensures high availability, as the VIP will automatically switch to another node if any node fails.
In this scenario, you may also need to globally modify the destination of domain name resolution
and adjust the minio_endpoint parameter to change the endpoint address corresponding to the MinIO alias on the management node:
Pigsty allows using dedicate load balancer cluster instead of the node cluster itself to run VIP & HAProxy.
For example, the prod template uses this way.
In this case, you need to manually configure the DNS resolution to point sss.pigsty to the VIP address of dedicated proxies cluster
To use the exposed service, you have to update/append the MinIO credential in the pgbackrest_repo section:
MinIO has a built-in console that can be accessed via HTTPS @ minio_admin_port. If you want to expose the MinIO console to the outside world, you can add MinIO to infra_portal.
Beware that MinIO console should be accessed via HTTPS, please DO NOT expose MinIO console without encryption in production.
Which means you usually need to add m.pigsty resolution to your DNS server, or /etc/hosts on your local host, to access the MinIO console.
Meanwhile, if you are using Pigsty’s self-signed CA rather than a regular public CA, you usually need to manually trust the CA or certificate to skip the “insecure” warning in the browser.
MinIO is a S3 compatible object storage service. Which is used as an optional central backup storage repo for PostgreSQL.
You may also use it for other purposes, such as storing large files, documents, pictures & videos.
There are 21 documented settings: 16 declared MINIO parameters, 2 derived values that may be overridden, and 3 MINIO_REMOVE flags.
| Parameter | Type | Level | Comment |
|---|---|---|---|
minio_seq |
int | I | minio instance identifier, REQUIRED |
minio_cluster |
string | C | minio cluster name, minio by default |
minio_user |
username | C | minio os user, minio by default |
minio_https |
bool | G | use https for minio, true by default |
minio_node |
string | C | minio node name pattern |
minio_data |
path | C | minio data dir(s), use {x...y} to specify multi drivers |
minio_volumes |
string | C | minio core parameter, specify nodes and disks, auto-gen by default |
minio_domain |
string | G | minio external domain name, sss.pigsty by default |
minio_port |
port | C | minio service port, 9000 by default |
minio_admin_port |
port | C | minio console port, 9001 by default |
minio_access_key |
username | C | root access key, minioadmin by default |
minio_secret_key |
password | C | root secret key, minioadmin by default |
minio_extra_vars |
string | C | extra environment variables for minio server |
minio_provision |
bool | G/C | run minio provisioning tasks? |
minio_alias |
string | G | alias name for local minio deployment |
minio_endpoint |
string | C | corresponding host:port for above minio alias |
minio_buckets |
bucket[] | C | list of minio bucket to be created |
minio_users |
user[] | C | list of minio user to be created |
MINIO_REMOVE Parameters (for minio_remove role)
| Parameter | Type | Level | Comment |
|---|---|---|---|
minio_safeguard |
bool | G/C/A | prevent accidental removal? (default: false) |
minio_rm_data |
bool | G/C/A | remove minio data during removal? (default: true) |
minio_rm_pkg |
bool | G/C/A | uninstall minio packagkes during removal? (default: false) |
The minio_volumes and minio_endpoint are auto-generated parameters, but you can explicitly override these two parameters.
MINIO: 18 settings (including 2 derived values), defined in roles/minio/defaults/main.yml
MINIO_REMOVE: 3 Parameters, defined in roles/minio_remove/defaults/main.yml:
minio_seq
name: minio_seq, type: int, level: I
minio instance identifier, REQUIRED identity parameters. no default value, you have to assign it manually
minio_cluster
name: minio_cluster, type: string, level: C
minio cluster name, minio by default. This is useful when deploying multiple MinIO clusters
minio_user
name: minio_user, type: username, level: C
minio os user name, minio by default
minio_https
name: minio_https, type: bool, level: G
Use HTTPS or HTTP for MinIO service, true by default, means using HTTPS.
Beware that pgbackrest requires MinIO HTTPS to work properly, but if you don’t use minio for that, and don’t want to use HTTPS for MinIO, you can set this to false.
minio_node
name: minio_node, type: string, level: C
minio node name pattern, this is used for multi-node deployment
default values: ${minio_cluster}-${minio_seq}.pigsty
minio_data
name: minio_data, type: path, level: C
minio data dir(s)
default values: /data/minio, which is a common dir for single-node deployment.
For a multi-drive deployment, you can use {x...y} notion to specify multi drivers.
minio_volumes
name: minio_volumes, type: string, level: C
The only core parameter of MinIO, if not specified, it will be auto-generated by the following rule:
minio_volumes directly uses the value of minio_dataminio_volumes uses the values of minio_node, minio_port, minio_data to generate this param:minio_volumes to specify multiple node pools explicitly.It user’s responsibility to make sure the parameters used in minio_volumes are consistent with minio_node, minio_port, minio_data.
minio_domain
name: minio_domain, type: string, level: G
minio service domain name, sss.pigsty by default.
The client can access minio S3 service via this domain name. This name will be registered to local DNSMASQ and included in SSL certs.
minio_port
name: minio_port, type: port, level: C
minio service port, 9000 by default
minio_admin_port
name: minio_admin_port, type: port, level: C
minio console port, 9001 by default
minio_access_key
name: minio_access_key, type: username, level: C
root access key, minioadmin by default
minio_secret_key
name: minio_secret_key, type: password, level: C
root secret key, minioadmin by default
default values: minioadmin
It’s very important to change this password in your deployment!
minio_extra_vars
name: minio_extra_vars, type: string, level: C
extra environment variables for minio server. Check Minio Server for the complete list.
default value is empty string, you can use multiline string to passing multiple environment variables.
minio_alias
name: minio_alias, type: string, level: G
MinIO alias name for the local MinIO cluster
default values: sss, which will be written to infra nodes’ / admin users’ client alias profile.
minio_endpoint
name: minio_endpoint, type: string, level: C
The corresponding host:port for the above MinIO alias. This parameter is not defined by default.
If not defined, it will be overwritten by the following default value:
This alias & endpoint will be added to the admin user on the admin node.
minio_buckets
name: minio_buckets, type: bucket[], level: C
list of minio bucket to be created by default:
Three default buckets are created by default, with different policies.
The pgsql bucket is used for PostgreSQL backups by default. while meta and data are open buckets for other purposes.
For example, the supabase template may use the data bucket to store business data.
And if you have important metadata that requires versioning, you can use the meta bucket out-of-the-box.
Every bucket will have a corresponding policy, with names same as the bucket name. e.g., the pgsql policy have all the privileges on the pgsql bucket, and so on.
You can also add the lock flag to bucket definition, which will enable the object locking feature to prevent accidental deletion of objects in the bucket.
minio_users
name: minio_users, type: user[], level: C
list of minio users to be created, default value:
Two default users are created for PostgreSQL DBA and pgBackREST.
Please change these passwords in serious production deployments.
minio_safeguard
name: minio_safeguard, type: bool, level: G/C/A
prevent accidental removal? default value is false
If enabled, the minio-rm.yml playbook will abort and refuse to remove the MinIO cluster, providing protection against accidental deletions.
minio_rm_data
name: minio_rm_data, type: bool, level: G/C/A
remove minio data during removal? default value is true
When enabled, the minio-rm.yml playbook will remove MinIO data directories and configuration files during cluster removal.
minio_rm_pkg
name: minio_rm_pkg, type: bool, level: G/C/A
uninstall minio packages during removal? default value is false
When enabled, the minio-rm.yml playbook will uninstall MinIO packages during cluster removal. This is disabled by default to preserve the MinIO installation for potential future use.
Here are some administration SOP for MinIO:
Check ETCD: FAQ for more questions.
To create a MinIO cluster, define the minio cluster in inventory first:
The minio_cluster param mark this cluster as a MinIO cluster, and the minio_seq is the sequence number of the MinIO node, which is used to generate MinIO node name like minio-1, minio-2, etc.
This snippet defines a single-node MinIO cluster, using the following command to create the MinIO cluster:
To destroy an existing MinIO cluster, use the dedicated minio-rm.yml playbook:
You can also customize the removal process with parameters:
Legacy approach (deprecated):
Since Pigsty v3.6+, MinIO cluster removal has been moved to the dedicated minio-rm.yml playbook using the minio_remove role. The prometheus monitoring targets are automatically cleaned up during the removal process.
You cannot scale MinIO at node/disk level, but you can scale at storage pool (multiple nodes) level.
Assume you have a 4-node MinIO cluster and want to double the capacity by adding another four-node storage pool.
Step 1, add 4 node definitions in the group, allocate sequence number 5 to 8.
The key step is to modify the minio_volumes param, assign the new 4 nodes to a new storage pool.
Step 2, adding these nodes to Pigsty:
Step 3, Provisioning MinIO on new nodes with minio_install subtask (user, dir, pkg, …):
Step 4: Reconfigure the entire MinIO cluster on the whole cluster with minio_config subtask
That is to say, the existing 4-nodes’
MINIO_VOLUMESconfiguration will be updated, too
Step 5: Restart the entire MinIO cluster simultaneously (be careful, do not rolling restart!):
Step 6: This is optional, if you are using a load balancer, make sure the load balancer configuration is updated.
For example, add the new four nodes to the load balancer configuration:
Then run the haproxy subtask of the node.yml playbook to update the load balancer configuration:
If node L2 VIP is also used to ensure reliable load balancer access, you also need to add new nodes (if any) to the existing NODE VIP group:
MinIO cannot scale down at the node/disk level, but you can retire at the storage pool (multiple nodes) level —— Add a new storage pool, drain the old storage pool, migrate to the new storage pool, and then retire the old storage pool.
First, download the new version of the MinIO software package to the local software repository of the INFRA node:
and then rebuild the software repo with:
You can upgrade all MinIO software packages with Ansible package module:
Finally, notify the MinIO cluster to restart with the mc command line tool:
You have to configure minio cluster in the config inventory before running the playbook.
There are two built-in playbooks for MinIO cluster management:
minio.yml for installing the MinIO clusterminio-rm.yml for removing the MinIO clusterminio.yml
minio-id : generate minio identityminio_install : install minio/mcli
minio_os_user : create os user miniominio_pkg : install minio/mcli packageminio_dir : create minio directoriesminio_config : generate minio config
minio_conf : minio main configminio_cert : minio ssl certminio_dns : write minio dns recordsminio_launch : launch minio serviceminio_register : register minio to prometheusminio_provision : create minio aliases/buckets/users
minio_alias : create minio client aliasminio_bucket : create minio bucketsminio_user : create minio biz usersSince Pigsty v3.6+, the minio.yml playbook and minio role are focused solely on cluster installation. All removal operations have been moved to the dedicated minio-rm.yml playbook using the minio_remove role.
Trusted ca file: /etc/pki/ca.crt should exist on all nodes already. which is generated in role: ca and loaded & trusted by default in role: node.
You should install MINIO module on Pigsty-managed nodes (i.e., Install NODE first)
minio-rm.yml
To remove the MinIO cluster, run the following playbook:
Here are available sub tasks:
minio-id : generate minio identity for removal operationsminio_safeguard : safeguard against accidental removal (default: false)prometheus : remove minio targets registration from prometheusminio_svc : stop and disable minio service with systemdminio_data : remove minio data (disable with minio_rm_data=false)minio_pkg : uninstall minio packages (enable with minio_rm_pkg=true)The removal playbook uses the new minio_remove role with configurable parameters:
minio_safeguard: Prevents accidental removal when set to trueminio_rm_data: Controls whether MinIO data is deleted (true by default)minio_rm_pkg: Controls whether MinIO packages are uninstalled (false by default)MINIO Playbook cheatsheet and common commands
There is one dashboard for MINIO module.
MinIO Overview: Overview of one single MinIO cluster
There are 3 predefined alert rules for MinIO, defined in files/prometheus/rules/minio.yml
MinioServerDownMinioNodeOfflineMinioDiskOfflineIn Multi-Driver or Multi-Node mode, MinIO will refuse to start if the data dir is not a valid mount point.
Use mounted disks for MinIO data dir rather than some regular directory. You can use the regular directory only in the single node, single drive mode.
You’d better plan the MinIO cluster before deployment… Since this requires a global restart
Check this: Expand MinIO Deployment
Access the HA MinIO cluster with an optional load balancer and different ports.
Here is an example: Access MinIO Service
Configure redis module, and use multiple redis nodes.
Customize redis components with 21 parameters
Create, remove, expand, redis cluster
Ansible playbooks that can be used in this module
Dashboards, metrics, record & alerting rules.
Frequently Asked Questions about redis module
The entity model of Redis is almost the same as that of PostgreSQL, which also includes the concepts of Cluster and Instance. The Cluster here does not refer to the native Redis Cluster mode.
The core difference between the REDIS module and the PGSQL module is that Redis uses a single-node multi-instance deployment rather than the 1:1 deployment: multiple Redis instances are typically deployed on a physical/virtual machine node to utilize multicore CPUs fully. Therefore, the ways to configure and administer Redis instances are slightly different from PGSQL.
In Redis managed by Pigsty, nodes are entirely subordinate to the cluster, which means that currently, it is not allowed to deploy Redis instances of two different clusters on one node. However, this does not affect deploying multiple independent Redis primary replica instances on one node.
Redis identity parameters are required parameters when defining a Redis cluster.
| Name | Attribute | Description | Example |
|---|---|---|---|
redis_cluster |
REQUIRED, cluster level | cluster name | redis-test |
redis_node |
REQUIRED, node level | Node Sequence Number | 1,2 |
redis_instances |
REQUIRED, node level | Instance Definition | { 6001 : {} ,6002 : {}} |
There are three redis_mode available in Pigsty:
standalone: setup Redis in standalone (master-slave) modecluster: setup this Redis cluster as a Redis native clustersentinel: setup Redis as a sentinel for standalone Redis HAHere are three examples:
redis-msredis-sentinelredis-clusterThere are 21 parameters in the redis module.
| Parameter | Type | Level | Comment |
|---|---|---|---|
redis_cluster |
string | C | redis cluster name, required identity parameter |
redis_instances |
dict | I | redis instances definition on this redis node |
redis_node |
int | I | redis node sequence number, node int id required |
redis_fs_main |
path | C | redis main data mountpoint, /data by default |
redis_exporter_enabled |
bool | C | install redis exporter on redis nodes? |
redis_exporter_port |
port | C | redis exporter listen port, 9121 by default |
redis_exporter_options |
string | C/I | cli args and extra options for redis exporter |
redis_safeguard |
bool | G/C/A | prevent purging running redis instance? |
redis_clean |
bool | G/C/A | purging existing redis during init? |
redis_rmdata |
bool | G/C/A | remove redis data when purging redis server? |
redis_mode |
enum | C | redis mode: standalone,cluster,sentinel |
redis_conf |
string | C | redis config template path, except sentinel |
redis_bind_address |
ip | C | redis bind address, empty string will use host ip |
redis_max_memory |
size | C/I | max memory used by each redis instance |
redis_mem_policy |
enum | C | redis memory eviction policy |
redis_password |
password | C | redis password, empty string will disable password |
redis_rdb_save |
string[] | C | redis rdb save directives, disable with empty list |
redis_aof_enabled |
bool | C | enable redis append only file? |
redis_rename_commands |
dict | C | rename redis dangerous commands |
redis_cluster_replicas |
int | C | replica number for one master in redis cluster |
redis_sentinel_monitor |
master[] | C | sentinel master list, sentinel cluster only |
The default parameters are defined in roles/redis/defaults/main.yml
redis_cluster
name: redis_cluster, type: string, level: C
redis cluster name, required identity parameter.
no default value, you have to define it explicitly.
Comply with regexp [a-z][a-z0-9-]*, it is recommended to use the same name as the group name and start with redis-
redis_node
name: redis_node, type: int, level: I
redis node sequence number, unique integer among redis cluster is required
You have to explicitly define the node id for each redis node. integer start from 0 or 1.
redis_instances
name: redis_instances, type: dict, level: I
redis instances definition on this redis node
no default value, you have to define redis instances on each redis node using this parameter explicitly.
Here is an example for a native redis cluster definition
The port number should be unique among the node, and the replica_of in value should be instance member of the same redis cluster.
redis_fs_main
name: redis_fs_main, type: path, level: C
redis main data mountpoint, /data by default
default values: /data, and /data/redis will be used as the redis data directory.
redis_exporter_enabled
name: redis_exporter_enabled, type: bool, level: C
install redis exporter on redis nodes?
default value is true, which will launch a redis_exporter on this redis_node
redis_exporter_port
name: redis_exporter_port, type: port, level: C
redis exporter listen port, 9121 by default
default values: 9121
redis_exporter_options
name: redis_exporter_options, type: string, level: C/I
cli args and extra options for redis exporter, will be added to /etc/default/redis_exporter.
default value is empty string
redis_safeguard
name: redis_safeguard, type: bool, level: G/C/A
prevent purging running redis instance?
default value is false, if set to true, and redis instance is running, init / remove playbook will abort immediately.
redis_clean
name: redis_clean, type: bool, level: G/C/A
purging existing redis during init?
default value is true, which will remove redis server during redis init or remove.
redis_rmdata
name: redis_rmdata, type: bool, level: G/C/A
remove redis data when purging redis server?
default value is true, which will remove redis rdb / aof along with redis instance.
redis_mode
name: redis_mode, type: enum, level: C
redis mode: standalone,cluster,sentinel
default values: standalone
standalone: setup redis as standalone (master-slave) modecluster: setup this redis cluster as a redis native clustersentinel: setup redis as sentinel for standalone redis HAredis_conf
name: redis_conf, type: string, level: C
redis config template path, except sentinel
default values: redis.conf, which is a template file in roles/redis/templates/redis.conf.
If you want to use your own redis config template, you can put it in templates/ directory and set this parameter to the template file name.
Note that redis sentinel are using a different template file, which is roles/redis/templates/redis-sentinel.conf
redis_bind_address
name: redis_bind_address, type: ip, level: C
redis bind address, empty string will use inventory hostname
default values: 0.0.0.0, which will bind to all available IPv4 address on this host
PLEASE bind to intranet IP only in production environment, i.e. set this value to
''
redis_max_memory
name: redis_max_memory, type: size, level: C/I
max memory used by each redis instance, default values: 1GB
redis_mem_policy
name: redis_mem_policy, type: enum, level: C
redis memory eviction policy
default values: allkeys-lru, check redis eviction policy for more details
noeviction: New values aren’t saved when memory limit is reached. When a database uses replication, this applies to the primary databaseallkeys-lru: Keeps most recently used keys; removes least recently used (LRU) keysallkeys-lfu: Keeps frequently used keys; removes least frequently used (LFU) keysvolatile-lru: Removes least recently used keys with the expire field set to true.volatile-lfu: Removes least frequently used keys with the expire field set to true.allkeys-random: Randomly removes keys to make space for the new data added.volatile-random: Randomly removes keys with expire field set to true.volatile-ttl: Removes keys with expire field set to true and the shortest remaining time-to-live (TTL) value.redis_password
name: redis_password, type: password, level: C/N
redis password, empty string will disable password, which is the default behavior
Note that due to the implementation limitation of redis_exporter, you can only set one redis_password per node. This is usually not a problem, because pigsty does not allow deploying two different redis cluster on the same node.
PLEASE use a strong password in production environment
redis_rdb_save
name: redis_rdb_save, type: string[], level: C
redis rdb save directives, disable with empty list, check redis persist for details.
the default value is ["1200 1"]: dump the dataset to disk every 20 minutes if at least 1 key changed:
redis_aof_enabled
name: redis_aof_enabled, type: bool, level: C
enable redis append only file? default value is false.
redis_rename_commands
name: redis_rename_commands, type: dict, level: C
rename redis dangerous commands, which is a dict of k:v old: new
default values: {}, you can hide dangerous commands like FLUSHDB and FLUSHALL by setting this value, here’s an example:
redis_cluster_replicas
name: redis_cluster_replicas, type: int, level: C
replica number for one master/primary in redis cluster, default values: 1
redis_sentinel_monitor
name: redis_sentinel_monitor, type: master[], level: C
This can only be used when redis_mode is set to sentinel.
List of redis master to be monitored by this sentinel cluster. each master is defined as a dict with name, host, port, password, quorum keys.
The name and host are mandatory, port, password, quorum are optional, quorum is used to set the quorum for this master, usually large than half of the sentinel instances.
Here are some common administration tasks for Redis. Check FAQ: Redis for more details.
Init Cluster/Node/Instance
You can also use the wrapper script:
Remove Cluster/Node/Instance
You can also use the wrapper script:
You can partially run redis.yml tasks to re-configure redis.
Beware that redis cannot be reloaded online; you have to restart redis to make config effective.
Access redis instance with redis-cli:
Redis also has a redis-benchmark which can be used for benchmark and generate load on redis server:
https://redis.io/commands/replicaof/
You have to enable HA for redis standalone m-s cluster manually with your redis sentinel.
Take the 4-node sandbox as an example, a redis sentinel cluster redis-meta is used to manage the redis-ms standalone cluster.
If you wish to remove a redis master from sentinel, use SENTINEL REMOVE <name>.
You can configure multiple redis master on sentinel cluster with redis_sentinel_monitor.
And refresh the master list on sentinel cluster with:
There are two playbooks for redis:
redis.yml: create redis cluster / node / instanceredis-rm.yml: remove redis cluster /docs/node /instanceredis.yml
The playbook redis.yml will init redis cluster/node/instance:
redis-rm.yml
The playbook redis-rm.yml will remove redis cluster/node/instance:
There are three dashboards for REDIS module.
Redis Overview: Overview of all Redis Instances
Redis Cluster : Overview of one single redis cluster
Redis Instance : Overview of one single redis instance
There are 6 predefined alert rules for Redis, defined in files/prometheus/rules/redis.yml.
| Name | Description | Level |
|---|---|---|
RedisDown |
Redis server is down | Critical |
RedisRejectConn |
Redis instance rejects connection | Critical |
RedisRTHigh |
Redis instance response time is too high | Warning |
RedisCPUHigh |
Redis instance CPU usage is too high | Warning |
RedisMemHigh |
Redis instance memory usage is too high | Warning |
RedisQPSHigh |
Redis instance QPS is too high | Warning |
use
redis_clean = trueandredis_safeguard = falseto force clean redis data
This happens when you run redis.yml to init a redis instance that is already running, and redis_clean is set to false.
If redis_clean is set to true (and the redis_safeguard is set to false, too), the redis.yml playbook will remove the existing redis instance and re-init it as a new one, which makes the redis.yml playbook fully idempotent.
This happens when removing a redis instance with
redis_safeguardset totrue.
You can disable redis_safeguard to remove the Redis instance. This is what redis_safeguard is for.
Use
bin/redis-add <ip> <port>to deploy a new redis instance on node.
bin/redis-rm <ip> <port>to remove a single redis instance from node
MongoDB has lost its open-source appeal and is no longer suitable for many cases. In contrast, PostgreSQL offers robust, native JSON support and outperforms MongoDB as a document database.
Thus, FerretDB provides a mongo wire-protocol-compatible layer upon postgres, enabling MongoDB users to migrate smoothly to PostgreSQL’s superior platform.
FERRET is an OPTIONAL module in Pigsty.
It requires the documentdb extensions to work since v2.0.
Pigsty has packaged that and provides a mongo.yml template to help you deploy a FerretDB cluster with ease.
Configure ferret module, and use multiple ferret nodes.
Customize ferret components with 15 parameters
Create, remove, expand, shrink, upgrade ferret cluster
Ansible playbooks that can be used in this module
Dashboards, metrics, record & alerting rules.
How to use the mcli and configure backup repo
You can use MongoDB’s command-line tool MongoSH to access FerretDB.
Use the pig command to add MongoDB repository, then install mongosh using yum or apt:
You can access FerretDB using MongoDB connection strings with any MongoDB driver in any language. Here’s an example using the mongosh CLI tool:
You can log in with different users. See FerretDB: Authentication for details.
You can connect to FerretDB and use it as if it were a MongoDB cluster.
MongoDB commands are translated to SQL and executed in the underlying PostgreSQL:
If you’re not familiar with MongoDB, here’s a quick tutorial that works with FerretDB: Perform CRUD Operations with MongoDB Shell
To generate sample workload, you can use this simple test script with mongosh:
You can check FerretDB’s supported MongoDB commands and known differences. For basic usage, these differences are usually not significant.
Before deploying a Mongo (FerretDB) cluster, you need to define it in the inventory using the relevant parameters.
The following example uses the default single-node pg-meta cluster’s meta database as FerretDB’s underlying storage:
Here, mongo_cluster and mongo_seq are essential identity parameters. For FerretDB, mongo_pgurl is also required to specify the underlying PG location.
Note that the mongo_pgurl parameter requires a PostgreSQL superuser. In this example, a dedicated mongod superuser is defined for FerretDB.
Note that FerretDB’s authentication is entirely based on PostgreSQL. You can create other regular users using either FerretDB or PostgreSQL.
FerretDB 2.0+ requires an extension: DocumentDB, which depends on several other extensions. Here’s a template for creating a PostgreSQL cluster for FerretDB:
You can use Services to connect to a highly available PostgreSQL cluster and deploy multiple FerretDB instance replicas with L2 VIP binding for FerretDB layer high availability.
There are 9 parameters in the FERRET module.
| Parameter | Type | Level | Comment |
|---|---|---|---|
mongo_seq |
int | I | mongo instance identifier, REQUIRED |
mongo_cluster |
string | C | mongo cluster name, MONGO by default |
mongo_pgurl |
pgurl | C/I | underlying postgres URL for ferretdb |
mongo_ssl_enabled |
bool | C | mongo/ferretdb ssl enabled, false by default |
mongo_listen |
ip | C | mongo listen address, empty for all addr |
mongo_port |
port | C | mongo service port, 27017 by default |
mongo_ssl_port |
port | C | mongo tls listen port, 27018 by default |
mongo_exporter_port |
port | C | mongo exporter port, 9216 by default |
mongo_extra_vars |
string | C | extra environment variables for MONGO server |
The default parameters are defined in roles/ferret/defaults/main.yml
mongo_cluster
name: mongo_cluster, type: string, level: C
mongo cluster name, required identity parameter.
default value is MONGO, but you should define it explicitly for production use.
Comply with regexp [a-z][a-z0-9-]*, it is recommended to use descriptive names and start with mongo-
mongo_seq
name: mongo_seq, type: int, level: I
mongo instance sequence number, unique integer among mongo cluster is required
You have to explicitly define the sequence number for each mongo instance. integer start from 0 or 1.
mongo_pgurl
name: mongo_pgurl, type: pgurl, level: C/I
underlying postgres URL for ferretdb connection.
no default value, you have to define it explicitly. This is the PostgreSQL database URL that FerretDB will use as its backend storage.
Format: postgres://username:password@host:port/database
mongo_ssl_enabled
name: mongo_ssl_enabled, type: bool, level: C
mongo/ferretdb ssl enabled flag.
default value is false. Set to true to enable SSL/TLS encryption for mongo connections.
mongo_listen
name: mongo_listen, type: ip, level: C
mongo listen address for binding.
default value is empty string '', which means listen on all available addresses. You can specify a specific IP address to bind to.
mongo_port
name: mongo_port, type: port, level: C
mongo service port for client connections.
default value is 27017, which is the standard MongoDB port. Change this if you need to avoid port conflicts.
mongo_ssl_port
name: mongo_ssl_port, type: port, level: C
mongo tls listen port for encrypted connections.
default value is 27018. This port is used when SSL/TLS is enabled for secure connections.
mongo_exporter_port
name: mongo_exporter_port, type: port, level: C
mongo exporter port for metrics collection.
default value is 9216. This port is used by the monitoring exporter to expose metrics for Prometheus.
mongo_extra_vars
name: mongo_extra_vars, type: string, level: C
extra environment variables for MONGO server.
default value is empty string ''. You can specify additional environment variables that will be passed to the FerretDB process.
After defining the FerretDB cluster in the inventory, you can install it with:
Since FerretDB uses PostgreSQL as its underlying storage, running this playbook multiple times is generally safe.
To remove a Mongo/FerretDB cluster, run the mongo_purge subtask of mongo.yml playbook with the mongo_purge parameter:
There’s a built-in playbook mongo.yml for installing FerretDB on nodes.
mongo.yml
mongo.yml: Install MongoDB/FerretDB on the target host.
This playbook consists of the following subtasks:
mongo_check : check mongo identitymongo_dbsu : create os user mongodmongo_install : install mongo/ferretdb rpmmongo_purge : purge mongo/ferretdbmongo_config: config mongo/ferretdbmongo_cert : issue mongo/ferretdb ssl certsmongo_launch : launch mongo/ferretdb servicemongo_register : register mongo/ferretdb to prometheusThere is one dashboard for FERRET module for now.
Mongo Overview: Overview of a Mongo/FerretDB cluster
Docker is an optional module in Pigsty, it is downloaded by default but not installed. You have to explicitly enable it before using.
Configure docker registry, proxy, images, etc...
Customize docker components with 8 parameters
Manage docker images, containers, etc...
Ansible playbooks that can be used in docker module
Dashboards, metrics, record & alerting rules.
Frequently Asked Questions about docker module
Pigsty includes built-in Docker support, allowing you to quickly deploy containerized applications.
To install docker on nodes, set the docker_enabled parameter to true.
Then run the docker.yml playbook (on target hosts/groups):
Docker will be installed on that infra group.
You can specify docker registry mirrors with docker_registry_mirrors:
Here are some example registry mirrors:
["https://registry.cn-hangzhou.aliyuncs.com"]["https://ccr.ccs.tencentyun.com"]["https://docker.m.daocloud.io"]["https://docker.1ms.run"]You can specify multiple registry mirrors as an array, remember to quote the URL with ".
Docker will use the proxy_env parameter if specified.
You can define it on global parameters all.vars or dedicate groups (such as infra ):
It will be rendered to /etc/docker/daemon.json during the docker_config task:
This is useful if direct network access is blocked due to various reasons.
You can provision docker images with docker_image and docker_image_cache:
The images defined in docker_image will be pulled during the docker_image task, one by one.
And the local docker image cache with .tgz suffix matching the docker_image_cache glob list will be loaded into docker with docker load
You can use accelerators on each cloud vendors:
There are 8 parameters for the Docker module:
| Name | Type | Level | Comment |
|---|---|---|---|
docker_enabled |
bool |
G/C/I | enable docker on this node? |
docker_data |
path |
G/C/I | Docker data directory, /var/lib/docker by default |
docker_storage_driver |
enum |
G/C/I | Docker storage driver, overlay2 by default |
docker_cgroups_driver |
enum |
G/C/I | docker cgroup fs driver: cgroupfs,systemd |
docker_registry_mirrors |
string[] |
G/C/I | docker registry mirror list |
docker_exporter_port |
port |
G | Docker metrics exporter port, 9323 by default |
docker_image |
path[] |
G/C/I | docker image to be pulled, [] by default |
docker_image_cache |
path |
G/C/I | docker image cache tarball glob, /tmp/docker by default |
Docker’s default parameters are defined in roles/docker/defaults/main.yml
docker_enabled
name: docker_enabled, type: bool, level: G/C/I
enable docker on this node? default value is false
docker_data
name: docker_data, type: path, level: C
Docker data directory, /var/lib/docker by default.
docker_storage_driver
name: docker_storage_driver, type: enum, level: C
Docker storage driver, overlay2 by default.
Please refer to: https://docs.docker.com/engine/storage/drivers/select-storage-driver/
overlay2fuse-overlayfsbrtfszfsvfsdocker_cgroups_driver
name: docker_cgroups_driver, type: enum, level: G/C/I
docker cgroup fs driver, could be cgroupfs or systemd, default values: systemd
docker_registry_mirrors
name: docker_registry_mirrors, type: string[], level: G/C/I
docker registry mirror list, default values: [], Example:
Here are some examples of using the internal network image of each cloud vendor:
Consider using Cloudflare Worker Docker Proxy
If the pull speed is too slow, you can also consider: docker login quay.io use other Registry.
docker_exporter_port
name: docker_exporter_port, type: port, level: G
Docker metrics exporter port, 9323 by default.
docker_image
name: docker_image, type: string[], level: G/C/I
docker image to be pulled, [] by default
The Image listed here will be pulled during docker provisioning.
docker_image_cache
name: docker_image_cache, type: path, level: G/C/I
docker image cache tarball glob list, "/tmp/docker/*.tgz" by default.
The local docker image cache with .tgz suffix match this glob list will be loaded into docker one by one:
To install & enable docker on nodes, configure the docker_enabled parameter to true.
Then run the docker.yml playbook (on target hosts/groups):
Docker will be installed on that infra group.
We are using the infra group here as an example, you can define it elsewhere as long as it applies to expected hosts.
Docker repo is part of the infra repo module, and will be automatically added during repo build.
You can add this repo to your nodes with:
To upgrade Docker Daemon, using the ansible command, add docker repo, then:
It will upgrade the docker-ce package to the latest version available on your configured repositories.
To remove Docker Daemon, using the ansible command to run:
It will remove the docker-ce package with your os package manager.
Pigsty provides ready-to-use software templates based on Docker Compose to deploy external applications seamlessly integrated with Pigsty-managed database clusters.
The DOCKER module has only one playbook: docker.yml
to install docker daemon & docker compose on target node.
docker.yml
The raw playbook: docker.yml.
Run this playbook on any host will install docker-ce and docker-compose-plugin on target node with docker_enabled: true flag.
Here are the available subtasks in the docker.yml playbook:
docker_install: Install Docker and Docker Compose packages on the node.docker_admin: Add specified users to the Docker administrator user group.docker_config: Generate Docker daemon service configuration file.docker_launch: Start the Docker daemon service.docker_register: Register Docker daemon as a Prometheus monitoring target.docker_image: Attempt to load prepackaged Docker images from /tmp/docker/*.tgz if present.The Docker module does not provide a dedicated playbook for uninstalling Docker. If you need to uninstall Docker, you can manually stop the Docker service and then uninstall it:
Pigsty will add docker daemon to monitoring target if that node is docker_enabled = true
But there are no default dashboards and alerting rules for docker module, you can add your own rules to prometheus & grafana.
By default, Pigsty adds both the management user running the playbook on the remote host (i.e., the SSH login user) and the user defined by the node_admin_username parameter to the operating-system group docker.
Any account in this group can manage Docker via the docker CLI.
Need to grant another user Docker access? Just add that OS user to the docker group:
During installation, if the proxy_env parameter is set, Pigsty writes the specified HTTP proxy settings to /etc/docker/daemon.json.
Docker will then route all image pulls from upstream registries through this proxy.
Tip: Running the configure playbook with the -x flag automatically captures your current shell’s proxy variables and injects them into proxy_env.
Inside mainland China you may encounter Great Firewall restrictions. Historically, mirrors such as quay.io could be used:
Update (June 2024): All previously accessible Docker mirrors in China have now been blocked. Please pull images via a proxy.
When the Docker module is installed, you can register Docker as a Prometheus target for a specific node by running the docker_register (alias register_prometheus) task:
Pigsty ships a collection of software templates that launch popular stacks with Docker Compose—ready to use out of the box.
Just make sure the Docker module is installed first.
Self-Hosting Supabase
Run Odoo the OSS ERP
Run Dify the AI workflow
Run official Admin GUI Tool
Pigsty has built-in support for Docker and a series software that use PostgreSQL as primary storage.
You can run stateless application with docker compose, and store the data in the external HA PostgreSQL (Redis/MinIO/…) clusters.
There’s a dedicate playbook app.yml that can help your running docker compose app easily
pgAdmin is the most popular and feature rich Open Source administration and development platform for PostgreSQL, the most advanced Open Source database in the world.
Pigsty has built-in (but optional) support for pgAdmin, it launches pgadmin with Docker Compose:
The default port for pgadmin is 8885, and you can access it through IP:Port : http://10.10.10.10:8885.
The default credentials are defined in .env, username: [email protected], password: pigsty.
Customize the pgadmin configuration in /opt/pgadmin/.env and manage it with docker compose.
You can also customize the apps parameter and override default .env configuration with:
To launch the application, run:
To access pgadmin through nginx (rather than access port 8885 directly), configure the infra portal with:
Then run make nginx to update nginx config, and configure local static DNS record <your_ip_address> adm.pigsty in /etc/hosts or local / public DNS server.
Pigsty will issue self-signed SSL certs for the domains listed in infra_portal automatically.
If you want to use real domain names, define cerbot entry and run make cert, check SSL Certs for details.
Supabase is great, but having your own Supabase is even better. Pigsty helps you build enterprise-grade Supabase on your own servers (physical/virtual machines/cloud servers) with one-click deployment — more extensions, better performance, deeper control, and much more cost-effective.
Pigsty is one of the three 3rd party self-hosting tutorials listed in the official Supabase docs
Prepare a Linux server, follow the Pigsty standard installation process, select the supabase configuration template, and execute the following commands:
After installation, visit port 8000 in your browser to access Supa Studio, username supabase, password pigsty.
Supabase is a BaaS (Backend as Service), an open-source Firebase alternative, and the most popular database + backend solution in the AI Agent era. Supabase wraps PostgreSQL and provides authentication, messaging, edge functions, object storage, and automatically generates REST API and GraphQL API based on PostgreSQL database schemas.
Supabase aims to provide developers with a one-stop backend solution, reducing the complexity of developing and maintaining backend infrastructure. It allows developers to eliminate most backend development work — developers only need to understand database design and frontend to quickly deliver applications! Developers can quickly complete a full application with just frontend development and database schema design using Vibe Coding.
Currently, Supabase is the most popular open-source project in the PostgreSQL open-source ecosystem, with 80,000 stars on GitHub. Supabase also provides “generous” free cloud service quotas for small entrepreneurs — 500 MB of free space, which is sufficient for storing user tables, view counts, and similar data.
Since Supabase cloud service is so attractive, why self-host?
The most intuitive reason is what we mentioned in “Are Cloud Databases an Intelligence Tax?”: when your data/computing scale exceeds the cloud computing applicable spectrum (Supabase: 4C/8G/500MB free storage), costs can easily explode. Moreover, currently, sufficiently reliable local enterprise-grade NVMe SSDs have a three to four order of magnitude advantage in cost-effectiveness compared to cloud storage, and self-hosting can better leverage this advantage.
Another important reason is functionality — Supabase cloud service functionality is limited. Many powerful PostgreSQL extensions cannot be provided as cloud services due to multi-tenant security challenges and licensing issues. Therefore, although extensions are PostgreSQL’s core feature, only 64 extensions are available on Supabase cloud service. Self-built Supabase with Pigsty provides up to 437 ready-to-use PostgreSQL extensions.
Additionally, autonomy and avoiding vendor lock-in are important reasons for self-hosting — although Supabase aims to provide an open-source alternative to Google Firebase without vendor lock-in, the threshold for self-building enterprise-grade Supabase to high standards is actually quite high. Supabase includes a series of PostgreSQL extension plugins developed and maintained by them, and plans to replace the native PostgreSQL kernel with the acquired OrioleDB, but these kernels and extensions are not provided in the official PGDG repository.
This is actually a form of implicit vendor lock-in, preventing users from self-building using methods other than the supabase/postgres Docker image. Pigsty provides an open-source, transparent, and universal solution to solve this problem. We package all 10 missing extensions developed and used by Supabase into ready-to-use RPM/DEB packages, ensuring they are available on all mainstream Linux operating system distributions:
| Extension | Description |
|---|---|
pg_graphql |
Provides GraphQL support within PostgreSQL (RUST), Rust extension, provided by PIGSTY |
pg_jsonschema |
Provides JSON Schema validation capability, Rust extension, provided by PIGSTY |
wrappers |
Supabase’s external data source wrapper bundle, Rust extension, provided by PIGSTY |
index_advisor |
Query index advisor, SQL extension, provided by PIGSTY |
pg_net |
Extension for asynchronous non-blocking HTTP/HTTPS requests with SQL (supabase), C extension, provided by PIGSTY |
vault |
Extension for storing encrypted credentials in Vault (supabase), C extension, provided by PIGSTY |
pgjwt |
PostgreSQL implementation of JSON Web Token API (supabase), SQL extension, provided by PIGSTY |
pgsodium |
Table data encryption storage TDE, extension, provided by PIGSTY |
supautils |
Used to ensure database cluster security in cloud environments, C extension, provided by PIGSTY |
pg_plan_filter |
Filter and block specific query statements using execution plan costs, C extension, provided by PIGSTY |
Meanwhile, we install most extensions by default in Supabase self-hosting deployment. You can refer to the available extension list to enable them as needed.
Additionally, Pigsty handles the automatic setup of underlying high availability PostgreSQL database clusters, high availability MinIO object storage clusters, and even Docker container infrastructure deployment and Nginx reverse proxy, domain configuration and HTTPS certificate issuance. You can deploy any number of stateless Supabase container clusters using Docker Compose and store state in external Pigsty self-hosted database services.
In this self-hosting deployment architecture, you gain the freedom to use different kernels (PostgreSQL 15-18, OrioleDB), the freedom to install 437 extensions, the freedom to scale Supabase/Postgres/MinIO, the freedom from database operational chores, and the freedom from vendor lock-in to run locally indefinitely. Compared to the cost of using cloud services, the price is just preparing servers and typing a few more commands.
Let’s start with single-node Supabase deployment. We’ll introduce multi-node high availability deployment methods later.
Prepare a fresh Linux server, use the supabase configuration template provided by Pigsty to execute the standard installation process,
then additionally run docker.yml and app.yml to deploy the stateless Supabase containers (default ports 8000/8433).
Before deploying Supabase, please modify the parameters (domain and passwords) in the automatically generated pigsty.yml configuration file according to your actual situation.
If it’s just local development testing, you can skip this for now. We’ll introduce how to further customize through configuration file modifications later.
If configured correctly, after about ten minutes, you can access the Supabase Studio graphical management interface locally via http://<your_ip_address>:8000.
The default username and password are: supabase and pigsty.
In mainland China, Pigsty uses DockerHub mirror sites provided by 1Panel and 1ms to download Supabase-related images by default, which may be slow.
You can also configure proxy and mirror sites yourself, or manually pull images with cd /opt/supabase; docker compose pull.
We also provide Supabase self-hosting expert consulting services including complete offline installation solutions.
If you need to use object storage functionality, you need to access Supabase via domain and HTTPS, otherwise errors will occur.
For serious production deployments, must change all default passwords!
Here are some key technical decisions involved in self-hosting Supabase for your reference:
Using the default single-node deployment, Supabase cannot enjoy PostgreSQL/MinIO high availability capabilities. Nevertheless, single-node deployment still has significant advantages compared to the official pure Docker Compose solution: for example, out-of-the-box monitoring systems, the ability to freely install extensions, component scaling capabilities, and providing fallback database point-in-time recovery capabilities.
If you only have one server or choose to self-host on cloud servers, Pigsty recommends using external S3 instead of local MinIO as object storage to store PostgreSQL backups and support Supabase Storage services. Such deployment can provide a fallback-level RTO (hour-level recovery time)/RPO (MB-level data loss) disaster recovery level under single-machine deployment conditions during failures.
In serious production deployments, Pigsty recommends using at least 3-4 node deployment strategies to ensure both MinIO and PostgreSQL use multi-node deployments that meet enterprise-grade high availability requirements. In this case, you need to prepare more nodes and disks accordingly and adjust cluster configurations in the pigsty.yml configuration manifest, as well as access information in supabase cluster configuration to use high availability access points.
Some Supabase functionality requires sending emails, so SMTP services are needed. Unless purely for internal networks, for serious production deployments, using SMTP cloud services is recommended. Self-built email servers easily have their emails marked as spam and rejected.
If your service is directly exposed to the public network, we strongly recommend using real domains and HTTPS certificates and accessing through Nginx Portal.
Next, we’ll discuss some advanced topics in sequence: how to further improve Supabase security, availability, and performance based on single-node deployment.
Pigsty Base Components
For serious production deployments, we strongly recommend changing Pigsty default passwords. Because these default values are public and well-known, going to production without changing passwords is like streaking:
grafana_admin_password: pigsty, Grafana admin passwordpg_admin_password: DBUser.DBA, PostgreSQL superuser passwordpg_monitor_password: DBUser.Monitor, PostgreSQL monitoring user passwordpg_replication_password: DBUser.Replicator, PostgreSQL replication user passwordpatroni_password: Patroni.API, Patroni high availability component passwordhaproxy_admin_password: pigsty, load balancer management passwordminio_secret_key: minioadmin, MinIO root user keyDBUser.SupaThe above passwords are for Pigsty component modules and are strongly recommended to be set before installation and deployment.
Supabase Keys
In addition to Pigsty component passwords, you also need to modify Supabase keys, including:
JWT_SECRETANON_KEYSERVICE_ROLE_KEYPG_META_CRYPTO_KEYDASHBOARD_USERNAME: Supabase Studio Web interface default username, default is supabaseDASHBOARD_PASSWORD: Supabase Studio Web interface default password, default is pigstyPlease refer to the Supabase tutorial: Securing your services instructions:
JWT_SECRET longer than 40 characters and use the tools in the tutorial to sign ANON_KEY and SERVICE_ROLE_KEY JWTs.ANON_KEY JWT based on JWT_SECRET and expiration time attributes. This is the credential for anonymous users.SERVICE_ROLE_KEY based on JWT_SECRET and expiration time attributes. This is the credential for higher-privilege service roles.PG_META_CRYPTO_KEY with a random string at least 32 char long for securing connection strings between Studio and postgres-metaPOSTGRES_PASSWORD value accordinglyS3_ACCESS_KEY and S3_SECRET_KEY values accordinglyAfter modifying Supabase credentials, you can restart Docker Compose containers to apply the new configuration:
If you’re using Supabase on localhost or within a LAN, you can choose IP:Port direct connection to Kong’s exposed HTTP port 8000 to access Supabase.
You can use an internal static DNS domain, but for serious production deployments, we recommend using real domain + HTTPS to access Supabase.
In this case, your server should have a public IP address, you should own a domain, use DNS resolution services provided by cloud/DNS/CDN providers to point it to the installation node’s public IP (optional fallback: local /etc/hosts static resolution).
A simple approach is to batch replace the placeholder domain (supa.pigsty) with your actual domain, say supa.pigsty.cc:
If you haven’t configured it beforehand, reload Nginx and Supabase configurations:
The modified configuration should look like the following snippet:
Complete domain/HTTPS configuration can refer to the Certificate Management tutorial. You can also use Pigsty’s built-in local static resolution and self-signed HTTPS certificates as fallback.
You can use S3 or S3-compatible services as object storage for PostgreSQL backups and Supabase usage. Here we use Alibaba Cloud OSS object storage as an example.
Pigsty provides a
terraform/spec/aliyun-meta-s3.tftemplate that can be used to deploy a server and an OSS bucket on Alibaba Cloud.
First, modify the S3-related configuration in all.children.supa.vars.apps.[supabase].conf, pointing it to the Alibaba Cloud OSS bucket:
Reload Supabase configuration with the following command:
You can also use S3 as PostgreSQL backup repository by adding an aliyun backup repository definition in all.vars.pgbackrest_repo:
Then specify using the aliyun backup repository in all.vars.pgbackrest_method and reset pgBackrest backup:
Pigsty will switch the backup repository to external object storage. More backup configurations can refer to PostgreSQL Backup documentation.
You can use SMTP to send emails by modifying the supabase application configuration and adding SMTP information:
Don’t forget to use app.yml to reload the configuration
After these configurations, you have an enterprise-grade Supabase (basic single-machine version) with public domain, HTTPS certificate, SMTP, PITR backup, monitoring, IaC, and 400+ extensions. For high availability configuration, please refer to other parts of Pigsty documentation. If you’re too lazy to read and learn, we provide hands-on Supabase self-hosting expert consulting services — ¥2000 to save you from the hassle of tinkering and downloading.
Single-node RTO/RPO relies on external object storage services for fallback. If your node fails, backups are retained in external S3 storage, and you can redeploy Supabase on a new node and restore from backup. Such deployment can provide a minimum standard RTO (hour-level recovery time)/RPO (MB-level data loss) fallback disaster recovery level during failures.
To achieve RTO < 30s with zero data loss failover, you need to use multi-node high availability deployment, which involves:
In this case, you also need to modify PostgreSQL and MinIO access points to use DNS/L2 VIP/HAProxy and other high availability access points
For these parts, you only need to refer to the documentation of each module in Pigsty for configuration and deployment.
We recommend referring to the configurations in conf/ha/trio.yml and conf/ha/safe.yml to upgrade cluster scale to three nodes or more.
Odoo is an open-source enterprise resource planning (ERP) software that provides a full suite of business applications, including CRM, sales, purchasing, inventory, production, accounting, and other management functions. Odoo is a typical web application that uses PostgreSQL as the underlying database.
All your business on one platform, Simple, efficient, yet affordable
The latest version of Odoo is 19.0
The default credentials are
admin:admin
The conf/app/odoo.yml defines a template config file
that defines the resources required for a single Odoo instance.
Check .env file for configurable environment variables:
Then launch odoo with:
Visit http://ddl.pigsty or http://10.10.10.10:8887
You can use external PostgreSQL for Odoo. Odoo will create its own database during setup, so you don’t need to do that
And create business user & database with:
Check connectivity:
Expose odoo seb service via nginx portal:
There are lots of Odoo modules available in the community, you can install them by downloading and placing them in the addons folder.
You can mount the ./addons dir to the /mnt/extra-addons in the container, then download and unzip to the addons folder,
To enable addon module, first enter the Developer mode
Settings -> Generic Settings -> Developer Tools -> Activate the developer Mode
Then go to the > Apps -> Update Apps List, then you can find the extra addons and install from the panel.
Frequently used free addons: Accounting Kit
Check public demo: http://odoo.pigsty.io, username: [email protected], password: pigsty
If you want to access odoo through SSL, you have to trust files/pki/ca/ca.crt on your browser (or use the dirty hack thisisunsafe in chrome)
Dify is a generative AI application innovation engine and open-source LLM application development platform. It provides capabilities from Agent construction to AI workflow orchestration, RAG retrieval, and model management, helping users easily build and operate generative AI-native applications.
Pigsty provides support for self-hosting Dify, allowing you to deploy Dify with a single command while storing critical state in externally managed PostgreSQL. You can use pgvector in the same PostgreSQL instance as a vector database, further simplifying deployment.
Pigsty v3.7.0 ships the Dify v1.8.1 application template.
On a fresh Linux x86 / ARM server running a compatible distribution, execute:
Dify listens on port 5001 by default. You can access it via browser at http://<ip>:5001 and set up your initial user credentials to log in.
After Dify starts, you can install various extensions, configure system models, and begin using it!
There are many reasons to self-host Dify, but the primary motivation is data security. The DockerCompose template provided by Dify uses basic default database images, lacking enterprise-grade features like high availability, disaster recovery, monitoring, IaC, and PITR capabilities.
Pigsty elegantly solves these issues for Dify, deploying all components with a single command based on configuration files, and using mirrors to resolve China region access challenges. This makes Dify deployment and delivery incredibly smooth. It handles PostgreSQL master database, PGVector vector database, MinIO object storage, Redis, Prometheus monitoring, Grafana visualization, Nginx reverse proxy, and free HTTPS certificates in one go.
Pigsty ensures all Dify state is stored in externally managed services, including metadata in PostgreSQL and other data in the filesystem. Therefore, the Dify instance launched via Docker Compose becomes a stateless application that can be destroyed and rebuilt at any time, greatly simplifying operations.
Let’s start with single-node Dify deployment. We’ll cover production high-availability deployment methods later.
First, use Pigsty’s standard installation process to install the PostgreSQL instance required by Dify:
When you use the ./configure -c app/dify command, Pigsty automatically generates the configuration file based on the conf/app/dify.yml
template and your current environment. You should modify passwords, domain, and other relevant parameters in the generated pigsty.yml configuration file
according to your actual needs, then use ./install.yml to execute the standard installation process.
Next, run docker.yml to install Docker and Docker Compose,
then use app.yml to complete Dify deployment:
You can access the Dify Web management interface at http://<your_ip_address>:5001 on your local network.
Default username, email, and password will be prompted for setup on first login.
You can also use the locally resolved placeholder domain dify.pigsty, or follow the configuration below to use a real domain with HTTPS certificates.
When you use the ./configure -c app/dify command for configuration,
Pigsty automatically generates the configuration file based on the conf/app/dify.yml template and your current environment.
Here’s a detailed explanation of the default configuration:
Here’s a checklist of configuration items you need to focus on:
x86_64/arm64 server, fresh installation of mainstream Linux operating systemsapp/dify config template and modify parameters as needed
configure -c app/dify, and enter node’s internal primary IP address, or specify via -i <primary_ip> command line parametergrafana_admin_password: pigsty, Grafana admin passwordpg_admin_password: DBUser.DBA, PG superuser passwordpg_monitor_password: DBUser.Monitor, PG monitoring user passwordpg_replication_password: DBUser.Replicator, PG replication user passwordpatroni_password: Patroni.API, Patroni HA component passwordhaproxy_admin_password: pigsty, Load balancer management passworddify and password difyai123456 are generated by Pigsty for Dify, please modify according to actual situationDB_USERNAME, DB_PASSWORD, PGVECTOR_USER, PGVECTOR_PASSWORD and other parameters accordinglyopenssl rand -base64 42 to randomly generate a password string and fill it in the SECRET_KEY parameterdify.pigsty with your actual domain, e.g. dify.pigsty.ccsed -ie 's/dify.pigsty/dify.pigsty.cc/g' pigsty.yml to modify Dify’s domainIf you want to use a real domain with HTTPS certificates, you need to modify in the pigsty.yml configuration file:
infra_portal parameter’s dify domaincertbot_email for receiving certificate expiration notificationsNGINX_SERVER_NAME parameter to specify your actual domainUse the following command to apply for Nginx certificates:
Execute app.yml playbook to redeploy Dify service to make NGINX_SERVER_NAME configuration take effect.
You can use restic to back up Dify’s filesystem. Dify’s data files are in the /data/dify directory. You can use the following commands to backup:
After creating the Restic backup repository, you can use the following commands to backup Dify:
Another more reliable way is to use JuiceFS to mount MinIO object storage to the /data/dify directory, so you can use MinIO/S3 to store file state.
If you want to store all data in PostgreSQL, consider “Using JuiceFS to store filesystem data in PostgreSQL”
For example, you can create another dify_fs database and use it as JuiceFS’s metadata storage: