Architecture
PostgreSQL cluster architecture and concept
This is the multi-page printable view of this section. .
PostgreSQL cluster architecture and concept
Reliable service access via lb, proxy, pool
Define, create, and manage business databases
Define, create, and manage users and roles
Host-Based Authentication in Pigsty
Access Control with default roles and privileges
Replace vanilla PostgreSQL with exotic kernel forks
Harness the synergistic power of PostgreSQL extensions
Describe and configure PostgreSQL clusters
Customize postgres cluster with 120 parameters
Run administrative tasks on PostgreSQL clusters
Control primitives with Ansible playbooks
Backup and point-in-time recovery
Zero-downtime blue-green deployment
Monitor existing PostgreSQL or RDS
Visualized information with Grafana dashboards
There are four types of core entities in Pigsty’s PGSQL module:
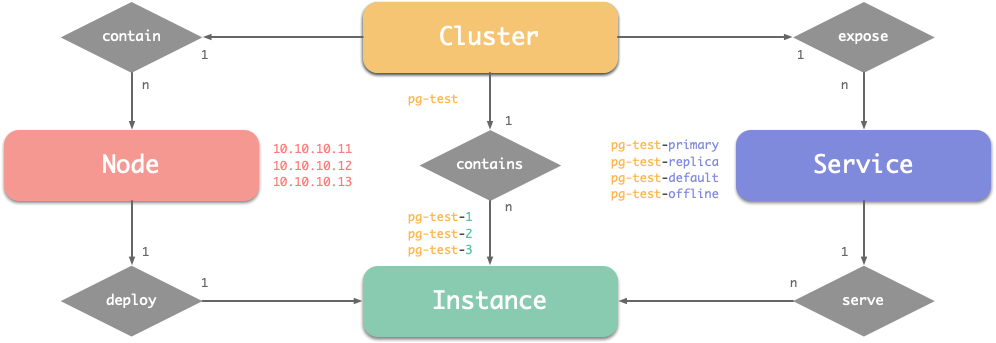
Here’s a PostgreSQL Cluster pg-test described in the config inventory:
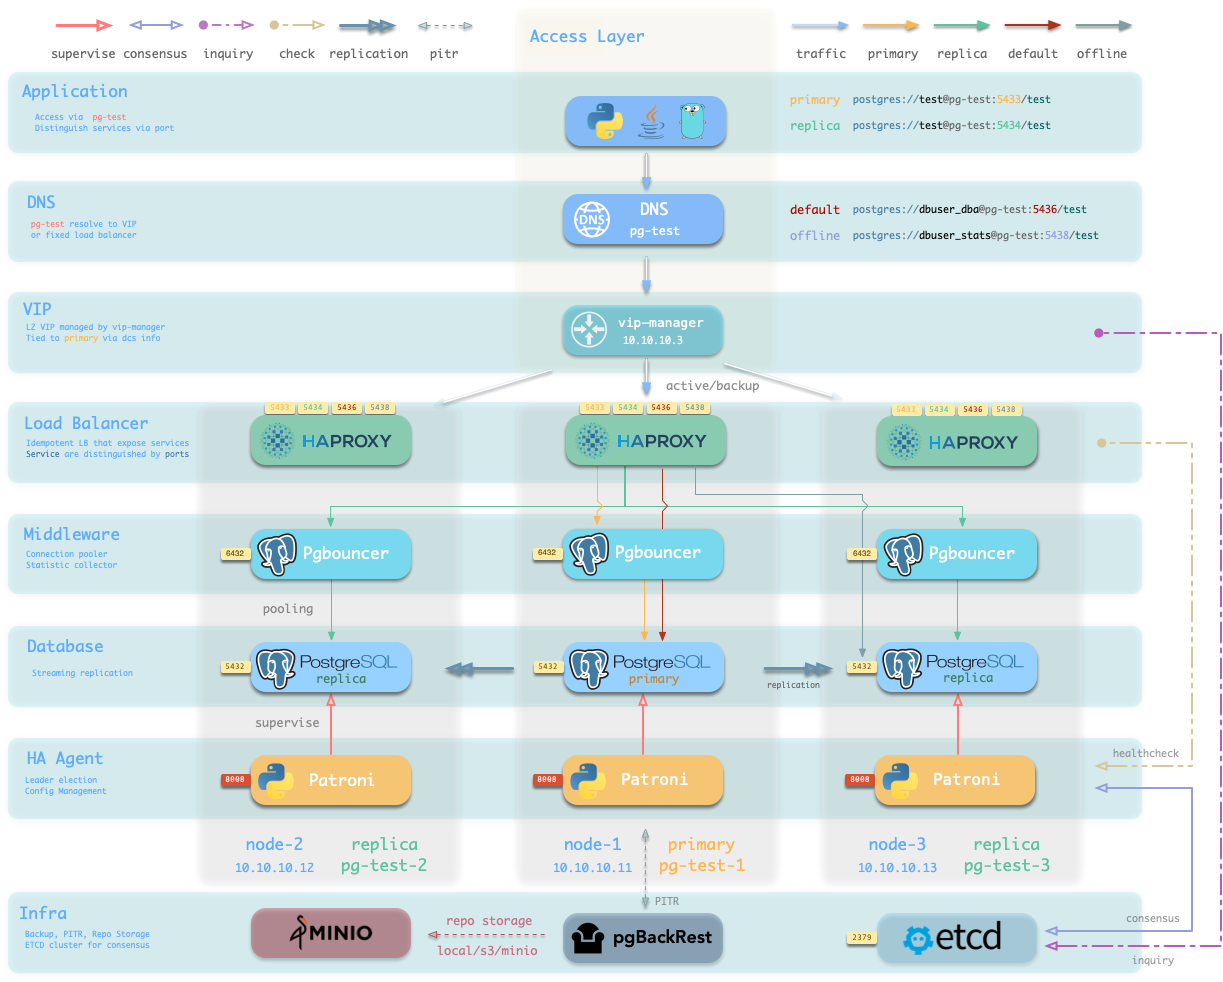
It defines a HA PostgreSQL cluster looks like the above, and here are related entities in this cluster:
pg-testprimary & replicapg-test-1, pg-test-2, pg-test-310.10.10.11, 10.10.10.12, 10.10.10.13pg-test-primary: Read-Write Service (route to primary pgbouncer)pg-test-replica: Read-Only Service (route to replicas pgbouncer)pg-test-default: Direct RW Service (route to primary postgres)pg-test-offline: Offline Read Service (route to dedicated postgres)The PostgreSQL cluster is managed by Patroni, which is a battle-tested HA solution for PostgreSQL. It will set up PG Replication on multiple nodes, and perform automatic failover when the primary node is down.
The backup is handled by pgBackRest, which is a powerful backup tool for PostgreSQL, which supports incremental backup/restore, compression, encryption, backup to local disk or S3 / MinIO.
The pgbouncer is a lightweight connection pooler which can increase the performance with high-concurrency. It is 1:1 deployed with the Postgres server and used by primary / replica services by default.
The services are exposed by HAProxy, which is a high-performance TCP/HTTP load balancer, it’s part of NODE module. And 4 default services are auto exposed in an idempotent way on all cluster nodes.
The application can visit any of the haproxy to access the Postgres cluster, and the traffic will be routed to the correct instance based on patroni health check endpoints. So failover is transparent to the apps.
The patroni requires a functioning ETCD in your deployment, and pgbackrest can use the optional MinIO as centralized backup storage; and monitoring exporters will collect metrics & logs into the Infra module.
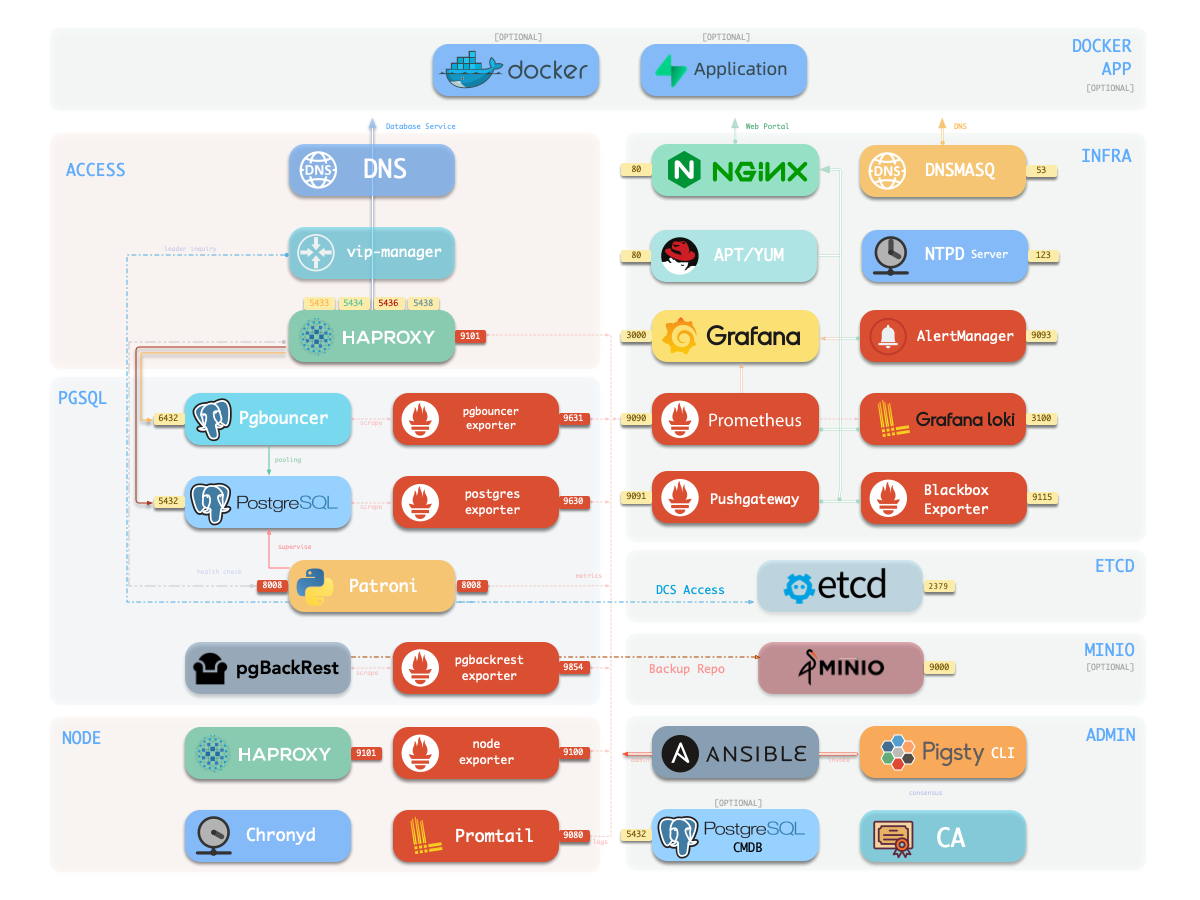
The PGSQL Node consists of the following components (some can be disabled)
| Component | Port | Description |
|---|---|---|
postgres |
5432 |
PostgreSQL Server Process Managed by Patroni |
pgbouncer |
6432 |
Pgbouncer Connection Pool |
pgbackrest |
- | Backup and point-in-time-recovery tools |
patroni |
8008 |
Patroni HA Component, Manage postgres |
primary @ haproxy |
5433 |
Primary connection pool: Read/Write Service |
replica @ haproxy |
5434 |
Replica connection pool: Read-only Service |
default @ haproxy |
5436 |
Primary Direct Connect Service |
offline @ haproxy |
5438 |
Offline Direct Connect: Offline Read Service |
pg_exporter |
9630 |
postgres Monitoring Metrics Exporter |
pgbouncer_exporter |
9631 |
pgbouncer Monitoring Metrics Exporter |
pgbackrest_exporter |
9854 |
pgbackrest Monitoring Metrics Exporter |
vip-manager |
- | Bind VIP to the primary |
Meanwhile, the Infra Node consists of the following components which interact with PGSQL.
| Component | Port | Domain | Description |
|---|---|---|---|
nginx |
80 |
h.pigsty |
Web Service Portal (YUM/APT Repo) |
alertmanager |
9059 |
a.pigsty |
Alert Aggregation and delivery |
prometheus |
9058 |
p.pigsty |
Monitoring Time Series Database |
grafana |
3000 |
g.pigsty |
Visualization Platform |
lok |
3100 |
- | Logging Collection Server |
pushgateway |
9091 |
- | Collect One-Time Job Metrics |
blackbox_exporter |
9115 |
- | Blackbox Probing |
dnsmasq |
53 |
- | DNS Server |
chronyd |
123 |
- | NTP Time Server |
ansible |
- | - | Run playbooks |
vip-manager, which binds to cluster primary.
vip-manager will acquire cluster leader info written by patroni from etcd cluster directly543x).
patroni.primary/replica services by setting pg_default_service_dest ) to postgrespatroni by default.etcd as DCS: config storage, failure detection, and leader election.pgbackrest_method)
local (default) is used as the backup repo, primary’s pg_fs_backup is used as local backup repominio is used, pgBackRest will create the repo on the dedicated MinIO clusterThere is one config inventory file and one infra corresponding to a Pigsty deployment. And there may have multiple database clusters in a Pigsty deployment.
A Cluster / Instance may have multiple Databases, and Databases contain Tables and other Objects (Query, Index, Function, Seq, …).
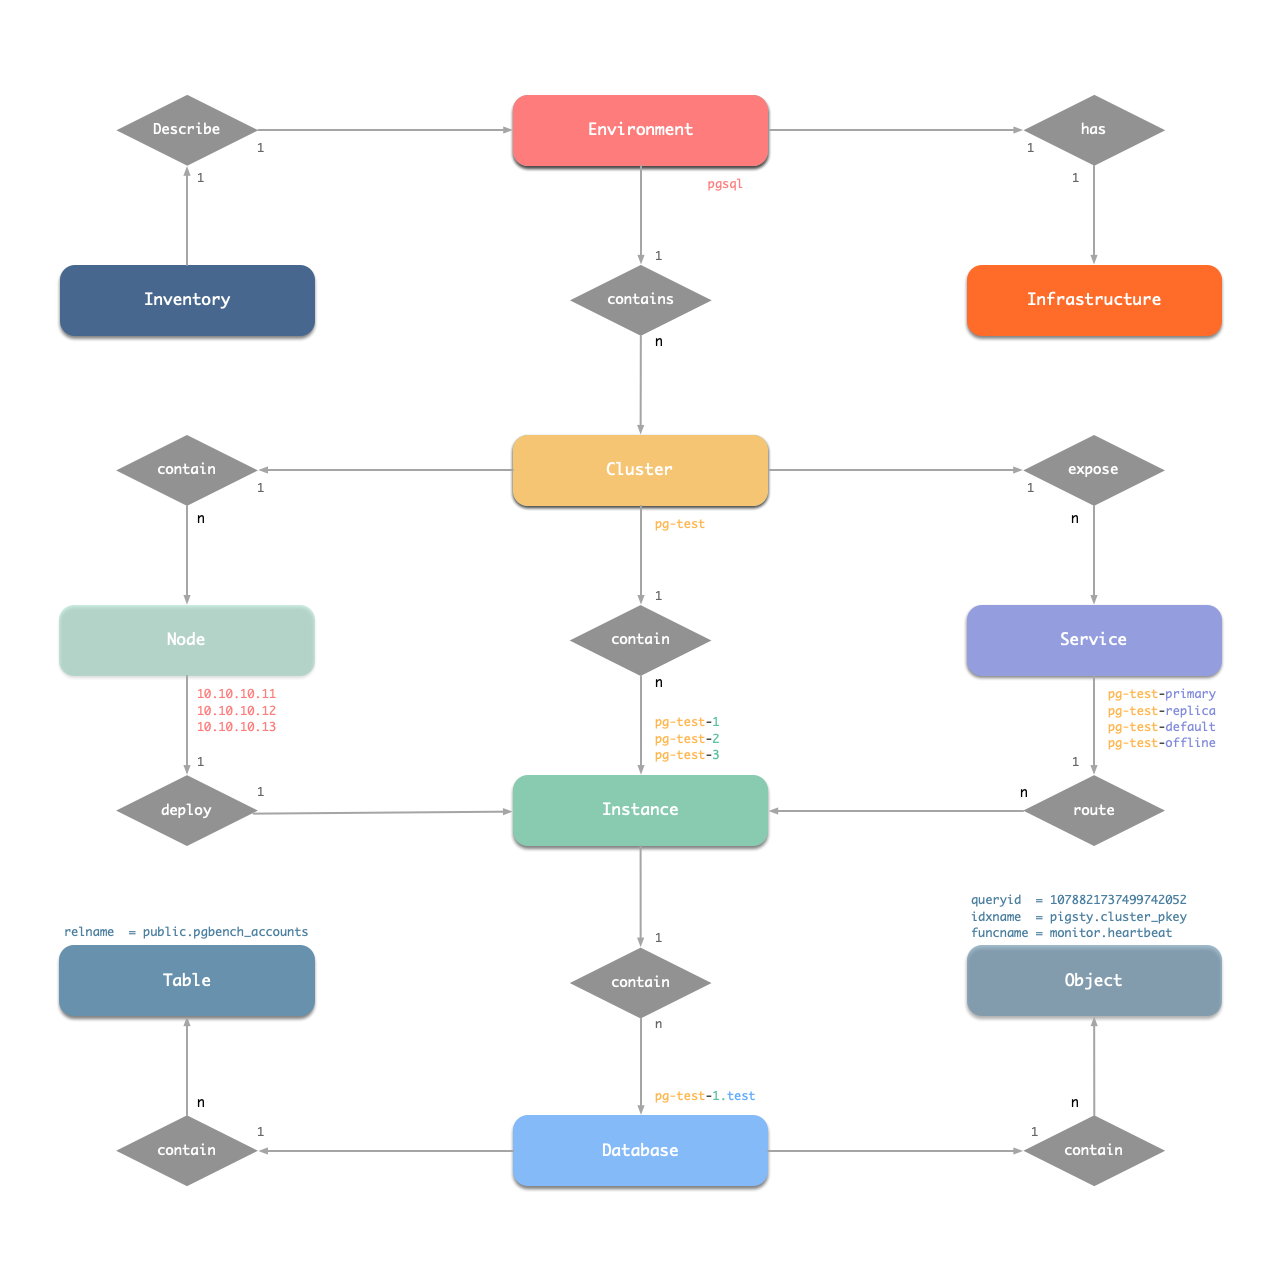
You can define different types of instances & clusters.
There are 4 REQUIRED parameters to describe a PostgreSQL Cluster:
| Name | Type | Level | Description |
|---|---|---|---|
inventory_hostname |
ip |
Instance | PG node IPv4 address |
pg_cluster |
string |
Cluster | PG database cluster name |
pg_seq |
number |
Instance | PG database instance id |
pg_role |
enum |
Instance | PG database instance role |
pg_cluster: Name of the cluster, configured at the cluster level.pg_role: Configured at the instance level, identifies the role of the instance.
primary role will mark this instance as cluster leader (initially).replica is the default role, which marks this instance as common read-only replica.offline marks this instance as special read-only replica that serves the offline service.pg_seq: Used to identify the instance within the cluster, a non-negative integer
{{ pg_cluster }}-{{ pg_seq }} is used to uniquely identify the instance, i.e. pg_instance.{{ pg_cluster }}-{{ pg_role }} is used to identify the services within the cluster, i.e. pg_service.pg_shard and pg_group are used for horizontally sharding clusters, for citus & greenplum only.These identities will be used in the entire system, for example, the metrics may look like:
You can use the OPTIONAL pg_shard and pg_group param to identify horizontal sharded clusters:
| Name | Type | Level | Description |
|---|---|---|---|
pg_shard |
string |
C | PG database shard name of cluster |
pg_group |
number |
C | PG database shard index of cluster |
For example, Horizontal sharding with citus, greenplum or sharding it manually
[a-zA-Z0-9-]+, and ≤ 40 char--| Entity | Naming Examples |
|---|---|
| Cluster | pg-meta, pg-test, … |
| Service | pg-meta-primary, pg-test-replica, pg-test-offline, pg-test-standby, pg-meta-default |
| Instance | pg-meta-1, pg-test-1, pg-test-2, pg-test-3,… |
| Node | 10.10.10.10, 10.10.10.11, 10.10.10.12, 10.10.10.13… |
Pigsty follows the PostgreSQL Version Policy and “Officially” support the following major versions.
| Major | Minor | Comment | RPM EXT | DEB EXT |
|---|---|---|---|---|
18 |
18.1 |
The latest stable version (RECOMMENDED) | 392 | 390 |
17 |
17.7 |
The sendary stable version (RECOMMENDED) | 418 | 413 |
16 |
16.11 |
First release on 2023-09-14 | 420 | 412 |
15 |
15.15 |
First release on 2022-10-13 | 422 | 414 |
14 |
14.20 |
First release on 2021-09-30 | 410 | 402 |
13 |
13.23 |
First release on 2020-09-24, EOLed soon | 382 | 371 |
Pigsty has PG 13 - 18 support. Lower major version (12-) “may” work, with no guarantee. For legacy PG version support, consider our professional services.
To use a different major version, configure the pg_version variable.
Which can be globally configure with -v <ver> option.
No further changed needed as long as they are available in local / upstream repo.
Let’s start with the simplest case, singleton meta:
Use the following command to create a primary database instance on the 10.10.10.11 node.
To add a physical replica, you can assign a new instance to pg-test with pg_role set to replica
You can create an entire cluster or append a replica to the existing cluster:
The offline instance is a dedicated replica to serve slow queries, ETL, OLAP traffic and interactive queries, etc…
To add an offline instance, assign a new instance with pg_role set to offline.
Offline instance works like common replica instances, but it is used as a backup server in pg-test-replica service. That is to say, offline and primary instances serve only when all replica instances are down.
You can have ad hoc access control offline with pg_default_hba_rules and pg_hba_rules. It will apply to the offline instance and any instances with pg_offline_query flag.
Pigsty uses asynchronous stream replication by default, which may have a small replication lag (10KB / 10ms). A small window of data loss may occur when the primary fails (can be controlled with pg_rpo), but it is acceptable for most scenarios.
But in some critical scenarios (e.g., financial transactions), data loss is totally unacceptable or read-your-write consistency is required. In this case, you can enable synchronous commit to ensure that.
To enable sync standby mode, you can simply use crit.yml template in pg_conf
To enable sync standby on existing clusters, config the cluster and enable synchronous_mode:
If synchronous_mode: true, the synchronous_standby_names parameter will be managed by patroni. It will choose a sync standby from all available replicas and write its name to the primary’s configuration file.
When sync standby is enabled, PostgreSQL will pick one replica as the standby instance, and all other replicas as candidates. Primary will wait until the standby instance flushes to disk before a commit is confirmed, and the standby instance will always have the latest data without any lags.
However, you can achieve an even higher/lower consistency level with the quorum commit (trade-off with availability).
For example, to have all 2 replicas to confirm a commit:
If you have more replicas and wish to have more sync standby, increase synchronous_node_count accordingly. Beware of adjust synchronous_node_count accordingly when you append or remove replicas.
The postgres synchronous_standby_names parameter will be managed by patroni:
The classic quorum commit is to use majority of replicas to confirm a commit.
You can clone an existing cluster and create a standby cluster, which can be used for migration, horizontal split, multi-az deployment, or disaster recovery.
A standby cluster’s definition is just the same as any other normal cluster, except there’s a pg_upstream defined on the primary instance.
For example, you have a pg-test cluster, to create a standby cluster pg-test2, the inventory may look like this:
And pg-test2-1, the primary of pg-test2 will be a replica of pg-test and serve as a Standby Leader in pg-test2.
Just make sure that the pg_upstream parameter is configured on the primary of the backup cluster to pull backups from the original upstream automatically.
A delayed cluster is a special type of standby cluster, which is used to recover “drop-by-accident” ASAP.
For example, if you wish to have a cluster pg-testdelay which has the same data as 1-day ago pg-test cluster:
You can also configure a replication delay on the existing standby cluster.
When some tuples & tables are dropped by accident, you can advance this delayed cluster to a proper time point and select data from it.
It takes more resources, but can be much faster and have less impact than PITR
Pigsty has native citus support. Check the conf/citus.yml example.
To define a citus cluster, you have to specify the following parameters:
pg_mode has to be set to citus instead of default pgsqlpg_shard & pg_group has to be defined on each sharding clusterpatroni_primary_db has to be defined to specify the database to be managedpg_dbsu_password has to be set to a non-empty string plain password if you want to use the pg_dbsu postgres rather than default pg_admin_username to perform admin commandsBesides, extra hba rules that allow ssl access from local & other data nodes are required. Which may looks like this
And you can create distributed table & reference table on the coordinator node. Any data node can be used as the coordinator node since citus 11.2.
There are 121 parameters about the PGSQL module.
| Section | Count | Description |
|---|---|---|
PG_ID |
11 | Calculate & Check Postgres Identity - parameters for identifying PGSQL entities like instances and services |
PG_BUSINESS |
12 | Postgres Business Object Definition - configuration for business users, databases, services, and authentication |
PG_INSTALL |
10 | Install PGSQL Packages & Extensions - settings for database user setup, version selection, and package installation |
PG_BOOTSTRAP |
35 | Init a HA Postgres Cluster with Patroni - comprehensive cluster initialization including data directories, networking, and high availability setup |
PG_PROVISION |
9 | Create users, databases, and in-database objects - post-bootstrap provisioning of database objects and default configurations |
PG_BACKUP |
6 | Setup backup repo with pgbackrest - backup and recovery configuration using pgbackrest |
PG_ACCESS |
16 | Exposing pg service, bind vip and register DNS - service exposure, load balancing, VIP management, and DNS registration |
PG_MONITOR |
18 | Add Monitor for PGSQL Instance - monitoring setup with various exporters for metrics collection |
PG_REMOVE : Remove a Postgres Cluster |
| Name | Type | Level | Comment |
|---|---|---|---|
pg_safeguard |
bool |
G/C/A | stop removal when enabled; false by default |
pg_rm_data |
bool |
G/C/A | remove postgres data during removal; true by default |
pg_rm_backup |
bool |
G/C/A | remove primary pgBackRest backup during removal; true by default |
pg_rm_pkg |
bool |
G/C/A | uninstall postgres packages during removal; true by default |
PG_ID
Here are some common parameters used to identify PGSQL entities: instance, service, etc…
pg_mode
name: pg_mode, type: enum, level: C
pgsql cluster mode, pgsql by default, i.e. standard PostgreSQL cluster.
pgsql: Standard PostgreSQL cluster, default value.citus: Horizontal sharding cluster with citus extension.mssql: Babelfish MSSQL wire protocol compatible kernel.ivory: IvorySQL Oracle compatible kernel.polar: PolarDB for PostgreSQL kernel.oracle: PolarDB for Oracle kernel.gpsql: Greenplum / CloudberryIf pg_mode is set to citus or gpsql, pg_shard and pg_group will be required for horizontal sharding clusters.
pg_cluster
name: pg_cluster, type: string, level: C
pgsql cluster name, REQUIRED identity parameter
The cluster name will be used as the namespace for PGSQL related resources within that cluster.
The naming needs to follow the specific naming pattern: [a-z][a-z0-9-]* to be compatible with the requirements of different constraints on the identity.
pg_seq
name: pg_seq, type: int, level: I
pgsql instance seq number, REQUIRED identity parameter
A serial number to identify these instances, unique within its cluster, starting from 0 or 1.
pg_role
name: pg_role, type: enum, level: I
pgsql role, REQUIRED, could be primary,replica,offline
Roles for PGSQL instance, can be: primary, replica, standby or offline.
primary: Primary, there is one and only one primary in a cluster.replica: Replica for carrying online read-only traffic, there may be a slight replication delay through (10ms~100ms, 100KB).standby: Special replica that is always synced with primary, there’s no replication delay & data loss on this replica. (currently same as replica)offline: Offline replica for taking on offline read-only traffic, such as statistical analysis/ETL/personal queries, etc.Identity params, required params, and instance-level params.
pg_instances
name: pg_instances, type: dict, level: I
define multiple pg instances on node in {port:ins_vars} format.
This parameter is reserved for multi-instance deployment on a single node which is not implemented in Pigsty yet.
pg_upstream
name: pg_upstream, type: ip, level: I
Upstream ip address for standby cluster or cascade replica
Setting pg_upstream is set on primary instance indicate that this cluster is a Standby Cluster, and will receiving changes from upstream instance, thus the primary is actually a standby leader.
Setting pg_upstream for a non-primary instance will explicitly set a replication upstream instance, if it is different from the primary IP Address,
this instance will become a cascade replica. And it’s user’s responsibility to ensure that the upstream IP addr is another instance in the same cluster.
pg_shard
name: pg_shard, type: string, level: C
pgsql shard name, required identity parameter for sharding clusters (e.g. citus cluster), optional for common pgsql clusters.
When multiple pgsql clusters serve the same business together in a horizontally sharding style, Pigsty will mark this group of clusters as a Sharding Group.
pg_shard is the name of the shard group name. It’s usually the prefix of pg_cluster.
For example, if we have a sharding group pg-citus, and 4 clusters in it, there identity params will be:
pg_group
name: pg_group, type: int, level: C
pgsql shard index number, required identity for sharding clusters, optional for common pgsql clusters.
Sharding cluster index of a sharding group, used in pairs with pg_shard. You can use any non-negative integer as the index number.
gp_role
name: gp_role, type: enum, level: C
greenplum/matrixdb role of this cluster, could be master or segment
master: mark the postgres cluster as greenplum master, which is the default valuesegment mark the postgres cluster as greenplum segmentThis parameter is only used for greenplum & derived databases, and is ignored for common pgsql cluster.
pg_exporters
name: pg_exporters, type: dict, level: C
additional pg_exporters to monitor remote postgres instances, default values: {}
If you wish to monitor remote postgres instances, define them in pg_exporters and load them with pgsql-monitor.yml playbook.
Check PGSQL Monitoring for details.
pg_offline_query
name: pg_offline_query, type: bool, level: I
set to true to enable offline queries on this instance
default value is false
When this parameter is enabled for a PostgreSQL instance, users belonging to the dbrole_offline group can directly connect to that PostgreSQL instance to perform offline queries (slow queries, interactive queries, ETL/analytical queries).
Instances with this flag are functionally similar to setting pg_role = offline, with the only difference being that offline instances by default do not handle replica service requests, as they exist specifically as dedicated offline/analytical replica instances.
If you don’t have spare instances that can be dedicated to this purpose, you can select a regular replica and enable this parameter at the instance level to accommodate offline queries when needed.
PG_BUSINESS
Database credentials, In-Database Objects that need to be taken care of by Users.
pg_userspg_databasespg_services (Global Definition: pg_default_services)pg_default_servicespgb_hba_rulespg_admin_username / pg_admin_passwordpg_replication_username / pg_replication_passwordpg_monitor_username / pg_monitor_passwordWARNING: YOU HAVE TO CHANGE THESE DEFAULT PASSWORDs in production environment.
pg_users
name: pg_users, type: user[], level: C
postgres business users, defined at cluster level.
default values: [], each object in the array defines a User/Role. Examples:
The only mandatory field of a user definition is name, and the rest are optional.
pg_databases
name: pg_databases, type: database[], level: C
postgres business databases, defined at cluster level.
default values: [], each object in the array defines a Database. Examples:
In each database definition, the DB name is mandatory and the rest are optional.
pg_services
name: pg_services, type: service[], level: C
postgres business services exposed via haproxy, has to be defined at cluster level.
You can define ad hoc services with pg_services in additional to default pg_default_services
default values: [], each object in the array defines a Service. Examples:
pg_hba_rules
name: pg_hba_rules, type: hba[], level: C
business hba rules for postgres
default values: [], each object in array is an HBA Rule definition:
Which are array of hba object, each hba object may look like
title: Rule Title, transform into comment in the hba filerules: Array of strings, each string is a raw hba rule recordrole : Applied roles, where to install these hba rules
common: apply for all instancesprimary, replica,standby, offline: apply on corresponding instances with that pg_role.role == 'offline' will be installed on instance with pg_offline_query flagor you can use another alias form
pg_default_hba_rules is similar to this, but is used for global HBA rule settings
pgb_hba_rules
name: pgb_hba_rules, type: hba[], level: C
business hba rules for pgbouncer, default values: []
Similar to pg_hba_rules, array of hba rule object, except this is for pgbouncer.
pg_replication_username
name: pg_replication_username, type: username, level: G
postgres replication username, replicator by default
This parameter is globally used, it is not wise to change it.
pg_replication_password
name: pg_replication_password, type: password, level: G
postgres replication password, DBUser.Replicator by default
WARNING: CHANGE THIS IN PRODUCTION ENVIRONMENT!!!!
pg_admin_username
name: pg_admin_username, type: username, level: G
postgres admin username, dbuser_dba by default, which is a global postgres superuser.
default values: dbuser_dba
pg_admin_password
name: pg_admin_password, type: password, level: G
postgres admin password in plain text, DBUser.DBA by default
WARNING: CHANGE THIS IN PRODUCTION ENVIRONMENT!!!!
pg_monitor_username
name: pg_monitor_username, type: username, level: G
postgres monitor username, dbuser_monitor by default, which is a global monitoring user.
pg_monitor_password
name: pg_monitor_password, type: password, level: G
postgres monitor password, DBUser.Monitor by default.
Try not using the @:/ character in the password to avoid problems with PGURL string.
WARNING: CHANGE THIS IN PRODUCTION ENVIRONMENT!!!!
pg_dbsu_password
name: pg_dbsu_password, type: password, level: G/C
PostgreSQL dbsu password for pg_dbsu, empty string means no dbsu password, which is the default behavior.
It’s not recommended to set the well-known dbsu (postgres) password for common PGSQL clusters, except for a good reason, such as using pg_mode = citus.
PG_INSTALL
This section is responsible for installing PostgreSQL & Extensions.
If you wish to install a different major version, make sure repo packages exists and overwrite pg_version on cluster level.
To install extra extensions, overwrite pg_extensions on cluster level. Beware that not all extensions are available with other major versions.
pg_dbsu
name: pg_dbsu, type: username, level: C
OS DBSU name, postgres by default, it’s not wise to change it.
When installing Greenplum / MatrixDB, set this parameter to the corresponding default value: gpadmin|mxadmin.
pg_dbsu_uid
name: pg_dbsu_uid, type: int, level: C
OS DBSU uid and gid, 26 for default postgres users and groups, which is consistent with the official pgdg RPM.
For Ubuntu/Debian, there’s no default postgres UID/GID, consider using another ad hoc value, such as 543 instead.
pg_dbsu_sudo
name: pg_dbsu_sudo, type: enum, level: C
OS DBSU sudo privilege, could be none, limit ,all ,nopass. limit by default
none: No Sudo privilegelimit: Limited sudo privilege to execute systemctl commands for database-related components, default.all: Full sudo privilege, password required.nopass: Full sudo privileges without a password (not recommended).default values: limit, which only allow sudo systemctl <start|stop|reload> <postgres|patroni|pgbouncer|...>
Available sudo services:
pg_dbsu_home
name: pg_dbsu_home, type: path, level: C
postgresql home directory, /var/lib/pgsql by default, which is consistent with the official pgdg RPM.
pg_dbsu_ssh_exchange
name: pg_dbsu_ssh_exchange, type: bool, level: C
exchange postgres os dbsu ssh key among pgsql instances?
default value is true, means the dbsu can ssh to each other among the playbook execution hosts.
For scenarios where ssh access is strictly limited, you can set it to false.
Please note that SSH key exchange occurs between instances that are executing the same playbook. If you run the pgsql role for a single PostgreSQL cluster, the key exchange will occur between all instances in that cluster.
If you run the pgsql role for all PostgreSQL clusters, the key exchange will occur between all instances, which can lead to severe combinatorial explosions for large clusters.
If any instance involved in the key exchange does not have the pg_dbsu user, the key exchange will fail for that instance, but will not affect other instances.
pg_version
name: pg_version, type: enum, level: C
postgres major version to be installed, 18 by default
Note that PostgreSQL physical stream replication cannot cross major versions, so do not configure this on instance level.
You can use the parameters in pg_packages and pg_extensions to install rpm/deb for the specific pg major version.
pg_bin_dir
name: pg_bin_dir, type: path, level: C
postgres binary dir, /usr/pgsql/bin by default
The default value is a soft link created manually during the installation process, pointing to the specific Postgres version dir installed.
For example /usr/pgsql -> /usr/pgsql-17. For more details, check PGSQL File Structure for details.
pg_log_dir
name: pg_log_dir, type: path, level: C
postgres log dir, /pg/log/postgres by default.
caveat: if
pg_log_diris prefixed withpg_datait will not be created explicitly (it will be created by postgres itself then).
pg_packages
name: pg_packages, type: string[], level: C
PostgreSQL packages (rpm/deb) to be installed. This is an array of package names, where each element is a comma or space-separated list of PG package names or aliases.
Default value: [ pgsql-main pgsql-common ]
These default values are two aliases that are translated through alias mapping into the main RPM/DEB package names for the current PG major version, as well as version-independent common components (such as Patroni, PgBackrest, etc.)
Since Pigsty v3, you can use the alias lists specified in the system configuration in roles/node_id/vars for this parameter.
The advantage of using package aliases is that you don’t need to worry about package names, architectures, and major version numbers for PostgreSQL-related packages across different system platforms, thus abstracting away differences between operating systems:
Packages defined here will first be translated through the package_map, then undergo PG major version number substitution, and finally install the actual RPM/DEB packages.
You can also directly specify the final RPM/DEB package names to be installed, where version placeholders like ${pg_version} or $v in the package name will be replaced with the specific major version number pg_version.
pg_extensions
name: pg_extensions, type: string[], level: C
PG extensions to be installed (rpm/deb), this is an array of software package names, each element is a comma or space separated PG extension package name.
This parameter is similar to pg_packages, but is usually used to specify the extension to be installed @ global | cluster level, and the software packages specified here will be upgraded to the latest available version.
The default value of this parameter is the three most important extension plugins in the PG extension ecosystem: postgis, timescaledb, pgvector.
The complete list of extensions can be found in auto generated config
The full extension list can be found in roles/node_id/vars and listed in Extension List.
PG_BOOTSTRAP
Bootstrap postgres cluster with patroni.
It also init cluster template databases with default roles, schemas & extensions & default privileges specified in PG_PROVISION
pg_data
name: pg_data, type: path, level: C
postgres data directory, /pg/data by default
default values: /pg/data, DO NOT CHANGE IT.
It’s a soft link that points to the underlying data directory.
pg_fs_main
name: pg_fs_main, type: path, level: C
postgres main data directory, /data/postgres by default.
This directory will be created and owned by the pg_dbsu user, and it will be used as the main data directory for postgres.
If your main data directory node_data is changed, consider changing this parameter as well.
It’s recommended to use NVME SSD for postgres main data storage, Pigsty is optimized for SSD storage by default.
If you are using HDD storage, consider changing the pg_storage_type to HDD to optimize for HDD storage.
pg_fs_backup
name: pg_fs_backup, type: path, level: C
postgres backup data directory, /data/backups by default
This directory will be created and owned by the pg_dbsu user, and it will be used as the local backup storage for postgres.
Local backup is enabled by default on primary pg cluster.
If you are using the default pgbackrest_method = local, it is recommended to have a separate disk for backup storage.
The backup disk should be large enough to hold all your backups, at least enough for 3 base backups + 2-day WAL archive.
This is usually not a problem since you can use affordable and large HDD for that.
It’s optional if you are using remote / centralized backup storage (e.g. pgbackrest_method = minio).
pg_storage_type
name: pg_storage_type, type: enum, level: C
storage type for pg main data, SSD,HDD, SSD by default
default values: SSD, it will affect some tuning parameters, such as random_page_cost & effective_io_concurrency
pg_dummy_filesize
name: pg_dummy_filesize, type: size, level: C
size of /pg/dummy, default values: 64MiB, which hold 64MB disk space for emergency use
When the disk is full, removing the placeholder file can free up some space for emergency use, it is recommended to set at least 8GiB for production use.
pg_listen
name: pg_listen, type: ip, level: C
postgres/pgbouncer listen address, 0.0.0.0 (all ipv4 addr) by default
You can use placeholder in this variable:
${ip}: translate to inventory_hostname, which is primary private IP address in the inventory${vip}: if pg_vip_enabled, this will translate to host part of pg_vip_address${lo}: will translate to 127.0.0.1For example: '${ip},${lo}' or '${ip},${vip},${lo}'.
pg_port
name: pg_port, type: port, level: C
postgres listen port, 5432 by default.
pg_localhost
name: pg_localhost, type: path, level: C
postgres unix socket dir for localhost connection, default values: /var/run/postgresql
The Unix socket dir for PostgreSQL and Pgbouncer local connection, which is used by pg_exporter and patroni.
pg_namespace
name: pg_namespace, type: path, level: C
top level key namespace in etcd, used by patroni & vip, default values is: /pg , and it’s not recommended to change it.
patroni_enabled
name: patroni_enabled, type: bool, level: C
if disabled, no postgres cluster will be created during init
default value is true, If disabled, Pigsty will skip pulling up patroni (thus postgres).
This option is useful when trying to add some components to an existing postgres instance.
patroni_mode
name: patroni_mode, type: enum, level: C
patroni working mode: default, pause, remove
default values: default
default: Bootstrap PostgreSQL cluster with Patronipause: Just like default, but entering maintenance mode after bootstrapremove: Init the cluster with Patroni, them remove Patroni and use raw PostgreSQL instead.patroni_port
name: patroni_port, type: port, level: C
patroni listening port, 8008 by default, changing it is not recommended.
The Patroni API server listens to this port for health checking & API requests.
patroni_log_dir
name: patroni_log_dir, type: path, level: C
patroni log dir, /pg/log/patroni by default, which will be collected by promtail.
patroni_ssl_enabled
name: patroni_ssl_enabled, type: bool, level: G
Secure patroni RestAPI communications with SSL? default value is false
This parameter is a global flag that can only be set before deployment.
Since if SSL is enabled for patroni, you’ll have to perform healthcheck, metrics scrape, and API call with HTTPS instead of HTTP.
patroni_watchdog_mode
name: patroni_watchdog_mode, type: string, level: C
In case of primary failure, patroni can use watchdog to fencing the old primary node to avoid split-brain.
patroni watchdog mode: automatic, required, off:
off: not using watchdog. avoid fencing at all. This is the default value.automatic: Enable watchdog if the kernel has softdog module enabled and watchdog is owned by dbsurequired: Force watchdog, refuse to start if softdog is not availabledefault value is off, you should not enable watchdog on infra nodes to avoid fencing.
For those critical systems where data consistency prevails over availability, it is recommended to enable watchdog.
Beware that if all your traffic is accessed via haproxy, there is no risk of brain split at all.
patroni_username
name: patroni_username, type: username, level: C
patroni restapi username, postgres by default, used in pair with patroni_password
Patroni unsafe RESTAPI is protected by username/password by default, check Config Cluster and Patroni RESTAPI for details.
patroni_password
name: patroni_password, type: password, level: C
patroni restapi password, Patroni.API by default
WARNING: CHANGE THIS IN PRODUCTION ENVIRONMENT!!!!
pg_primary_db
name: pg_primary_db, type: string, level: C
primary database name, used by citus,etc… , postgres by default
Patroni 3.0’s native citus will specify a managed database for citus. which is created by patroni itself.
pg_parameters
Parameter Name: pg_parameters, Type: dict, Level: G/C/I
This parameter is used to specify and manage configuration parameters in postgresql.auto.conf.
After all instances in the cluster have completed initialization, the pg_param task will sequentially overwrite the key/value pairs in this dictionary to /pg/data/postgresql.auto.conf.
Note: Please do not manually modify this configuration file, or use
ALTER SYSTEMto change cluster configuration parameters. Any changes will be overwritten during the next configuration sync.
This variable has a higher priority than the cluster configuration in Patroni/DCS (i.e., it has a higher priority than the cluster configuration edited by Patroni edit-config). Therefore, it can typically override the cluster default parameters at the instance level.
When your cluster members have different specifications (not recommended!), you can fine-tune the configuration of each instance using this parameter.
Please note that some important cluster parameters (which have requirements for primary and replica parameter values) are managed directly by Patroni through command-line parameters and have the highest priority.
These cannot be overridden by this method. For these parameters, you must use Patroni edit-config for management and configuration.
PostgreSQL parameters that must remain consistent across primary and replicas (inconsistency will prevent the replica from starting!):
wal_levelmax_connectionsmax_locks_per_transactionmax_worker_processesmax_prepared_transactionstrack_commit_timestampParameters that should ideally remain consistent across primary and replicas (considering the possibility of primary-replica switch):
listen_addressesportcluster_namehot_standbywal_log_hintsmax_wal_sendersmax_replication_slotswal_keep_segmentswal_keep_sizeYou can set non-existent parameters (such as GUCs from extensions), but changing existing configurations to illegal values may prevent PostgreSQL from starting. Please configure with caution!
pg_files
Parameter Name: pg_files, Type: path[], Level: C
Designates a list of files to be copied to the {{ pg_data }} directory. The default value is an empty array: [].
Files specified in this parameter will be copied to the {{ pg_data }} directory. This is mainly used to distribute license files required by special commercial versions of the PostgreSQL kernel.
Currently, only the PolarDB (Oracle-compatible) kernel requires a license file. For example, you can place the license.lic file in the files/ directory and specify it in pg_files:
pg_conf
name: pg_conf, type: enum, level: C
config template: {oltp,olap,crit,tiny}.yml, oltp.yml by default
tiny.yml: optimize for tiny nodes, virtual machines, small demo, (1oltp.yml: optimize for OLTP workloads and latency-sensitive applications, (4C8GB+), which is the default templateolap.yml: optimize for OLAP workloads and throughput (4C8G+)crit.yml: optimize for data consistency and critical applications (4C8G+)default values: oltp.yml, but configure procedure will set this value to tiny.yml if current node is a tiny node.
You can have your own template, just put it under templates/<mode>.yml and set this value to the template name.
pg_max_conn
name: pg_max_conn, type: int, level: C
postgres max connections, You can specify a value between 50 and 5000, or use auto to use recommended value.
default value is auto, which will set max connections according to the pg_conf and pg_default_service_dest.
It’s not recommended to set this value greater than 5000, otherwise you have to increase the haproxy service connection limit manually as well.
Pgbouncer’s transaction pooling can alleviate the problem of too many OLTP connections, but it’s not recommended to use it in OLAP scenarios.
pg_shared_buffer_ratio
name: pg_shared_buffer_ratio, type: float, level: C
postgres shared buffer memory ratio, 0.25 by default, 0.1~0.4
default values: 0.25, means 25% of node memory will be used as PostgreSQL shard buffers.
Setting this value greater than 0.4 (40%) is usually not a good idea.
Note that shared buffer is only part of shared memory in PostgreSQL, to calculate the total shared memory, use show shared_memory_size_in_huge_pages;.
pg_rto
name: pg_rto, type: int, level: C
recovery time objective in seconds, This will be used as Patroni TTL value, 30s by default.
If a primary instance is missing for such a long time, a new leader election will be triggered.
Decreasing the value can reduce the unavailable time (unable to write) of the cluster during failover, but it will make the cluster more sensitive to network jitter, thus increase the chance of false-positive failover.
Config this according to your network condition and expectation to trade-off between chance and impact, the default value is 30s, and it will be populated to the following patroni parameters:
pg_rpo
name: pg_rpo, type: int, level: C
recovery point objective in bytes, 1MiB at most by default
default values: 1048576, which will tolerate at most 1MiB data loss during failover.
when the primary is down and all replicas are lagged, you have to make a tough choice to trade off between Availability and Consistency:
You can use crit.yml conf template to ensure no data loss during failover, but it will sacrifice some performance.
pg_libs
name: pg_libs, type: string, level: C
shared preloaded libraries, pg_stat_statements,auto_explain by default.
They are two extensions that come with PostgreSQL, and it is strongly recommended to enable them.
For existing clusters, you can configure the shared_preload_libraries parameter of the cluster and apply it.
If you want to use TimescaleDB or Citus extensions, you need to add timescaledb or citus to this list. timescaledb and citus should be placed at the top of this list, for example:
Other extensions that need to be loaded can also be added to this list, such as pg_cron, pgml, etc.
Generally, citus and timescaledb have the highest priority and should be added to the top of the list.
pg_delay
name: pg_delay, type: interval, level: I
replications apply delay for standby cluster leader, default values: 0.
if this value is set to a positive value, the standby cluster leader will be delayed for this time before apply WAL changes.
Check delayed standby cluster for details.
pg_checksum
name: pg_checksum, type: bool, level: C
enable data checksum for postgres cluster? The v3.7.0 default value is true.
This parameter can only be set before PGSQL deployment. (but you can enable it manually later)
If pg_conf crit.yml template is used, data checksum is always enabled regardless of this parameter to ensure data integrity.
pg_pwd_enc
name: pg_pwd_enc, type: enum, level: C
password encryption algorithm: md5, scram-sha-256
default values: scram-sha-256, if you have compatibility issues with old clients, you can set it to md5 instead.
The md5 option is deprecated but remains available in v3.7.0 for legacy clients; prefer scram-sha-256.
pg_encoding
name: pg_encoding, type: enum, level: C
database cluster encoding, UTF8 by default
pg_locale
name: pg_locale, type: enum, level: C
The locale set for PostgreSQL, default is C.
When configure detects that the current PG version is greater than or equal to 17, or the current system explicitly supports C.utf8, it will automatically configure this parameter to C.UTF-8.
When the PostgreSQL version is greater than or equal to 17, the C and C.UTF-8 configurations will use the PostgreSQL internal Locale Provider.
Unless you are very clear about what you are doing, it is strongly recommended to use the default C or C.UTF-8 configuration.
pg_lc_collate
name: pg_lc_collate, type: enum, level: C
The locale set for PostgreSQL, default is C.
When configure detects that the current PG version is greater than or equal to 17, or the current system explicitly supports C.utf8, it will automatically configure this parameter to C.UTF-8.
Unless you are very clear about what you are doing, it is strongly recommended to use the default C or C.UTF-8 configuration.
The parameter behaves like pg_locale, but for collate.
pg_lc_ctype
name: pg_lc_ctype, type: enum, level: C
The locale set for PostgreSQL, default is C.
When configure detects that the current PG version is greater than or equal to 17, or the current system explicitly supports C.utf8, it will automatically configure this parameter to C.UTF-8.
When the PostgreSQL version is greater than or equal to 17, the C and C.UTF-8 configurations will use the PostgreSQL internal Locale Provider.
This parameter behaves like pg_locale, but for ctype.
Unless you are very clear about what you are doing, it is strongly recommended to use the default C or C.UTF-8 configuration.
pgsodium_key
name: pgsodium_key, type: string, level: C
Default value is not defined, which will use the SHA256 hash of the pg_cluster as the key.
You can provide a custom pgsodium key, which should be a 64 hex digit string.
The key will be written to /pg/conf/pgsodium.key.
pgsodium_getkey_script
name: pgsodium_getkey_script, type: path, level: C
default value is pgsodium_getkey, which render the roles/pgsql/templates/pgsodium_getkey to /pg/bin/pgsodium_getkey.
The default getkey script will just read the pgsodium_key from /pg/conf/pgsodium.key, and return it.
If your key is managed by external system like KMS, IAM, …, you can implement your own getkey script to fetch the key from there: examples.
PG_PROVISION
PG_BOOTSTRAP will bootstrap a new postgres cluster with patroni, while PG_PROVISION will create default objects in the cluster, including:
pg_provision
name: pg_provision, type: bool, level: C
provision postgres cluster after bootstrap, default value is true.
If disabled, postgres cluster will not be provisioned after bootstrap.
pg_init
name: pg_init, type: string, level: G/C
Provision init script for cluster template, pg-init by default, which is located in roles/pgsql/templates/pg-init
You can add your own logic in the init script, or provide a new one in templates/ and set pg_init to the new script name.
pg_default_roles
name: pg_default_roles, type: role[], level: G/C
default roles and users in postgres cluster.
Pigsty has a built-in role system, check PGSQL Access Control for details.
pg_default_privileges
name: pg_default_privileges, type: string[], level: G/C
default privileges for each databases:
Pigsty has a built-in privileges based on the default role system, check PGSQL Privileges for details.
pg_default_schemas
name: pg_default_schemas, type: string[], level: G/C
default schemas to be created, default values is: [ monitor ], which will create a monitor schema on all databases.
pg_default_extensions
name: pg_default_extensions, type: extension[], level: G/C
default extensions to be created, default value:
The only 3rd party extension is pg_repack, which is important for database maintenance, all other extensions are built-in postgres contrib extensions.
Monitor related extensions are installed in monitor schema, which is created by pg_default_schemas.
pg_reload
name: pg_reload, type: bool, level: A
reload postgres after hba changes, default value is true
This is useful when you want to check before applying HBA changes, set it to false to disable reload.
pg_default_hba_rules
name: pg_default_hba_rules, type: hba[], level: G/C
postgres default host-based authentication rules, array of hba rule object.
default value provides a fair enough security level for common scenarios, check PGSQL Authentication for details.
pgb_default_hba_rules
name: pgb_default_hba_rules, type: hba[], level: G/C
pgbouncer default host-based authentication rules, array or hba rule object.
default value provides a fair enough security level for common scenarios, check PGSQL Authentication for details.
PG_BACKUP
This section defines variables for pgBackRest, which is used for PGSQL PITR (Point-In-Time-Recovery).
Check PGSQL Backup & PITR for details.
pgbackrest_enabled
name: pgbackrest_enabled, type: bool, level: C
enable pgBackRest on pgsql host? default value is true
When using the local file system backup repository (local), only the primary instance of the cluster will actually enable pgbackrest. Other instances will only initialize an empty repository.
pgbackrest_clean
name: pgbackrest_clean, type: bool, level: C
remove pg backup data during init? default value is true
pgbackrest_log_dir
name: pgbackrest_log_dir, type: path, level: C
pgBackRest log dir, /pg/log/pgbackrest by default, which is referenced by promtail the logging agent.
pgbackrest_method
name: pgbackrest_method, type: enum, level: C
pgBackRest repo method: local, minio, or other user-defined methods, local by default
This parameter is used to determine which repo to use for pgBackRest, all available repo methods are defined in pgbackrest_repo.
Pigsty will use local backup repo by default, which will create a backup repo on primary instance’s /pg/backup directory. The underlying storage is specified by pg_fs_backup.
pgbackrest_init_backup
name: pgbackrest_init_backup, type: bool, level: C
Take a full backup after pgBackRest is initialized? default value is true.
An initial pgbackrest backup is created after repo init if:
pgbackrest_init_backup is true (and pgbackrest_enabled is true of course)/etc/pgbackrest/initial.done marker file doesn’t exist (will be created after the initial backup is done).If you don’t want to take an initial full backup at all, just set this parameter tofalse.
pgbackrest_repo
name: pgbackrest_repo, type: dict, level: G/C
pgBackRest repo document: https://pgbackrest.org/configuration.html#section-repository
default value includes two repo methods: local and minio, which are defined as follows:
You can define a new backup repository, for example, using AWS S3, GCP or another cloud provider’s S3-compatible storage service.
In the backup repository definition parameters, you can use ${pg_cluster} variable to reference the cluster name, for example, as part of the backup path or encryption key.
But if you have cross-cluster PITR requirements, you should keep the backup repository path and encryption key the same.
PG_ACCESS
This section is about exposing PostgreSQL service to the outside world: including:
pgbouncerhaproxyvip-managerdnsmasq on infra nodespgbouncer_enabled
name: pgbouncer_enabled, type: bool, level: C
default value is true, if disabled, pgbouncer will not be launched on pgsql host
pgbouncer_port
name: pgbouncer_port, type: port, level: C
pgbouncer listen port, 6432 by default
pgbouncer_log_dir
name: pgbouncer_log_dir, type: path, level: C
pgbouncer log dir, /pg/log/pgbouncer by default, referenced by promtail the logging agent.
pgbouncer_auth_query
name: pgbouncer_auth_query, type: bool, level: C
query postgres to retrieve unlisted business users? default value is false
If enabled, pgbouncer user will be authenticated against postgres databases with SELECT username, password FROM monitor.pgbouncer_auth($1), otherwise, only the users with pgbouncer: true will be allowed to connect to pgbouncer.
pgbouncer_poolmode
name: pgbouncer_poolmode, type: enum, level: C
Pgbouncer pooling mode: transaction, session, statement, transaction by default
session: Session-level pooling with the best compatibility.transaction: Transaction-level pooling with better performance (lots of small conns), could break some session level features such as notify/listen, etc…statements: Statement-level pooling which is used for simple read-only queries.If your application has some compatibility issues with pgbouncer, you can try to change this value to session instead.
pgbouncer_sslmode
name: pgbouncer_sslmode, type: enum, level: C
pgbouncer client ssl mode, disable by default
default values: disable, beware that this may have a huge performance impact on your pgbouncer.
disable: Plain TCP. If a client requests TLS, it’s ignored. Default.allow: If a client requests TLS, it is used. If not, plain TCP is used. If the client presents a client certificate, it is not validated.prefer: Same as allow.require: Client must use TLS. If not, the client connection is rejected. If the client presents a client certificate, it is not validated.verify-ca: Client must use TLS with valid client certificate.verify-full: Same as verify-ca.pgbouncer_ignore_param
name: pgbouncer_ignore_param, type: string[], level: G/C
default values: [ extra_float_digits, application_name, TimeZone, DateStyle, IntervalStyle, search_path ]
This will be used as value of ignore_startup_parameters in pgbouncer.
pg_weight
name: pg_weight, type: int, level: G
relative load balance weight in service, 100 by default, 0~255
default values: 100. you have to define it at instance vars, and reload-service to take effect.
pg_service_provider
name: pg_service_provider, type: string, level: G/C
dedicate haproxy node group name, or empty string for local nodes by default.
If specified, PostgreSQL Services will be registered to the dedicated haproxy node group instead of this pgsql cluster nodes.
Do remember to allocate unique ports on dedicated haproxy nodes for each service!
For example, if we define the following parameters on 3-node pg-test cluster:
pg_default_service_dest
name: pg_default_service_dest, type: enum, level: G/C
When defining a service, if svc.dest= default, this parameter will be used as the default value.
default values: pgbouncer, means 5433 the primary service and 5434 the replicas service will route traffic to pgbouncer by default.
If you don’t want to use pgbouncer, set it to postgres instead. traffic will be routed to postgres directly.
pg_default_services
name: pg_default_services, type: service[], level: G/C
postgres default service definitions
default value is four default services definitions, which are explained in PGSQL Service
pg_vip_enabled
name: pg_vip_enabled, type: bool, level: C
enable a l2 vip for pgsql primary?
default value is false, means no L2 VIP is created for this cluster.
L2 VIP can only be used in the same L2 network, which may incur extra restrictions on your network topology.
pg_vip_address
name: pg_vip_address, type: cidr4, level: C
vip address in <ipv4>/<mask> format, if vip is enabled, this parameter is required.
default values: 127.0.0.1/24. This value is consist of two parts: ipv4 and mask, separated by /.
pg_vip_interface
name: pg_vip_interface, type: string, level: C/I
vip network interface to listen, eth0 by default.
It should be the same primary intranet interface of your node, which is the IP address you used in the inventory file.
If your nodes have different interface, you can override it on instance vars:
pg_dns_suffix
name: pg_dns_suffix, type: string, level: C
pgsql dns suffix, empty string by default, cluster DNS name is defined as {{ pg_cluster }}{{ pg_dns_suffix }}
For example, if you set pg_dns_suffix to .db.vip.company.tld for cluster pg-test, then the cluster DNS name will be pg-test.db.vip.company.tld
pg_dns_target
name: pg_dns_target, type: enum, level: C
Could be: auto, primary, vip, none, or an ad hoc ip address, which will be the target IP address of cluster DNS record.
default values: auto , which will bind to pg_vip_address if pg_vip_enabled, or fallback to cluster primary instance ip address.
vip: bind to pg_vip_addressprimary: resolve to cluster primary instance ip addressauto: resolve to pg_vip_address if pg_vip_enabled, or fallback to cluster primary instance ip address.none: do not bind to any ip address<ipv4>: bind to the given IP addressPG_MONITOR
pg_exporter_enabled
name: pg_exporter_enabled, type: bool, level: C
enable pg_exporter on pgsql hosts?
default value is true, if you don’t want to install pg_exporter, set it to false.
pg_exporter_config
name: pg_exporter_config, type: string, level: C
pg_exporter configuration file name, used by pg_exporter & pgbouncer_exporter
default values: pg_exporter.yml, if you want to use a custom configuration file, you can specify its relative path here.
Your config file should be placed in files/<filename>.yml. For example, if you want to monitor a remote PolarDB instance, you can use the sample config: files/polar_exporter.yml.
pg_exporter_cache_ttls
name: pg_exporter_cache_ttls, type: string, level: C
pg_exporter collector ttl stage in seconds, 1,10,60,300 by default
default values: 1,10,60,300, which will use 1s, 10s, 60s, 300s for different metric collectors.
This should be set in pair with prometheus_scrape_interval
pg_exporter_port
name: pg_exporter_port, type: port, level: C
pg_exporter listen port, 9630 by default
pg_exporter_params
name: pg_exporter_params, type: string, level: C
extra url parameters for pg_exporter dsn
default values: sslmode=disable, which will disable SSL for monitoring connection (since it’s local unix socket by default)
pg_exporter_url
name: pg_exporter_url, type: pgurl, level: C
overwrite auto-generate pg dsn if specified
default value is empty string, If specified, it will be used as the pg_exporter dsn instead of constructing from other parameters:
This could be useful if you want to monitor a remote pgsql instance, or you want to use a different user/password for monitoring.
pg_exporter_auto_discovery
name: pg_exporter_auto_discovery, type: bool, level: C
enable auto database discovery? enabled by default
default value is true, which will auto-discover all databases on the postgres server and spawn a new pg_exporter connection for each database.
pg_exporter_exclude_database
name: pg_exporter_exclude_database, type: string, level: C
csv of databases that WILL NOT be monitored during auto-discovery
default values: template0,template1,postgres, which will be excluded for database auto discovery.
pg_exporter_include_database
name: pg_exporter_include_database, type: string, level: C
csv of databases that WILL BE monitored during auto-discovery
the default value is empty string. If set, only the databases in this list will be monitored during auto discovery.
pg_exporter_connect_timeout
name: pg_exporter_connect_timeout, type: int, level: C
pg_exporter connect timeout in ms, 200 by default
default values: 200ms , which is enough for most cases.
If your remote pgsql server is in another continent, you may want to increase this value to avoid connection timeout.
pg_exporter_options
name: pg_exporter_options, type: arg, level: C
overwrite extra options for pg_exporter
the default value is empty string, which will fall back the following default options:
If you want to customize logging options or other pg_exporter options, you can set it here.
pgbouncer_exporter_enabled
name: pgbouncer_exporter_enabled, type: bool, level: C
enable pgbouncer_exporter on pgsql hosts?
default value is true, which will enable pg_exporter for pgbouncer connection pooler.
pgbouncer_exporter_port
name: pgbouncer_exporter_port, type: port, level: C
pgbouncer_exporter listen port, 9631 by default
pgbouncer_exporter_url
name: pgbouncer_exporter_url, type: pgurl, level: C
overwrite auto-generate pgbouncer dsn if specified
the default value is empty string, If specified, it will be used as the pgbouncer_exporter dsn instead of constructing from other parameters:
This could be useful if you want to monitor a remote pgbouncer instance, or you want to use a different user/password for monitoring.
pgbouncer_exporter_options
name: pgbouncer_exporter_options, type: arg, level: C
overwrite extra options for pgbouncer_exporter, default value is empty string.
the default value is empty string, which will fall back the following default options:
If you want to customize logging options or other pgbouncer_exporter options, you can set it here.
but do not overwrite pgbouncer_exporter_port here.
pgbackrest_exporter_enabled
name: pgbackrest_exporter_enabled, type: bool, level: C
enable pgbackrest_exporter on pgsql hosts? default value is true
If pgbackrest_enabled is false, this parameter will be short-circuited and disabled.
pgbackrest_exporter_port
name: pgbackrest_exporter_port, type: port, level: C
pgbackrest_exporter listen port, 9854 by default
pgbackrest_exporter_options
name: pgbackrest_exporter_options, type: arg, level: C
extra cli args for pgbackrest_exporter, default value is empty string "".
PG_REMOVE
These flags control the pgsql-rm.yml
playbook and match roles/pg_remove/defaults/main.yml in v3.7.0.
pg_safeguard
name: pg_safeguard, type: bool, level: G/C/A
When true, the pgsql-rm.yml playbook aborts before changing the cluster.
The v3.7.0 default is false.
pg_rm_data
name: pg_rm_data, type: bool, level: G/C/A
Remove PostgreSQL data during removal. The default is true; set it to
false to preserve the data directories.
pg_rm_backup
name: pg_rm_backup, type: bool, level: G/C/A
Remove the pgBackRest repository when removing a primary instance. The
default is true; set it to false to preserve backups.
pg_rm_pkg
name: pg_rm_pkg, type: bool, level: G/C/A
Uninstall PostgreSQL and extension packages during removal. The v3.7.0
role default is true; set it to false to keep installed packages.
How to maintain an existing PostgreSQL cluster with Pigsty?
Here are some SOP for common pgsql admin tasks
PGSQL playbooks and shortcuts:
Patroni admin command and shortcuts:
pgBackRest backup & restore command and shortcuts:
Systemd components quick reference
To create a new Postgres cluster, define it in the inventory first, then init with:
Beware, perform
bin/node-addfirst, thenbin/pgsql-add, PGSQL works on managed nodes only.
To create a new business user on the existing Postgres cluster, add user definition to all.children.<cls>.pg_users, then create the user as follows:
To create a new database user on the existing Postgres cluster, add database definition to all.children.<cls>.pg_databases, then create the database as follows:
Note: If the database has specified an owner, the user should already exist, or you’ll have to Create User first.
Services are exposed access point served by HAProxy.
This task is used when cluster membership has changed, e.g., append/remove replicas, switchover/failover / exposing new service or updating existing service’s config (e.g., LB Weight)
To create new services or reload existing services on entire proxy cluster or specific instances:
This task is used when your Postgres/Pgbouncer HBA rules have changed, you may have to reload hba to apply changes.
If you have any role-specific HBA rules, you may have to reload hba after a switchover/failover, too.
To reload postgres & pgbouncer HBA rules on entire cluster or specific instances:
To change the config of a existing Postgres cluster, you have to initiate control command on admin node with admin user:
Change patroni parameters & postgresql.parameters, save & apply changes with the wizard.
To add a new replica to the existing Postgres cluster, you have to add its definition to the inventory: all.children.<cls>.hosts, then:
It will add node <ip> to pigsty and init it as a replica of the cluster <cls>.
Cluster services will be reloaded to adopt the new member
To remove a replica from the existing PostgreSQL cluster:
It will remove instance <ip> from cluster <cls>. Cluster services will be reloaded to kick the removed instance from load balancer.
To remove the entire Postgres cluster, just run:
You can perform a PostgreSQL cluster switchover with patroni cmd.
To create a backup with pgBackRest, run as local dbsu:
Check Backup & PITR for details.
To restore a cluster to a previous time point (PITR), run as local dbsu:
Check Backup & Restore docs for more details.
To add the newer version of RPM/DEB packages, you have to add them to repo_packages and repo_url_packages
Then rebuild repo on infra nodes with ./infra.yml -t repo_build subtask, Then you can install these packages with ansible module package:
If you want to install extension on pg clusters, Add them to pg_extensions and make sure them installed with:
Some extension needs to be loaded in shared_preload_libraries, You can add them to pg_libs, or Config an existing cluster.
Finally, CREATE EXTENSION <extname>; on the cluster primary instance to install it.
Check PGSQL Extensions: Install for details.
To perform a minor server version upgrade/downgrade, you have to add packages to yum/apt repo first.
Then perform a rolling upgrade/downgrade from all replicas, then switchover the cluster to upgrade the leader.
The simplest way to achieve a major version upgrade is to create a new cluster with the new version, then migration with logical replication & green/blue deployment.
You can also perform an in-place major upgrade, which is not recommended, especially when certain extensions are installed. But it is possible.
Assume you want to upgrade PostgreSQL 14 to 15, you have to add packages to yum/apt repo, and guarantee the extensions have the exact same version too.
Pigsty provides four scenario-specific parameter templates by default, which can be specified and used via the pg_conf parameter.
tiny.yml: Optimized for small nodes, virtual machines, and small demos (1-8 cores, 1-16GB)oltp.yml: Optimized for OLTP workloads and latency-sensitive applications (4C8GB+) (default template)olap.yml: Optimized for OLAP workloads and throughput (4C8G+)crit.yml: Optimized for data consistency and critical applications (4C8G+)Pigsty adopts different parameter optimization strategies for these four default scenarios, as shown below:
Pigsty automatically detects system memory size and uses it as the basis for setting maximum connections and memory-related parameters.
pg_max_conn: PostgreSQL maximum connections, auto will use recommended values for different scenariospg_shared_buffer_ratio: Shared buffer memory ratio, defaults to 0.25By default, Pigsty uses 25% of memory as PostgreSQL shared buffers, leaving the remaining 75% for the operating system cache.
By default, if users don’t set a pg_max_conn maximum connection count, Pigsty will use default values according to these rules:
For OLTP and CRIT templates, if services point directly to the PostgreSQL database instead of the pgbouncer connection pool, maximum connections double to 1000.
After determining maximum connections, work_mem is calculated based on shared memory amount / maximum connections, constrained within a 64MB ~ 1GB range.
In PostgreSQL, there are 4 important parameters related to parallel queries. Pigsty automatically optimizes these parameters based on the current system’s CPU core count. Across all strategies, the total parallel process count (total budget) is typically set to CPU cores + 8, with a minimum of 16, thus reserving sufficient background worker capacity for logical replication and extensions. OLAP and TINY templates vary slightly based on scenario.
| OLTP | Configuration Logic | Range Constraints |
|---|---|---|
max_worker_processes |
max(100% CPU + 8, 16) | Cores + 4, minimum 12 |
max_parallel_workers |
max(ceil(50% CPU), 2) | 1/2 CPU rounded up, minimum 2 |
max_parallel_maintenance_workers |
max(ceil(33% CPU), 2) | 1/3 CPU rounded up, minimum 2 |
max_parallel_workers_per_gather |
min(max(ceil(20% CPU), 2),8) | 1/5 CPU rounded down, minimum 2, maximum 8 |
| OLAP | Configuration Logic | Range Constraints |
|---|---|---|
max_worker_processes |
max(100% CPU + 12, 20) | Cores + 12, minimum 20 |
max_parallel_workers |
max(ceil(80% CPU, 2)) | 4/5 CPU rounded up, minimum 2 |
max_parallel_maintenance_workers |
max(ceil(33% CPU), 2) | 1/3 CPU rounded up, minimum 2 |
max_parallel_workers_per_gather |
max(floor(50% CPU), 2) | 1/2 CPU rounded up, minimum 2 |
| CRIT | Configuration Logic | Range Constraints |
|---|---|---|
max_worker_processes |
max(100% CPU + 8, 16) | Cores + 8, minimum 16 |
max_parallel_workers |
max(ceil(50% CPU), 2) | 1/2 CPU rounded up, minimum 2 |
max_parallel_maintenance_workers |
max(ceil(33% CPU), 2) | 1/3 CPU rounded up, minimum 2 |
max_parallel_workers_per_gather |
0, enable as needed |
| TINY | Configuration Logic | Range Constraints |
|---|---|---|
max_worker_processes |
max(100% CPU + 4, 12) | Cores + 4, minimum 12 |
max_parallel_workers |
max(ceil(50% CPU) 1) | 50% CPU rounded down, minimum 1 |
max_parallel_maintenance_workers |
max(ceil(33% CPU), 1) | 33% CPU rounded down, minimum 1 |
max_parallel_workers_per_gather |
0, enable as needed |
Note that CRIT and TINY templates disable parallel queries directly by setting max_parallel_workers_per_gather = 0.
Users can set this parameter as needed to enable parallel queries.
Both OLTP and CRIT templates set the following additional parameters, doubling parallel query costs to reduce the tendency to use parallel queries:
Note that max_worker_processes parameter adjustments only take effect after a restart. Additionally, when a replica’s configuration value for this parameter exceeds the primary’s, the replica cannot start.
This parameter must be adjusted through Patroni configuration management. The parameter is managed by Patroni to ensure consistent primary-replica configuration and prevent new replicas from failing to start during failover.
Pigsty automatically detects the total disk space where the /data/postgres main data directory resides and uses it as the basis for specifying the following parameters:
temp_file_limit defaults to 5% of disk space, capped at 200GB maximum.min_wal_size defaults to 5% of disk space, capped at 200GB maximum.max_wal_size defaults to 20% of disk space, capped at 2TB maximum.max_slot_wal_keep_size defaults to 30% of disk space, capped at 3TB maximum.As a special case, the OLAP template allows 20% for temp_file_limit, capped at 2TB maximum.
Ensuring healthy and stable operation of Pigsty and PostgreSQL clusters requires routine maintenance work.
Pigsty provides an out-of-the-box monitoring platform. We recommend reviewing monitoring dashboards daily to track system status. At minimum, we suggest weekly monitoring reviews, focusing on alert events to proactively avoid most failures and issues.
Here’s a list of predefined alert rules in Pigsty.
Pigsty’s high availability architecture allows PostgreSQL clusters to automatically perform primary-replica switching, meaning operations and DBAs don’t require immediate intervention. However, users still need to perform follow-up tasks at appropriate times (e.g., next business day), including:
bin/pgsql-svc to update service routing statebin/pgsql-hba to prevent primary-replica specific rule driftbin/pgsql-rm and expand with new replicas using bin/pgsql-addLong-running PostgreSQL instances develop “table bloat” / “index bloat”, degrading system performance.
Regular online rebuilding of tables and indexes using pg_repack helps maintain optimal PostgreSQL performance.
Pigsty installs and enables this extension by default in all databases, ready for immediate use.
You can check table and index bloat through Pigsty’s PGCAT Database - Table Bloat panel.
Select tables and indexes with high bloat rates (larger tables with >50% bloat) for online reorganization using pg_repack:
Normal reads/writes continue during reorganization, but the switch moment at completion requires an AccessExclusive lock, blocking all access. For high-throughput operations, schedule during low-traffic periods or maintenance windows. For more details, see: Managing Relation Bloat
Freezing expired transaction IDs (VACUUM FREEZE) is a critical PostgreSQL maintenance task preventing transaction ID (XID) exhaustion outages. While PostgreSQL provides AutoVacuum mechanisms, for high-standard production environments, we recommend combining automatic and manual approaches, regularly executing database-wide VACUUM FREEZE to ensure XID safety.
This document outlines potential failures in PostgreSQL and Pigsty, along with SOPs for diagnosing, handling, and analyzing issues.
Disk space exhaustion is the most common type of failure.
When the disk hosting the database runs out of space, PostgreSQL cannot function properly. You may observe: database logs repeatedly reporting “no space left on device”, inability to write new data, or PostgreSQL triggering a PANIC and forcing shutdown.
Pigsty includes a NodeFsSpaceFull alert rule that triggers when filesystem available space drops below 10%. Use the monitoring system’s NODE Instance panel to review FS metric panels for diagnosis.
You can also log into the database node and use df -h to check usage rates for each mount point, determining which partition is full.
For database nodes, focus on these directories and their sizes to determine which file category is consuming space:
/pg/data/base): Stores table and index data files, watch for heavy writes and temporary filespg/data/pg_wal): Stores PG WAL, WAL accumulation/replication slot retention are common causes of disk exhaustionpg/log): If PG logs aren’t rotated timely and massive errors are written, this can consume significant spacedata/backups): When using pgBackRest to save backups locally, this can also fill the diskFor Pigsty admin nodes or monitoring nodes, also consider:
After identifying directories consuming the most space, use du -sh <directory> to drill down for specific large files or subdirectories.
Disk exhaustion is an emergency requiring immediate action to free space and maintain database operation:
Emergency scenario: When data and system disks aren’t separated, disk exhaustion can prevent shell commands from executing. In this case, delete the /pg/dummy placeholder file to free emergency space for shell command recovery.
After freeing space with above measures, PostgreSQL should resume normal operation. If the database crashed due to pg_wal exhaustion, restart the database service after clearing space and carefully verify data integrity.
PostgreSQL uses 32-bit transaction IDs (XIDs) cyclically. When XIDs are exhausted, “transaction ID wraparound” failure occurs.
Initial symptoms include PGSQL Persist - Age Usage panel age saturation entering the warning zone.
Database logs begin showing: WARNING: database "postgres" must be vacuumed within xxxxxxxx transactions.
If the problem worsens, PostgreSQL enters protection mode: when remaining transaction IDs drop below ~1 million, the database switches to read-only mode; at the limit of ~2.1 billion (2^31), it refuses new transactions and forces server shutdown to prevent data corruption.
PostgreSQL and Pigsty enable AutoVacuum by default, so this failure usually indicates deeper root causes. Common causes include: super-aged transactions (SAGE), misconfigured Autovacuum, blocked replication slots, insufficient resources, storage engine/extension bugs, disk corruption.
First identify the database with the oldest age, then use the Pigsty PGCAT Database - Tables panel to check table age distribution. Review database error logs for clues to identify root causes.
VACUUM FREEZE tablename; on tables with highest relfrozenxid, prioritizing tables with oldest XID age. This quickly reclaims significant transaction ID space.VACUUM FREEZE database_name; to freeze-clean the entire database. Then restart in multi-user mode. This releases wraparound locks and restores write capability. Exercise extreme caution in single-user mode and ensure sufficient transaction ID headroom for freezing.PostgreSQL has a maximum connection limit (max_connections). When client connections exceed this limit, new connection requests are rejected. Typical symptoms include applications unable to connect with errors like
FATAL: remaining connection slots are reserved for non-replication superuser connections or too many clients already.
This indicates regular connection slots are exhausted, leaving only slots reserved for superusers or replication.
Connection exhaustion typically results from massive concurrent client requests. You can review current active sessions through PGCAT Instance / PGCAT Database / PGCAT Locks to determine what queries are filling the system for further action. Pay special attention to numerous Idle in Transaction connections and long-running transactions (and slow queries).
Kill queries: For exhaustion blocking business operations, immediately use pg_terminate_backend(pid) for emergency relief.
For connection pool users, adjust pool size parameters and reload to reduce database-level connections.
You can also use pg edit-config to increase max_connections, but this parameter requires database restart to take effect.
etcd quota exhaustion causes PG high availability control plane failure, preventing configuration changes. Versions between Pigsty v2.0.0 - v2.5.1 are affected by default.
Pigsty uses etcd as distributed configuration storage (DCS) for high availability. etcd has a storage quota (default ~2GB). When etcd storage reaches the quota limit, etcd refuses write operations with error “etcdserver: mvcc: database space exceeded”. In this state, Patroni cannot write heartbeats or update configurations to etcd, causing cluster management failure.
Pigsty v2.6.0 adds auto-compaction configuration for deployed etcd. If you only use it for PG high availability leases, regular use cases won’t encounter this issue.
Currently, TimescaleDB’s experimental Hypercore storage engine has proven defects, with documented cases of VACUUM failing to reclaim XIDs causing wraparound failures. Users of this feature should migrate promptly to PostgreSQL native tables or TimescaleDB’s default engine.
Details: PG New Storage Engine Failure Case
For small-batch DELETE operations performed in error, consider using the pg_surgery extension for in-place surgical recovery.
If the deleted data has already been reclaimed by VACUUM, follow the general data loss recovery workflow.
When DROP/DELETE operations are performed in error, follow this workflow to determine the recovery approach:
In cases where an entire database cluster is accidentally deleted, such as mistakenly executing the pgsql-rm.yml playbook:
Unless you explicitly specified pg_rm_backup: false beforehand, backups will typically be deleted along with the database cluster.
How to manage PostgreSQL cluster with ansible playbooks
Pigsty has a series of playbooks for PostgreSQL:
pgsql.yml : Init HA PostgreSQL clusters or add new replicas.pgsql-rm.yml : Remove PostgreSQL cluster, or remove replicaspgsql-db.yml : Add a new business database to existing PostgreSQL clusterpgsql-user.yml : Add new business user to existing PostgreSQL clusterpgsql-pitr.yml : Perform point-in-time recovery on existing PostgreSQL clusterpgsql-monitor.yml : Monitor remote PostgreSQL instance with local exporterspgsql-migration.yml : Generate Migration manual & scripts for existing PostgreSQLIf you are afraid of accidentally deleting your PostgreSQL cluster, you can enable the safeguard feature.
Setting the pg_safeguard parameter to true will stop the pgsql-rm.yml from running.
Pigsty v3.5 remove the pg purge logic from pgsql.yml,
So the only way to remove a PostgreSQL now is running pgsql-rm.yml.
pgsql.yml
The pgsql.yml is used for init HA PostgreSQL clusters or adding new replicas.
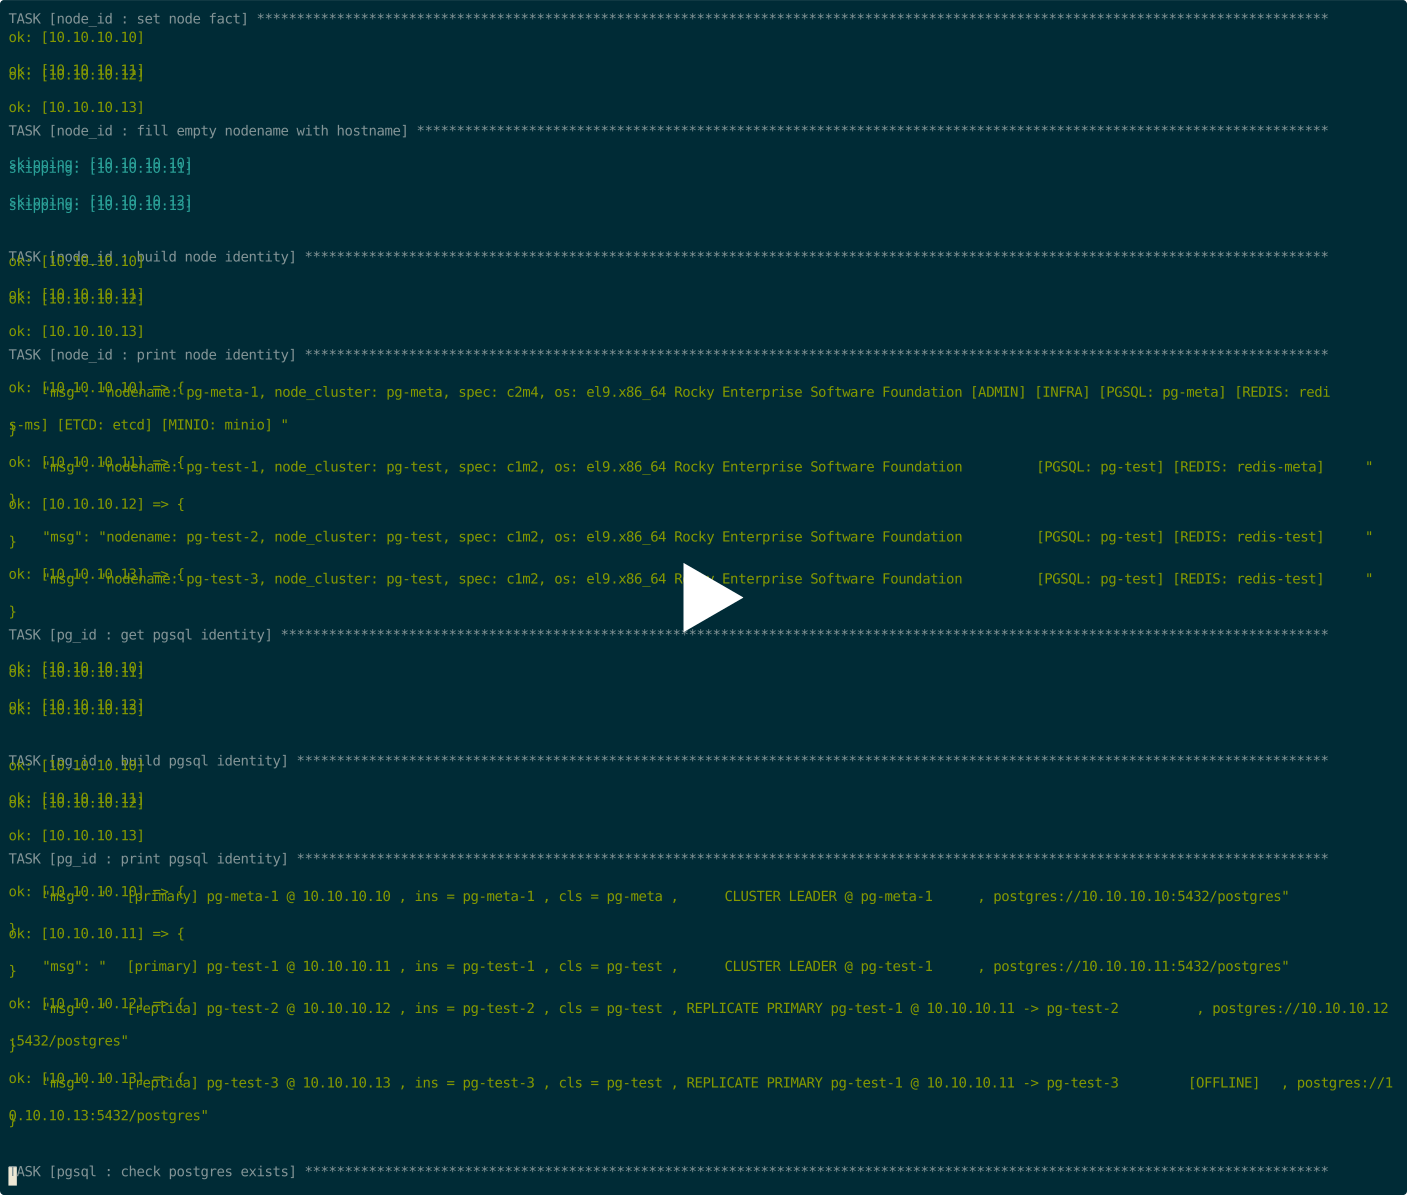
This playbook contains the following subtasks:
Administration Tasks that use this playbook
Reload HBARule and Append Replica after replica init.pgsql-add will do this, check SOP: Add Instance for details.pgsql-rm.yml
The playbook pgsql-rm.yml can remove PostgreSQL cluster, or specific replicas from cluster.
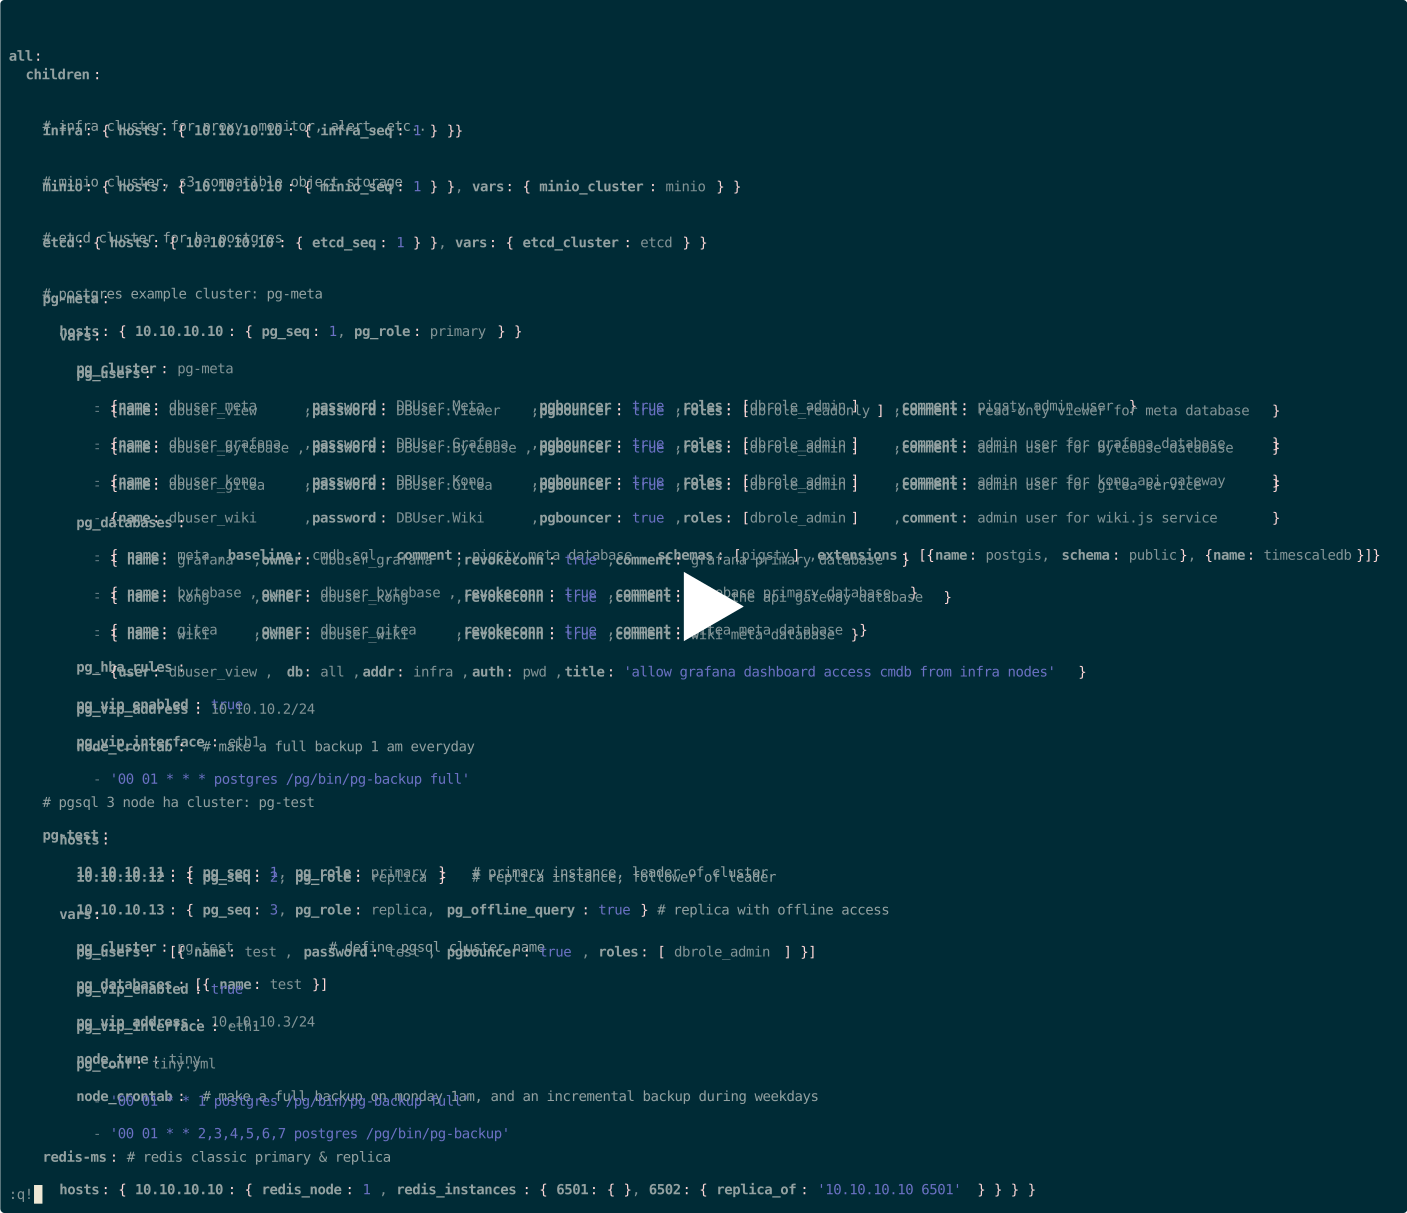
This playbook contains the following subtasks:
Some arguments can affect the behavior of this playbook:
Administration Tasks that use this playbook
Some notes about this playbook
pgsql-db.yml
The playbook pgsql-db.yml can add new business database to existing PostgreSQL cluster.
Check admin SOP: Create Database
pgsql-user.yml
The playbook pgsql-user.yml can add new business user to existing PostgreSQL cluster.
Check admin SOP: Create User
pgsql-pitr.yml
The playbook pgsql-pitr.yml can perform point-in-time recovery on existing PostgreSQL cluster.
Check admin SOP: Restore
pgsql-monitor.yml
The playbook pgsql-monitor.yml can monitor remote postgres instance with local exporters.
Check admin SOP: Monitor Postgres
pgsql-migration.yml
The playbook pgsql-migration.yml can generate migration manual & scripts for existing PostgreSQL cluster.
Check admin SOP: Migration
Pigsty uses the modern observability stack for PostgreSQL monitoring:
PostgreSQL’s metrics are defined by collector files: pg_exporter.yml. Prometheus record rules and alert evaluation will further process it: files/prometheus/rules/pgsql.yml
There are three identity labels: cls, ins, ip, which will be attached to all metrics & logs. node & haproxy will try to reuse the same identity to provide consistent metrics & logs.
PostgreSQL-related logs are collected by promtail and sent to Loki on infra nodes by default.
pg_log_dir : postgres log dir, /pg/log/postgres by defaultpgbouncer_log_dir : pgbouncer log dir, /pg/log/pgbouncer by defaultpatroni_log_dir : patroni log dir, /pg/log/patroni by defaultpgbackrest_log_dir : pgbackrest log dir, /pg/log/pgbackrest by defaultPrometheus monitoring targets are defined in static files under /etc/prometheus/targets/pgsql/. Each instance will have a corresponding file. Take pg-meta-1 as an example:
When the global flag patroni_ssl_enabled is set, the patroni target will be managed as /etc/prometheus/targets/patroni/<ins>.yml because it requires a different scrape endpoint (https).
Prometheus monitoring target will be removed when a cluster is removed by bin/pgsql-rm or pgsql-rm.yml. You can use playbook subtasks, or remove them manually:
Remote RDS targets are managed as /etc/prometheus/targets/pgrds/<cls>.yml. It will be created by the pgsql-monitor.yml playbook or bin/pgmon-add script.
There are three ways to monitor PostgreSQL instances in Pigsty:
| Item \ Level | L1 | L2 | L3 |
|---|---|---|---|
| Name | Remote Database Service | Existing Deployment | Fully Managed Deployment |
| Abbr | RDS | MANAGED | FULL |
| Scenes | connect string URL only | ssh-sudo-able | Instances created by Pigsty |
| PGCAT Functionality | ✅ Full Availability | ✅ Full Availability | ✅ Full Availability |
| PGSQL Functionality | ✅ PG metrics only | ✅ PG and node metrics | ✅ Full Support |
| Connection Pool Metrics | ❌ Not available | ⚠️ Optional | ✅ Pre-Configured |
| Load Balancer Metrics | ❌ Not available | ⚠️ Optional | ✅ Pre-Configured |
| PGLOG Functionality | ❌ Not Available | ⚠️ Optional | ⚠️ Optional |
| PG Exporter | ⚠️ On infra nodes | ✅ On DB nodes | ✅ On DB nodes |
| Node Exporter | ❌ Not Deployed | ✅ On DB nodes | ✅ On DB nodes |
| Intrusion into DB nodes | ✅ Non-Intrusive | ⚠️ Installing Exporter | ⚠️ Fully Managed by Pigsty |
| Instance Already Exists | ✅ Yes | ✅ Yes | ⚠️ Created by Pigsty |
| Monitoring users and views | ⚠️Manually Setup | ⚠️Manually Setup | ✅ Auto configured |
| Deployment Usage Playbook | bin/pgmon-add <cls> |
subtasks of pgsql.ym/node.yml |
pgsql.yml |
| Required Privileges | connectable PGURL from infra nodes | DB node ssh and sudo privileges | DB node ssh and sudo privileges |
| Function Overview | PGCAT + PGRDS | Most Functionality | Full Functionality |
Suppose the target DB node can be managed by Pigsty (accessible via ssh and sudo is available). In that case, you can use the pg_exporter task in the pgsql.yml playbook to deploy the monitoring component PG Exporter on the target node in the same manner as a standard deployment.
You can also deploy the connection pool and its monitoring on existing instance nodes using the pgbouncer and pgbouncer_exporter tasks from the same playbook. Additionally, you can deploy host monitoring, load balancing, and log collection components using the node_exporter, haproxy, and promtail tasks from the node.yml playbook, achieving a similar user experience with the native Pigsty cluster.
The definition method for existing clusters is very similar to the normal clusters managed by Pigsty. Selectively run certain tasks from the pgsql.yml playbook instead of running the entire playbook.
Since the target database cluster already exists, you must manually setup monitoring users, schemas, and extensions on the target database cluster.
If you can only access the target database via PGURL (database connection string), you can refer to the instructions here for configuration. In this mode, Pigsty deploys the corresponding PG Exporter on the INFRA node to fetch metrics from the remote database, as shown below:
The monitoring system will no longer have host/pooler/load balancer metrics. But the PostgreSQL metrics & catalog info are still available. Pigsty has two dedicated dashboards for that: PGRDS Cluster and PGRDS Instance. Overview and Database level dashboards are reused. Since Pigsty cannot manage your RDS, you have to setup monitor on the target database in advance.
Below, we use a sandbox environment as an example: now we assume that the pg-meta cluster is an RDS instance pg-foo-1 to be monitored, and the pg-test cluster is an RDS cluster pg-bar to be monitored:
Create monitoring schemas, users, and permissions on the target. Refer to Monitor Setup for details.
Declare the cluster in the configuration list. For example, suppose we want to monitor the “remote” pg-meta & pg-test clusters:
The databases listed in the pg_databases field will be registered in Grafana as a PostgreSQL data source, providing data support for the PGCAT monitoring panel. If you don’t want to use PGCAT and register the database in Grafana, set pg_databases to an empty array or leave it blank.
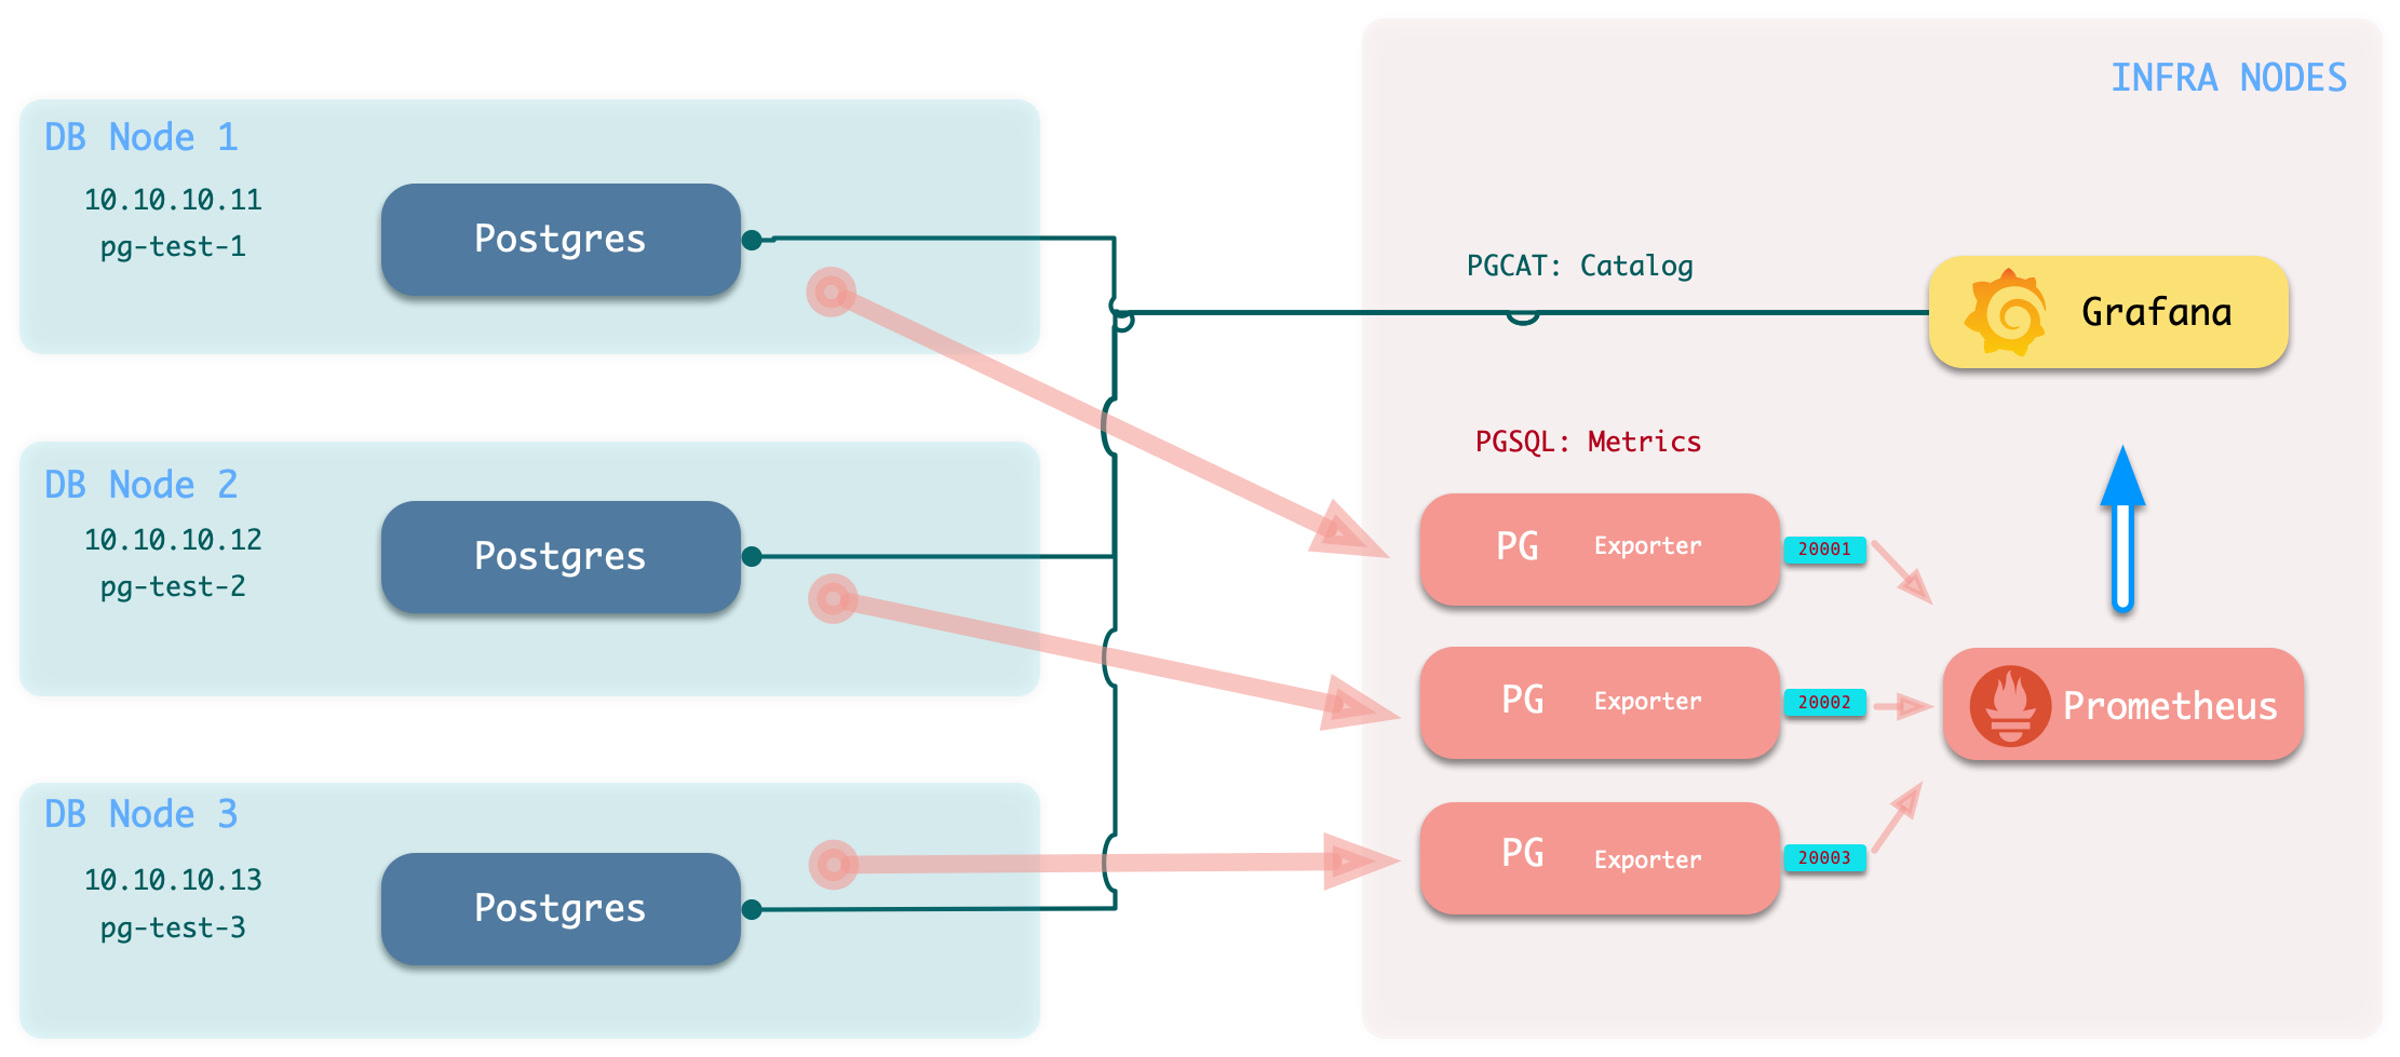
bin/pgmon-add <clsname>bin/pgmon-rm <clsname>You can use more parameters to override the default pg_exporter options. Here is an example for monitoring Aliyun RDS and PolarDB with Pigsty:
When you want to monitor existing instances, whether it’s RDS or a self-built PostgreSQL instance, you need to make some configurations on the target database so that Pigsty can access them.
To bring an external existing PostgreSQL instance into monitoring, you need a connection string that can access that instance/cluster. Any accessible connection string (business user, superuser) can be used, but we recommend using a dedicated monitoring user to avoid permission leaks.
dbuser_monitor. This user belongs to the pg_monitor group, or ensure it has the necessary view permissions.DBUser.Monitor. You need to ensure that the HBA policy allows the monitoring user to access the database from the infra nodes.monitor for monitoring views and extensions.pg_stat_statements.Create a monitor user on the target database cluster. For example, dbuser_monitor is used by default in Pigsty.
The monitor user here should have consistent pg_monitor_username and pg_monitor_password with Pigsty config inventory.
You also need to configure pg_hba.conf to allow monitoring user access from infra/admin nodes.
If your RDS does not support the RAW HBA format, add admin/infra node IP to the whitelist.
Monitor schema is optional, but we strongly recommend creating one.
Monitor extension is optional, but we strongly recommend enabling pg_stat_statements extension.
Note that this extension must be listed in shared_preload_libraries to take effect, and changing this parameter requires a database restart.
You should create this extension inside the admin database: postgres. If your RDS does not grant CREATE on the database postgres. You can create that extension in the default public schema:
As long as your monitor user can access pg_stat_statements view without schema qualification, it should be fine.
It’s recommended to create the monitor views in all databases that need to be monitored.
Monitor Schema & View Definition
This happens when you run pgsql.yml on a node with postgres running.
If there’s a running postgres instance, you can explicitly remove it with pgsql-rm.yml playbook:
Disable
pg_safeguardto remove the Postgres instance.
If pg_safeguard is enabled, you cannot remove the running pgsql instance with bin/pgsql-rm and pgsql-rm.yml playbook.
To disable pg_safeguard, you can set pg_safeguard to false in the inventory or pass -e pg_safeguard=false as cli arg to the playbook:
There are several possible reasons for this error, and you need to check the system logs to determine the actual cause.
This usually happens when the cluster is misconfigured, or the previous primary is improperly removed. (e.g., trash metadata in DCS with the same cluster name).
You must check /pg/log/* to find the reason.
To delete trash meta from etcd, you can use etcdctl del --prefix /pg/<cls>, do with caution!
etcdctl del --prefix /pg/<cls> to manually delete the residual data.pg_lc_collate and pg_lc_ctype does not exist in OSFeel free to submit an issue or seek help from the community.
Failed Immediately: Usually, this happens because of misconfiguration, network issues, broken DCS metadata, etc…, you have to inspect /pg/log to find out the actual reason.
Failed After a While: This may be due to source instance data corruption. Check PGSQL FAQ: How to create replicas when data is corrupted?
Timeout: If the wait for postgres replica task takes 30min or more and fails due to timeout, This is common for a huge cluster (e.g., 1TB+, which may take hours to create a replica). In this case, the underlying creating replica procedure is still proceeding. You can check cluster status with pg list <cls> and wait until the replica catches up with the primary. Then continue the following tasks:
To install PostgreSQL 13 ~ 17, you have to set pg_version to 13, 14, 15, 16, or 17 in the inventory. (usually at cluster level)
use
node_hugepage_countandnode_hugepage_ratioor/pg/bin/pg-tune-hugepage
If you plan to enable hugepage, consider using node_hugepage_count and node_hugepage_ratio and apply with ./node.yml -t node_tune .
It’s good to allocate enough hugepage before postgres start, and use pg_tune_hugepage to shrink them later.
If your postgres is already running, you can use /pg/bin/pg-tune-hugepage to enable hugepage on the fly. Note that this only works on PostgreSQL 15+
Use
crit.ymltemplate, or settingpg_rpoto0, or config cluster with synchronous mode.
Consider using Sync Standby and Quorum Comit to guarantee 0 data loss during failover.
rm -rf /pg/dummywill free some emergency space.
The pg_dummy_filesize is set to 64MB by default. Consider increasing it to 8GB or larger in the production environment.
It will be placed on /pg/dummy same disk as the PGSQL main data disk. You can remove that file to free some emergency space. At least you can run some shell scripts on that node.
Disable
clonefromon bad instances and reload patroni config.
Pigsty sets the cloneform: true tag on all instances’ patroni config, which marks the instance available for cloning replica.
If this instance has corrupt data files, you can set clonefrom: false to avoid pulling data from the evil instance. To do so:
Disable
clonefromon bad instances and reload patroni config.
Pigsty sets the cloneform: true tag on all instances’ patroni config, which marks the instance available for cloning replica.
If this instance has corrupt data files, you can set clonefrom: false to avoid pulling data from the evil instance. To do so:
Not very much, 200ms per 10 ~ 15 seconds, won’t affect the database performance.
The default scrape interval for prometheus is 10s in pigsty, make sure the exporter can finish the scrape within that period.
Check PGSQL Monitor for details.
Or
You can manage PostgreSQL users and roles with Pigsty, in an IaC manner.
You can define roles/users with the following parameters, they are both arrays consisting of user objects:
pg_users : Define business users & roles at cluster level (Cluster Definition)pg_default_roles : Define system-wide roles & global users (Global Defaults)The former defines global roles and users shared across the entire environment, while the latter defines business roles and users specific to a single cluster. Here are some examples of user definitions:
You can customize users with more attributes, the full example is as follows:
name, which should be a valid & unique username in PostgreSQL.password, while it could be necessary for a login-able user.password can be plain text or a scram-sha-256 / md5 hash string.pg_default_roles first, pg_users later, in sequence order.login, superuser, createdb, createrole, inherit, replication, bypassrlspgbouncer is disabled by default. Set it to true explicitly to enable it in pgbouncer.Pigsty has a battery-included ACL system, which can be easily used by assigning roles to users:
dbrole_readonly : The role for global read-only accessdbrole_readwrite : The role for global read-write accessdbrole_admin : The role for object creationdbrole_offline : The role for restricted read-only access (offline instance)If you wish to re-design your ACL system, check the following parameters and SQL templates.
pg_default_roles : System-wide roles & global userspg_default_privileges : Default privileges for newly created objectsroles/pgsql/templates/pg-init-roles.sql: Role creation SQL templateroles/pgsql/templates/pg-init-template.sql: Privilege SQL templateUsers and roles defined in pg_default_roles and pg_users will be automatically created one by one during module installation.
It only runs on cluster leader, the primary instance.
To create users on an existing cluster,
add new user/role definitions to all.children.<cls>.pg_users, and create the database with the bin/pgsql-user util or pgsql-user.yml playbook:
Create user is an idempotent operation, meaning it can be run multiple times safely.
Pigsty will manage the pgbouncer userlist, so please create business databases with the Pigsty playbook/utils. Check create user SOP for details. If you are not using pgbouncer or able to maintain it by yourself, you can create users in any way you like.
In PostgreSQL, users belong to the database cluster, not a specific database.
If your user is an owner of any databases, make sure the user is created before creating the database.
Modifying PostgreSQL user attributes is the same as creating users.
Adjust your user definition by modifying the config inventory, then re-run create user.
There are two exceptions: name and roles, which require manual intervention:
The username is used as the identity of the user, so if you really want to do that, use the standard SQL:
Note that modifying a user does not delete the user, but modifies user attributes using the ALTER USER command.
It also DOES NOT revoke user permissions and group memberships, and uses the GRANT command to grant new roles.
Check PostgreSQL Docs for more details on ALTER USER.
For security reasons, Pigsty does not automatically delete users, even if you remove user definitions from the configuration, Pigsty will not delete existing users.
You need to use the SQL command DROP USER to manually delete users:
If the role you want to delete is a group (has other users belonging to it), you need to first remove other users from the group before deleting the group:
If the user you want to delete owns database objects, you need to first change the ownership of these objects to another user before deleting the user:
Check PostgreSQL Docs for more details on DROP USER, REASSIGN OWNED, and REVOKE.
Pigsty helps manage users in pgbouncer userlist, and keep it in sync with the postgres.
It requires explicitly setting the pgbouncer: true flag in the user definition to be enrolled in the pgbouncer user list.
The system admin user (pg_admin_username) and monitoring user (pg_monitor_username)
will always be added to the pgbouncer user list for administration & monitoring.
Users in the Pgbouncer connection pool are listed in /etc/pgbouncer/userlist.txt, examples:
User-level parameters are maintained in a separate file: /etc/pgbouncer/useropts.txt, examples:
The userlist.txt and useropts.txt will be automatically refreshed when you create users
and take effect with systemctl reload pgbouncer, normally without affecting existing connections.
To reload pgbouncer configuration, you can use the ansible playbook, or systemctl command
Pgbouncer runs with the same dbsu as PostgreSQL, defaulting to the postgres os user.
You can use the pgb alias to access pgbouncer management functions using dbsu.
If all database users are managed by Pigsty, you can just regenerate pgbouncer userlist (without the removed user in the list in the config inventory) and reload it:
To manually remove a user from the pgbouncer pool, simply delete the corresponding line from /etc/pgbouncer/userlist.txt and reload pgbouncer:
Note that the pgbouncer_auth_query parameter allows you to use dynamic queries to complete connection pool user authentication, which is a compromise when you don’t want to manage users in the connection pool.
CREATE DATABASE.A PostgreSQL server can serve multiple databases simultaneously. You can manage them with Pigsty.
Business databases are defined by pg_databases, which is a cluster-level parameter.
For example, the default meta database is defined in the pg-meta cluster:
Each database definition is a dict with the following fields:
The only required field is name, which should be a valid and unique database name in PostgreSQL.
Newly created databases are forked from template1 database by default. Which is customized by PG_PROVISION during cluster bootstrap.
Check ACL: Database Privilege for details about database-level privilege.
Databases defined in pg_databases will be automatically created during module installation.
If you wish to create database on an existing cluster, the bin/pgsql-db util can be used.
Add new database definition to all.children.<cls>.pg_databases, and create that database with:
This playbook is usually idempotent and can be re-run to flush the database definition.
But if you have non-trivial baseline schema (like drop stuff), you should NOT re-run this on existing databases.
Pigsty will manage pgbouncer database list, so please create business databases with the Pigsty playbook/utils. Check create database SOP for details. If you are not using pgbouncer or able to maintain it by yourself, you can create databases in any way you like.
Pgbouncer is enabled by default and serves as connection pool middleware.
Pigsty will add all databases in pg_databases to the pgbouncer database list by default.
You can disable the pgbouncer proxy for a specific database by setting pgbouncer: false in the database definition.
The Pgbouncer database list will be updated when create database with Pigsty util & playbook.
Databases are listed in /etc/pgbouncer/database.txt, with extra database-level parameters:
When you create databases, the Pgbouncer database list definition file will be refreshed and take effect through online configuration reload, without affecting existing connections.
To access pgbouncer admin functionality, you can use the pgb alias as dbsu (postgres).
Check pgbouncer usage for available commands:
There’s a util function defined in /etc/profile.d/pg-alias.sh, allowing you to reroute pgbouncer database traffic to a new host quickly, which can be used during zero-downtime migration.
In Pigsty, services are implemented using haproxy on nodes, differentiated by different ports on the host node.
Every node has Haproxy enabled to expose services. From the database perspective, nodes in the cluster may be primary or replicas, but from the service perspective, all nodes are the same. This means even if you access a replica node, as long as you use the correct service port, you can still use the primary’s read-write service. This design seals the complexity: as long as you can access any instance on the PostgreSQL cluster, you can fully access all services.
This design is akin to the NodePort service in Kubernetes. Similarly, in Pigsty, every service includes these two core elements:
The boundary of Pigsty’s service delivery stops at the cluster’s HAProxy. Users can access these load balancers in various ways. Please refer to Access Service.
All services are declared through configuration files. For instance, the default PostgreSQL service is defined by the pg_default_services parameter:
You can also define new service in pg_services. And pg_default_services and pg_services are both arrays of Service Definition.
The default services are defined in pg_default_services.
While you can define your extra PostgreSQL services with pg_services @ the global or cluster level.
These two parameters are both arrays of service objects. Each service definition will be rendered as a haproxy config in /etc/haproxy/<svcname>.cfg, check service.cfg for details.
Here is an example of an extra service definition: standby
And it will be translated to a haproxy config file /etc/haproxy/pg-test-standby.conf:
When cluster membership has changed, such as append / remove replicas, switchover/failover, or adjust relative weight, You have to reload service to make the changes take effect.
You can override the default service configuration in several ways:
Bypass Pgbouncer
When defining a service, if svc.dest='default', this parameter pg_default_service_dest will be used as the default value. pgbouncer is used by default, you can use postgres instead, so the default primary & replica service will bypass pgbouncer and route traffic to postgres directly
If you don’t need connection pooling at all, you can change pg_default_service_dest to postgres, and remove default and offline services.
If you don’t need read-only replicas for online traffic, you can remove replica from pg_default_services too.
Pigsty exposes PostgreSQL services with haproxy on node. All haproxy instances among the cluster are configured with the same service definition.
However, you can delegate pg service to a specific node group (e.g., dedicate haproxy lb cluster) rather than cluster members.
To do so, you will have to override the default service definition with pg_default_services and set pg_service_provider to the proxy group name.
For example, this configuration will expose pg cluster primary service on haproxy node group proxy with port 10013.
It’s user’s responsibility to make sure each delegate service port is unique among the proxy cluster.
Split read & write, route traffic to the right place, and achieve stable & reliable access to the PostgreSQL cluster.
Service is an abstraction to seal the details of the underlying cluster, especially during cluster failover/switchover.
Service is meaningless to personal users. You can access the database with raw IP address or whatever method you like.
We utilize a PostgreSQL database cluster based on replication in real-world production environments. Within the cluster, only one instance is the leader (primary) that can accept writes. Other instances (replicas) continuously fetch WAL from the leader to stay synchronized. Additionally, replicas can handle read-only queries and offload the primary in read-heavy, write-light scenarios. Thus, distinguishing between write and read-only requests is a common practice.
Moreover, we pool requests through a connection pooling middleware (Pgbouncer) for high-frequency, short-lived connections to reduce the overhead of connection and backend process creation. And, for scenarios like ETL and change execution, we need to bypass the connection pool and directly access the database servers. Furthermore, high-availability clusters may undergo failover during failures, causing a change in the cluster leadership. Therefore, the RW requests should be re-routed automatically to the new leader.
These varied requirements (read-write separation, pooling vs. direct connection, and client request failover) have led to the abstraction of the service concept.
Typically, a database cluster must provide this basic service:
For production database clusters, at least these two services should be provided:
Additionally, there might be other services, such as:
Pigsty will enable four default services for each PostgreSQL cluster:
| service | port | description |
|---|---|---|
| primary | 5433 | pgbouncer read/write, connect to primary 5432 or 6432 |
| replica | 5434 | pgbouncer read-only, connect to replicas 5432/6432 |
| default | 5436 | admin or direct access to primary |
| offline | 5438 | OLAP, ETL, personal user, interactive queries |
Take the default pg-meta cluster as an example, you can access these services in the following ways:
Here the pg-meta domain name is point to the cluster’s L2 VIP, which in turn points to the haproxy load balancer on the primary instance.
It is responsible for routing traffic to different instances, check Access Services for details.
The primary service may be the most critical service for production usage.
It will route traffic to the primary instance, depending on pg_default_service_dest:
pgbouncer: route traffic to primary pgbouncer port (6432), which is the default behaviorpostgres: route traffic to primary postgres port (5432) directly if you don’t want to use pgbouncerIt means all cluster members will be included in the primary service (selector: "[]"), but the one and only one instance that past health check (check: /primary) will be used as the primary instance. Patroni will guarantee that only one instance is primary at any time, so the primary service will always route traffic to THE primary instance.
The replica service is used for production read-only traffic.
There may be many more read-only queries than read-write queries in real-world scenarios. You may have many replicas.
The replica service will route traffic to Pgbouncer or postgres depending on pg_default_service_dest, just like the primary service.
The replica service traffic will try to use common pg instances with pg_role = replica to alleviate the load on the primary instance as much as possible. It will try NOT to use instances with pg_role = offline to avoid mixing OLAP & OLTP queries as much as possible.
All cluster members will be included in the replica service (selector: "[]") when it passes the read-only health check (check: /read-only). primary and offline instances are used as backup servers, which will take over in case of all replica instances are down.
The default service will route to primary postgres (5432) by default.
It is quite like the primary service, except it will always bypass pgbouncer, regardless of pg_default_service_dest. Which is useful for administration connection, ETL writes, CDC changing data capture, etc…
The Offline service will route traffic to dedicate postgres instance directly.
Which could be a pg_role = offline instance, or a pg_offline_query flagged instance.
If no such instance is found, it will fall back to any replica instances. the bottom line is: it will never route traffic to the primary instance.
Pigsty exposes service with haproxy. Which is enabled on all nodes by default.
haproxy load balancers are idempotent among the same pg cluster by default, you use ANY / ALL of them by all means.
The typical method is access via cluster domain name, which resolves to cluster L2 VIP, or all instances ip address in a round-robin manner.
Service can be implemented in different ways. You can even implement your own access method such as L4 LVS, F5, etc… instead of haproxy.
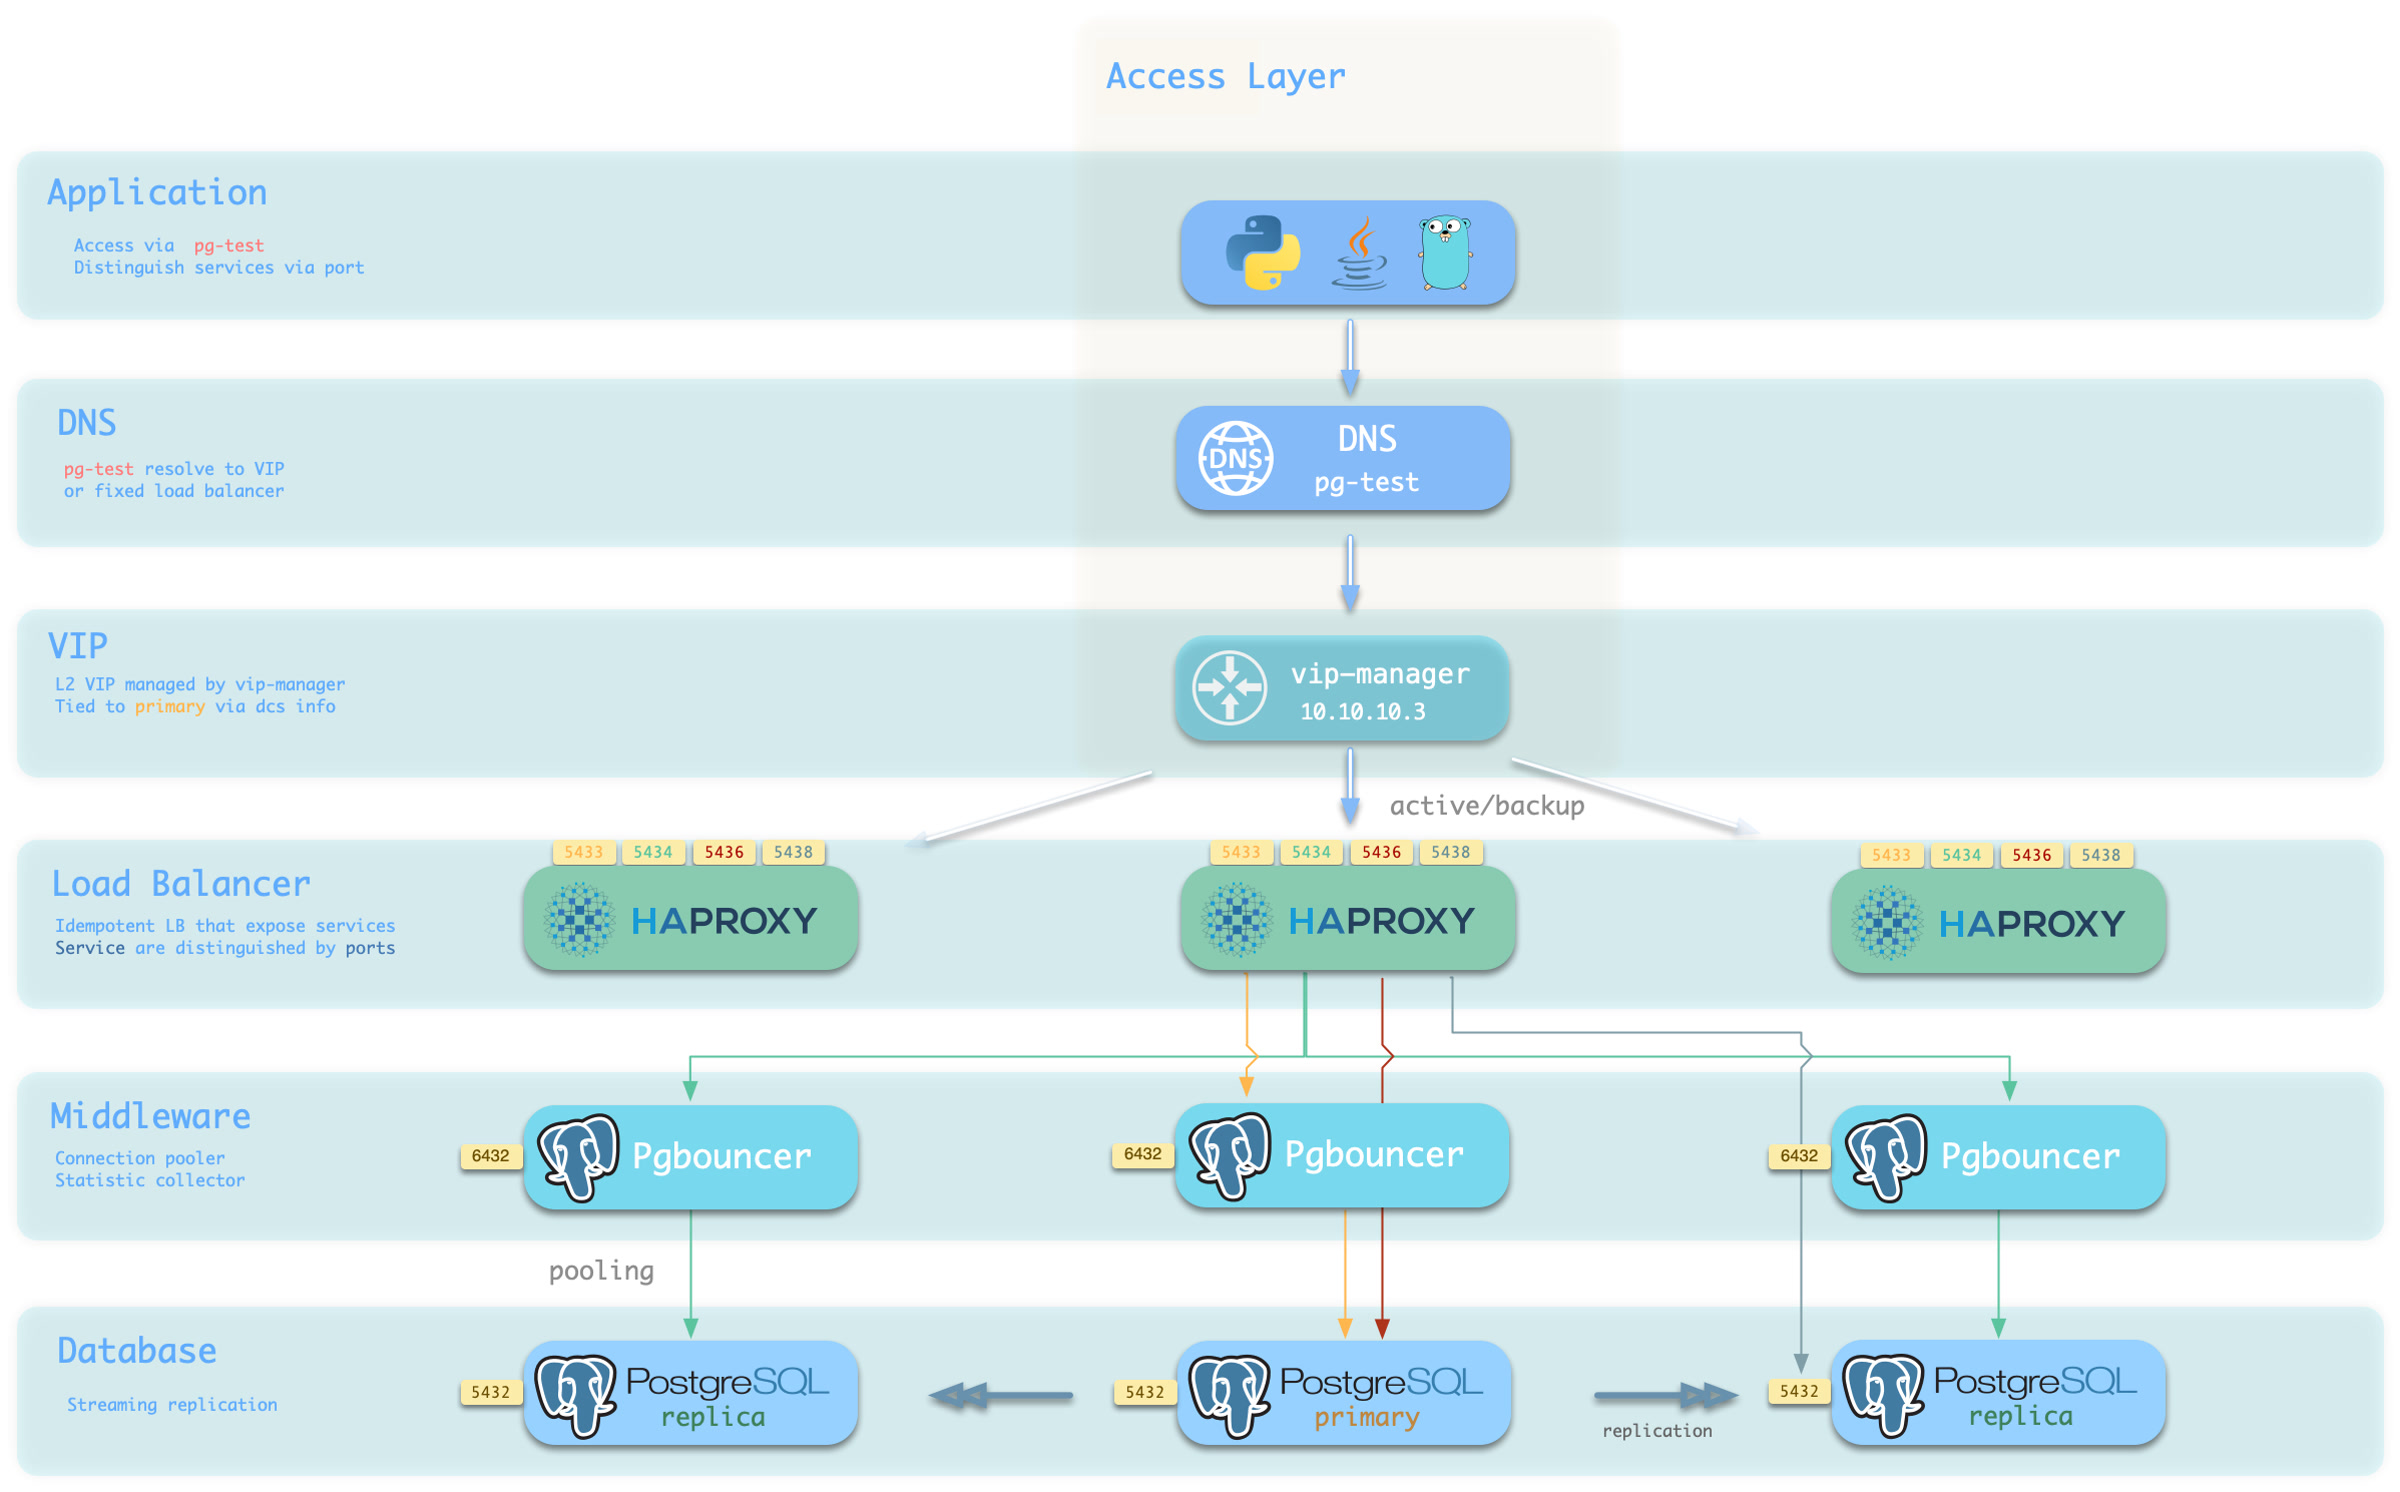
You can use a different combination of host & port, they are providing PostgreSQL service in different ways.
Host
| type | sample | description |
|---|---|---|
| Cluster Domain Name | pg-test |
via cluster domain name (resolved by dnsmasq @ infra nodes) |
| Cluster VIP Address | 10.10.10.3 |
via a L2 VIP address managed by vip-manager, bind to primary |
| Instance Hostname | pg-test-1 |
Access via any instance hostname (resolved by dnsmasq @ infra nodes) |
| Instance IP Address | 10.10.10.11 |
Access any instance ip address |
Port
Pigsty uses different ports to distinguish between pg services:
| port | service | type | description |
|---|---|---|---|
| 5432 | postgres | database | Direct access to postgres server |
| 6432 | pgbouncer | middleware | Go through connection pool middleware before postgres |
| 5433 | primary | service | Access primary pgbouncer (or postgres) |
| 5434 | replica | service | Access replica pgbouncer (or postgres) |
| 5436 | default | service | Access primary postgres |
| 5438 | offline | service | Access offline postgres |
Combinations
PostgreSQL has various authentication methods. You can use all of them, while pigsty’s battery-included ACL system focuses on HBA, password, and SSL authentication.
To connect to a PostgreSQL database, the user has to be authenticated (with a password by default).
You can provide the password in the connection string (not secure) or use the PGPASSWORD env or .pgpass file. Check psql docs and PostgreSQL connection string for more details.
The default connection string for the meta database:
To connect with the SSL certificate, you can use the PGSSLCERT and PGSSLKEY env or sslkey & sslcert parameters.
While the client certificate (CN = username) can be issued with local CA & cert.yml.
There are four parameters for HBA Rules in Pigsty:
pg_hba_rules: postgres ad-hoc hba rulespg_default_hba_rules: postgres default hba rulespgb_hba_rules: pgbouncer ad-hoc hba rulespgb_default_hba_rules: pgbouncer default hba rulesWhich are array of hba rule objects, and each hba rule is one of the following forms:
In the form, the title will be rendered as a comment line, followed by the rules as hba string one by one.
An HBA Rule is installed when the instance’s pg_role is the same as the role.
HBA Rule with role: common will be installed on all instances.
HBA Rule with role: offline will be installed on instances with pg_role = offline or pg_offline_query = true.
The alias form, which replace rules with addr, auth, user, and db fields.
addr: where
world: all IP addressesintra: all intranet cidr: '10.0.0.0/8', '172.16.0.0/12', '192.168.0.0/16'infra: IP addresses of infra nodesadmin: admin_ip addresslocal: local unix socketlocalhost: local unix socket + tcp 127.0.0.1/32cluster: all IP addresses of pg cluster members<cidr>: any standard CIDR blocks or IP addressesauth: how
deny: reject accesstrust: trust authenticationpwd: use md5 or scram-sha-256 password auth according to pg_pwd_encsha/scram-sha-256: enforce scram-sha-256 password authenticationmd5: md5 password authenticationssl: enforce host ssl in addition to pwd authssl-md5: enforce host ssl in addition to md5 password authssl-sha: enforce host ssl in addition to scram-sha-256 password authos/ident: use ident os user authenticationpeer: use peer authenticationcert: use certificate-based client authenticationuser: who
all: all users${dbsu}: database superuser specified by pg_dbsu${repl}: replication user specified by pg_replication_username${admin}: admin user specified by pg_admin_username${monitor}: monitor user specified by pg_monitor_usernamedb: which
all: all databasesreplication: replication databaseTypically, global HBA is defined in all.vars. If you want to modify the global default HBA rules, you can copy from the full.yml template to all.vars for modification.
pg_default_hba_rules: postgres global default HBA rulespgb_default_hba_rules: pgbouncer global default HBA rulesCluster-specific HBA rules are defined in the cluster-level configuration of the database:
pg_hba_rules: postgres HBA rules for the clusterpgb_hba_rules: pgbouncer HBA rules for the clusterHere are some examples of cluster HBA rule definitions.
To reload postgres/pgbouncer hba rules:
The underlying command: are:
Pigsty has a default set of HBA rules, which is pretty secure for most cases.
The rules are self-explained in alias form.
For those critical cases, we have a safe.yml template with the following hba rule set as a reference:
Pigsty has a default role system consisting of four default roles and four default users:
| Default User | User Description | Default Role | Role Description |
|---|---|---|---|
postgres |
system superuser | dbrole_readonly |
role for global read-only access |
replicator |
system replicator | dbrole_readwrite |
role for global read-write access |
dbuser_dba |
pgsql admin user | dbrole_admin |
role for object creation |
dbuser_monitor |
pgsql monitor user | dbrole_offline |
role for restricted read-only access |
| Role name | Attributes | Member of | Description |
|---|---|---|---|
dbrole_readonly |
NOLOGIN |
role for global read-only access | |
dbrole_readwrite |
NOLOGIN |
dbrole_readonly | role for global read-write access |
dbrole_admin |
NOLOGIN |
pg_monitor,dbrole_readwrite | role for object creation |
dbrole_offline |
NOLOGIN |
role for restricted read-only access | |
postgres |
SUPERUSER |
system superuser | |
replicator |
REPLICATION |
pg_monitor,dbrole_readonly | system replicator |
dbuser_dba |
SUPERUSER |
dbrole_admin | pgsql admin user |
dbuser_monitor |
pg_monitor | pgsql monitor user |
There are four default roles in pigsty:
dbrole_readonly): Role for global read-only accessdbrole_readwrite): Role for global read-write access, inherits dbrole_readonly.dbrole_admin): Role for DDL commands, inherits dbrole_readwrite.dbrole_offline): Role for restricted read-only access (offline instance)Default roles are defined in pg_default_roles, changing default roles is not recommended.
There are four default users in pigsty, too.
postgres), the owner and creator of the cluster, same as the OS dbsu.replicator), the system user used for primary-replica.dbuser_monitor), a user used to monitor database and connection pool metrics.dbuser_dba), the admin user who performs daily operations and database changes.Default users’ username/password are defined with dedicated parameters (except for dbsu password):
pg_dbsu : os dbsu name, postgres by default, better not change itpg_replication_username : postgres replication username, replicator by defaultpg_replication_password : postgres replication password, DBUser.Replicator by defaultpg_admin_username : postgres admin username, dbuser_dba by defaultpg_admin_password : postgres admin password in plain text, DBUser.DBA by defaultpg_monitor_username : postgres monitor username, dbuser_monitor by defaultpg_monitor_password : postgres monitor password, DBUser.Monitor by default!> Remember to change these password in production deployment !
To define extra options, specify them in pg_default_roles:
Pigsty has a battery-included privilege model that works with default roles.
pg_role = 'offline' or pg_offline_query = true)CREATE privileges of database & public schema are revoked from PUBLIC by defaultDefault object privileges are defined in pg_default_privileges.
Newly created objects will have corresponding privileges when it is created by admin users
The \ddp+ may looks like:
| Type | Access privileges |
|---|---|
| function | =X |
| dbrole_readonly=X | |
| dbrole_offline=X | |
| dbrole_admin=X | |
| schema | dbrole_readonly=U |
| dbrole_offline=U | |
| dbrole_admin=UC | |
| sequence | dbrole_readonly=r |
| dbrole_offline=r | |
| dbrole_readwrite=wU | |
| dbrole_admin=rwU | |
| table | dbrole_readonly=r |
| dbrole_offline=r | |
| dbrole_readwrite=awd | |
| dbrole_admin=arwdDxt |
ALTER DEFAULT PRIVILEGES allows you to set the privileges that will be applied to objects created in the future. It does not affect privileges assigned to already-existing objects, and objects created by non-admin users.
Pigsty will use the following default privileges:
Which will be rendered in pg-init-template.sql alone with ALTER DEFAULT PRIVILEGES statement for admin users.
These SQL commands will be executed on postgres & template1 during cluster bootstrap, and newly created databases will inherit it from template1 by default.
That is to say, to maintain the correct object privilege, you have to run DDL with admin users, which could be:
{{ pg_dbsu }}, postgres by default{{ pg_admin_username }}, dbuser_dba by defaultdbrole_adminIt’s wise to use postgres as the global object owner to perform DDL changes.
If you wish to create objects with business admin user, YOU MUST USE SET ROLE dbrole_admin before running that DDL to maintain the correct privileges.
You can also ALTER DEFAULT PRIVILEGE FOR ROLE <some_biz_admin> XXX to grant default privilege to business admin user, too.
Database privilege is covered by database definition.
There are 3 database level privileges: CONNECT, CREATE, TEMP, and a special ‘privilege’: OWNERSHIP.
owner exists, it will be used as the database owner instead of default {{ pg_dbsu }}revokeconn is false, all users have the CONNECT privilege of the database, this is the default behavior.revokeconn is set to true explicitly:CONNECT privilege of the database will be revoked from PUBLICCONNECT privilege will be granted to {{ pg_replication_username }}, {{ pg_monitor_username }} and {{ pg_admin_username }}CONNECT privilege will be granted to the database owner with GRANT OPTIONrevokeconn flag can be used for database access isolation, you can create different business users as the owners for each database and set the revokeconn option for all of them.
Pigsty revokes the CREATE privilege on database from PUBLIC by default, for security consideration. And this is the default behavior since PostgreSQL 15.
The database owner has the full ability to adjust these privileges as they see fit.
There are 26 default grafana dashboards about PostgreSQL and categorized into 4 levels. and categorized into PGSQL, PGCAT & PGLOG by datasource.
Overview
Cluster
Instance
Database
PGSQL Overview : The main dashboard for PGSQL module
PGSQL Alert : Global PGSQL key metrics and alerting events
PGSQL Shard : Overview of a horizontal sharded PGSQL cluster, e.g. CITUS / GPSQL cluster
PGSQL Cluster: The main dashboard for a PGSQL cluster
PGRDS Cluster: The PGSQL Cluster dashboard for RDS, focus on all postgres metrics only.
PGSQL Service: Cares about PGSQL cluster services, proxies, routes, and load balancers.
PGSQL Activity: Cares about the Session/Load/QPS/TPS/Locks of a PGSQL cluster
PGSQL Replication: Cares about PGSQL cluster replication, slots, and pub/sub.
PGSQL Databases: Cares about database CRUD, slow queries, and table statistics cross all instances.
PGSQL Patroni: Cares about cluster HA agent: patroni status.
PGSQL PITR: Cares about context of cluster status during PITR procedure
PGSQL Instance: The main dashboard for a single PGSQL instance
PGRDS Instance: The PGSQL Instance dashboard for RDS, focus on all postgres metrics only.
PGSQL Proxy: Metrics about haproxy the service provider
PGSQL Pgbouncer: Metrics about one single pgbouncer connection pool instance
PGSQL Persist: Metrics about persistence: WAL, XID, Checkpoint, Archive, IO
PGSQL Xacts: Metrics about transactions, locks, queries, etc…
PGSQL Session: Metrics about sessions and active/idle time in a single instance
PGSQL Exporter: Postgres & Pgbouncer exporter self monitoring metrics
PGSQL Database: The main dashboard for a single PGSQL database
PGSQL Tables : Table/Index access metrics inside a single database
PGSQL Table: Detailed information (QPS/RT/Index/Seq…) about a single table
PGSQL Query: Detailed information (QPS/RT) about a single query
PGCAT Instance: Instance information from database catalog directly
PGCAT Database: Database information from database catalog directly
PGCAT Schema: Detailed information about one single schema from database catalog directly
PGCAT Table: Detailed information about one single table from database catalog directly
PGCAT Query: Detailed information about one single type of query from database catalog directly
PGCAT Locks: Detailed information about live locks & activity from database catalog directly
PGLOG Overview: Overview of csv log sample in pigsty meta database
PGLOG Overview: Detail of one single session of csv log sample in pigsty meta database
Pigsty has a built-in playbook pgsql-migration.yml to perform online database migration based on logical replication.
With proper automation, the downtime could be minimized to several seconds. But beware that logical replication requires PostgreSQL 10+ to work. You can still use the facility here and use a pg_dump | psql instead of logical replication.
You have to create a migration task definition file to use this playbook.
Check files/migration/pg-meta.yml for example.
It will try to migrate the pg-meta.meta to pg-test.test.
You have to tell pigsty where is the source cluster and destination cluster. The database to be migrated, and the primary IP address.
You should have superuser privileges on both sides to proceed
You can overwrite the superuser connection to the source cluster with src_pg, and logical replication connection string with sub_conn, Otherwise, pigsty default admin & replicator credentials will be used.
The playbook does not migrate src to dst, but it will generate everything your need to do so.
After the execution, you will find migration context dir under ~/migration/pg-meta.meta by default
Following the README.md and executing these scripts one by one, you will do the trick!
Caveats
You can use ./copy-seq 1000 to advance all sequences by a number (e.g. 1000) after syncing sequences. Which may prevent potential serial primary key conflict in new clusters.
You have to implement your own ./re-routing script to route your application traffic from src to dst. Since we don’t know how your traffic is routed (e.g dns, VIP, haproxy, or pgbouncer). Of course, you can always do that by hand…
You have to implement your own ./disable-src script to restrict the src cluster. You can do that by changing HBA rules & reload (recommended), or just shutting down postgres, pgbouncer, or haproxy…
Pigsty uses pgBackRest to manage PostgreSQL backups, it may be the most powerful open-source backup tools in the ecosystem. With incremental / parallel backup & restore, encryption, MinIO / S3 support, and many other features. Pigsty has pre-configured it for every PGSQL cluster by default.
Backup scripts, scheduling, pgbackrest, repo and admin
Backup policy, disk planning, recovery window trade-off
Restore to specific time point with playbook
Sandbox example: Perform recovery with bare hands
Pigsty try its best to provide a reliable PITR solution, but we do not take any responsibility for the data loss caused by the PITR operation, use it at your own risk. For professional support, consider our pro service.
[Backup Policy](/docs/pgsql/backup/mechanism): Schedule Base Backups with Crontab
[WAL Archiving](/docs/pgsql/backup/policy): Continuously record write activities
[Restore & Recovery](/docs/pgsql/backup/restore): Recover from backup and wal archive
Backups can be invoked by built-in scripts, scheduled with node crontab, managed by pgbackrest, and stored in backup repo, which could be local disk filesystem or MinIO / S3, with different retention policies.
You can create a backup with pgbackrest command with pg_dbsu user (postgres by default):
The stanza here is the database cluster name: pg_cluster, which is pg-meta for the default setup.
Pigsty has an alias pb and wrapper script pg-backup that fills the current cluster name as stanza:
Pigsty is leveraging Linux’s crontab to schedule backups. You can define your backup policies with it
For example, most one-node config template will have the following node_crontab for backup.
You can design more sophisticated backup policies with crontab and pg-backup script, such as:
To apply crontab change, use the node.yml to update the crontab on all nodes.
Here’s pigsty’s setup details for pgbackrest:
pgbackrest_enabled)pg_install task in the pgsql.yml playbook, defined in pg_packagespg_backup task in the pgsql.yml playbook, PARAM: PG_BACKUPpgbackrest_init task, fails if repo exists! (errors can be ignored)pgbackrest_backup task, controlled by pgbackrest_init_backup/usr/bin/pgbackrest, from the PGDG’s pgbackrest package, in the group alias pgsql-common./etc/pgbackrest, the main config is /etc/pgbackrest/pgbackrest.conf./pg/log/pgbackrest/*, controlled by pgbackrest_log_dir/pg/spool is used as the temp spool directory for pgbackrest/pg/backup is used, if the default local filesystem backup repo is selected.Moreover, during the PITR Recovery process,
Pigsty will create a temp /pg/conf/pitr.conf pgbackrest config file.
And write postgres recovery log to the /pg/tmp/recovery.log file.
There is a pgbackrest_exporter service running on (pgbackrest_exporter_port: 9854) to export the pgbackrest metrics.
You can customize it by pgbackrest_exporter_options and disable it with setting pgbackrest_exporter_enabled to false.
When a postgres cluster is created, pigsty will create an initial backup automatically.
It’s a tiny backup since the new cluster is almost empty.
It will leave a marker file /etc/pgbackrest/initial.done to avoid creating the initial backup again.
Set the pgbackrest_init_backup to false if you don’t want it.
If you database cluster is created with pgbackrest_enable set to true, the backup will be enabled automatically.
If it created with the false value, you can enable the pgbackrest component with:
Pigsty will remove pgbackrest backup stanza when removing the primary instance (pg_role = primary).
Use the pg_backup subtask to remove the backup only, and use the pg_rm_backup arg to keep backups.
If your backup repo is locked, (e.g., S3 / MinIO has a lock option), this operation will fail.
Removing backup may lead to permanent data loss, it’s a dangerous operation, do with extreme caution.
This command will list all backups in the pgbackrest repository (shared by all clusters)
Pigsty has a built-in script /pg/bin/pg-backup which wraps the pgbackrest backup command.
Pigsty has an alternative backup script /pg/bin/pg-basebackup which does not rely on pgbackrest, and gives you a physical copy of the database cluster.
The default backup dir is /pg/backup.
Backup are compressed with lz4, You can unzip and extract the tarball with the following command:
You can also use the pg_dump command to perform a logical backup.
Logical backups cannot be used for PITR (Point In Time Recovery), but they are useful for migrating data between different major versions, or implement flexible data export logic.
Now let’s say you have an existing cluster pg-meta, and want to FORK it as pg-meta2:
You’ll need to create the new pg-meta2 cluster fork, then run pitr on it.
You can to configure WHERE to store the backups by specifying the pgbackrest_repo parameter.
You can define multiple repo there, and Pigsty will pick it according to the value of pgbackrest_method.
By default, Pigsty has two default backup repo definition: the local and minio backup repo.
local: The default, use the local /pg/backup dir (Softlink point to pg_fs_backup: /data/backups)minio: Use the SNSD 1-node MinIO cluster (Supported by pigsty, but not enabled by default)If you take backups every day without deleting them, the backup repo will grow larger and larger and blow your disk space. You’ll need to define a retention policy to only keep a limited number of backups.
The default backup policy is defined in the pgbackrest_repo parameter, change them on demand.
local: keep last 2 full backups, at most 3 during backupminio: keep all full backups in the last 14 daysObject storage provides virtually unlimited storage capacity, so you don’t need to worry about the disk space. You can optimize space usage with a hybrid full & diff backup policy.
For local disk backup repo, pigsty recommends using a retention policy of keeping the last 2 full backups, which means keep the two most-recent full backups on disk (a third copy may exist while a new backup is running).
This gives you a guaranteed recovery window of at least last 24 hours. Check backup policy for details.
You can also use other services as backup repo, check pgbackrest documentation for details:
You can even specify a repo target time to get a snapshot of object storage.
You can enable MinIO versioning by adding versioning flag to the minio_buckets:
Some object storage service (S3, MinIO, etc.) supports the locking, which can prevent the backup from being deleted, even by DBA themselves.
You can enable MinIO locking feature by adding lock flag to the minio_buckets:
Object storage service provides virtually unlimited storage capacity, and provides a remote disaster tolerance for your system. If you don’t have one, Pigsty has built-in MinIO support.
You can enable minio backup repo by uncommenting the following settings. Beware that pgbackrest only takes HTTPS / domain names, so you have to run MinIO with a domain name and HTTPS endpoint.
If you only have one node, the meaningful backup policy could be using a cloud vendor’s object storage service such as AWS S3, Aliyun OSS, or Google Cloud, etc… To achieve this, you can define a new repo:
If you database cluster is created with pgbackrest_enable set to true, the backup will be enabled automatically.
If it created with the false value, you can enable the pgbackrest component with:
Pigsty will remove pgbackrest backup stanza when removing the primary instance (pg_role = primary).
Use the pg_backup subtask to remove the backup only, and use the pg_rm_backup arg to keep backups.
If your backup repo is locked, (e.g., S3 / MinIO has a lock option), this operation will fail.
Removing backup may lead to permanent data loss, it’s a dangerous operation, do with extreme caution.
This command will list all backups in the pgbackrest repository (shared by all clusters)
Pigsty has a built-in script /pg/bin/pg-backup which wraps the pgbackrest backup command.
Pigsty has an alternative backup script /pg/bin/pg-basebackup which does not rely on pgbackrest, and gives you a physical copy of the database cluster.
The default backup dir is /pg/backup.
Backup are compressed with lz4, You can unzip and extract the tarball with the following command:
You can also use the pg_dump command to perform a logical backup.
Logical backups cannot be used for PITR (Point In Time Recovery), but they are useful for migrating data between different major versions, or implement flexible data export logic.
Now let’s say you have an existing cluster pg-meta, and want to FORK it as pg-meta2:
You’ll need to create the new pg-meta2 cluster fork, then run pitr on it.
The first problem is WHEN to backup your database — Trade off between backup frequency and recovery time. Since you’ll need to replay the WAL logs to your recovery target since the last previous backup, the more frequent you backup, the less WAL logs you’ll need to replay, and the faster your recovery will be.
For a production database, it is recommended to start with the simplest everyday full backup policy. Where is the default backup policy in pigsty, implemented with crontab.
When using with the default local filesystem backup repo, it provides a 24~48h recovery window.
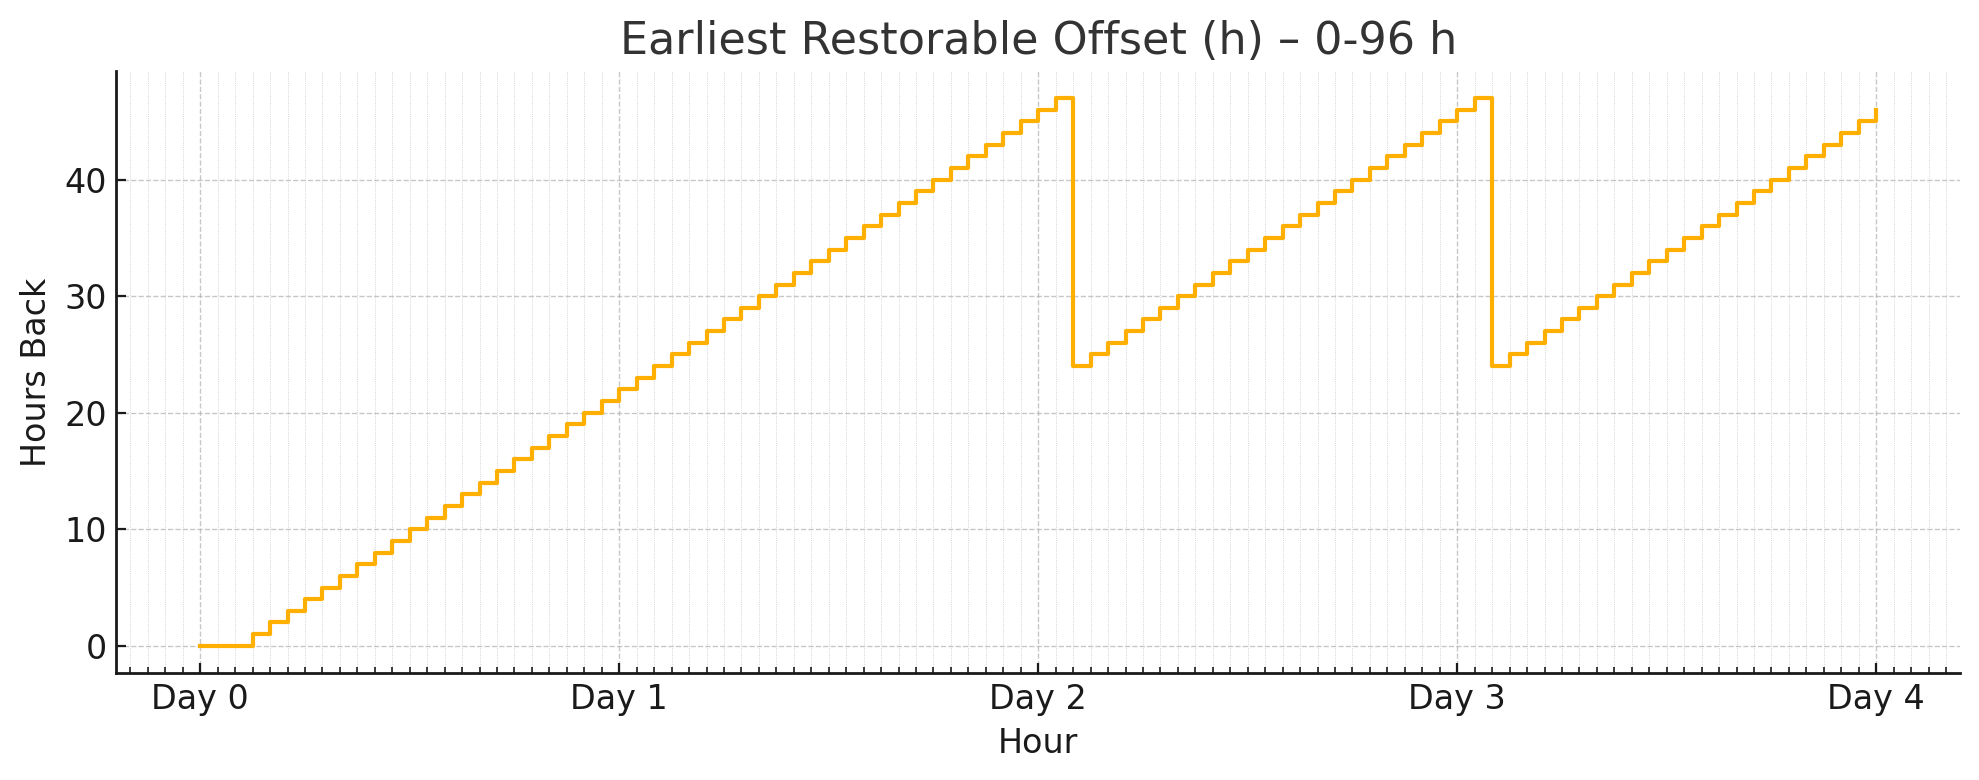
Let’s assume your database size is 100GB, and 10GB writes per day, and your backup size will be.
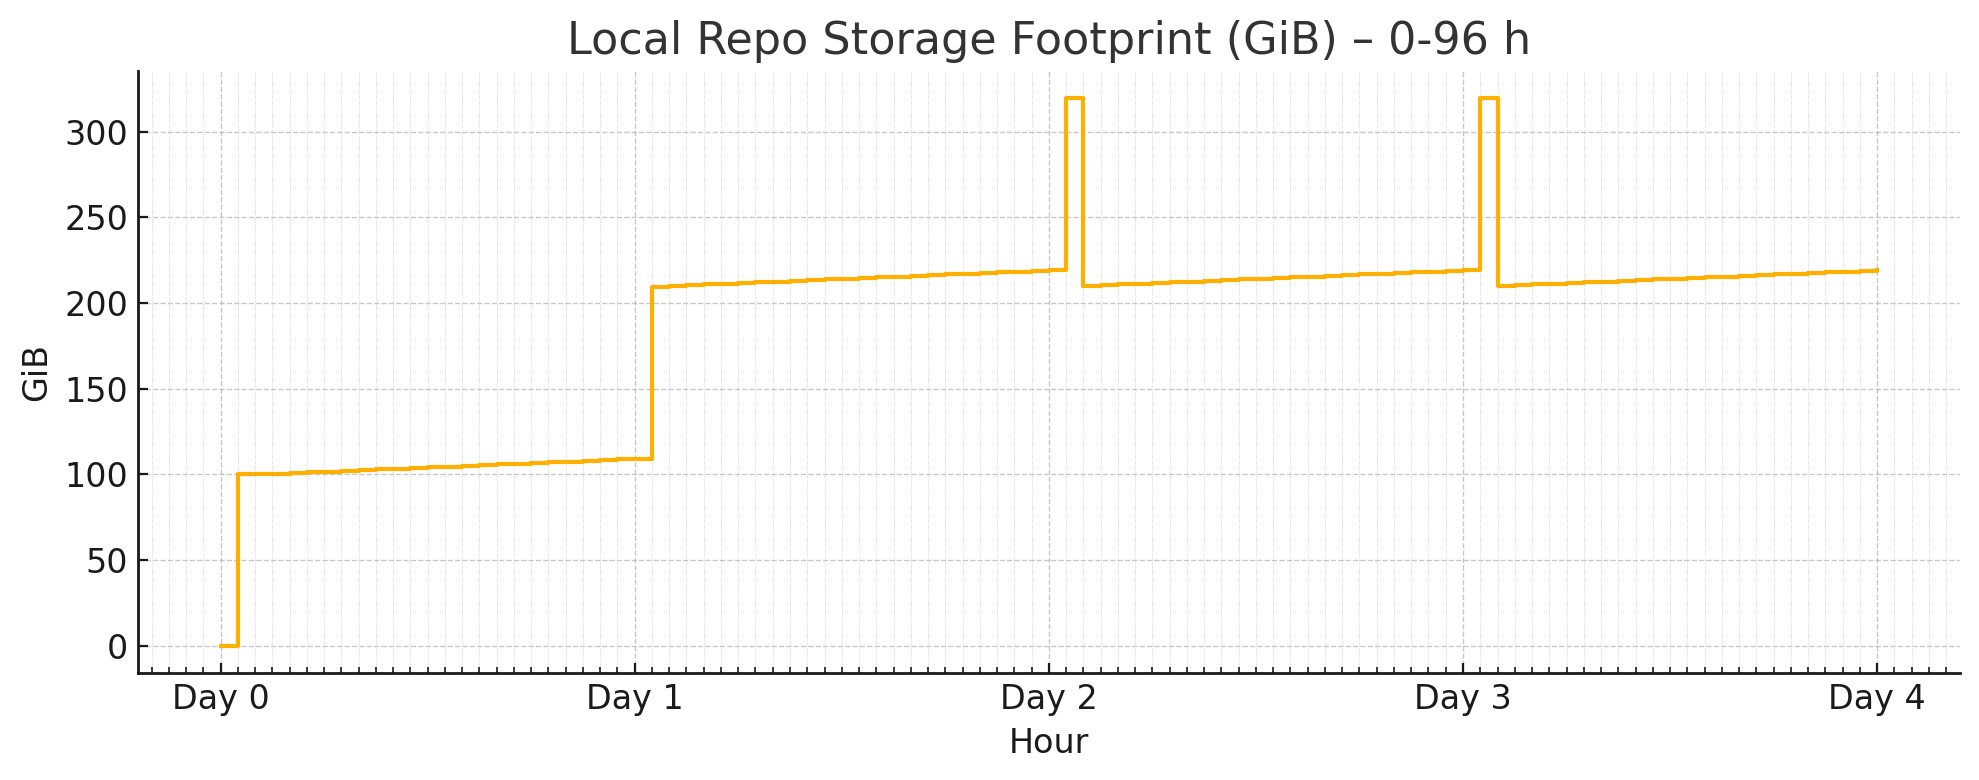
It will consume 2 ~ 3x of your database size, plus a 2 day’s WAL.
So in practice, you may have to prepare a backup disk with at least 3 ~ 5x of your database size
to use the default backup policy.
You can optimize backup space usage by changing these parameters.
If you are using MinIO / S3 as centralized backup repo, you can use more space than your disk limitation. Then consider the full + incr backup with 2-week retention policy:
When using with the built-in minio filesystem backup repo, it provides a guaranteed 1-week pitr window.
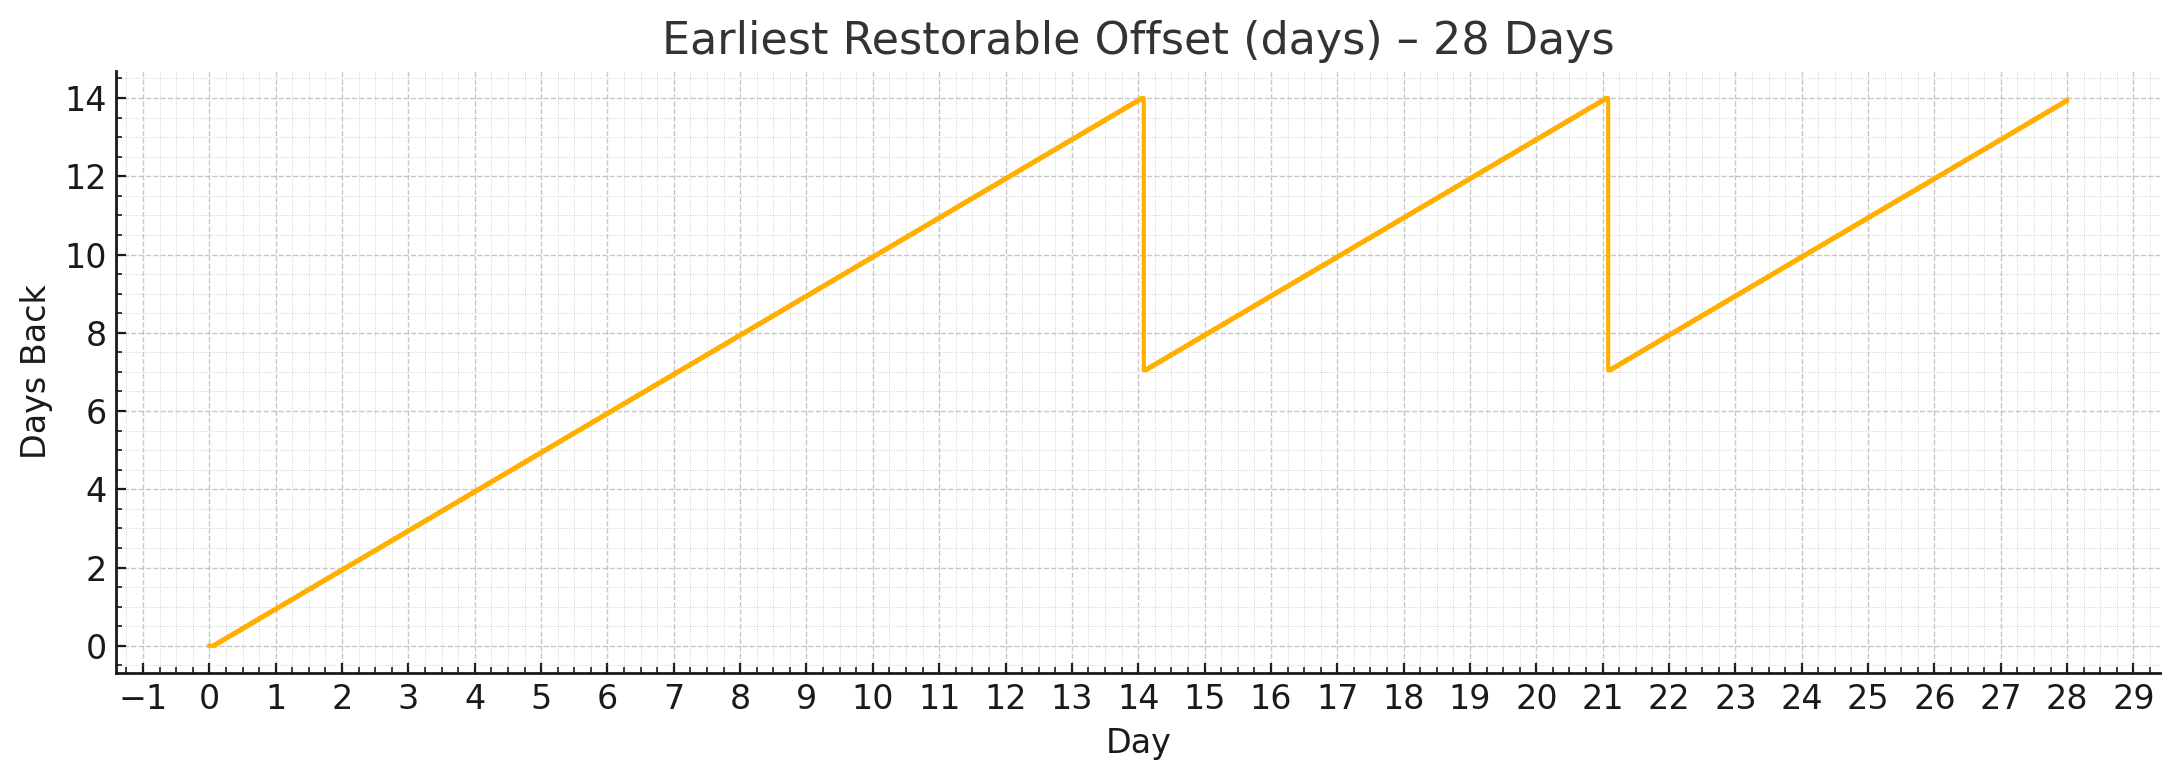
Let’s assume your database size is 100GB, and 10GB writes per day, and your backup size will be like:
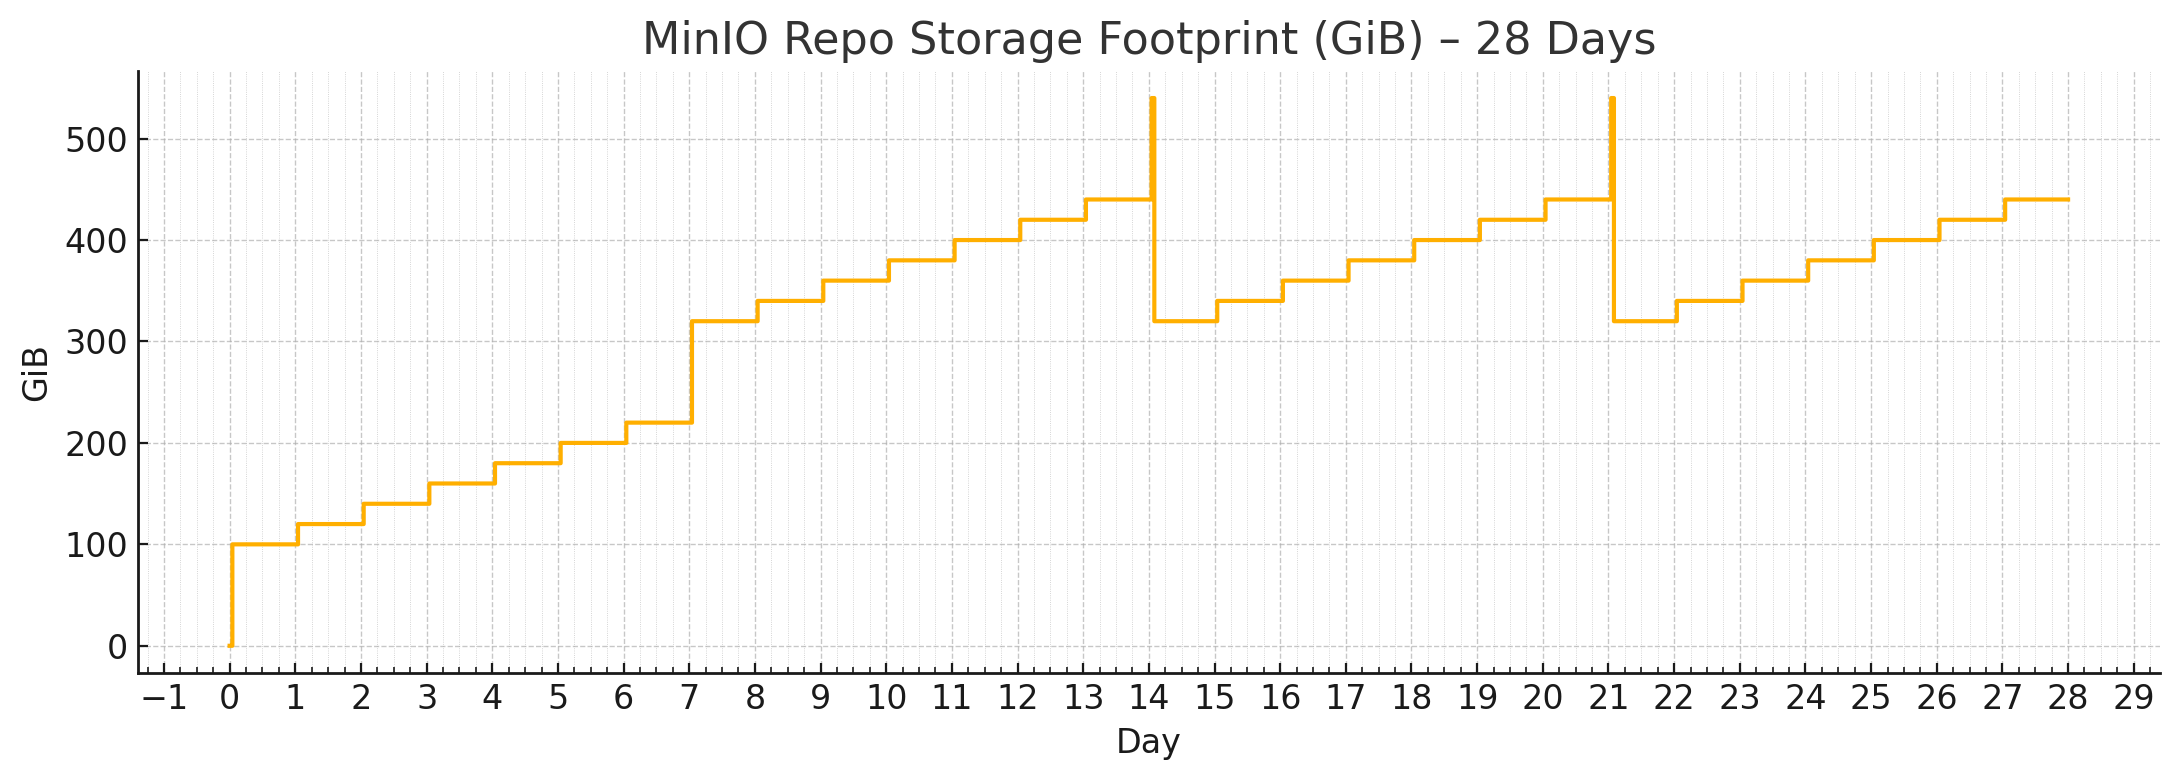
By default, Pigsty has two default backup repo definition: the local and minio backup repo.
local: The default, use the local /pg/backup dir (Softlink point to pg_fs_backup: /data/backups)minio: Use the SNSD 1-node MinIO cluster (Supported by pigsty, but not enabled by default)If you database cluster is created with pgbackrest_enable set to true, the backup will be enabled automatically.
If it created with the false value, you can enable the pgbackrest component with:
Pigsty will remove pgbackrest backup stanza when removing the primary instance (pg_role = primary).
Use the pg_backup subtask to remove the backup only, and use the pg_rm_backup arg to keep backups.
If your backup repo is locked, (e.g., S3 / MinIO has a lock option), this operation will fail.
Removing backup may lead to permanent data loss, it’s a dangerous operation, do with extreme caution.
This command will list all backups in the pgbackrest repository (shared by all clusters)
Pigsty has a built-in script /pg/bin/pg-backup which wraps the pgbackrest backup command.
Pigsty has an alternative backup script /pg/bin/pg-basebackup which does not rely on pgbackrest, and gives you a physical copy of the database cluster.
The default backup dir is /pg/backup.
Backup are compressed with lz4, You can unzip and extract the tarball with the following command:
You can also use the pg_dump command to perform a logical backup.
Logical backups cannot be used for PITR (Point In Time Recovery), but they are useful for migrating data between different major versions, or implement flexible data export logic.
Now let’s say you have an existing cluster pg-meta, and want to FORK it as pg-meta2:
You’ll need to create the new pg-meta2 cluster fork, then run pitr on it.
You can use the pre-configured pgbackrest to perform Point-in-Time Recovery (PITR) in Pigsty.
pg-pitr hint script, do it manually, more flexible with more complexity.pgsql-pitr.yml playbook, automatic, but less flexible and more error-prone.If you are very convenient with your configuration, you can use the fully automatic playbook, otherwise, consider do it step by step manually
If you want to roll back the pg-meta cluster to the previous timepoint, adding the pg_pitr:
Then run the pgsql-pitr.yml playbook, it will roll back the pg-meta cluster to the specified timepoint.
The archive_mode will be disabled on recovered cluster to prevent unwanted WAL writes.
If the recovered database status is ok, you can enable the archive_mode and make a full backup.
You can specify different types of recovery targets in pg_pitr, but they are mutually exclusive:
time: which time point to restore?name: restore to a named restore point (created by pg_create_restore_point)xid: restore to a specific transaction ID (TXID/XID)lsn: restore to a specific LSN (Log Sequence Number) pointThe recovery type will be set accordingly if any of the above parameters is specified,
otherwise it will be set to latest (the end of the WAL archive stream).
The special immediate type can be used to instruct pgbackrest to minimize the recovery time by stop at the first consistent point.
The most frequently used target is the time point; you can specify the time point to restore to:
Time should be a valid PostgreSQL TIMESTAMP, YYYY-MM-DD HH:MM:SS+TZ is recommended.
You can create a named restore point with pg_create_restore_point:
And use that named restore point in PITR:
If you have a transaction that accidentally deleted some data, the best way to recover is to restore the database to the state before that transaction.
You can find the exact transaction id from monitoring dashboard, or find it from TXID from the CSVLOG.
The target parameter is “inclusive” by default, which means the recovery will include the target point.
The exclusive flag will exclude that exact target, like the xid 24999 will be the last transaction being replayed
This only applies to time, xid, lsn recovery targets, check recovery_target_inclusive for details.
PostgreSQL uses the LSN (Log Sequence Number) to identify the position of a WAL record. You can find it everywhere, like the PG LSN panel from Pigsty dashboards.
To restore to an exact point in the WAL stream, you may also specify the timeline parameter (default to latest)
cluster: which cluster to restore? the current pg_cluster will be used by default, you can use any other cluster in the same pgbackrest reporepo: overwrite the backup repo, use the same format in pgbackrest_reposet: the latest backup set is used by default, but you can specify a specific pgbackrest backup by labelPigsty will recover from the pgbackrest backup repository, if you are using a centralized backup repo (like MinIO/S3), you can specify another “stanza” (another cluster’s backup directory) to restore from.
The above configuration will mark the PITR procedure to use the pg-meta stanza.
You can also pass the pg_pitr parameter via CLI args:
You can also use these targets when pitr from another cluster:
This approach is semi-automatic, you will participate in the PITR process to make key decisions.
For example, this configuration will restore the pg-meta cluster itself to the specified timepoint
Let’s do this one step by step:
There are more options available in the pg_pitr parameter:
You can do PITR with the pgsql-pitr playbook, while in some case, you may want to perform PITR manually.
We’ll illustrate the procedure with the 4-node sandbox cluster with minio backup repo.
Prepare the 4-node sandbox environment with vagrant or terraform, then:
Now operate as the admin user (or dbsu) on the admin node to proceed.
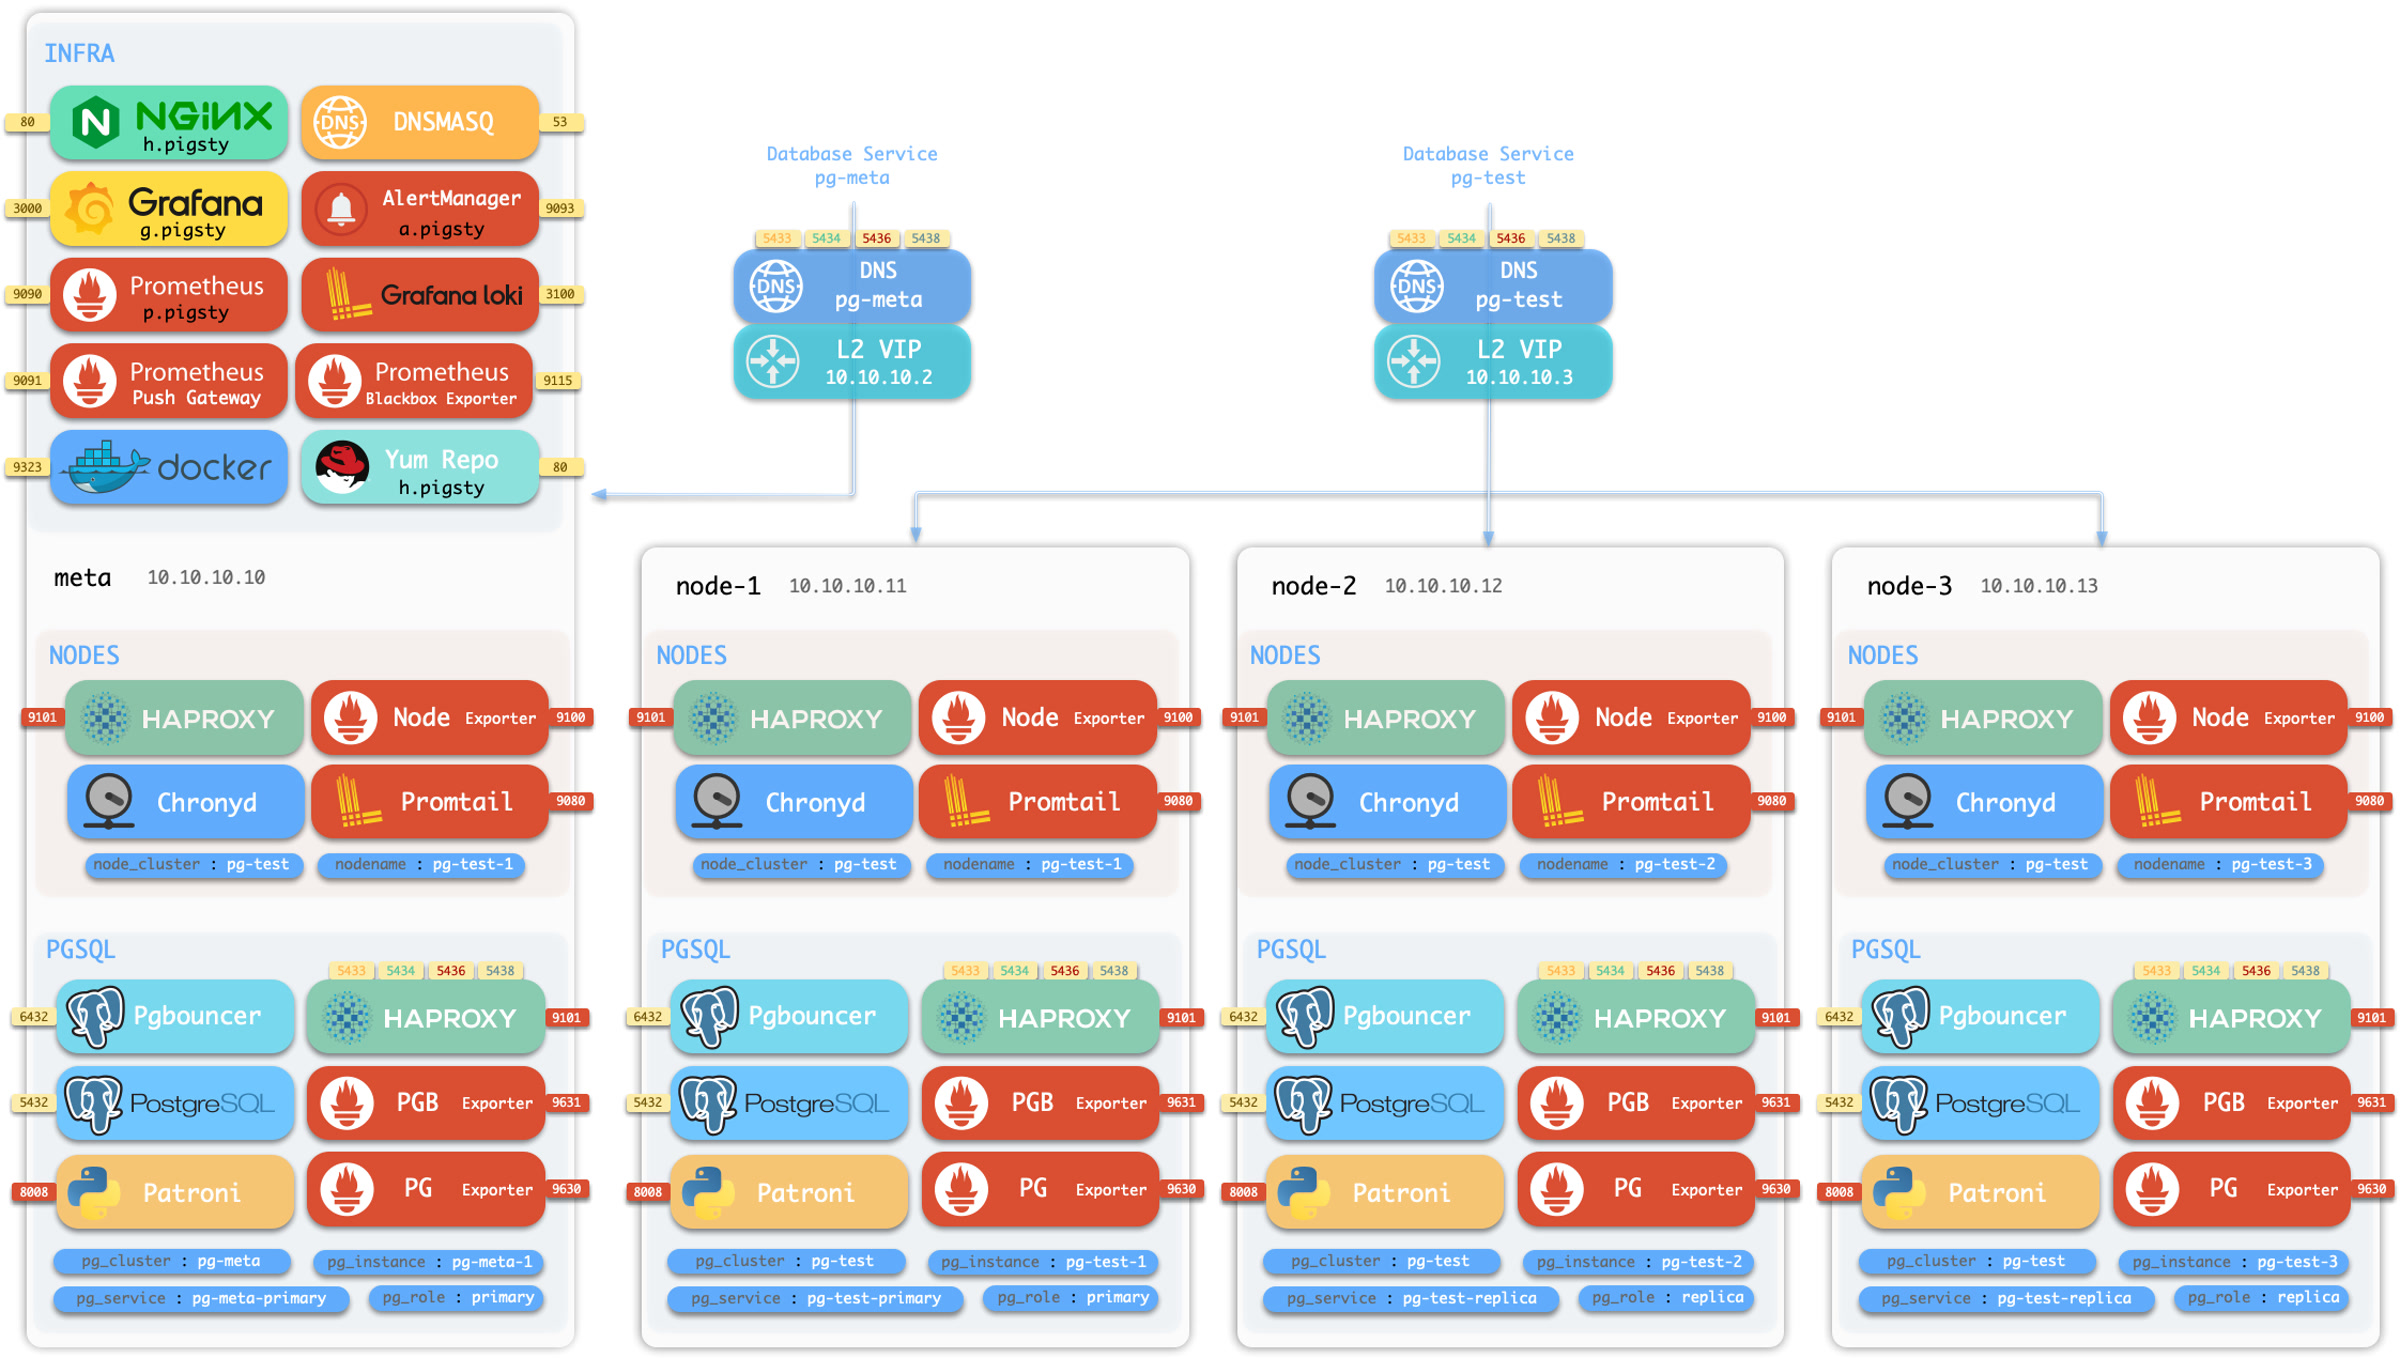
To check the backup status, you’ll need to switch to the postgres user and use the pb command:
The pb is the alias for pgbackrest, with auto scraped stanza name from pgbackrest config.
You can see the initial backup info, which is a full backup created at
The backup finish at 2025-07-13 02:27:33+00, this is the earliest time you can restore to.
Since wal archive is active, you can restore to any point in time after the backup, until the WAL end (now).
You can generate some heartbeat to simulate the workload. the /pg-bin/pg-heartbeat is for this purpose,
It will write a heartbeat timestamp to the monitor.heartbeat table every second.
You can even add more workload to the cluster, let’s use pgbench to generate some random writes:
Now let’s choose a time point to recovery, let’s say 2025-07-13 03:03:03+00, which is a timepoint after the initial backup (and heartbeat).
To perform the manual PITR, use the pg-pitr util:
It will generate the instructions for you to perform the recovery, it usually takes four steps:
Let’s start with the simple 1-node pg-meta cluster as an example, which is simpler.
Make sure the local postgres is not running, then perform the recovery command given in the manual:
We don’t want patroni HA to take over until we are sure the data is correct, so we start postgres manually:
Now you can check the data to see if the it is at the timepoint you want. You can validate it by checking some latest timestamp from business tables, or in this case, check via the heartbeat table.
The timestamp is right before the timepoint we specified! (2025-07-13 03:03:00+00).
If this is not the timepoint you want, you can repeat the restore with a different timepoint.
It’s rapid since recovery is performed in an incremental and parallel way.
It’s ok to retry until you get the right point.
The recovered postgres cluster is in recovery mode, so it will reject any write operations until you promote it to primary.
These recovery params are generated by pgBackRest in the config file.
If data is correct, you can promote it to primary, mark it as the new leader and ready to accept writes.
Once promoted, the database cluster will enter a new timeline (the leader epoch). If there’s any write traffic, it will be written to the new timeline.
Finally, it’s not only the data that need recovery, but also the cluster state, such as:
You postgres is start directly, to restore HA takeover; you’ll have to start the patroni service:
The archive_mode is disabled by pgbackrest during recovery。
If you want the new leader’s writes to be archived in the backup repo, you also need to enable the archive_mode config.
It’s usually a good idea to take a new full backup after PITR, but it’s optional.
If your postgres cluster has replicas, you’ll need to perform the PITR on each replica as well. Or, the simple way is to nuke the replica data directory and restart patroni, which will re-initialize the replica from the primary. We will cover this case in the next multi-node cluster example.
Now let’s play with the 3-node pg-test cluster as an PITR example.
Pigsty supports various PostgreSQL kernels and compatible forks, enabling you to simulate different database systems while leveraging PostgreSQL’s ecosystem. Each kernel provides unique capabilities and compatibility layers.
Vanilla Postgres with 437 Extensions
Native Distributive Extension
SQL Server wire-compatible
Oracle grammar & PL/SQL compatible
MySQL wire-compatibility
Transparent Data Encryption
OLTP-optimized cloud-native storage engine
Aurora-like RAC with china domestic compliance
Backend as a Service, self-hosting Firebase
Mongo Wire-Compatibility over PostgreSQL
Flexible Kernel: Choose the right kernel for your specific use case - whether you need MSSQL compatibility, Oracle features, or horizontal scaling capabilities.
| Kernel | Key Feature | Description |
|---|---|---|
| PostgreSQL | Original Flavor | Vanilla PostgreSQL with 437 extensions |
| Citus | Horizontal Scaling | Distributive PostgreSQL via native extension |
| WiltonDB | SQL Server Migration | SQL Server wire-compatibility |
| IvorySQL | Oracle Migration | Oracle Grammar and PL/SQL compatible |
| OpenHalo | MySQL Migration | MySQL wire-protocol compatibility |
| Percona | Transparent Data Encryption | Percona Distribution with pg_tde |
| FerretDB | MongoDB Migration | MongoDB wire-protocol compatibility |
| OrioleDB | OLTP Optimization | Zheap, No bloat, S3 Storage |
| PolarDB | Aurora flavor RAC | RAC, China domestic compliance |
| Supabase | Backend as Service | BaaS based on PostgreSQL, Firebase alternative |
| Cloudberry (WIP) | MPP DW & Analytics | Massively parallel processing database warehouse |
Citus Native Distributive
Citus transforms PostgreSQL into a distributed database system, enabling horizontal scaling across multiple nodes. Deploy native HA Citus clusters with Pigsty for better throughput and performance.
Planning Required: Proper shard key selection is crucial for optimal performance and avoiding cross-shard queries.
Babelfish SQL Server Wire Compatible
SQL Server Compatible
Beta
Create SQL Server-compatible PostgreSQL clusters with WiltonDB and Babelfish, providing wire protocol-level compatibility with Microsoft SQL Server.
Migration Path: Ideal for organizations looking to reduce licensing costs while maintaining existing SQL Server application compatibility.
Babelfish Oracle Grammar Compatible
Run Oracle-compatible PostgreSQL clusters with the IvorySQL kernel, open-sourced by HighGo, providing Oracle syntax and feature compatibility.
Enterprise Focus: Particularly valuable for enterprises with significant Oracle investments looking for migration paths.
OpenHalo MySQL Wire-Compatible
The OpenHalo kernel provides MySQL-compatible PostgreSQL functionality, accessible using standard MySQL clients and protocols.
Early Stage: Currently experimental - evaluate thoroughly before production use.
OrioleDB OLTP Optimized Cloud Native
A PostgreSQL storage engine optimized for OLTP workloads, eliminating transaction ID wraparound issues and table bloat while supporting cloud storage.
Compatible with PostgreSQL 17, Available on all support platforms.
Early Stage: Currently in Beta - evaluate thoroughly before production use.
PolarDB Aurora Flavor RAC
Replace vanilla PostgreSQL with PolarDB PG, an open-source Aurora-like solution similar to Oracle RAC with shared storage architecture.
Cloud Architecture: Designed for cloud environments with disaggregated compute and storage.
Supabase Backend as a Service
Self-host Supabase with existing managed HA PostgreSQL clusters, launching the stateless components with docker-compose for a complete Firebase alternative.
Full Stack: Provides a complete backend solution with PostgreSQL as the foundation.
Cloudberry MPP Data Warehouse
Install and monitor Greenplum / Cloudberry / YMatrix MPP clusters with Pigsty for large-scale analytical processing and data warehousing.
Enterprise Analytics: Designed for enterprise-scale analytical workloads requiring massive parallel processing capabilities.
PostgreSQL is the most advanced & popular open source database in the world.
Pigsty supports PostgreSQL 13 ~ 18, and provides 437 extensions alone with it.
install Pigsty’s with the pgsql config template.
Most of the config template is use the PostgreSQL kernel by default, such as:
meta : DEFAULT, postgres with core extensions (vector, postgis, timescale)rich : postgres with all extensions installedslim : postgres only without monitor infrafull : the 4-node sandbox for HA demonstrationpgsql : the minimal postgres kernel config example (THIS CONFIG)Nothing special needs to be tuned for vanilla PostgreSQL kernel:
To use a different PostgreSQL major version, you can configure with -v parameter:
If PostgreSQL cluster is already installed, you’ll need to uninstall it before installing the new version
To use PostgreSQL beta version (19 not released), you’ll also need to add the beta repo to your node_repo_modules
(or repo_modules if you are building a local repo)
The configure will do that for you if you are use the -v 19 argument:
Beware Pigsty is not build extensions for PostgreSQL 19 yet, so only those existing extensions in the PGDG repo are currently available. We will start building them after the PostgreSQL 19 is released.
To setup a multi-node PostgreSQL cluster, you can check the PGSQL: Configure for details:
This is the example 3-node pg-test cluster in the full config template:
Citus is a PostgreSQL extension that transforms PostgreSQL into a distributed database, enabling horizontal scaling across multiple nodes to handle large amounts of data and queries.
Since Patroni v3.0, native support for Citus high availability has been provided, simplifying the setup of Citus clusters. Pigsty also offers native support for this.
Pigsty v3.7.0 pins the Citus template to PostgreSQL 17; Citus packages are not available for PostgreSQL 18 in this release.
Pigsty natively supports Citus. Refer to conf/citus.yml.
This example uses a four-node sandbox with a Citus cluster named pg-citus, consisting of a two-node coordinator cluster pg-citus0 and two worker clusters pg-citus1 and pg-citus2.
Compared to a standard PostgreSQL cluster, Citus cluster configuration has some specific requirements. First, ensure that the Citus extension is downloaded, installed, loaded, and enabled. This involves the following four parameters:
repo_packages: Must include the citus extension, or you need to use a PostgreSQL offline package with the Citus extension.pg_extensions: Must include the citus extension, meaning you need to install the citus extension on each node.pg_libs: Must include the citus extension, and it must be first in the list, but now Patroni will automatically handle this.pg_databases: Define a primary database with the citus extension installed.Additionally, ensure the configuration for the Citus cluster is correct:
pg_mode: Must be set to citus to inform Patroni to use the Citus mode.pg_primary_db: Specify the primary database name, which must have the citus extension (named citus here).pg_shard: Specify a unified name as a prefix for all horizontal shard PG clusters (e.g., pg-citus).pg_group: Specify a shard number, starting from zero for the coordinator cluster and incrementing for worker clusters.pg_cluster: Must match the combination of [pg_shard] and [pg_group].pg_dbsu_password: Set a non-empty plain-text password for proper Citus functionality.pg_parameters: It is recommended to set the citus.node_conninfo parameter, which enforces SSL access and requires node-to-node client certificate verification.Once configured, deploy the Citus cluster just like a regular PostgreSQL cluster using pgsql.yml.
After defining the Citus cluster, use the same playbook pgsql.yml to deploy the Citus cluster:
Any DBSU user (postgres) can use patronictl (alias: pg) to list the status of the Citus cluster:
Each horizontal shard cluster can be treated as a separate PGSQL cluster, managed with the pg (patronictl) command. Note that when using pg to manage the Citus cluster, the --group parameter must be used to specify the cluster shard number:
Citus has a system table called pg_dist_node to record node information, which Patroni automatically maintains.
Additionally, you can view user authentication information (restricted to superusers):
You can then access the Citus cluster with regular business users (e.g., dbuser_citus with DDL permissions):
When using a Citus cluster, we highly recommend reading the Citus Official Documentation to understand its architecture and core concepts.
Key to this is understanding the five types of tables in Citus, their characteristics, and use cases:
On the coordinator node, you can create distributed and reference tables and query them from any data node. Since version 11.2, any Citus database node can act as a coordinator.
We can use pgbench to create some tables, distributing the main table (pgbench_accounts) across the nodes, and using other smaller tables as reference tables:
Run read-write bench:
Production citus deployment usually requires physical replication for both coordinator and each worker cluster.
For example, in simu.yml there’s a 10-node cluster cluster:
We’ll cover a range of advanced topics in subsequent tutorials:
Pigsty allows users to create a Microsoft SQL Server compatible PostgreSQL cluster using Babelfish and WiltonDB!
Babelfish is a PostgreSQL extension, but it works on a slightly modified PostgreSQL kernel Fork, WiltonDB provides compiled kernel binaries and extension binary packages on EL/Ubuntu systems.
Pigsty can replace the native PostgreSQL kernel with WiltonDB, providing an out-of-the-box MSSQL compatible cluster along with all the supported by common PostgreSQL clusters, such as HA, PITR, IaC, monitoring, etc.
WiltonDB is very similar to PostgreSQL 15, but it can not use vanilla PostgreSQL extensions directly. WiltonDB has several re-compiled extensions such as system_stats, pg_hint_plan and tds_fdw.
The cluster will listen on the default PostgreSQL port and the default MSSQL 1433 port, providing MSSQL services via the TDS WireProtocol on this port. You can connect to the MSSQL service provided by Pigsty using any MSSQL client, such as SQL Server Management Studio, or using the sqlcmd command-line tool.
install Pigsty’s with the mssql config template.
For production deployments, make sure to modify the password parameters in the pigsty.yml config before running the install playbook.
When installing and deploying the MSSQL module, please pay special attention to the following points:
pg_version: 15.wiltondb binary is installed by default in the /usr/bin/ directory, while on Ubuntu systems, it is installed in the /usr/lib/postgresql/15/bin/ directory, which is different from the official PostgreSQL binary location.md5 instead of scram-sha-256. Therefore, you need to override Pigsty’s default HBA rule set and insert the md5 authentication rule required by SQL Server before the dbrole_readonly wildcard authentication rule.mssql and dbuser_myssql. If you change this, you should also modify the user in files/mssql.sql.babelfishpg_tds needs to be enabled in shared_preload_libraries.1433. You can override Pigsty’s default service definitions to redirect the primary and replica services to port 1433 instead of the 5432 / 6432ports.The following parameters need to be configured for the MSSQL database cluster:
You can define business databases & users in the pg_databases and pg_users section:
You can use any SQL Server compatible client tool to access this database cluster.
Microsoft provides sqlcmd as the official command-line tool.
Besides, they have a go version cli tool: go-sqlcmd
Install go-sqlcmd:
Get started with go-sqlcmd
You can route service traffic to MSSQL 1433 port instead of 5433/5434:
If you have the Internet access, you can add the WiltonDB repository to the node and install it as a node package directly:
Install wiltondb with the following command:
It’s OK to install vanilla PostgreSQL and WiltonDB on the same node, but you can only run one of them at a time, and this is not recommended for production environments.
Most of the PGSQL module’s extensions (non-SQL class) cannot be used directly on the WiltonDB core of the MSSQL module and need to be recompiled.
WiltonDB currently comes with the following extension plugins:
| Name | Version | Comment |
|---|---|---|
| dblink | 1.2 | connect to other PostgreSQL databases from within a database |
| adminpack | 2.1 | administrative functions for PostgreSQL |
| dict_int | 1.0 | text search dictionary template for integers |
| intagg | 1.1 | integer aggregator and enumerator (obsolete) |
| dict_xsyn | 1.0 | text search dictionary template for extended synonym processing |
| amcheck | 1.3 | functions for verifying relation integrity |
| autoinc | 1.0 | functions for autoincrementing fields |
| bloom | 1.0 | bloom access method - signature file based index |
| fuzzystrmatch | 1.1 | determine similarities and distance between strings |
| intarray | 1.5 | functions, operators, and index support for 1-D arrays of integers |
| btree_gin | 1.3 | support for indexing common datatypes in GIN |
| btree_gist | 1.7 | support for indexing common datatypes in GiST |
| hstore | 1.8 | data type for storing sets of (key, value) pairs |
| hstore_plperl | 1.0 | transform between hstore and plperl |
| isn | 1.2 | data types for international product numbering standards |
| hstore_plperlu | 1.0 | transform between hstore and plperlu |
| jsonb_plperl | 1.0 | transform between jsonb and plperl |
| citext | 1.6 | data type for case-insensitive character strings |
| jsonb_plperlu | 1.0 | transform between jsonb and plperlu |
| jsonb_plpython3u | 1.0 | transform between jsonb and plpython3u |
| cube | 1.5 | data type for multidimensional cubes |
| hstore_plpython3u | 1.0 | transform between hstore and plpython3u |
| earthdistance | 1.1 | calculate great-circle distances on the surface of the Earth |
| lo | 1.1 | Large Object maintenance |
| file_fdw | 1.0 | foreign-data wrapper for flat file access |
| insert_username | 1.0 | functions for tracking who changed a table |
| ltree | 1.2 | data type for hierarchical tree-like structures |
| ltree_plpython3u | 1.0 | transform between ltree and plpython3u |
| pg_walinspect | 1.0 | functions to inspect contents of PostgreSQL Write-Ahead Log |
| moddatetime | 1.0 | functions for tracking last modification time |
| old_snapshot | 1.0 | utilities in support of old_snapshot_threshold |
| pgcrypto | 1.3 | cryptographic functions |
| pgrowlocks | 1.2 | show row-level locking information |
| pageinspect | 1.11 | inspect the contents of database pages at a low level |
| pg_surgery | 1.0 | extension to perform surgery on a damaged relation |
| seg | 1.4 | data type for representing line segments or floating-point intervals |
| pgstattuple | 1.5 | show tuple-level statistics |
| pg_buffercache | 1.3 | examine the shared buffer cache |
| pg_freespacemap | 1.2 | examine the free space map (FSM) |
| postgres_fdw | 1.1 | foreign-data wrapper for remote PostgreSQL servers |
| pg_prewarm | 1.2 | prewarm relation data |
| tcn | 1.0 | Triggered change notifications |
| pg_trgm | 1.6 | text similarity measurement and index searching based on trigrams |
| xml2 | 1.1 | XPath querying and XSLT |
| refint | 1.0 | functions for implementing referential integrity (obsolete) |
| pg_visibility | 1.2 | examine the visibility map (VM) and page-level visibility info |
| pg_stat_statements | 1.10 | track planning and execution statistics of all SQL statements executed |
| sslinfo | 1.2 | information about SSL certificates |
| tablefunc | 1.0 | functions that manipulate whole tables, including crosstab |
| tsm_system_rows | 1.0 | TABLESAMPLE method which accepts number of rows as a limit |
| tsm_system_time | 1.0 | TABLESAMPLE method which accepts time in milliseconds as a limit |
| unaccent | 1.1 | text search dictionary that removes accents |
| uuid-ossp | 1.1 | generate universally unique identifiers (UUIDs) |
| plpgsql | 1.0 | PL/pgSQL procedural language |
| babelfishpg_money | 1.1.0 | babelfishpg_money |
| system_stats | 2.0 | EnterpriseDB system statistics for PostgreSQL |
| tds_fdw | 2.0.3 | Foreign data wrapper for querying a TDS database (Sybase or Microsoft SQL Server) |
| babelfishpg_common | 3.3.3 | Transact SQL Datatype Support |
| babelfishpg_tds | 1.0.0 | TDS protocol extension |
| pg_hint_plan | 1.5.1 | |
| babelfishpg_tsql | 3.3.1 | Transact SQL compatibility |
IvorySQL is an open-source “Oracle-compatible” PostgreSQL kernel, developed by HighGo, licensed under Apache 2.0.
The Oracle compatibility here refers to compatibility at the PL/SQL, syntax, built-in functions, data types, system views, MERGE, and GUC parameter levels. It’s not a wire protocol compatibility like Babelfish, openHalo, or FerretDB that allows using the original client drivers. Users still need to use PostgreSQL client tools to access IvorySQL, but can use Oracle-compatible syntax.
Currently, IvorySQL’s latest version 5.0 maintains compatibility with PostgreSQL’s latest minor version 18.0, and provides binary RPM/DEB packages for mainstream Linux distributions. Pigsty offers the option to replace the native PostgreSQL with the IvorySQL kernel in PG RDS.
Use the standard procedure to install Pigsty with the ivory configuration template:
For production deployments, you should edit the auto-generated pigsty.yml configuration file to modify parameters like passwords before executing ./install.yml for deployment.
The latest IvorySQL 5.0 is equivalent to PostgreSQL 18.0 Any client tool compatible with PostgreSQL’s wire protocol can access IvorySQL clusters.
By default, you can use a PostgreSQL client to access through the alternative 1521 port, which enables Oracle compatibility mode by default.
To use the IvorySQL kernel in Pigsty, modify the following four configuration parameters:
pg_mode: Use ivory compatibility moderepo_extra_packages: Download ivorysql packagespg_packages: Install ivorysql packagespg_libs: Load Oracle syntax compatibility extensionsIt’s that simple — just add these four lines to the global variables in the configuration file, and Pigsty will replace the native PostgreSQL kernel with IvorySQL:
IvorySQL also provides a series of new GUC parameters that can be specified in pg_parameters.
Most of the PGSQL modules’ extension (non-SQL classes) cannot be used directly on the IvorySQL kernel. If you need to use them, you need to recompile and install from source code for the new kernel.
pigsty-infra repository, not in pigsty-pgsql or pigsty-ivory repositories.Percona Postgres is a patched Postgres kernel with pg_tde (Transparent Data Encryption) extension.
It is compatible with PostgreSQL 18.1, and available on all supported platforms in Pigsty.
install Pigsty’s with the pgtde config template.
The following parameters need to be tuned to deploy a percona cluster:
Percona Postgres has 80 available extensions, including pg_tde, pgvector, postgis, pgaudit, set_user, pg_stat_monitor,….
| name | version | comment |
|---|---|---|
| hstore_plperlu | 1.0 | transform between hstore and plperlu |
| jsonb_plperl | 1.0 | transform between jsonb and plperl |
| intagg | 1.1 | integer aggregator and enumerator (obsolete) |
| pltcl | 1.0 | PL/Tcl procedural language |
| isn | 1.3 | data types for international product numbering standards |
| pgstattuple | 1.5 | show tuple-level statistics |
| postgis_topology-3 | 3.5.4 | PostGIS topology spatial types and functions |
| postgis_raster | 3.5.4 | PostGIS raster types and functions |
| tsm_system_rows | 1.0 | TABLESAMPLE method which accepts number of rows as a limit |
| lo | 1.2 | Large Object maintenance |
| hstore_plperl | 1.0 | transform between hstore and plperl |
| ltree | 1.3 | data type for hierarchical tree-like structures |
| postgis_raster-3 | 3.5.4 | PostGIS raster types and functions |
| postgis_topology | 3.5.4 | PostGIS topology spatial types and functions |
| pgrowlocks | 1.2 | show row-level locking information |
| address_standardizer_data_us-3 | 3.5.4 | Address Standardizer US dataset example |
| uuid-ossp | 1.1 | generate universally unique identifiers (UUIDs) |
| postgis-3 | 3.5.4 | PostGIS geometry and geography spatial types and functions |
| hstore_plpython3u | 1.0 | transform between hstore and plpython3u |
| postgis | 3.5.4 | PostGIS geometry and geography spatial types and functions |
| set_user | 4.2.0 | similar to SET ROLE but with added logging |
| postgis_tiger_geocoder-3 | 3.5.4 | PostGIS tiger geocoder and reverse geocoder |
| jsonb_plperlu | 1.0 | transform between jsonb and plperlu |
| pg_surgery | 1.0 | extension to perform surgery on a damaged relation |
| xml2 | 1.2 | XPath querying and XSLT |
| pg_stat_monitor | 2.3 | The pg_stat_monitor is a PostgreSQL Query Performance Monitoring tool, based on PostgreSQL contrib module pg_stat_statements. pg_stat_monitor provides aggregated statistics, client information, plan details including plan, and histogram information. |
| pg_tde | 2.1 | pg_tde access method |
| plpgsql | 1.0 | PL/pgSQL procedural language |
| address_standardizer-3 | 3.5.4 | Used to parse an address into constituent elements. Generally used to support geocoding address normalization step. |
| tablefunc | 1.0 | functions that manipulate whole tables, including crosstab |
| hstore | 1.8 | data type for storing sets of (key, value) pairs |
| vector | 0.8.1 | vector data type and ivfflat and hnsw access methods |
| postgis_tiger_geocoder | 3.5.4 | PostGIS tiger geocoder and reverse geocoder |
| dblink | 1.2 | connect to other PostgreSQL databases from within a database |
| pltclu | 1.0 | PL/TclU untrusted procedural language |
| pg_trgm | 1.6 | text similarity measurement and index searching based on trigrams |
| sslinfo | 1.2 | information about SSL certificates |
| pg_stat_statements | 1.12 | track planning and execution statistics of all SQL statements executed |
| bool_plperlu | 1.0 | transform between bool and plperlu |
| cube | 1.5 | data type for multidimensional cubes |
| ltree_plpython3u | 1.0 | transform between ltree and plpython3u |
| amcheck | 1.5 | functions for verifying relation integrity |
| postgis_sfcgal | 3.5.4 | PostGIS SFCGAL functions |
| plpython3u | 1.0 | PL/Python3U untrusted procedural language |
| tsm_system_time | 1.0 | TABLESAMPLE method which accepts time in milliseconds as a limit |
| intarray | 1.5 | functions, operators, and index support for 1-D arrays of integers |
| btree_gist | 1.8 | support for indexing common datatypes in GiST |
| plperlu | 1.0 | PL/PerlU untrusted procedural language |
| fuzzystrmatch | 1.2 | determine similarities and distance between strings |
| bool_plperl | 1.0 | transform between bool and plperl |
| btree_gin | 1.3 | support for indexing common datatypes in GIN |
| pg_prewarm | 1.2 | prewarm relation data |
| pg_repack | 1.5.3 | Reorganize tables in PostgreSQL databases with minimal locks |
| citext | 1.8 | data type for case-insensitive character strings |
| pgcrypto | 1.4 | cryptographic functions |
| moddatetime | 1.0 | functions for tracking last modification time |
| plperl | 1.0 | PL/Perl procedural language |
| seg | 1.4 | data type for representing line segments or floating-point intervals |
| earthdistance | 1.2 | calculate great-circle distances on the surface of the Earth |
| unaccent | 1.1 | text search dictionary that removes accents |
| postgres_fdw | 1.2 | foreign-data wrapper for remote PostgreSQL servers |
| pg_logicalinspect | 1.0 | functions to inspect logical decoding components |
| tcn | 1.0 | Triggered change notifications |
| bloom | 1.0 | bloom access method - signature file based index |
| dict_int | 1.0 | text search dictionary template for integers |
| autoinc | 1.0 | functions for autoincrementing fields |
| address_standardizer_data_us | 3.5.4 | Address Standardizer US dataset example |
| postgis_sfcgal-3 | 3.5.4 | PostGIS SFCGAL functions |
| jsonb_plpython3u | 1.0 | transform between jsonb and plpython3u |
| file_fdw | 1.0 | foreign-data wrapper for flat file access |
| pgaudit | 18.0 | provides auditing functionality |
| dict_xsyn | 1.0 | text search dictionary template for extended synonym processing |
| pg_walinspect | 1.1 | functions to inspect contents of PostgreSQL Write-Ahead Log |
| pg_buffercache | 1.6 | examine the shared buffer cache |
| refint | 1.0 | functions for implementing referential integrity (obsolete) |
| pg_freespacemap | 1.3 | examine the free space map (FSM) |
| insert_username | 1.0 | functions for tracking who changed a table |
| address_standardizer | 3.5.4 | Used to parse an address into constituent elements. Generally used to support geocoding address normalization step. |
| pg_visibility | 1.2 | examine the visibility map (VM) and page-level visibility info |
| pageinspect | 1.13 | inspect the contents of database pages at a low level |
PolarDB is an aurora RAC flavor “cloud native” database system developed & open-sourced by Aliyun.
The latest version is v15.15.5.0, compatible with PostgreSQL 15, and available on all linux distributions supported by Pigsty.
install Pigsty’s with the polar config template.
The following parameters need to be tuned to deploy a PolarDB cluster:
PolarDB for PostgreSQL is essentially equivalent to PostgreSQL 15, and any client tools compatible with the PostgreSQL wire protocol can access the PolarDB cluster.
Most of the PGSQL module’s extension (non pure-SQL) cannot be used directly on the PolarDB kernel. If you need to use them, you need to recompile and install from source code for the new kernel.
Currently, the PolarDB kernel comes with the following 61 extension plugins. In addition to Contrib extensions, the additional extensions provided include:
| name | Version | comment |
|---|---|---|
| adminpack | 2.1 | administrative functions for PostgreSQL |
| amcheck | 1.3 | functions for verifying relation integrity |
| autoinc | 1.0 | functions for autoincrementing fields |
| bloom | 1.0 | bloom access method - signature file based index |
| bool_plperl | 1.0 | transform between bool and plperl |
| bool_plperlu | 1.0 | transform between bool and plperlu |
| btree_gin | 1.3 | support for indexing common datatypes in GIN |
| btree_gist | 1.7 | support for indexing common datatypes in GiST |
| citext | 1.6 | data type for case-insensitive character strings |
| cube | 1.5 | data type for multidimensional cubes |
| dblink | 1.2 | connect to other PostgreSQL databases from within a database |
| dict_int | 1.0 | text search dictionary template for integers |
| dict_xsyn | 1.0 | text search dictionary template for extended synonym processing |
| earthdistance | 1.1 | calculate great-circle distances on the surface of the Earth |
| file_fdw | 1.0 | foreign-data wrapper for flat file access |
| fuzzystrmatch | 1.1 | determine similarities and distance between strings |
| hll | 2.18 | type for storing hyperloglog data |
| hstore | 1.8 | data type for storing sets of (key, value) pairs |
| hstore_plperl | 1.0 | transform between hstore and plperl |
| hstore_plperlu | 1.0 | transform between hstore and plperlu |
| hstore_plpython3u | 1.0 | transform between hstore and plpython3u |
| hypopg | 1.3.1 | Hypothetical indexes for PostgreSQL |
| insert_username | 1.0 | functions for tracking who changed a table |
| intagg | 1.1 | integer aggregator and enumerator (obsolete) |
| intarray | 1.5 | functions, operators, and index support for 1-D arrays of integers |
| isn | 1.2 | data types for international product numbering standards |
| jsonb_plperl | 1.0 | transform between jsonb and plperl |
| jsonb_plperlu | 1.0 | transform between jsonb and plperlu |
| jsonb_plpython3u | 1.0 | transform between jsonb and plpython3u |
| lo | 1.1 | Large Object maintenance |
| log_fdw | 1.4 | foreign-data wrapper for Postgres log file access |
| ltree | 1.2 | data type for hierarchical tree-like structures |
| ltree_plpython3u | 1.0 | transform between ltree and plpython3u |
| moddatetime | 1.0 | functions for tracking last modification time |
| old_snapshot | 1.0 | utilities in support of old_snapshot_threshold |
| pageinspect | 1.11 | inspect the contents of database pages at a low level |
| pase | 0.0.1 | ant ai similarity search |
| pg_bigm | 1.2 | text similarity measurement and index searching based on bigrams |
| pg_buffercache | 1.4 | examine the shared buffer cache |
| pg_freespacemap | 1.2 | examine the free space map (FSM) |
| pg_jieba | 1.1.0 | a parser for full-text search of Chinese |
| pg_prewarm | 1.2 | prewarm relation data |
| pg_repack | 1.5.1-1 | Reorganize tables in PostgreSQL databases with minimal locks |
| pg_stat_statements | 1.10 | track planning and execution statistics of all SQL statements executed |
| pg_surgery | 1.0 | extension to perform surgery on a damaged relation |
| pg_trgm | 1.6 | text similarity measurement and index searching based on trigrams |
| pg_visibility | 1.2 | examine the visibility map (VM) and page-level visibility info |
| pg_walinspect | 1.0 | functions to inspect contents of PostgreSQL Write-Ahead Log |
| pgcrypto | 1.3 | cryptographic functions |
| pgrowlocks | 1.2 | show row-level locking information |
| pgstattuple | 1.5 | show tuple-level statistics |
| plperl | 1.0 | PL/Perl procedural language |
| plperlu | 1.0 | PL/PerlU untrusted procedural language |
| plpgsql | 1.0 | PL/pgSQL procedural language |
| plpython3u | 1.0 | PL/Python3U untrusted procedural language |
| pltcl | 1.0 | PL/Tcl procedural language |
| pltclu | 1.0 | PL/TclU untrusted procedural language |
| polar_audit | 1.0 | provides auditing functionality |
| polar_feature_utils | 1.0 | PolarDB feature utilization |
| polar_io_stat | 1.0 | polar io stat in multi dimension |
| polar_login_history | 1.0 | record user login information |
| polar_masking | 1.0.0 | provides data masking for polardb |
| polar_monitor | 1.0 | monitor functions for PolarDB |
| polar_monitor_preload | 1.0 | examine the polardb information |
| polar_parameter_manager | 1.1 | Extension to select parameters for manger. |
| polar_password_policy | 1.0 | create password policies and check user passwords based on the policies |
| polar_proxy_utils | 1.0 | Extension to provide operations about proxy. |
| polar_resource_manager | 1.0 | a background process that forcibly frees user session process memory |
| polar_smgrperf | 1.0 | smgr perf test extension |
| polar_sql_mapping | 1.0 | Record error sqls and mapping them to correct one |
| polar_stat_env | 1.0 | env stat functions for PolarDB |
| polar_vfs | 1.0 | polar virtual file system for different storage |
| polar_worker | 1.0 | polar_worker |
| postgres_fdw | 1.1 | foreign-data wrapper for remote PostgreSQL servers |
| refint | 1.0 | functions for implementing referential integrity (obsolete) |
| roaringbitmap | 0.5 | support for Roaring Bitmaps |
| seg | 1.4 | data type for representing line segments or floating-point intervals |
| sslinfo | 1.2 | information about SSL certificates |
| tablefunc | 1.0 | functions that manipulate whole tables, including crosstab |
| tcn | 1.0 | Triggered change notifications |
| tsm_system_rows | 1.0 | TABLESAMPLE method which accepts number of rows as a limit |
| tsm_system_time | 1.0 | TABLESAMPLE method which accepts time in milliseconds as a limit |
| unaccent | 1.1 | text search dictionary that removes accents |
| uuid-ossp | 1.1 | generate universally unique identifiers (UUIDs) |
| vector | 0.6.2 | vector data type and ivfflat and hnsw access methods |
| xml2 | 1.1 | XPath querying and XSLT |
There’s 2nd fork of PolarDB, which is PolarDB for Oracle, which is not open source.
Pigsty Pro has support for Running PolarDB for Oracle as RDS.
OrioleDB is a PostgreSQL storage engine extension that claims to deliver 4x OLTP performance without the xid wraparound & table bloat, and “cloud native” (data on s3) capabilities.
The latest version of OrioleDB is based on a Patched PostgreSQL 17.0 with an additional extension
You can run OrioleDB as RDS with pigsty, it is compatible with PG 17 and available on all supported Linux platforms. The latest version is beta12 over patchset 17_11.
Follow the Pigsty standard installation and use the oriole config template.
For production deployments, make sure to modify the password parameters in the pigsty.yml config before running the install playbook.
To use OrioleDB, you need to install the orioledb_17 and oriolepg_17 packages (currently only available as RPMs).
Initialize TPC-B-like tables with 100 warehouses using pgbench:
Next, you can rebuild these tables using the orioledb storage engine and observe the performance differences:
OpenHalo is an open-source PostgreSQL kernel that provides MySQL wire protocol compatibility.
OpenHalo is based on PostgreSQL 14.10 kernel version and provides wire protocol compatibility with MySQL 5.7.32-log / 8.0 version.
Pigsty provides deployment support for OpenHalo on all supported Linux platforms.
Use Pigsty’s standard installation process with the mysql configuration template.
For production deployment, please ensure to modify the password parameters in the pigsty.yml
configuration file before running the installation playbook.
When accessing MySQL, the actual connection uses the postgres database. Please note that the concept of “database” in MySQL actually corresponds to “Schema” in PostgreSQL. Therefore, use mysql actually uses the mysql Schema within the postgres database.
The usernames and passwords used for MySQL are the same as those in PostgreSQL. You can manage users and permissions using the standard PostgreSQL approach.
OpenHalo provides MySQL wire protocol compatibility, listening on port 3306 by default, allowing direct connections from MySQL clients and drivers.
Pigsty’s conf/mysql configuration installs the mysql client tool by default.
You can access MySQL using the following command:
Currently, OpenHalo officially ensures that Navicat can access this MySQL port normally, but Intellij IDEA’s DataGrip access will result in errors.
The OpenHalo kernel installed by Pigsty is based on the HaloTech-Co-Ltd/openHalo kernel with minor modifications:
halo0root back to postgres1.0. prefix from the default version number, reverting to 14.103306 by defaultPlease note that Pigsty does not provide any warranty for using the OpenHalo kernel. Any issues or requirements encountered while using this kernel should be addressed with the original vendor.
You can deploy and monitor Cloudberry clusters, which is a Greenplum fork.
To define a Greenplum cluster, you need to specify the following parameters:
We are waiting for the official release of Apache Cloudberry 2.0, so do not use it in production now
To install cloudberry, you’ll have to enable the gpsql repo module:
Set pg_mode = gpsql and the extra identity parameters pg_shard and gp_role.
See the maintained self-hosting tutorial: Supabase
Supabase is great, but having your own Supabase is even better. Pigsty helps you build enterprise-grade Supabase on your own servers (physical/virtual machines/cloud servers) with one-click deployment — more extensions, better performance, deeper control, and much more cost-effective.
Pigsty is one of the three 3rd party self-hosting tutorials listed in the official Supabase docs
Prepare a Linux server, follow the Pigsty standard installation process, select the supabase configuration template, and execute the following commands:
After installation, visit port 8000 in your browser to access Supa Studio, username supabase, password pigsty.
Supabase is a BaaS (Backend as Service), an open-source Firebase alternative, and the most popular database + backend solution in the AI Agent era. Supabase wraps PostgreSQL and provides authentication, messaging, edge functions, object storage, and automatically generates REST API and GraphQL API based on PostgreSQL database schemas.
Supabase aims to provide developers with a one-stop backend solution, reducing the complexity of developing and maintaining backend infrastructure. It allows developers to eliminate most backend development work — developers only need to understand database design and frontend to quickly deliver applications! Developers can quickly complete a full application with just frontend development and database schema design using Vibe Coding.
Currently, Supabase is the most popular open-source project in the PostgreSQL open-source ecosystem, with 80,000 stars on GitHub. Supabase also provides “generous” free cloud service quotas for small entrepreneurs — 500 MB of free space, which is sufficient for storing user tables, view counts, and similar data.
Since Supabase cloud service is so attractive, why self-host?
The most intuitive reason is what we mentioned in “Are Cloud Databases an Intelligence Tax?”: when your data/computing scale exceeds the cloud computing applicable spectrum (Supabase: 4C/8G/500MB free storage), costs can easily explode. Moreover, currently, sufficiently reliable local enterprise-grade NVMe SSDs have a three to four order of magnitude advantage in cost-effectiveness compared to cloud storage, and self-hosting can better leverage this advantage.
Another important reason is functionality — Supabase cloud service functionality is limited. Many powerful PostgreSQL extensions cannot be provided as cloud services due to multi-tenant security challenges and licensing issues. Therefore, although extensions are PostgreSQL’s core feature, only 64 extensions are available on Supabase cloud service. Self-built Supabase with Pigsty provides up to 437 ready-to-use PostgreSQL extensions.
Additionally, autonomy and avoiding vendor lock-in are important reasons for self-hosting — although Supabase aims to provide an open-source alternative to Google Firebase without vendor lock-in, the threshold for self-building enterprise-grade Supabase to high standards is actually quite high. Supabase includes a series of PostgreSQL extension plugins developed and maintained by them, and plans to replace the native PostgreSQL kernel with the acquired OrioleDB, but these kernels and extensions are not provided in the official PGDG repository.
This is actually a form of implicit vendor lock-in, preventing users from self-building using methods other than the supabase/postgres Docker image. Pigsty provides an open-source, transparent, and universal solution to solve this problem. We package all 10 missing extensions developed and used by Supabase into ready-to-use RPM/DEB packages, ensuring they are available on all mainstream Linux operating system distributions:
| Extension | Description |
|---|---|
pg_graphql |
Provides GraphQL support within PostgreSQL (RUST), Rust extension, provided by PIGSTY |
pg_jsonschema |
Provides JSON Schema validation capability, Rust extension, provided by PIGSTY |
wrappers |
Supabase’s external data source wrapper bundle, Rust extension, provided by PIGSTY |
index_advisor |
Query index advisor, SQL extension, provided by PIGSTY |
pg_net |
Extension for asynchronous non-blocking HTTP/HTTPS requests with SQL (supabase), C extension, provided by PIGSTY |
vault |
Extension for storing encrypted credentials in Vault (supabase), C extension, provided by PIGSTY |
pgjwt |
PostgreSQL implementation of JSON Web Token API (supabase), SQL extension, provided by PIGSTY |
pgsodium |
Table data encryption storage TDE, extension, provided by PIGSTY |
supautils |
Used to ensure database cluster security in cloud environments, C extension, provided by PIGSTY |
pg_plan_filter |
Filter and block specific query statements using execution plan costs, C extension, provided by PIGSTY |
Meanwhile, we install most extensions by default in Supabase self-hosting deployment. You can refer to the available extension list to enable them as needed.
Additionally, Pigsty handles the automatic setup of underlying high availability PostgreSQL database clusters, high availability MinIO object storage clusters, and even Docker container infrastructure deployment and Nginx reverse proxy, domain configuration and HTTPS certificate issuance. You can deploy any number of stateless Supabase container clusters using Docker Compose and store state in external Pigsty self-hosted database services.
In this self-hosting deployment architecture, you gain the freedom to use different kernels (PostgreSQL 15-18, OrioleDB), the freedom to install 437 extensions, the freedom to scale Supabase/Postgres/MinIO, the freedom from database operational chores, and the freedom from vendor lock-in to run locally indefinitely. Compared to the cost of using cloud services, the price is just preparing servers and typing a few more commands.
Let’s start with single-node Supabase deployment. We’ll introduce multi-node high availability deployment methods later.
Prepare a fresh Linux server, use the supabase configuration template provided by Pigsty to execute the standard installation process,
then additionally run docker.yml and app.yml to deploy the stateless Supabase containers (default ports 8000/8433).
Before deploying Supabase, please modify the parameters (domain and passwords) in the automatically generated pigsty.yml configuration file according to your actual situation.
If it’s just local development testing, you can skip this for now. We’ll introduce how to further customize through configuration file modifications later.
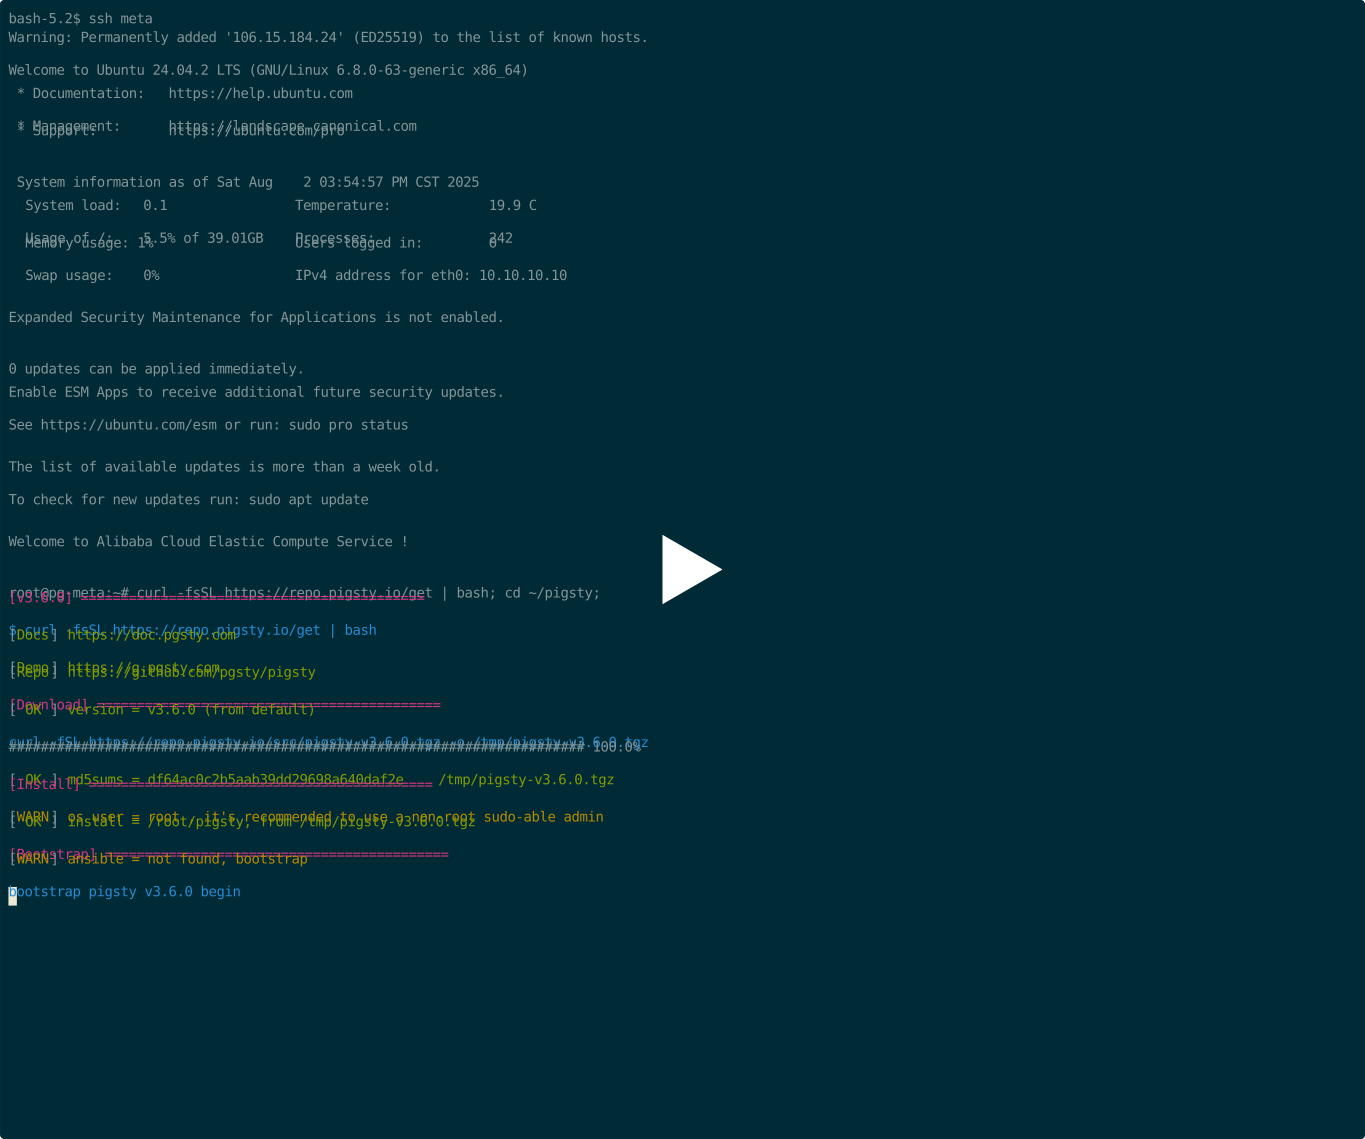
If configured correctly, after about ten minutes, you can access the Supabase Studio graphical management interface locally via http://<your_ip_address>:8000.
The default username and password are: supabase and pigsty.
In mainland China, Pigsty uses DockerHub mirror sites provided by 1Panel and 1ms to download Supabase-related images by default, which may be slow.
You can also configure proxy and mirror sites yourself, or manually pull images with cd /opt/supabase; docker compose pull.
We also provide Supabase self-hosting expert consulting services including complete offline installation solutions.
If you need to use object storage functionality, you need to access Supabase via domain and HTTPS, otherwise errors will occur.
For serious production deployments, must change all default passwords!
Here are some key technical decisions involved in self-hosting Supabase for your reference:
Using the default single-node deployment, Supabase cannot enjoy PostgreSQL/MinIO high availability capabilities. Nevertheless, single-node deployment still has significant advantages compared to the official pure Docker Compose solution: for example, out-of-the-box monitoring systems, the ability to freely install extensions, component scaling capabilities, and providing fallback database point-in-time recovery capabilities.
If you only have one server or choose to self-host on cloud servers, Pigsty recommends using external S3 instead of local MinIO as object storage to store PostgreSQL backups and support Supabase Storage services. Such deployment can provide a fallback-level RTO (hour-level recovery time)/RPO (MB-level data loss) disaster recovery level under single-machine deployment conditions during failures.
In serious production deployments, Pigsty recommends using at least 3-4 node deployment strategies to ensure both MinIO and PostgreSQL use multi-node deployments that meet enterprise-grade high availability requirements. In this case, you need to prepare more nodes and disks accordingly and adjust cluster configurations in the pigsty.yml configuration manifest, as well as access information in supabase cluster configuration to use high availability access points.
Some Supabase functionality requires sending emails, so SMTP services are needed. Unless purely for internal networks, for serious production deployments, using SMTP cloud services is recommended. Self-built email servers easily have their emails marked as spam and rejected.
If your service is directly exposed to the public network, we strongly recommend using real domains and HTTPS certificates and accessing through Nginx Portal.
Next, we’ll discuss some advanced topics in sequence: how to further improve Supabase security, availability, and performance based on single-node deployment.
Pigsty Base Components
For serious production deployments, we strongly recommend changing Pigsty default passwords. Because these default values are public and well-known, going to production without changing passwords is like streaking:
grafana_admin_password: pigsty, Grafana admin passwordpg_admin_password: DBUser.DBA, PostgreSQL superuser passwordpg_monitor_password: DBUser.Monitor, PostgreSQL monitoring user passwordpg_replication_password: DBUser.Replicator, PostgreSQL replication user passwordpatroni_password: Patroni.API, Patroni high availability component passwordhaproxy_admin_password: pigsty, load balancer management passwordminio_secret_key: minioadmin, MinIO root user keyDBUser.SupaThe above passwords are for Pigsty component modules and are strongly recommended to be set before installation and deployment.
Supabase Keys
In addition to Pigsty component passwords, you also need to modify Supabase keys, including:
JWT_SECRETANON_KEYSERVICE_ROLE_KEYPG_META_CRYPTO_KEYDASHBOARD_USERNAME: Supabase Studio Web interface default username, default is supabaseDASHBOARD_PASSWORD: Supabase Studio Web interface default password, default is pigstyPlease refer to the Supabase tutorial: Securing your services instructions:
JWT_SECRET longer than 40 characters and use the tools in the tutorial to sign ANON_KEY and SERVICE_ROLE_KEY JWTs.ANON_KEY JWT based on JWT_SECRET and expiration time attributes. This is the credential for anonymous users.SERVICE_ROLE_KEY based on JWT_SECRET and expiration time attributes. This is the credential for higher-privilege service roles.PG_META_CRYPTO_KEY with a random string at least 32 char long for securing connection strings between Studio and postgres-metaPOSTGRES_PASSWORD value accordinglyS3_ACCESS_KEY and S3_SECRET_KEY values accordinglyAfter modifying Supabase credentials, you can restart Docker Compose containers to apply the new configuration:
If you’re using Supabase on localhost or within a LAN, you can choose IP:Port direct connection to Kong’s exposed HTTP port 8000 to access Supabase.
You can use an internal static DNS domain, but for serious production deployments, we recommend using real domain + HTTPS to access Supabase.
In this case, your server should have a public IP address, you should own a domain, use DNS resolution services provided by cloud/DNS/CDN providers to point it to the installation node’s public IP (optional fallback: local /etc/hosts static resolution).
A simple approach is to batch replace the placeholder domain (supa.pigsty) with your actual domain, say supa.pigsty.cc:
If you haven’t configured it beforehand, reload Nginx and Supabase configurations:
The modified configuration should look like the following snippet:
Complete domain/HTTPS configuration can refer to the Certificate Management tutorial. You can also use Pigsty’s built-in local static resolution and self-signed HTTPS certificates as fallback.
You can use S3 or S3-compatible services as object storage for PostgreSQL backups and Supabase usage. Here we use Alibaba Cloud OSS object storage as an example.
Pigsty provides a
terraform/spec/aliyun-meta-s3.tftemplate that can be used to deploy a server and an OSS bucket on Alibaba Cloud.
First, modify the S3-related configuration in all.children.supa.vars.apps.[supabase].conf, pointing it to the Alibaba Cloud OSS bucket:
Reload Supabase configuration with the following command:
You can also use S3 as PostgreSQL backup repository by adding an aliyun backup repository definition in all.vars.pgbackrest_repo:
Then specify using the aliyun backup repository in all.vars.pgbackrest_method and reset pgBackrest backup:
Pigsty will switch the backup repository to external object storage. More backup configurations can refer to PostgreSQL Backup documentation.
You can use SMTP to send emails by modifying the supabase application configuration and adding SMTP information:
Don’t forget to use app.yml to reload the configuration
After these configurations, you have an enterprise-grade Supabase (basic single-machine version) with public domain, HTTPS certificate, SMTP, PITR backup, monitoring, IaC, and 400+ extensions. For high availability configuration, please refer to other parts of Pigsty documentation. If you’re too lazy to read and learn, we provide hands-on Supabase self-hosting expert consulting services — ¥2000 to save you from the hassle of tinkering and downloading.
Single-node RTO/RPO relies on external object storage services for fallback. If your node fails, backups are retained in external S3 storage, and you can redeploy Supabase on a new node and restore from backup. Such deployment can provide a minimum standard RTO (hour-level recovery time)/RPO (MB-level data loss) fallback disaster recovery level during failures.
To achieve RTO < 30s with zero data loss failover, you need to use multi-node high availability deployment, which involves:
In this case, you also need to modify PostgreSQL and MinIO access points to use DNS/L2 VIP/HAProxy and other high availability access points
For these parts, you only need to refer to the documentation of each module in Pigsty for configuration and deployment.
We recommend referring to the configurations in conf/ha/trio.yml and conf/ha/safe.yml to upgrade cluster scale to three nodes or more.
FerretDB is an open-source MongoDB wire protocol compatible middleware that allows you to use PostgreSQL as a drop-in replacement for MongoDB. It enables applications that rely on MongoDB’s wire protocol to work seamlessly with PostgreSQL, providing a bridge between the two databases.
To enable FerretDB, you’ll need the FerretDB patched documentdb extension, which is also available in the Pigsty repository.
The latest combo is FerretDB 2.7 and DocumentDB 0.107.0.
Use Pigsty’s standard installation process with the mongo configuration template.
For production deployment, please ensure to modify the password parameters in the pigsty.yml configuration file before running the installation playbook.
Check the FERRET docs for the details.
You can use MongoDB’s command-line tool MongoSH to access FerretDB.
Use the pig command to add MongoDB repository, then install mongosh using yum or apt:
You can access FerretDB using MongoDB connection strings with any MongoDB driver in any language. Here’s an example using the mongosh CLI tool:
You can log in with different users. See FerretDB: Authentication for details.
You can connect to FerretDB and use it as if it were a MongoDB cluster.
MongoDB commands are translated to SQL and executed in the underlying PostgreSQL:
If you’re not familiar with MongoDB, here’s a quick tutorial that works with FerretDB: Perform CRUD Operations with MongoDB Shell
To generate sample workload, you can use this simple test script with mongosh:
You can check FerretDB’s supported MongoDB commands and known differences. For basic usage, these differences are usually not significant.
Pigsty allows you to harness the synergistic superpower of the Postgres extensions ecosystem with 3 things: Catalog, Repo, and pig.
The complete list of <span class="text-lg font-black text-emerald-500">437</span> available PostgreSQL extensions
The APT/YUM repo that deliver PostgreSQL extensions
The missing package manager for PostgreSQL & Extensions
How to get, install, config, manage these extensions?
There are 437 PostgreSQL extensions in the v3.7.0 catalog. PostgreSQL 18 is the default in v3.7.0.
The per-major figures below are the archive’s PG13–17 compatibility snapshot; the final PG18 breakdown was not recorded in this table. Use the v3.7.0 package aliases and release note for PG18.
| Distro | All | PGDG | PIGSTY | CONTRIB | OTHER | MISS | PG17 | PG16 | PG15 | PG14 | PG13 |
|---|---|---|---|---|---|---|---|---|---|---|---|
| EL | 417 | 119 | 227 | 71 | 0 | 6 | 399 | 407 | 410 | 394 | 368 |
| Debian | 410 | 103 | 236 | 71 | 0 | 13 | 397 | 400 | 403 | 391 | 363 |
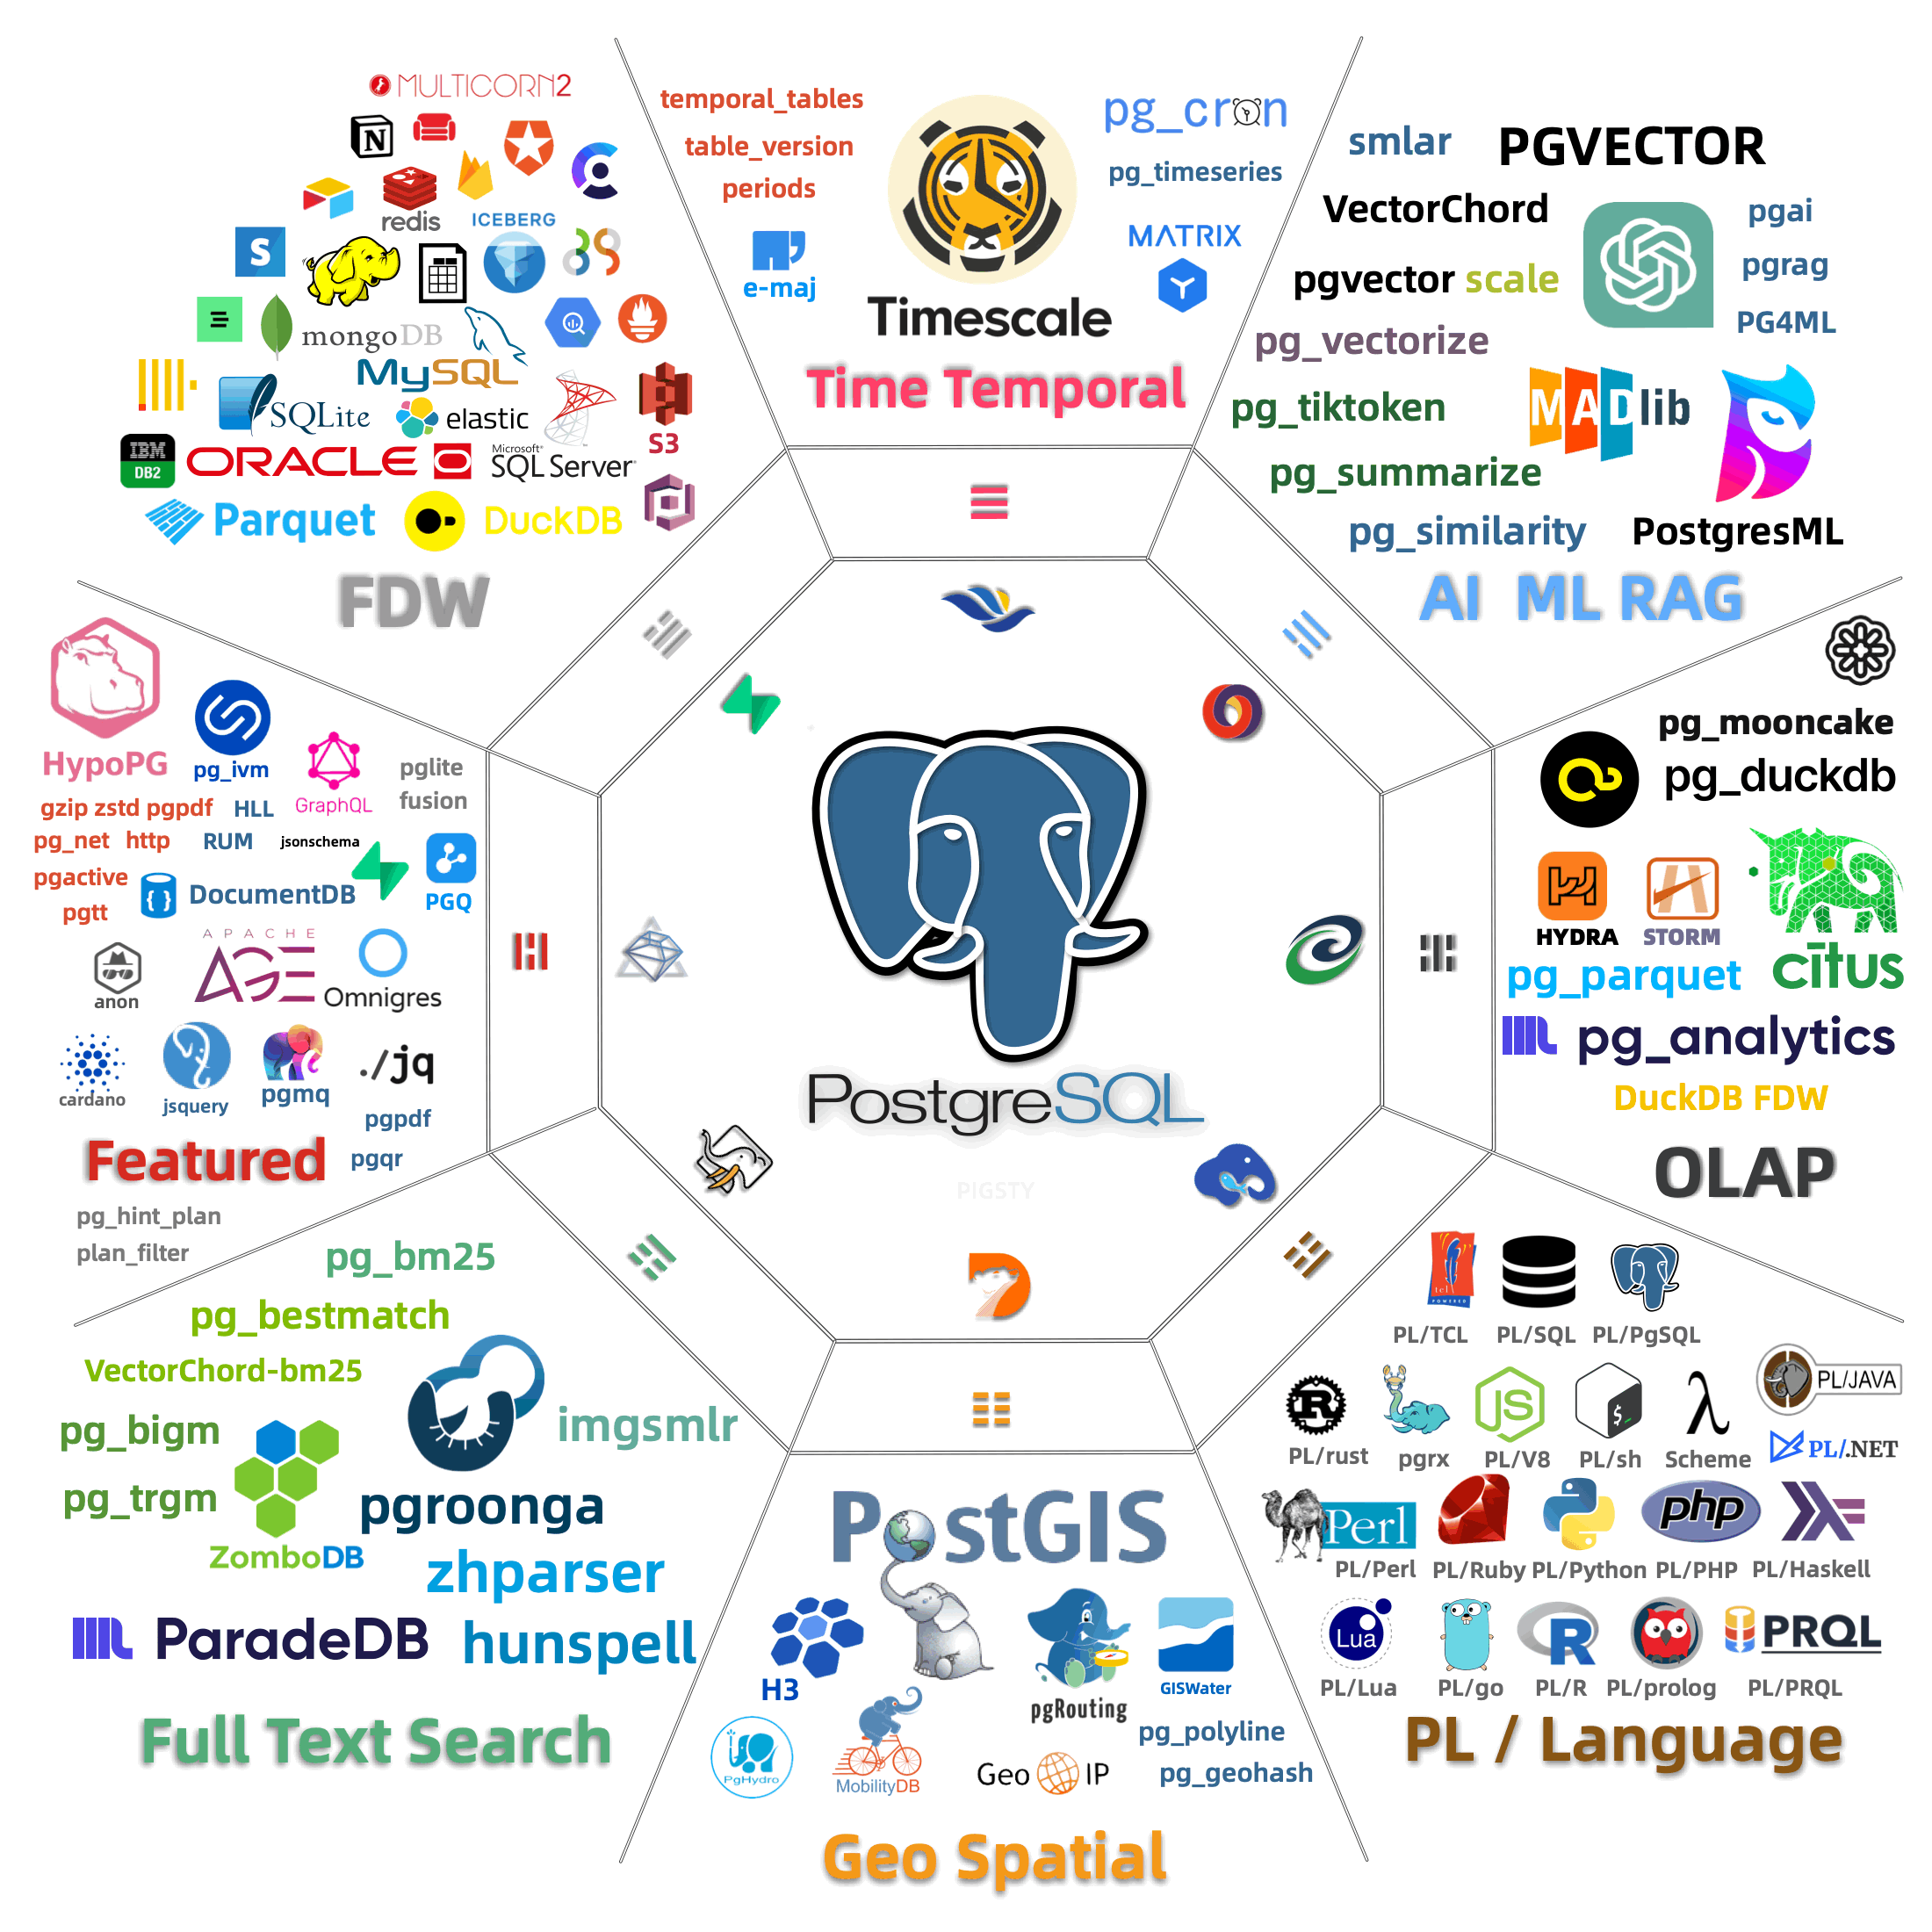
TIME GIS RAG FTS OLAP FEAT LANG TYPE UTIL FUNC ADMIN STAT SEC FDW SIM ETL
MIT ISC PostgreSQL BSD-0 BSD-2 BSD-3 Artistic Apache-2.0 MPL-2.0 GPL-2.0 GPL-3.0 LGPL-2.1 LGPL-3.0 AGPL-3.0 Timescale
Download and install extensions with package alias
Download Extensions from PGDG / Pigsty Repo
Install Postgres Extension Packages
Configure extensions and setup pre-loading
Download Extensions from PGDG / Pigsty Repo
Install Postgres Extension Packages
Configure extensions and setup pre-loading
CREATE Postgres Extension in Database
Upgrade Postgres Extension
Uninstall Postgres Extension
There are unparalleled 437 extensions available in Pigsty for 14 mainstream Linux distros.
It takes 4 steps to deliver an extension: downloads, installs, config, and create:
[**Download**](#download-extension) : Which extension packages to download
```yaml tab="config" title="define which extensions to be downloaded"
repo_extra_packages: [ postgis, timescaledb, vector ]
```
```bash tab="apply" title="download package"
make repo
```
[Install](#install-extension) : Which extensions to be installed
```yaml tab="config"
pg_extensions: [ postgis, pgvector, timescaledb ]
```
```bash tab="apply"
./pgsql.yml -t pg_ext # install extensions
```
[**Load**](#load-extension) : Which extensions to be pre-loaded
```yaml tab="config"
pg_libs: 'timescaledb, pg_stat_statements, auto_explain' # add extension to preload libraries (not all extensions need this)
```
```bash tab="apply" title="edit existing cluster config and reload"
pg edit-config --force -p shared_preload_libraries='timescaledb, pg_stat_statements, auto_explain'
```
[**Create**](#create-extension) : Create extension in the [database](/docs/pgsql/db)
```yaml tab="config"
pg_databases:
- { name: meta ,extensions: [ postgis, timescaledb, vector ] }
```
```sql tab="apply" title="create extension in existing database"
CREATE EXTENSION postgis CASCADE;
```
You can describe extensions in the config inventory, and pigsty will
download, install, configure, and enable extensions for you.
This example makes postgis, pgvector, timescaledb out-of-the-box:
When you init this PG cluster, these extensions will be made available for you in the pg-meta cluster.
Here’s a more complicated example: launch Postgres with required extensions for self-hosting supabase:
All available extensions for PG 17 are downloaded and installed, and required ones are loaded & enabled.
Mange extensions and packages are not that simple, here are two common extension examples:
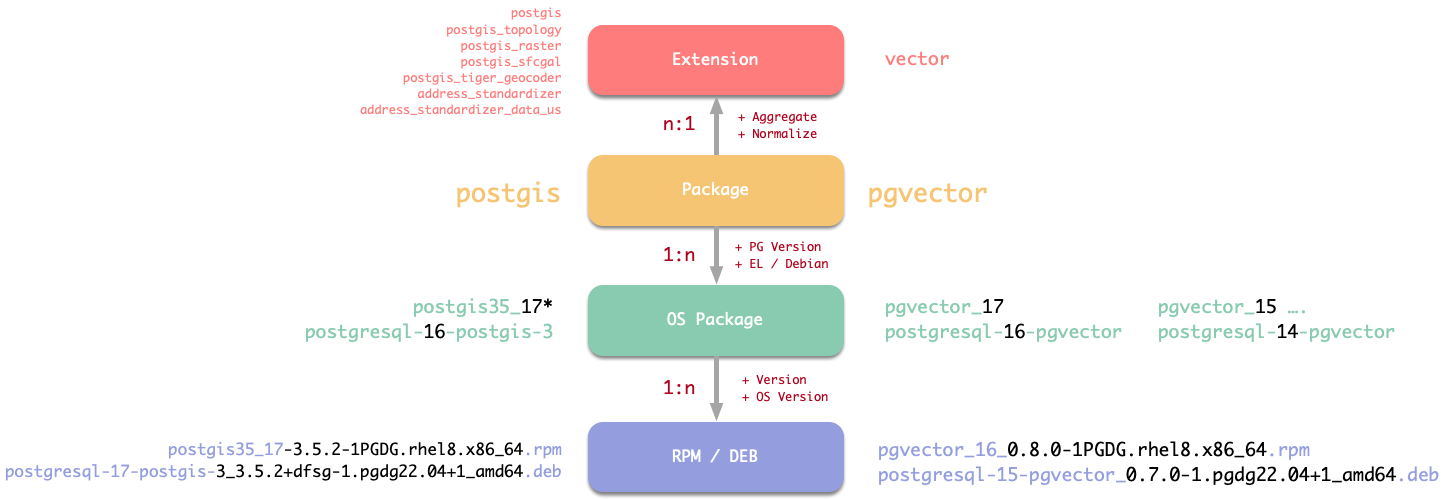
| Entity | Example pgvector |
Example postgis… |
|---|---|---|
| Extension | vector |
postgis, postgis_topology, postgis_raster,… |
| Package | pgvector |
postgis |
| OS PKG | pgvector_18 | postgresql-16-postgis-3 |
| RPM/DEB | pgvector_18_0.8.1-1PGDG.rhel8.x86_64.rpm | postgresql-17-postgis-3_3.5.2+dfsg-1.pgdg22.04+1_amd64.deb |
To install the right RPM / DEB with minimal effort, we need to use the abstract layer: package alias.
So you can install these extensions by specifying the “Normalized” names, like pgvector or postgis.
Without knowing any details about PG & OS version, Arch, Extension versions, and any other details.
Package alias pkg are used for extension download & install, but you’ll have to use the extension name ext when CREATE EXTENSION in the database (like the vector in meta database).
And beware some extensions require explicit preloading, like the timescaledb in the above example.
Besides, all the extensions are categorized into 16 major categories, we also have alias for the entire extension category so that you can download and install them in batch, such as:
All extensions CAN be installed simultaneously, except the olap category, where citus conflict with hydra, and pg_duckdb conflict with pg_mooncake.
So you can download them all, but install one at a time.
In Pigsty, downloading and installing extensions are separate steps. During INFRA module installation, Pigsty downloads all required software to the local machine and creates a local YUM/APT repo for the entire deployment.
This approach accelerates installation, eliminates redundant downloads, removes the need for database nodes to access the internet, reduces network traffic, improves delivery reliability, and ensures consistent versions across your environment - all best practices for production deployments.
For development environments, installing extensions directly from internet repo is also acceptable
Packages defined in repo_packages and repo_extra_packages are automatically downloaded to your local repo during Pigsty installation.
For PostgreSQL-related packages (core and extensions), typically put them in repo_extra_packages while leaving repo_packages with its os-specific global defaults.
The default value for repo_extra_packages is [pgsql-main], an alias representing core PostgreSQL and critical extensions for the current active major version.
To add specific extensions, simply add Pigsty extension package name (pkg) to this parameter. Pigsty automatically downloads the appropriate packages for your active PG version and current OS distro.
To download all available extensions for the current PG version, add all 16 extension category aliases (as in the rich config template):
Alternatively, use version-specific aliases to download extensions for multiple PostgreSQL versions:
To add new extensions to your local repo, modify the parameters above and run:
To refresh the repo metadata on all other nodes in your environment, run:
PostgreSQL has a rich open-source ecosystem with numerous packages across different systems and architectures.
Pigsty provides an abstraction layer that categorizes PostgreSQL packages into “aliases,” hiding differences between systems, architectures, and PG versions.
In the Quick Start section, we used aliases like pgsql-main and pgsql-core. These aliases are translated into specific package names based on your system and architecture. For EL systems, pgsql-main expands to postgresql$v* kernel packages with pgvector_$v*, pg_repack_$v*, and wal2json_$v* extension packages.
The $v placeholder is replaced by the pg_version value (default: 18) to target the correct version. The * wildcard expands to include all package variants (e.g., server, libs, contrib, devel). Pigsty handles these details automatically.
The complete list of available packages and aliases is in roles/node_id/vars/<os_package>.yml. Here are commonly used aliases available across all supported systems:
When using these aliases, the $v placeholder is replaced with the PostgreSQL major version number from pg_version (default: 18).
To download packages for different PostgreSQL versions, either:
pg_version parameter, orpgsql- prefix with pg18-, pg17-, pg16-, etc.Not all extensions are available on all systems. Some extensions are commented out in the aliases because they:
pl/R)oracle_fdw)You can still manually add these extensions if needed.
Pigsty piggyback on standard OS package managers (yum/apt) to install PostgreSQL extensions.
When installing extensions, Pigsty uses the same alias mapping in the download section.
Install all extensions explicitly specified in the pg_extensions parameter, for the cluster pg-meta:
Or install all extensions by category aliases globally:
You can also specify the PG major version explicitly in these alias:
Install all extensions simultaneously is applicable (except two conflicts in the olap category) but not recommended. Just install the extensions you need by explicitly specifying them in the pg_extensions parameter.
During PGSQL cluster init, Pigsty will automatically install packages (& alias) specified in pg_packages and pg_extensions.
Both parameters can be used to install PostgreSQL-related packages. Typically, pg_packages is used to globally specify packages that should be installed across all PostgreSQL clusters in your environment: such as the PostgreSQL kernel, high-availability agent like Patroni, connection pooling with pgBouncer, monitoring with pgExporter, etc.
By default, Pigsty also specifies 3 important extensions here: pgvector, pg_repack, and wal2json for vector search, bloat management, and CDC change extraction.
Meanwhile, pg_extensions is usually used to specify extension for a specific cluster. The default is an empty list, indicating no other extensions will be installed by default.
An important distinction: packages installed via pg_packages are merely ensured to be present, whereas those installed via pg_extensions are automatically upgraded to the latest available version.
When using a local software repo, this distinction isn’t an issue. However, when using upstream internet repo, consider this carefully and move extensions you don’t want automatically upgraded to pg_packages.
Extensions pre-defined in the pg_extensions (and pg_packages) will be installed during cluster provisioning.
To install new extensions on a provisioned PostgreSQL cluster:
First, add extensions to pg_extensions, then execute the playbook subtask:
Note that extension plugins specified in the pg_extension task will be upgraded to the latest available version in your current environment by default.
To install extension, you need to ensure one of the following conditions is met:
For production environments, we recommend using Pigsty’s local software repo to manage and install extensions uniformly: First download extensions to the local repo, then install them from there. This ensures consistent extension versions across your environment and prevents database nodes from directly accessing the internet. You have to do nothing when installed from local repo, just make sure they are downloaded to the local repo.
For development environments, you may choose to directly use upstream internet repo for convenience. Use the following commands to add Internet repo and install extensions on the target cluster directly:
When installing extensions, users can use extension aliases to specify extension.
The aliases will be translated to the current active PG major version and OS environment.
and translated to the corresponding RPM/DEB package names by alias translation mechanism.
citus and hydra are mutually exclusive, since hydra is a fork of citus columnar without renamingpg_duckdb, pg_mooncake, duckdb_fdw, they all use their own libduckdbpgaudit got a different naming pattern on el for pg 15-: pg16+ = pgaudit, pg15=pgaudit17, pg14=pgaudit16 pg13=pgaudit15 pg12=pgaudit14postgis got its own version in el package name: postgis35 by default, and postgis33 for legacy el7While most PostgreSQL extensions written in SQL can be directly enabled with CREATE EXTENSION, some extensions that use special postgres hook will require an extra step to preload them before using.
Most extensions have one or more corresponding dynamic library (.so, .dylib, .dll), some of them require preloading before using.
Attempting to CREATE these extensions without proper preloading will result in an error.
And a wrongly configured preload library may lead to a failure on database restart/start.
Some extensions can partially work without preloading, which means part of the extension features are available directly, and the rest of the features are available after preloading.
To preload an extension, add it to the shared_preload_libraries and restart the database server.
The Extension Catalog gives the complete list of extensions that require dynamic preloading.
To configure a preload on new postgres cluster, the pg_libs parameter can be used.
It will be populated to the shared_preload_libraries parameter during postgres cluster bootstrap.
This example show how to specify pre-loaded extensions with pg_libs parameter.
shared_preload_libraries is a comma-separated list of extensions.
Beware that only works before cluster creation. After that,
you’ll have to config cluster to change the shared_preload_libraries parameter on existing cluster. (with patronictl, ALTER SYSTEM, etc…)
If you want to configure preloading manually, you can just change the postgresql.conf by yourself
The default value of pg_libs is pg_stat_statements, auto_explain,
which preload these two Contrib extensions by default, these two extensions provide essential observability:
auto_explain: Automatic logging of slow query execution planspg_stat_statements: Tracks planning and execution statistics for grouped SQL statementsPreload libraries are loaded one by one, so the order of extensions in shared_preload_libraries matters,
Here are some known rules to follow:
pg_stat_statements to ensure using the same query_id.timescaledb and citus should be placed at the BEGINNING of shared_preload_librariescitus and timescaledb together, place citus before timescaledb.pg_documentdb and pg_documentdb_core as library name for documentdb.pg_search does not require preloading in PostgreSQL 17 and later, but earlier versions do.Some extensions have configurable parameters, you can manage them in different places.
pg_parameters: write to /pg/data/postgresql.auto.confConsult the official docs of each extension for details.
You can enable (create) extension using the CREATE EXTENSION statement:
Extensions need to be installed first, some extension also requires preloading before using.
Some extensions have dependencies on other extensions.
In such cases, you can either install the dependencies first
or use the CASCADE clause to install all dependencies at once.
You can also provision extension with Pigsty, which will automatically create the extensions for you.
Extensions (database logical objects) are logically part of PostgreSQL databases.
In Pigsty, you can specify which extensions to be created in a database with pg_databases parameter.
But you can explicitly specify extension details with the object format, like create them in a specific schema.
Or install a specific version. Here’s a complete example (self-hosting supabase):
The extensions field is a list of extension (name or object) to be created in the database.
It will be created under the first schema in dbsu’s search_path, (usually the public schema).
Here, the extensions in the database object is a list where each element can be:
vectorname: Extension name, REQUIRED, beware it may differ from the extension package name.schema: Schema for installing the extension, OPTIONAL, defaults to the first schema in the current dbsu search path, usually the default public.version: Specifies the extension version, OPTIONAL, defaults to the latest version, rarely used.If the database doesn’t exist yet, the extensions defined here will be automatically created when creating a cluster or creating a database through Pigsty.
Re-creating database with non-trivial baseline schema may be dangerous (if you put some DROP there)
So for existing clusters / databases, it’s advised to use your own schema migration tool to manage extensions. (pgadmin, psql, bytebase, flyway, sqlitch,…)
But it’s helpful to enlist them in the config inventory for bookkeeping purposes. (So if you want to fork this cluster, it includes these extensions)
Some built-in extensions and one special pg_repack are created by default in Pigsty.
These extensions are defined by pg_default_extensions, created in the template1 database and the postgres database by default.
Newly created databases will inherit these extensions from template1, so you don’t need to create them again.
One extra default schema monitor is defined by pg_default_schemas is also created by default.
Which is used to contain monitoring related extensions, tables, functions and views.
There are three 3rd-party extensions that are available by default in Pigsty:
| Extension | What | Where |
|---|---|---|
pg_repack |
Online Bloat Control Tools | in the pg_default_extensions |
wal2json |
Changing data capture in JSON | extension without DDL, install means available |
vector |
vector data type & indexes | in pg_databases as an example |
The pg_repack extension is an important utility for maintaining bloat tables online.
vector is a very popular extension for RAG,
It is installed by default (in the pgsql-main alias) and created in the placeholder meta database in most config template.
The wal2json is another important extension for Changing Data Capture (CDC). It is installed by default, but it is an extension without DDL,
So you don’t need to CREATE it explicitly.
Extension without DDL does not require the CREATE EXTENSION command to work
PostgreSQL extensions typically consist of three parts: a required control file, optional SQL files, and optional libraries.
If an extension does not have SQL file, CREATE EXTENSION command is not needed.
| Component | Description | Required |
|---|---|---|
| Control file | Key metadata, name, dependencies, schema, version,… | REQUIRED |
| SQL file | SQL DDL statements, Types, Functions, etc… | OPTIONAL |
| Library file | binary shared libraries (.so, .dylib, .dll) |
OPTIONAL |
Since SQL / LIB files are optional, there are four possible combinations of extension types:
| LOAD / DDL | Requires CREATE EXTENSION |
Doesn’t require CREATE EXTENSION |
|---|---|---|
Requires LOAD |
Extensions using hooks | Headless extensions |
Doesn’t Require LOAD |
Extensions not using hooks | Logical decoding output plugins |
To update an existing extension, you need to first update the RPM/DEB package with your OS’s package manager,
then alter the extension to the new version in PostgreSQL with ALTER EXTENSION ... UPDATE.
You can upgrade extension packages with the following commands
All extensions listed in pg_extensions will be upgraded using during the pgsql.yml playbook execution.
Extensions (Package Alias) listed in pg_extensions will be upgraded with pgsql.yml’s pg_ext subtask:
This playbook will automatically install the latest available version of extension RPM/DEB packages in your current environment.
(from built local repo or via Internet directly).
You can also upgrade extensions with linux system’s yum/apt upgrade command directly, but you need to specify the full package names:
Pigsty’s pig cli can also help you with that, without the burden of specifying full package names:
Execute the ALTER EXTENSION ... UPDATE SQL command to update the extension to the new version:
If the TO new_version clause is omitted, the extension will be updated to the latest version available.
To uninstall an extension, you typically need to run the DROP EXTENSION SQL statement:
If other extensions or database objects depend on this extension, you’ll need to remove those dependencies first before uninstalling the extension.
Or remove all of them with CASCADE option:
The CASCADE option will delete all objects that depend on this extension,
including database objects, functions, views, etc. Use with caution!
Some extensions don’t have DDL, these extensions do not require the DROP EXTENSION statement to uninstall.
Instead, you can simply remove the extension from the shared_preload_libraries (if configured) and uninstall the package.
Refer to the Extensions Without DDL section for more details.
If you’re using an extension that requires dynamic loading (which modifies the shared_preload_libraries parameter), you need to first re-confnigure the shared_preload_libraries parameter.
Remove the extension name from shared_preload_libraries and restart the database cluster for the changes to take effect.
For extensions that need dynamic loading, refer to the Extensions that Need Loading list.
After removing the extension (logical object) from all databases in the cluster, you can safely uninstall the extension’s software package. Ansible commands can help you do this conveniently:
You can also use pig, or apt/yum commands directly to uninstall.
If you don’t know the extension package name, you can refer to the Extension List or check the extension package name mapping defined in roles/node_id/vars.